
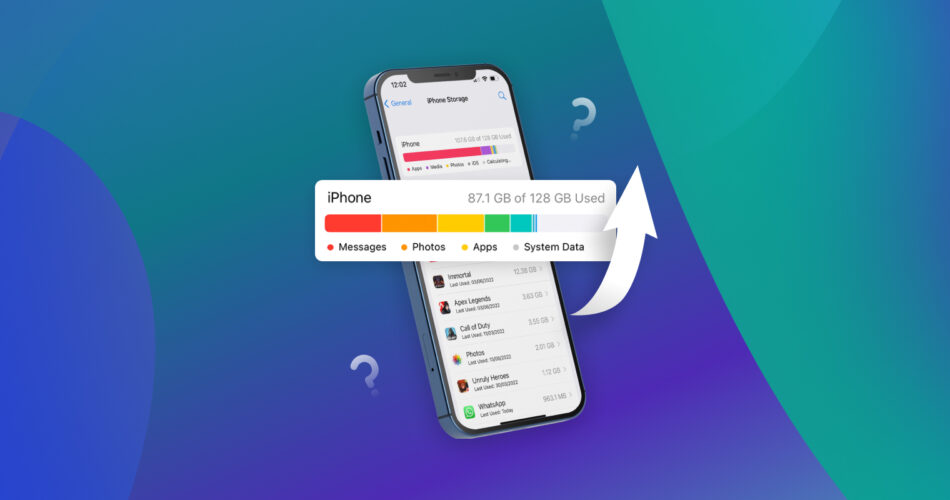
Running out of iPhone storage is common, especially as photos, videos, apps, downloads, caches, and other data accumulate over time. iOS can manage some storage automatically, but it won’t always free up enough space on its own.
You can’t upgrade your iPhone’s built-in storage after purchase, but there are several ways to reclaim space without replacing your device. We’ll cover 9 free methods to clear unnecessary data, as well as options such as iCloud+ and external storage when cleanup alone isn’t enough.
TL;DR: You can’t upgrade your iPhone’s built-in storage after purchase, but you have several ways to free up space or store your files elsewhere:
- Check iPhone Storage first to see which apps and types of data take up the most space.
- Clean up photos and videos, especially duplicates, similar shots, screenshots, large videos, Live Photos, and RAW files.
- Delete or offload unused apps and clear app and browser caches.
- Remove old downloads and Messages attachments that you no longer need.
- Use a third-party cleanup app if you have a large photo library and want a faster way to find unnecessary media.
- Consider iCloud+ or external storage if a cleanup still doesn’t give you enough space.
Start with the categories that occupy the most storage rather than delete files at random.
Can I Get More Storage on My iPhone Without Paying?
Apple doesn’t let you expand an iPhone’s built-in storage after purchase, and additional cloud storage usually costs money. So, if you don’t want to pay, we recommend reclaiming the space you already have. Depending on what’s stored on your iPhone, this can sometimes give you tens of gigabytes back without buying a new device or paying for a subscription.
Another option is external storage. Unlike some smartphones, iPhones don’t have an SD card slot that lets you permanently expand their internal capacity. However, you can connect a compatible SD card, USB drive, or external SSD and move photos, videos, and other files there. This doesn’t technically increase your iPhone’s built-in storage, but it can free up local space without forcing you to permanently delete your files.
How to Get More Storage on iPhone for Free
Before you clean up your iPhone, check what actually takes up the most space. iOS has a built-in storage overview that shows how much space apps, photos, messages, system data, and other content use.
To check your iPhone storage:
- Open the Settings app.
- Tap General.
- Tap iPhone Storage.
- Check the storage bar at the top and the list of apps below it. You can see how much space each category and app uses.
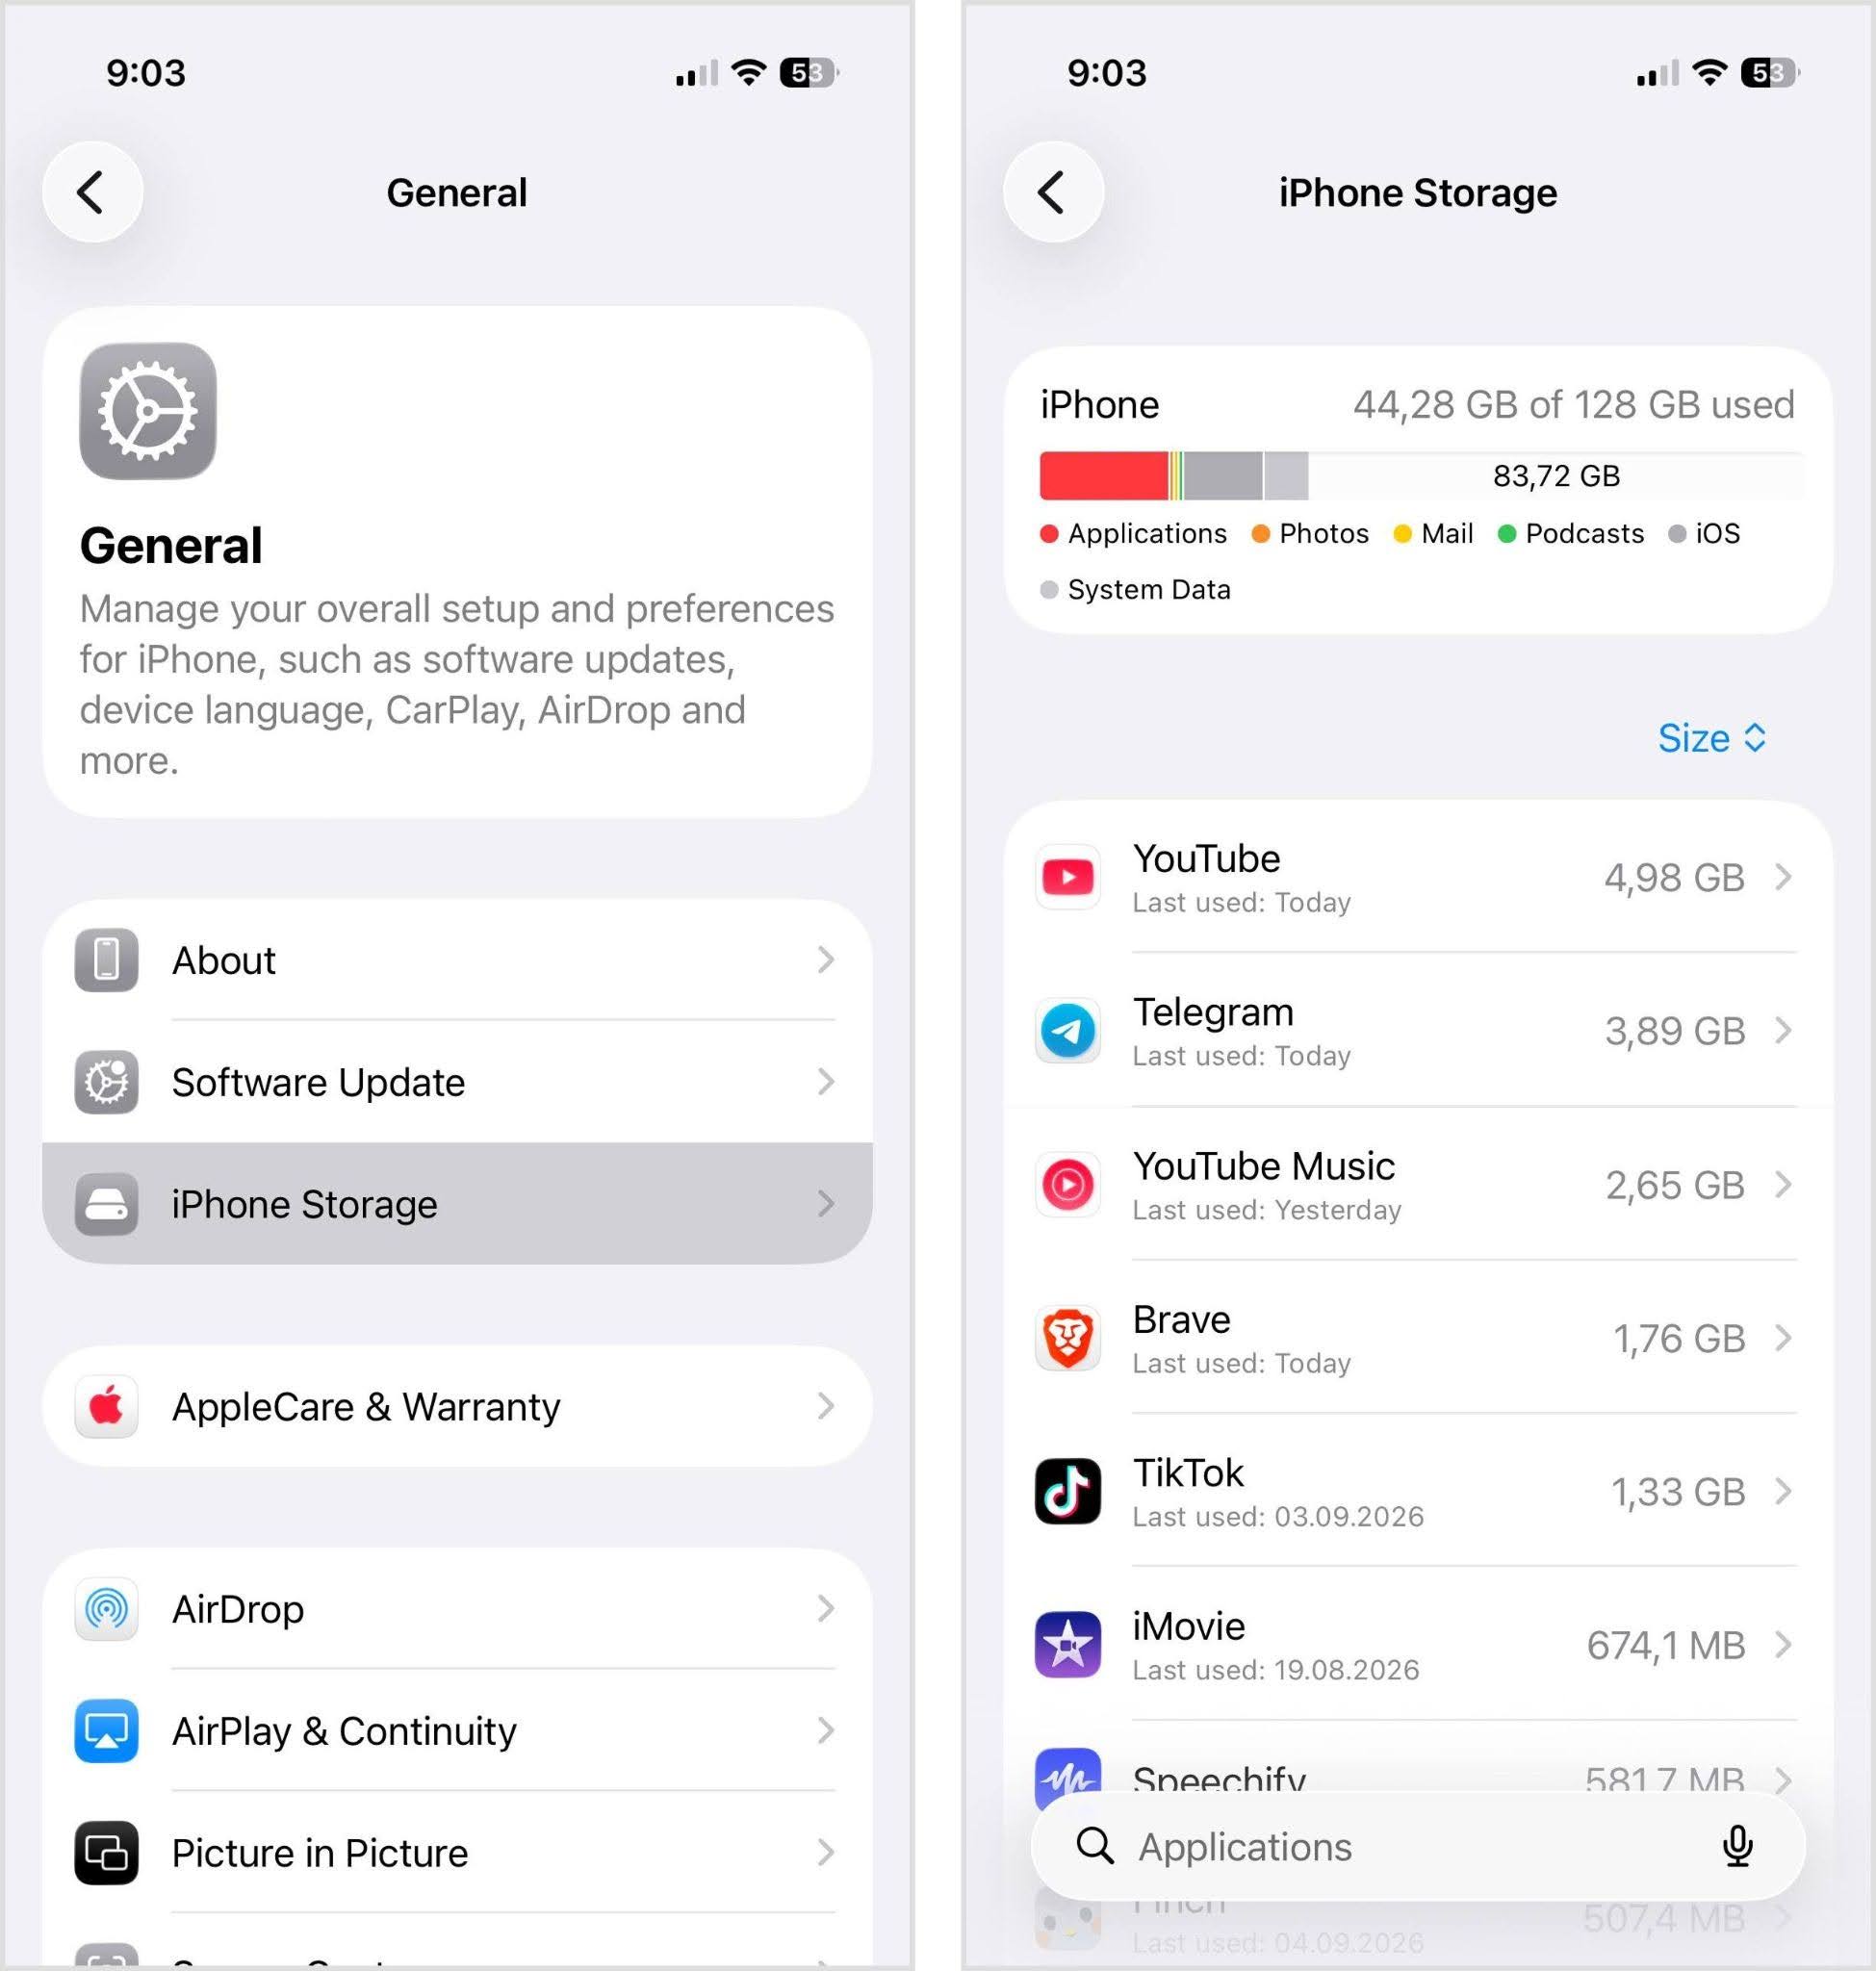
Use this information to figure out which methods in the next section you should try out first. However, doing them all will greatly improve your iPhone experience.
Once you know where your storage goes, you can choose the methods that can free up the most space instead of deleting random files.
Some of the methods involve data deletion. If you have important files that don’t exist anywhere else, we recommend that you back up your iPhone first.
Method 1: Manage Your Photos & Videos
For many iPhone users, the photo library is one of the first places worth checking when storage gets tight. A few long videos can take up more space than hundreds of regular photos, while screenshots, duplicates, similar shots, Live Photos, and old media can add even more over time.
Open the Photos app, review your library, and delete everything you don’t need anymore. Pay particular attention to:
- Duplicates: Open Photos > Collections > Utilities > Duplicates. Here, you can review duplicate photos and videos and use Merge to combine copies while keeping the highest-quality version and relevant data. The built-in Duplicates album doesn’t catch every near-identical shot, so photos taken seconds apart or slightly edited versions may still require a manual review or a third-party cleanup app.
- Large videos: Old 4K and high-frame-rate videos can take up several gigabytes.
- Screenshots: These often have a short useful life but can stay in your library for months or years.
- Live Photos: They generally use more space than regular still photos because they contain additional motion and audio data.
- RAW photos: ProRAW and other RAW files can be much larger than standard HEIF or JPEG images.
You can find many of these categories under Photos > Collections > Media Types and Utilities, which saves you from searching through the entire library manually.
You can also prevent your photo library from growing as quickly by adjusting how your iPhone captures new media. For example, you can lower the video resolution and frame rate, turn off HDR video if you don’t need it, disable ProRAW, or turn off Live Photos. These changes won’t shrink existing files, but they can significantly reduce the storage required by future photos and videos.
Deleted photos and videos move to Recently Deleted, where they can remain for up to 30 days. If you need the space back immediately, open Photos > Collections > Utilities > Recently Deleted and permanently remove the items you no longer need.
If you want to keep your media, you can also compress large files, transfer older photos and videos to external storage, or use iCloud Photos with Optimize iPhone Storage to reduce their local storage use.
Method 2: Use a Third-Party Tool for a Quick Cleanup
The Photos app gives you plenty of ways to remove unwanted media, but a manual cleanup can take a long time if your library contains thousands of photos and videos. A third-party cleaner can speed up the process by grouping similar content, finding large files, and putting several cleanup tools in one place.
We’ll use Clever Cleaner: AI CleanUp App as an example. Its main advantage here is speed: instead of checking your entire library photo by photo, you can use Smart cleanup to deal with several common space wasters at once.
For a quick cleanup with Clever Cleaner:
- Download Clever Cleaner from the App Store and open it.
- Tap Smart cleanup and choose what you want the app to handle. It can select duplicates and similar photos with AI, convert Live Photos to still images, and compress screenshots. Before you confirm, you can see how much storage the cleanup can return.
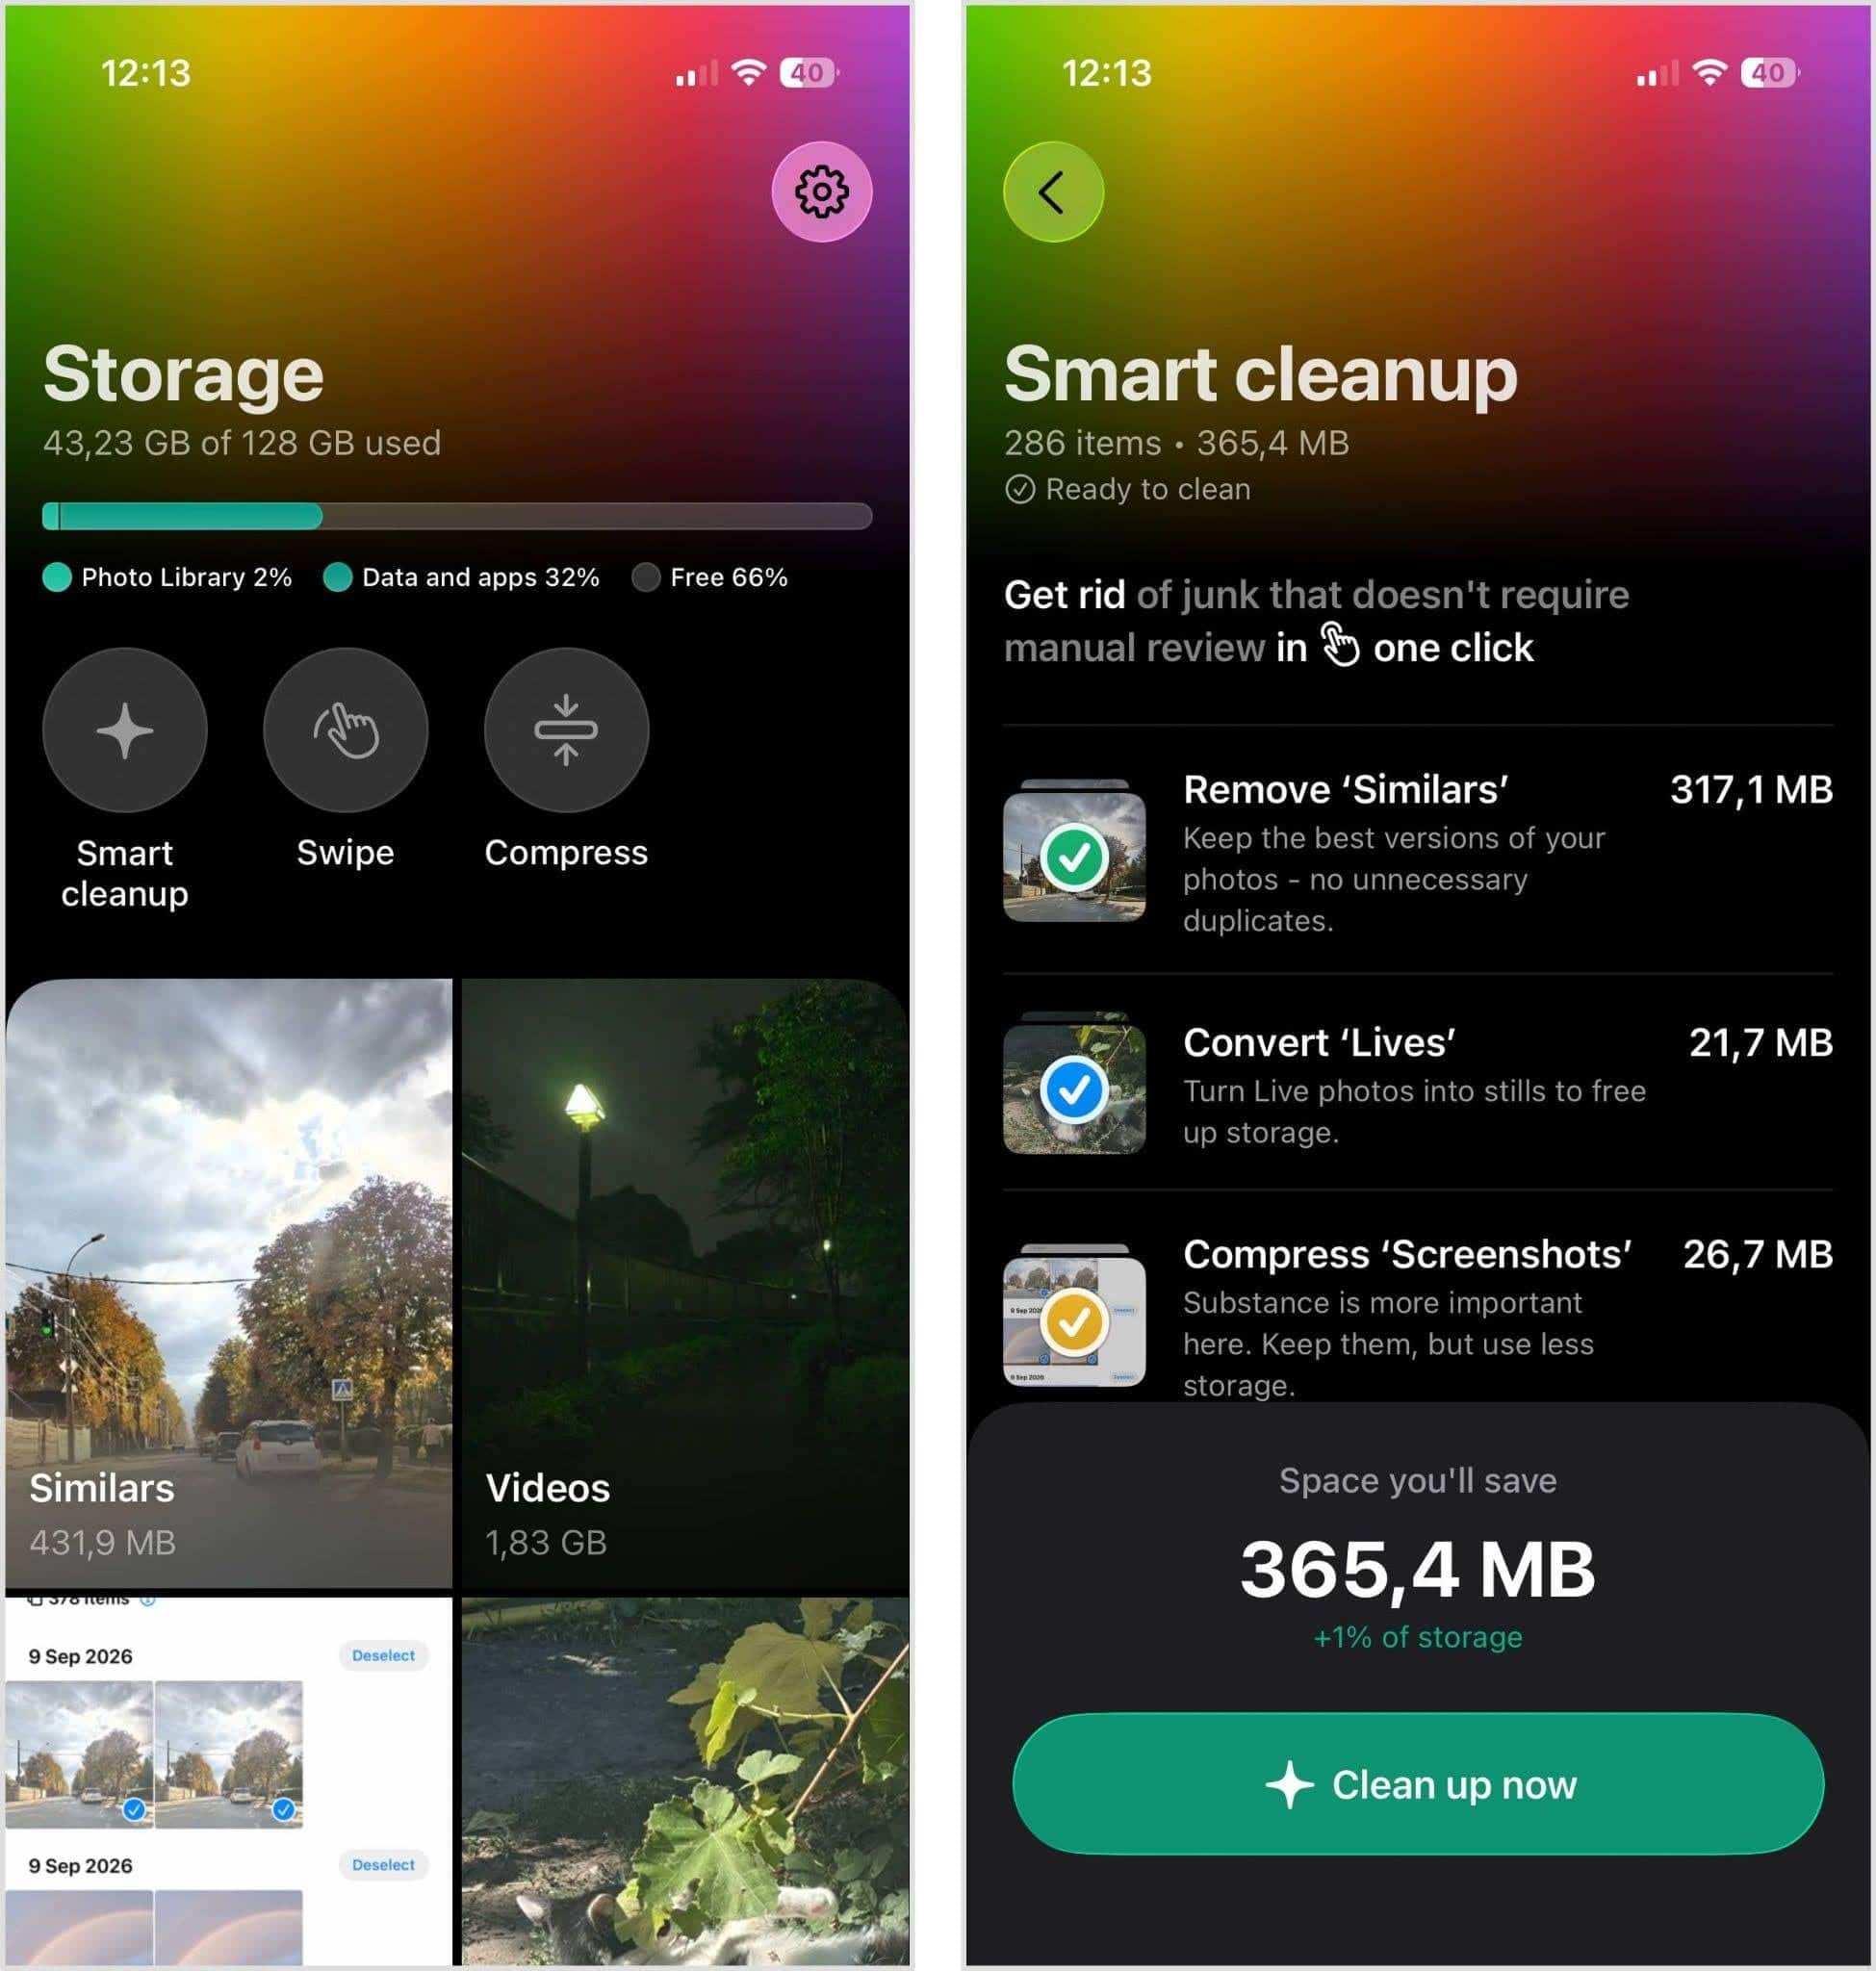
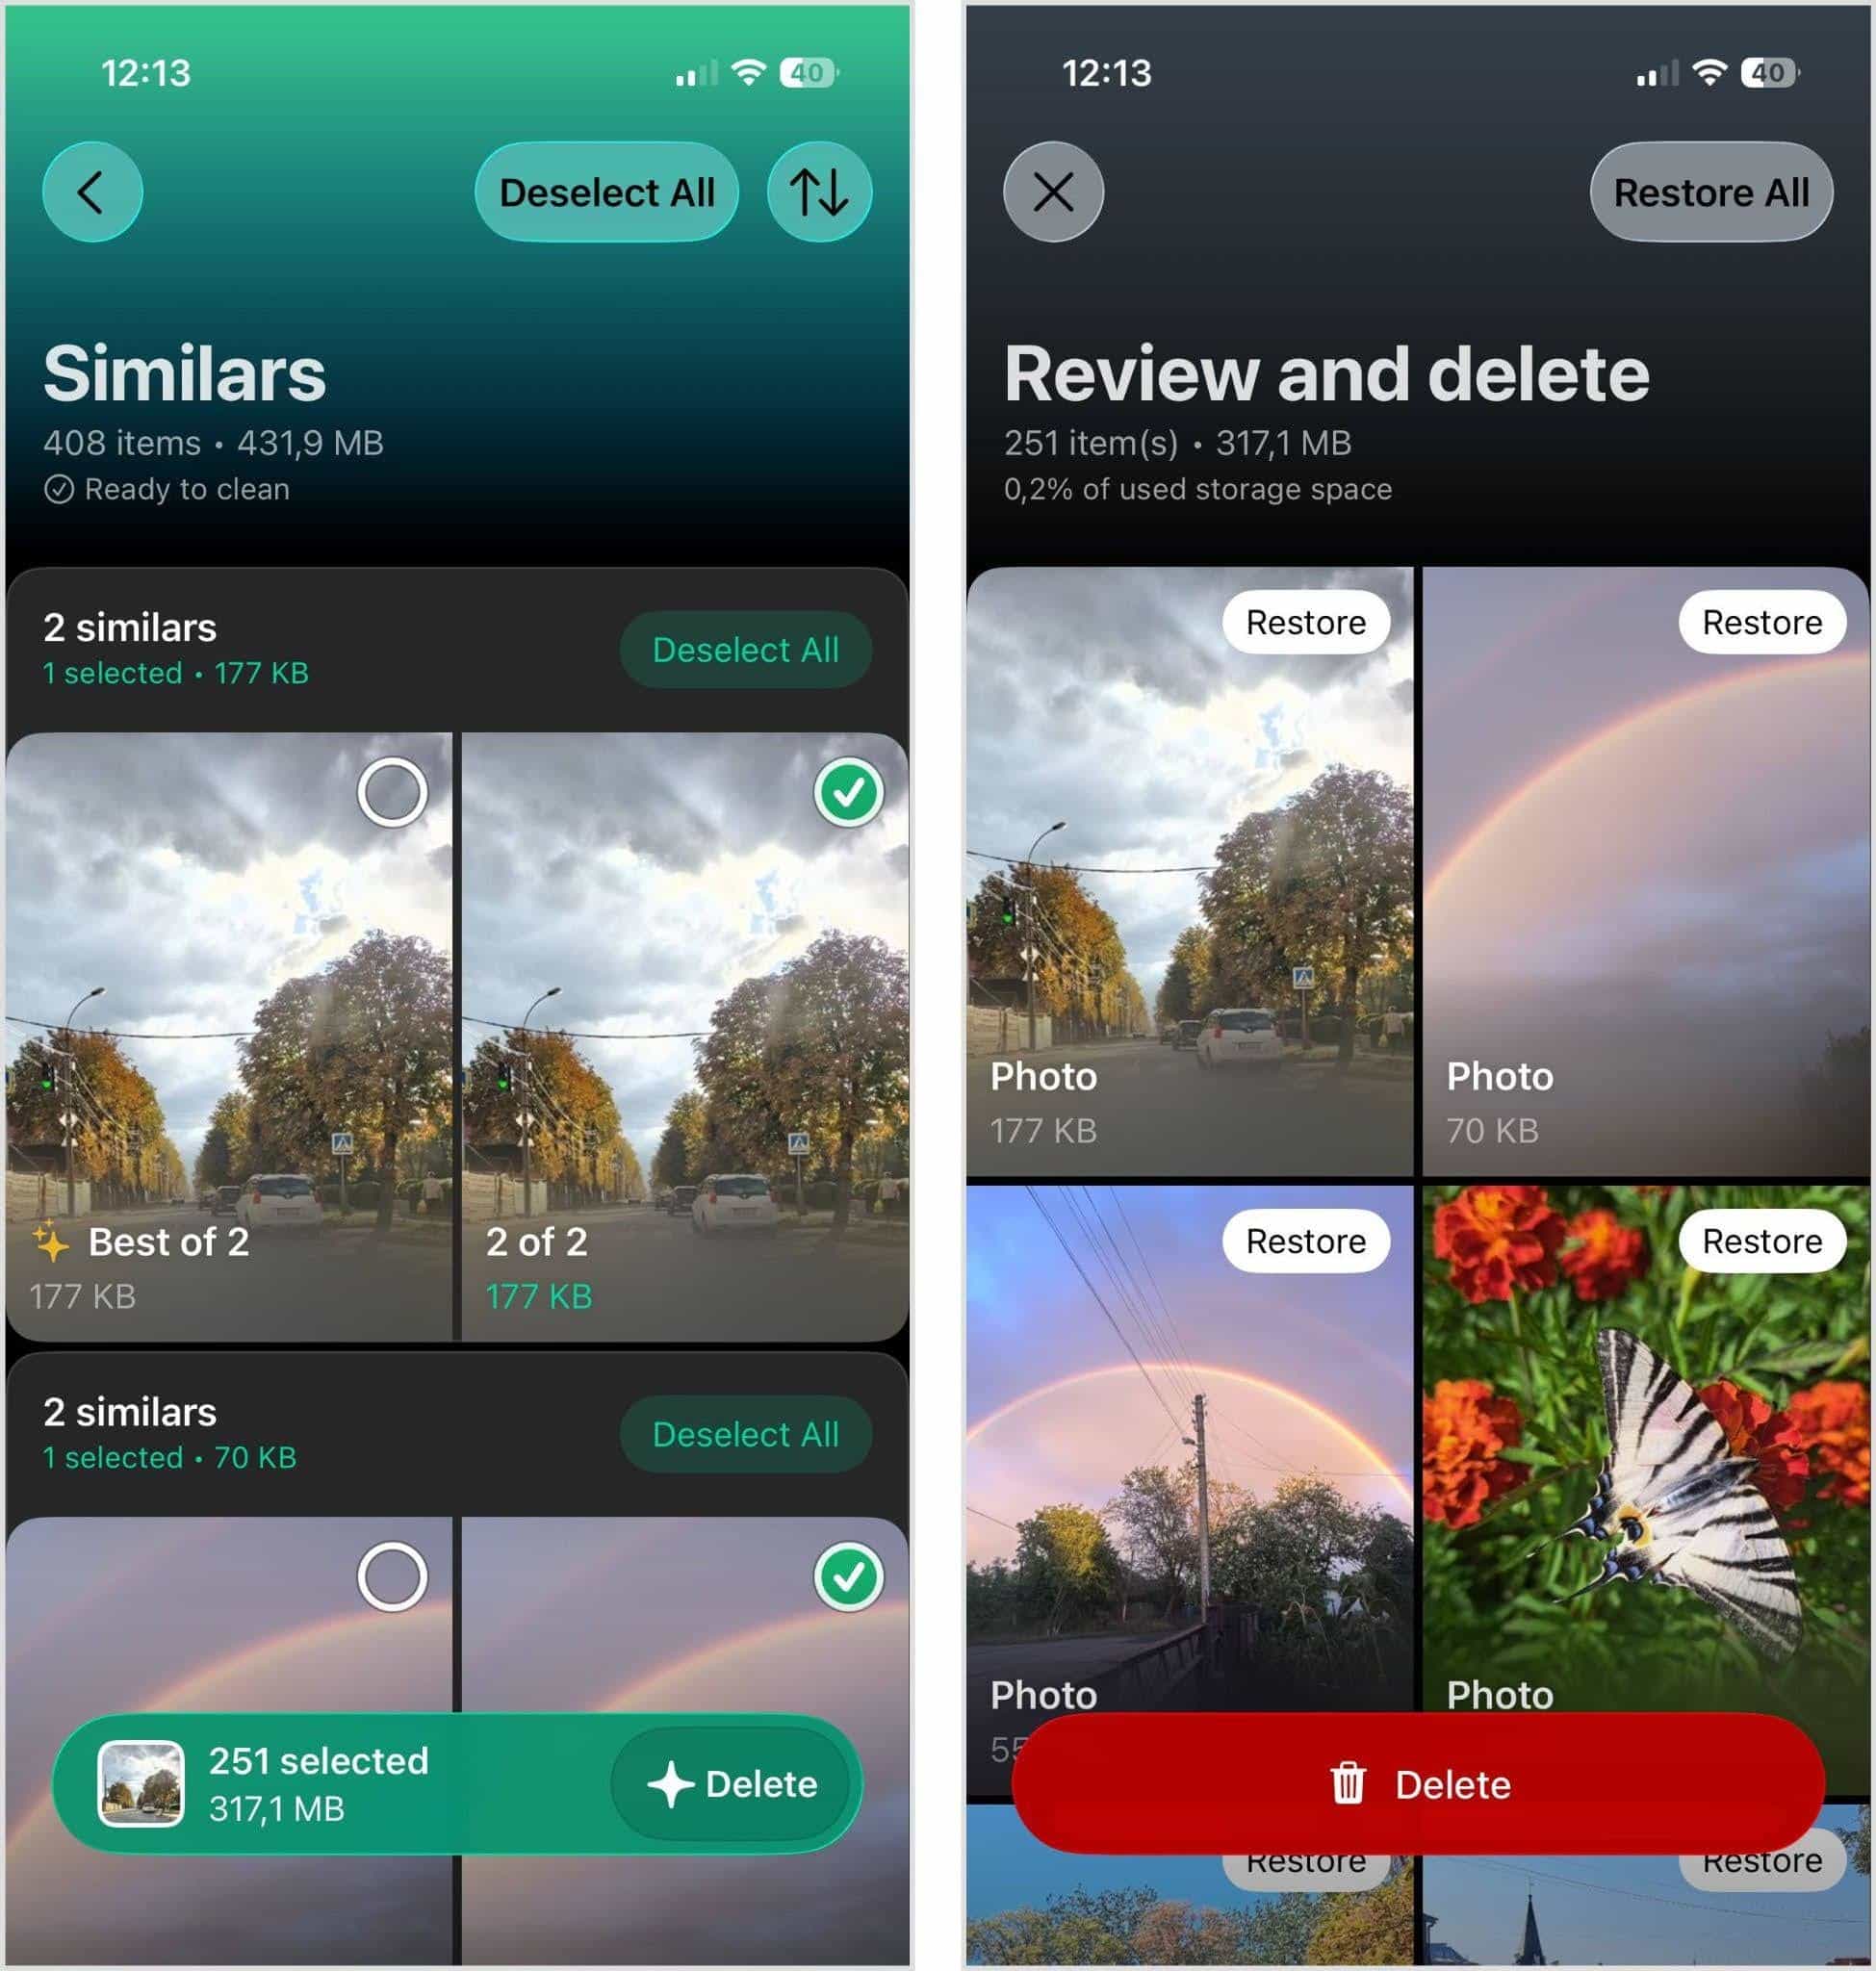
- Open Similars if you prefer to check photo groups yourself. The app groups duplicates and near-identical shots together and marks its preferred photo in each group, so you can keep the best one and remove the extras.
- Check Videos next. Sort them by size to quickly find the biggest files, then delete the ones you don’t need, or use Compress if you want to keep them with a smaller file size.
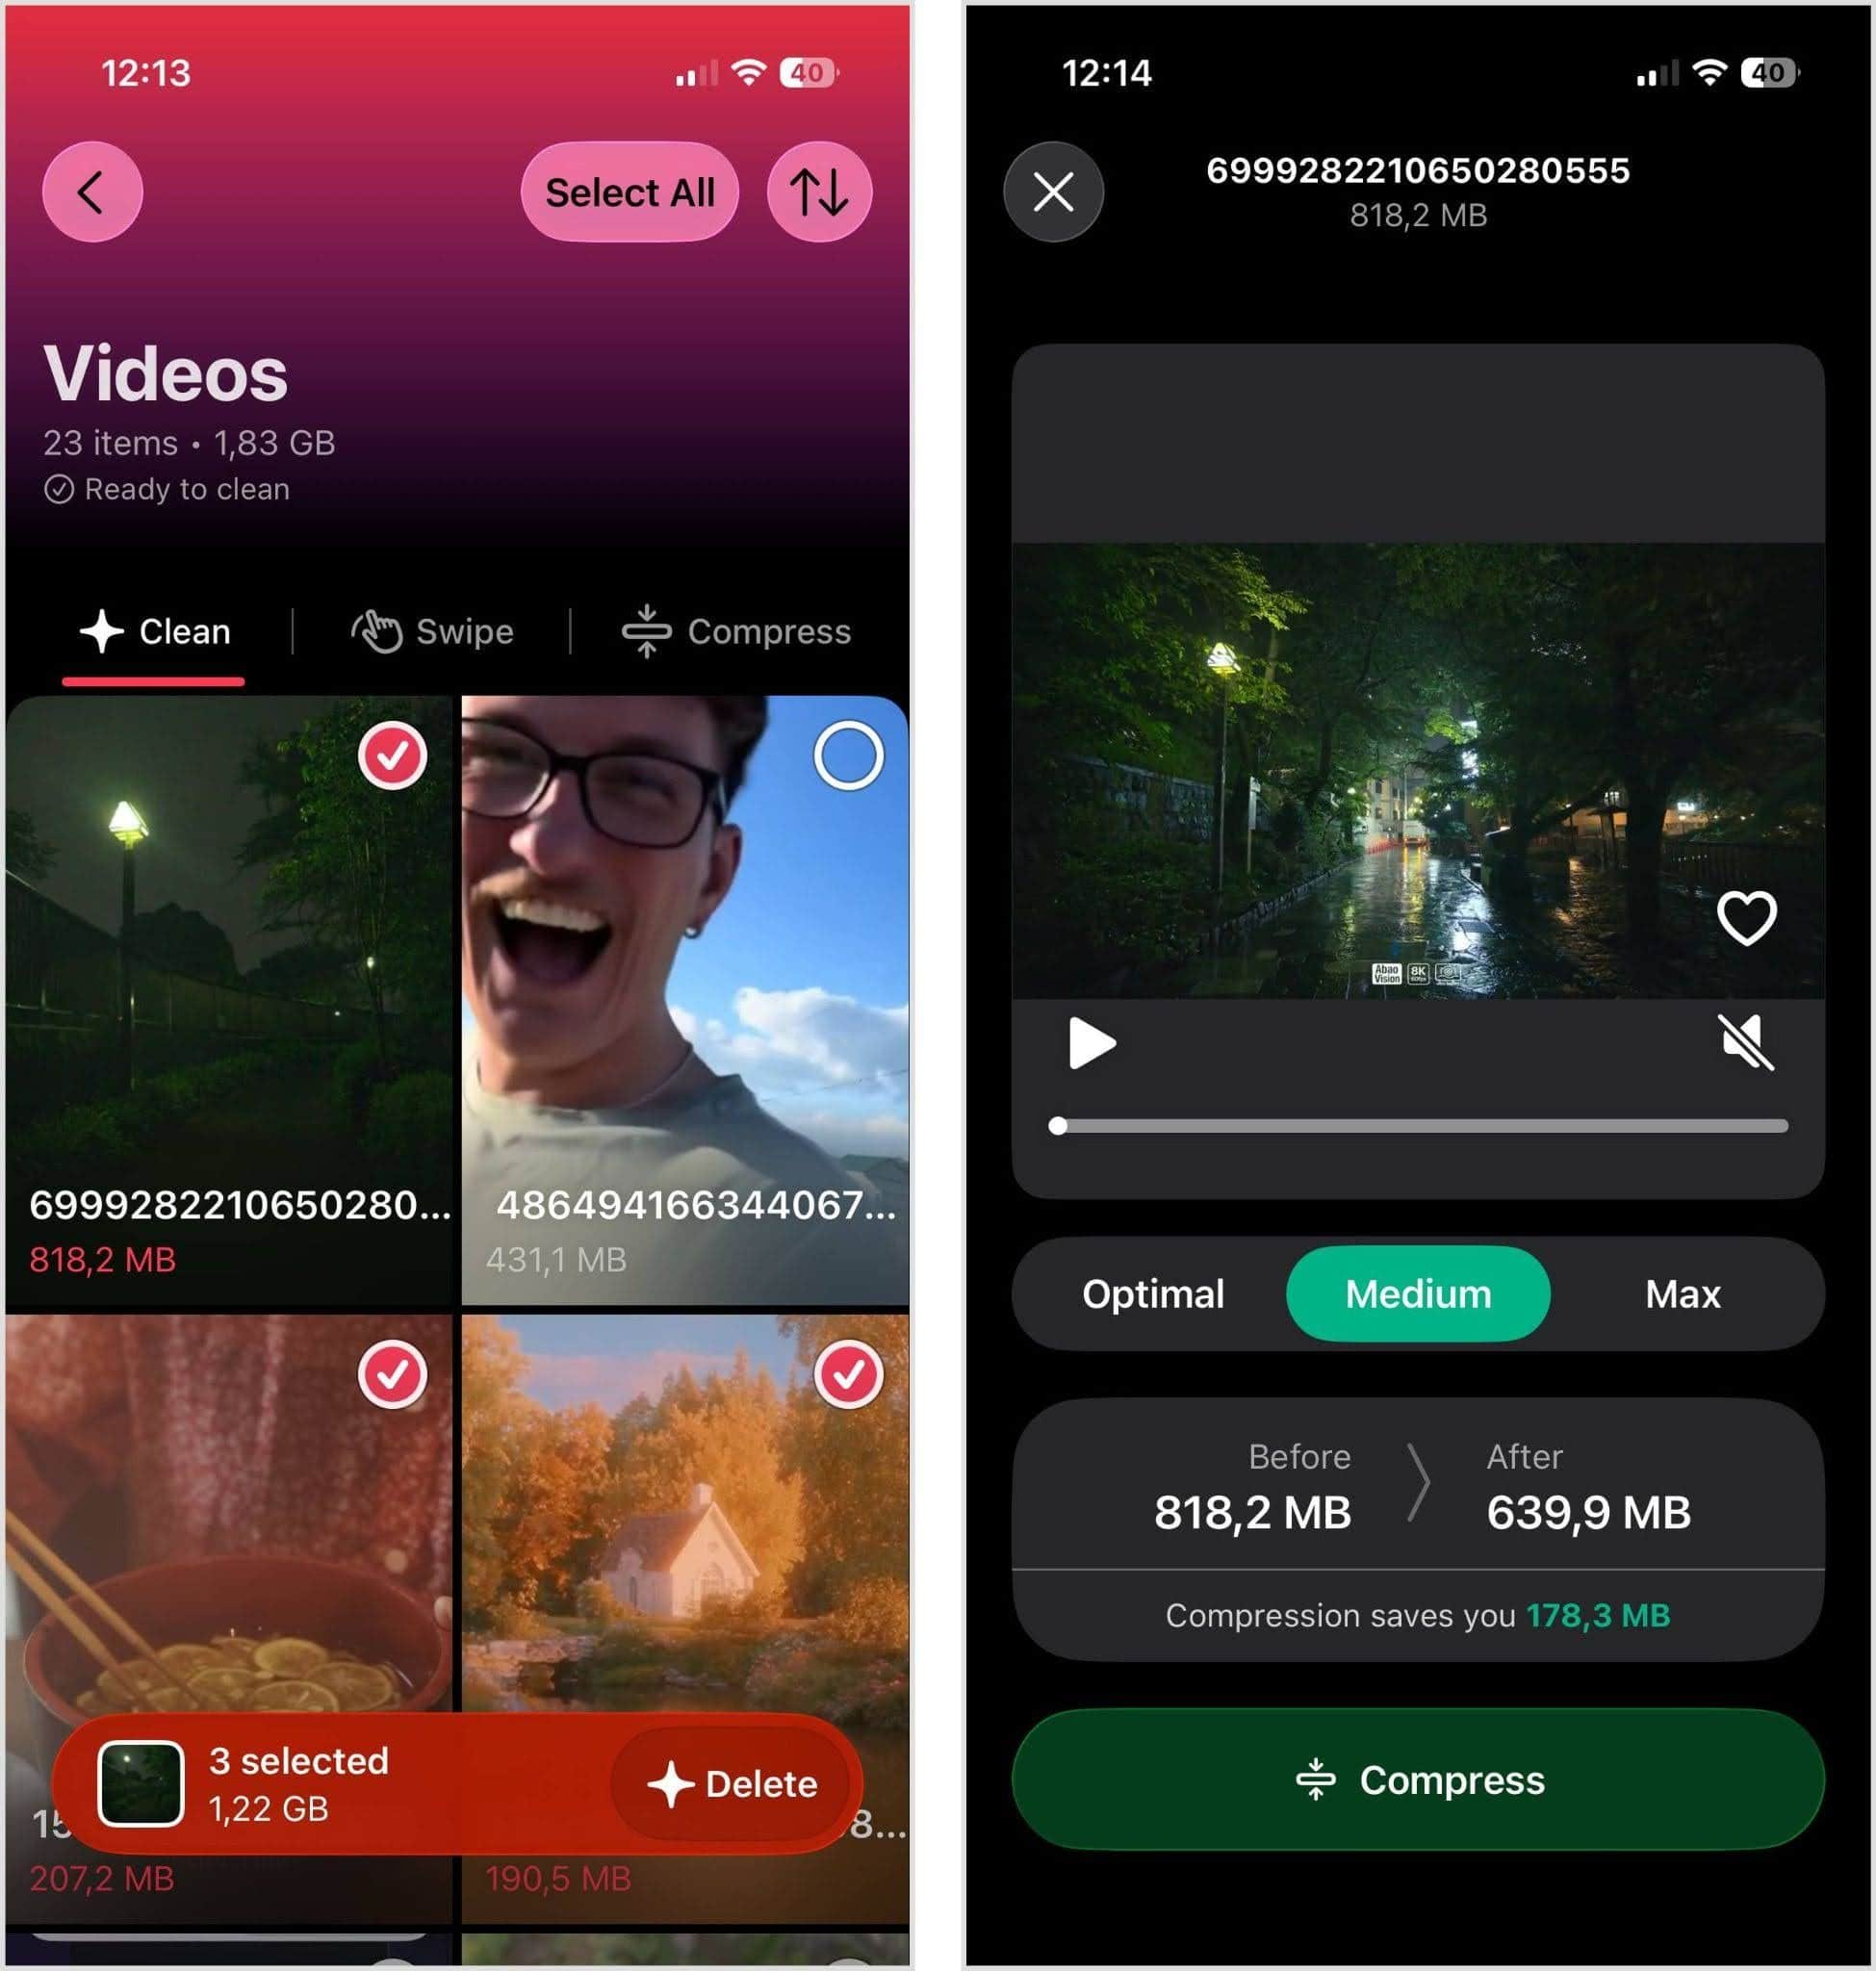
- Like the Photos app, Clever Cleaner sends deleted media to Photos > Recently Deleted rather than erasing it immediately. Clear that album afterward if you need the storage back right away.
Clever Cleaner also includes separate tools for screenshots, Live Photos, photo and video compression, and Swipe, which lets you review photos month by month with left and right swipes. The app is free to use with daily limits on some cleanup features, while Swipe is unlimited. There are no ads, and Premium is optional if you want to remove the daily limits.
Method 3: Delete or Offload Unused Apps
Apps can take up a surprising amount of storage, especially games, social media apps, and apps with large downloads or cached data. If you no longer use an app, the easiest option is to delete the app and its data. If you still need the app’s data, you can offload the app instead.
When you offload an app, iOS removes the app itself but keeps its documents and data. If you reinstall it later, you can usually pick up where you left off.
To delete or offload an app:
- Open Settings and tap General.
- Tap iPhone Storage.
- Select an app from the list.
- Tap Offload App if you want to remove the app but keep its documents and data. Tap Delete App if you want to remove the app and its related data from your iPhone.
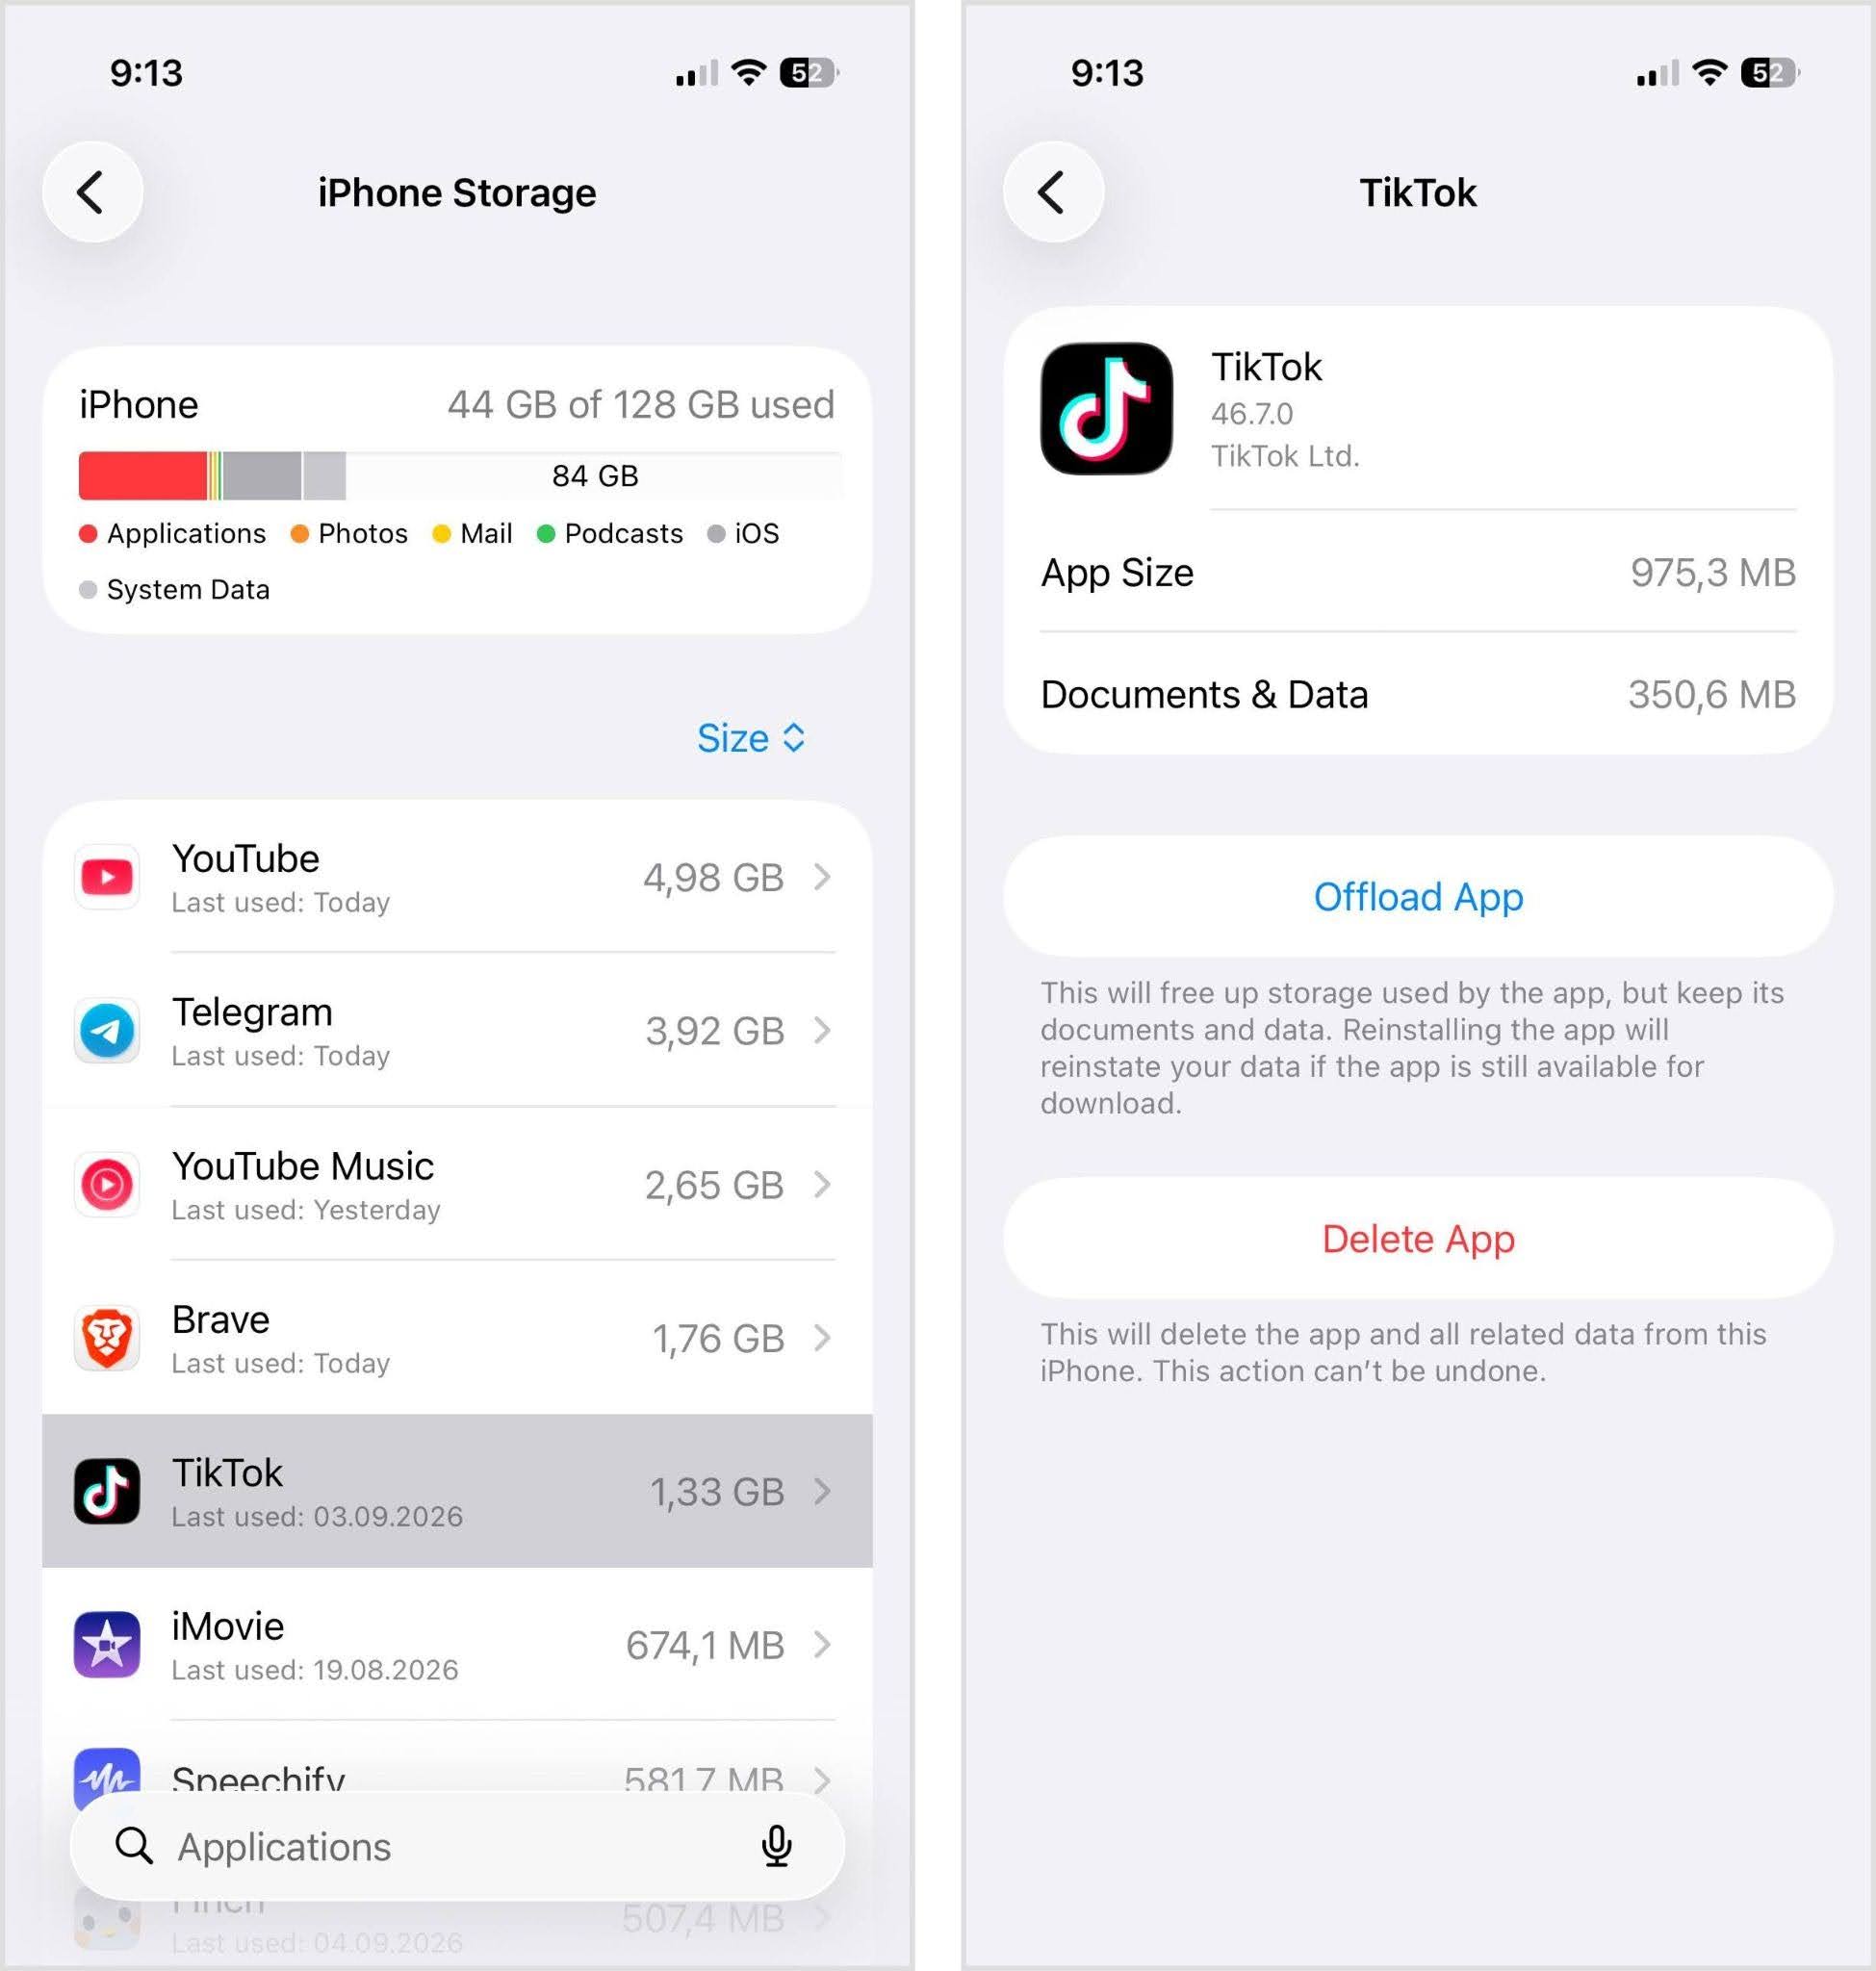
- Confirm your choice when prompted.
The same screen shows App Size and Documents & Data, which can help you judge how much space each option can actually return. Offload works best when the app itself is large. If most of its storage comes from documents and data, offloading may save much less space than you expect.
You may also see an Offload Unused Apps recommendation under Settings > General > iPhone Storage. If available, you can enable it and let iOS automatically remove apps you rarely use when it needs more space while keeping their documents and data.
Method 4: Clear Browser Cache
If you’ve never cleared your iPhone’s cache data, Safari may have accumulated a fair amount of website data. The browser stores elements from websites so it doesn’t have to download everything again each time you visit.
Over time, these junk files can take up noticeable storage space. You can clear it to reclaim some space and remove data from websites you no longer use.
To clear Safari’s history, cache, and cookies:
- Open Settings and tap Apps.
- Select Safari.
- Scroll down and tap Clear History and Website Data.
- Choose the timeframe you want to clear.
- Tap Clear History to confirm.
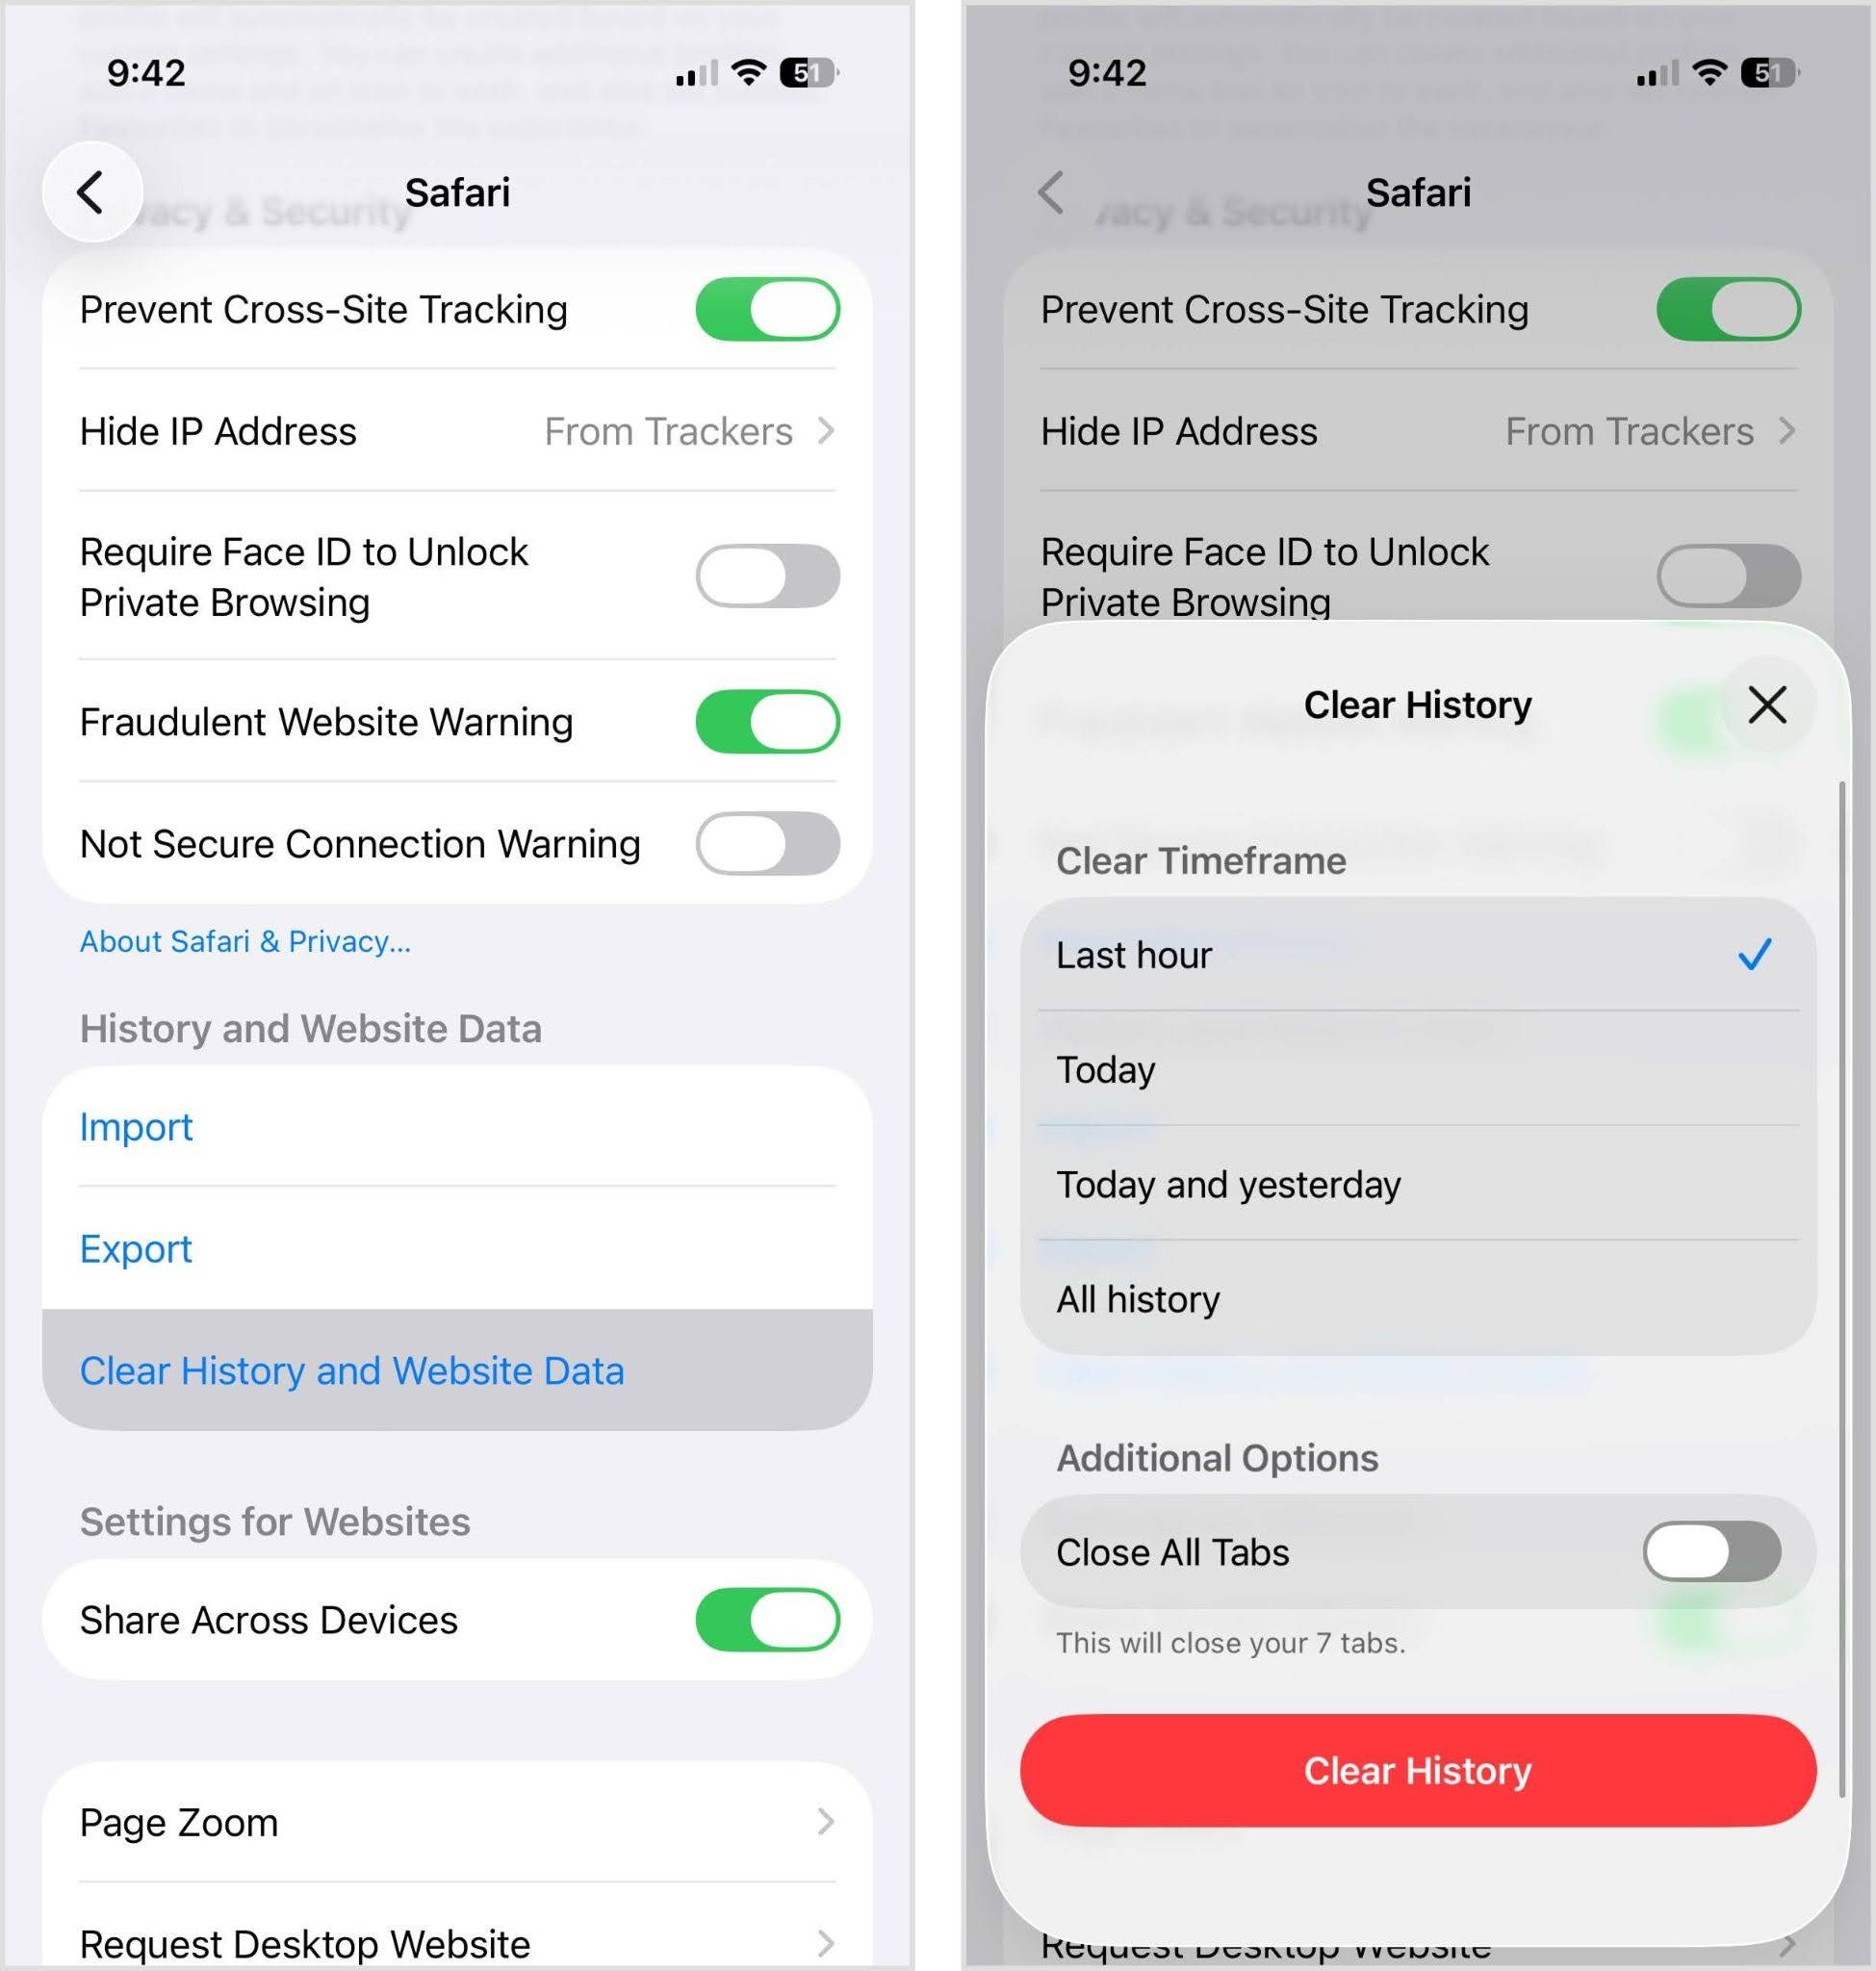
If you want to clear cookies and cache without deleting your browsing history, go to Settings > Apps > Safari > Advanced > Website Data > Remove All Website Data, then tap Remove Now.
If you use another browser, check its own settings as well. Chrome, Firefox, Edge, and other browsers keep their own browsing data and cache. The exact steps vary by browser, but you can usually find the option under Privacy, History, or Browsing Data.
Method 5: Clear Apps Cache
Similar to the browser cache, the app cache stores certain data from apps so they don’t have to be loaded from scratch every single time. As a result, your device can launch these apps way faster. If you have a lot of apps on your device, these files add up – so clearing the app data on your iPhone might make a huge difference.
While iOS is designed to manage cache data automatically, many popular social media apps like Snapchat, TikTok, Facebook, Instagram, and Twitter allow you to clear their cache from within the app.
We’ll use Telegram as an example of how to clear an app’s cache:
- Open Telegram and tap Settings.
- Select Data and Storage.
- Tap Storage Usage.
- Tap Clear Entire Cache.
- Choose what you want to remove and confirm.
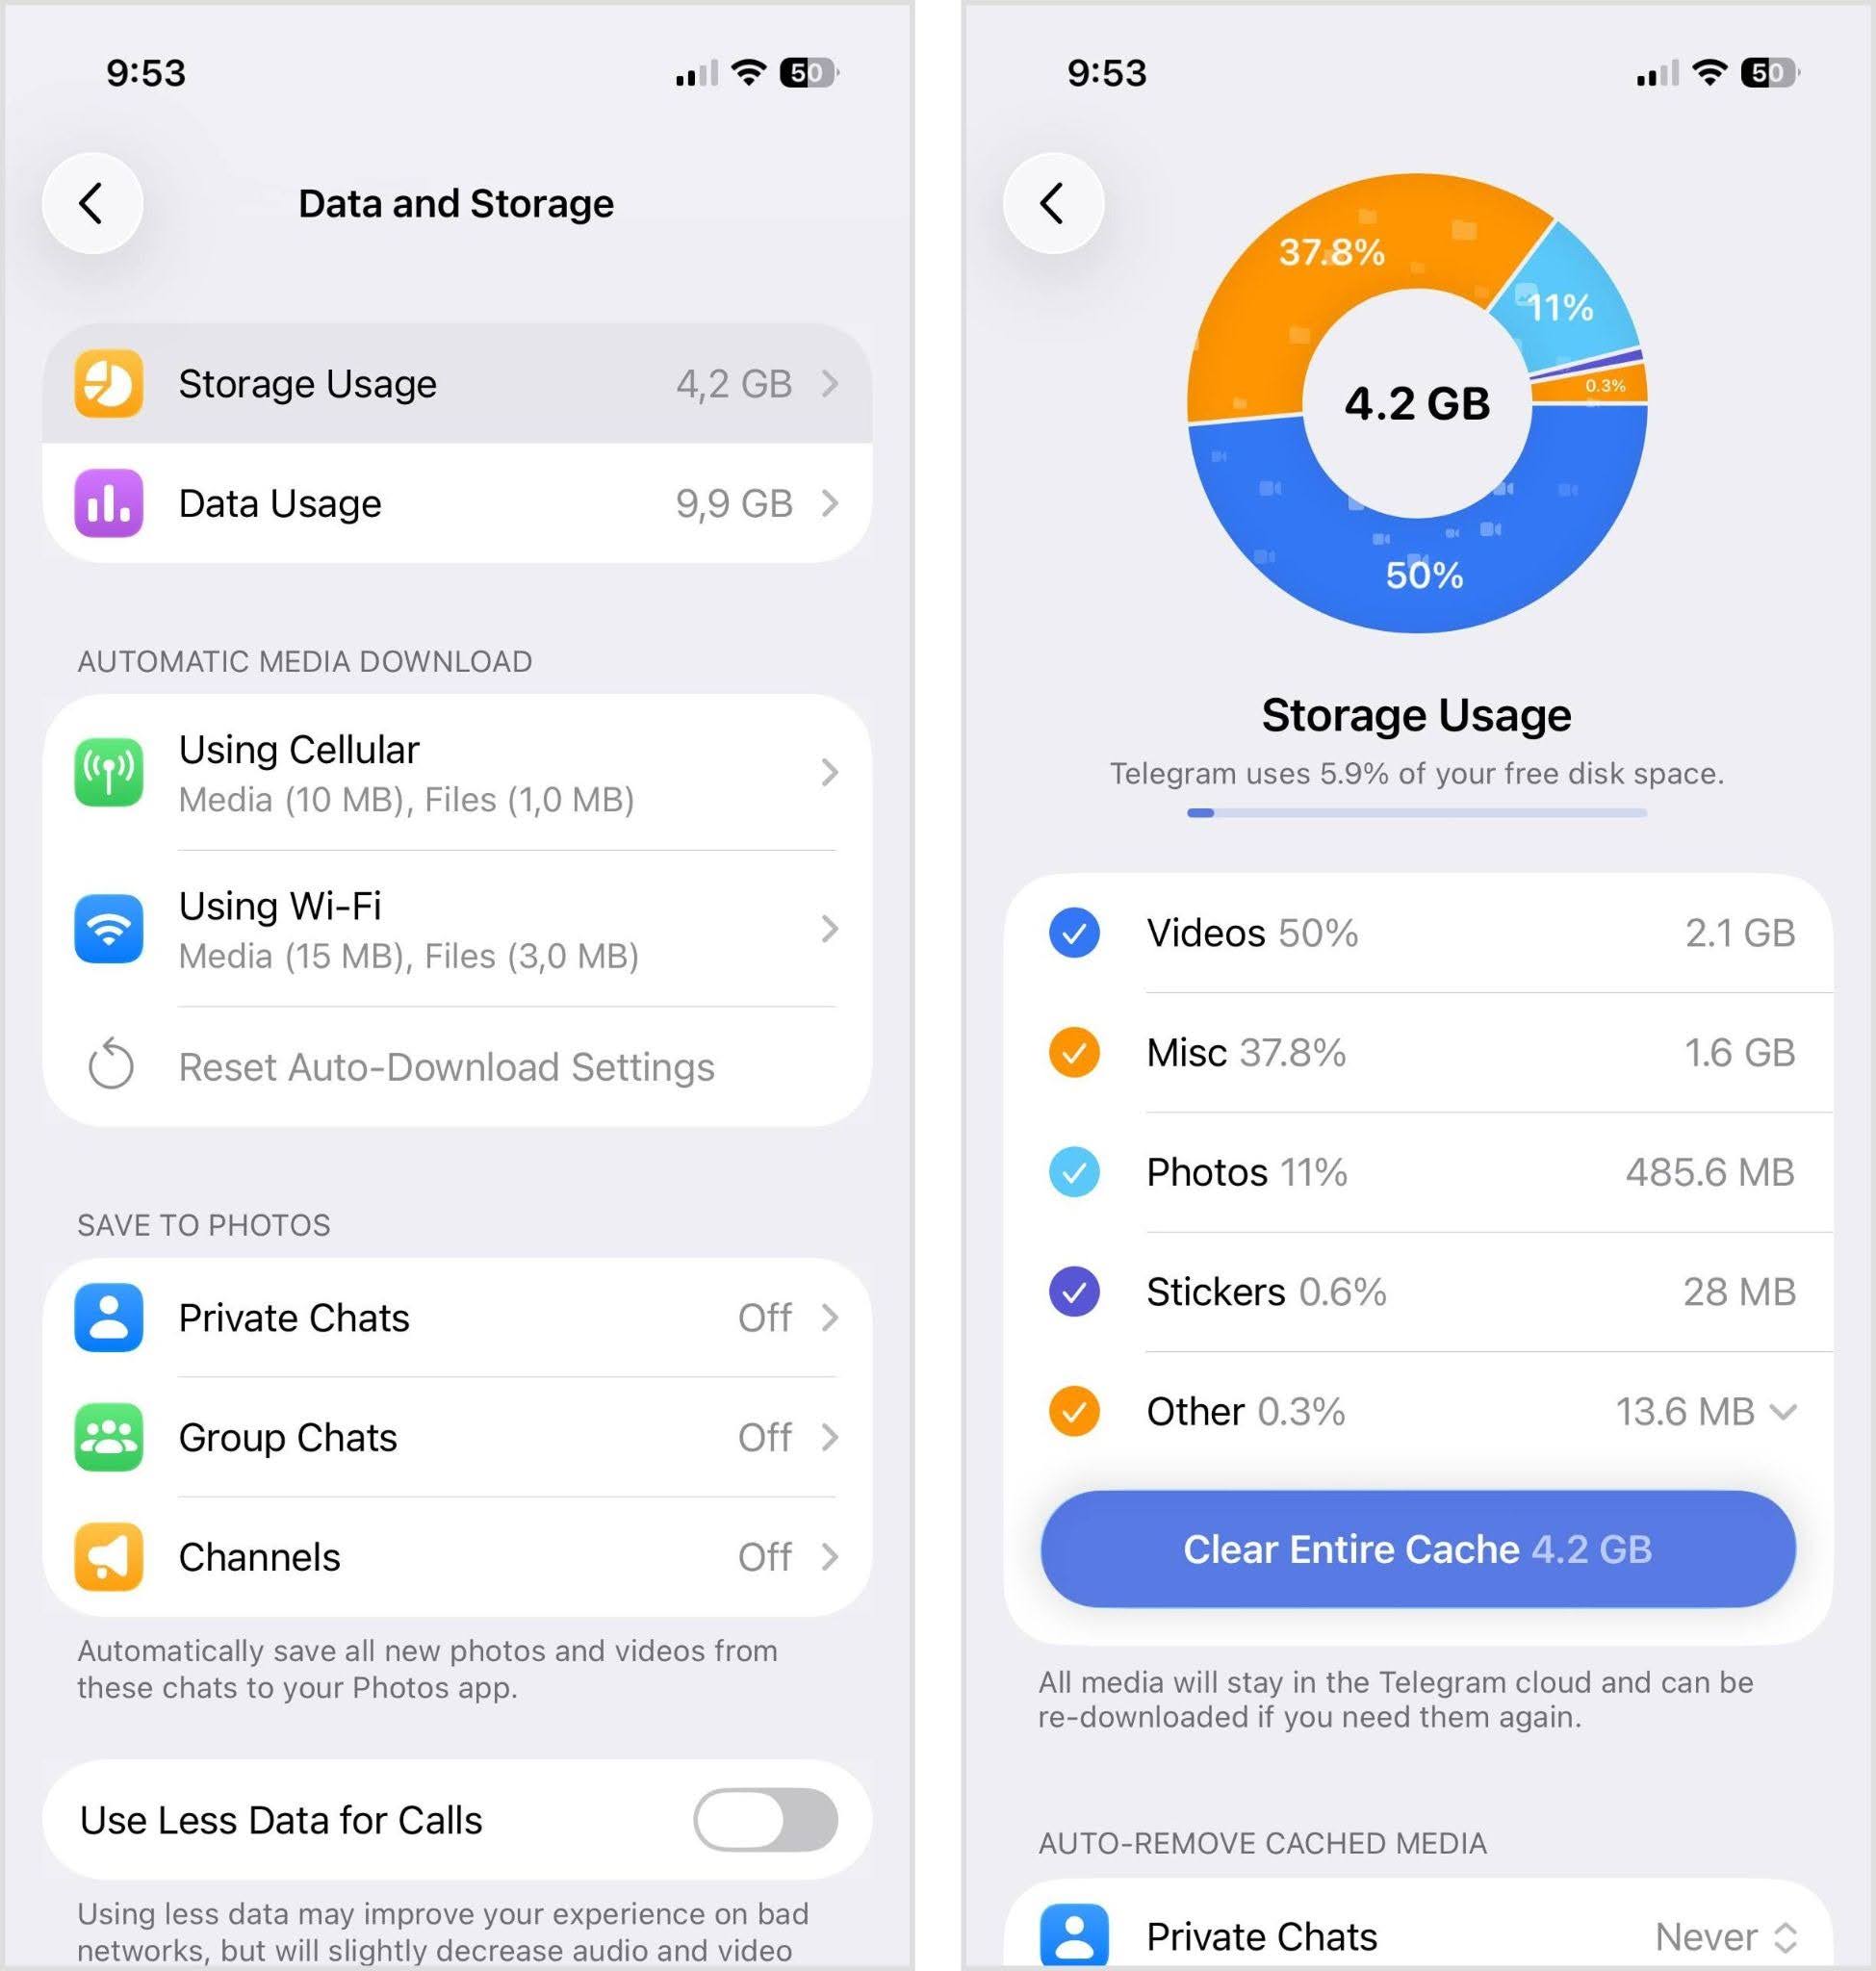
Your chats and cloud-based media remain available, and Telegram can download media again when you need it.
Other apps may not have a Clear Cache option at all. In that case, one way to remove accumulated app data is to delete the app and reinstall it from the App Store.
Method 6: Clear Downloads from Music and Streaming Apps
Downloaded content from streaming apps can take up a lot of space. YouTube videos, Netflix shows, Spotify playlists, podcasts, and Apple Music tracks may occupy several gigabytes if you save a lot for offline use.
For example, YouTube lets you download videos for offline playback. To remove them:
- Open the YouTube app.
- Tap your profile picture at the bottom.
- Tap Downloads.
- Find the downloaded video you no longer need.
- Tap the three-dot menu (⋮) next to it.
- Tap Delete from downloads.
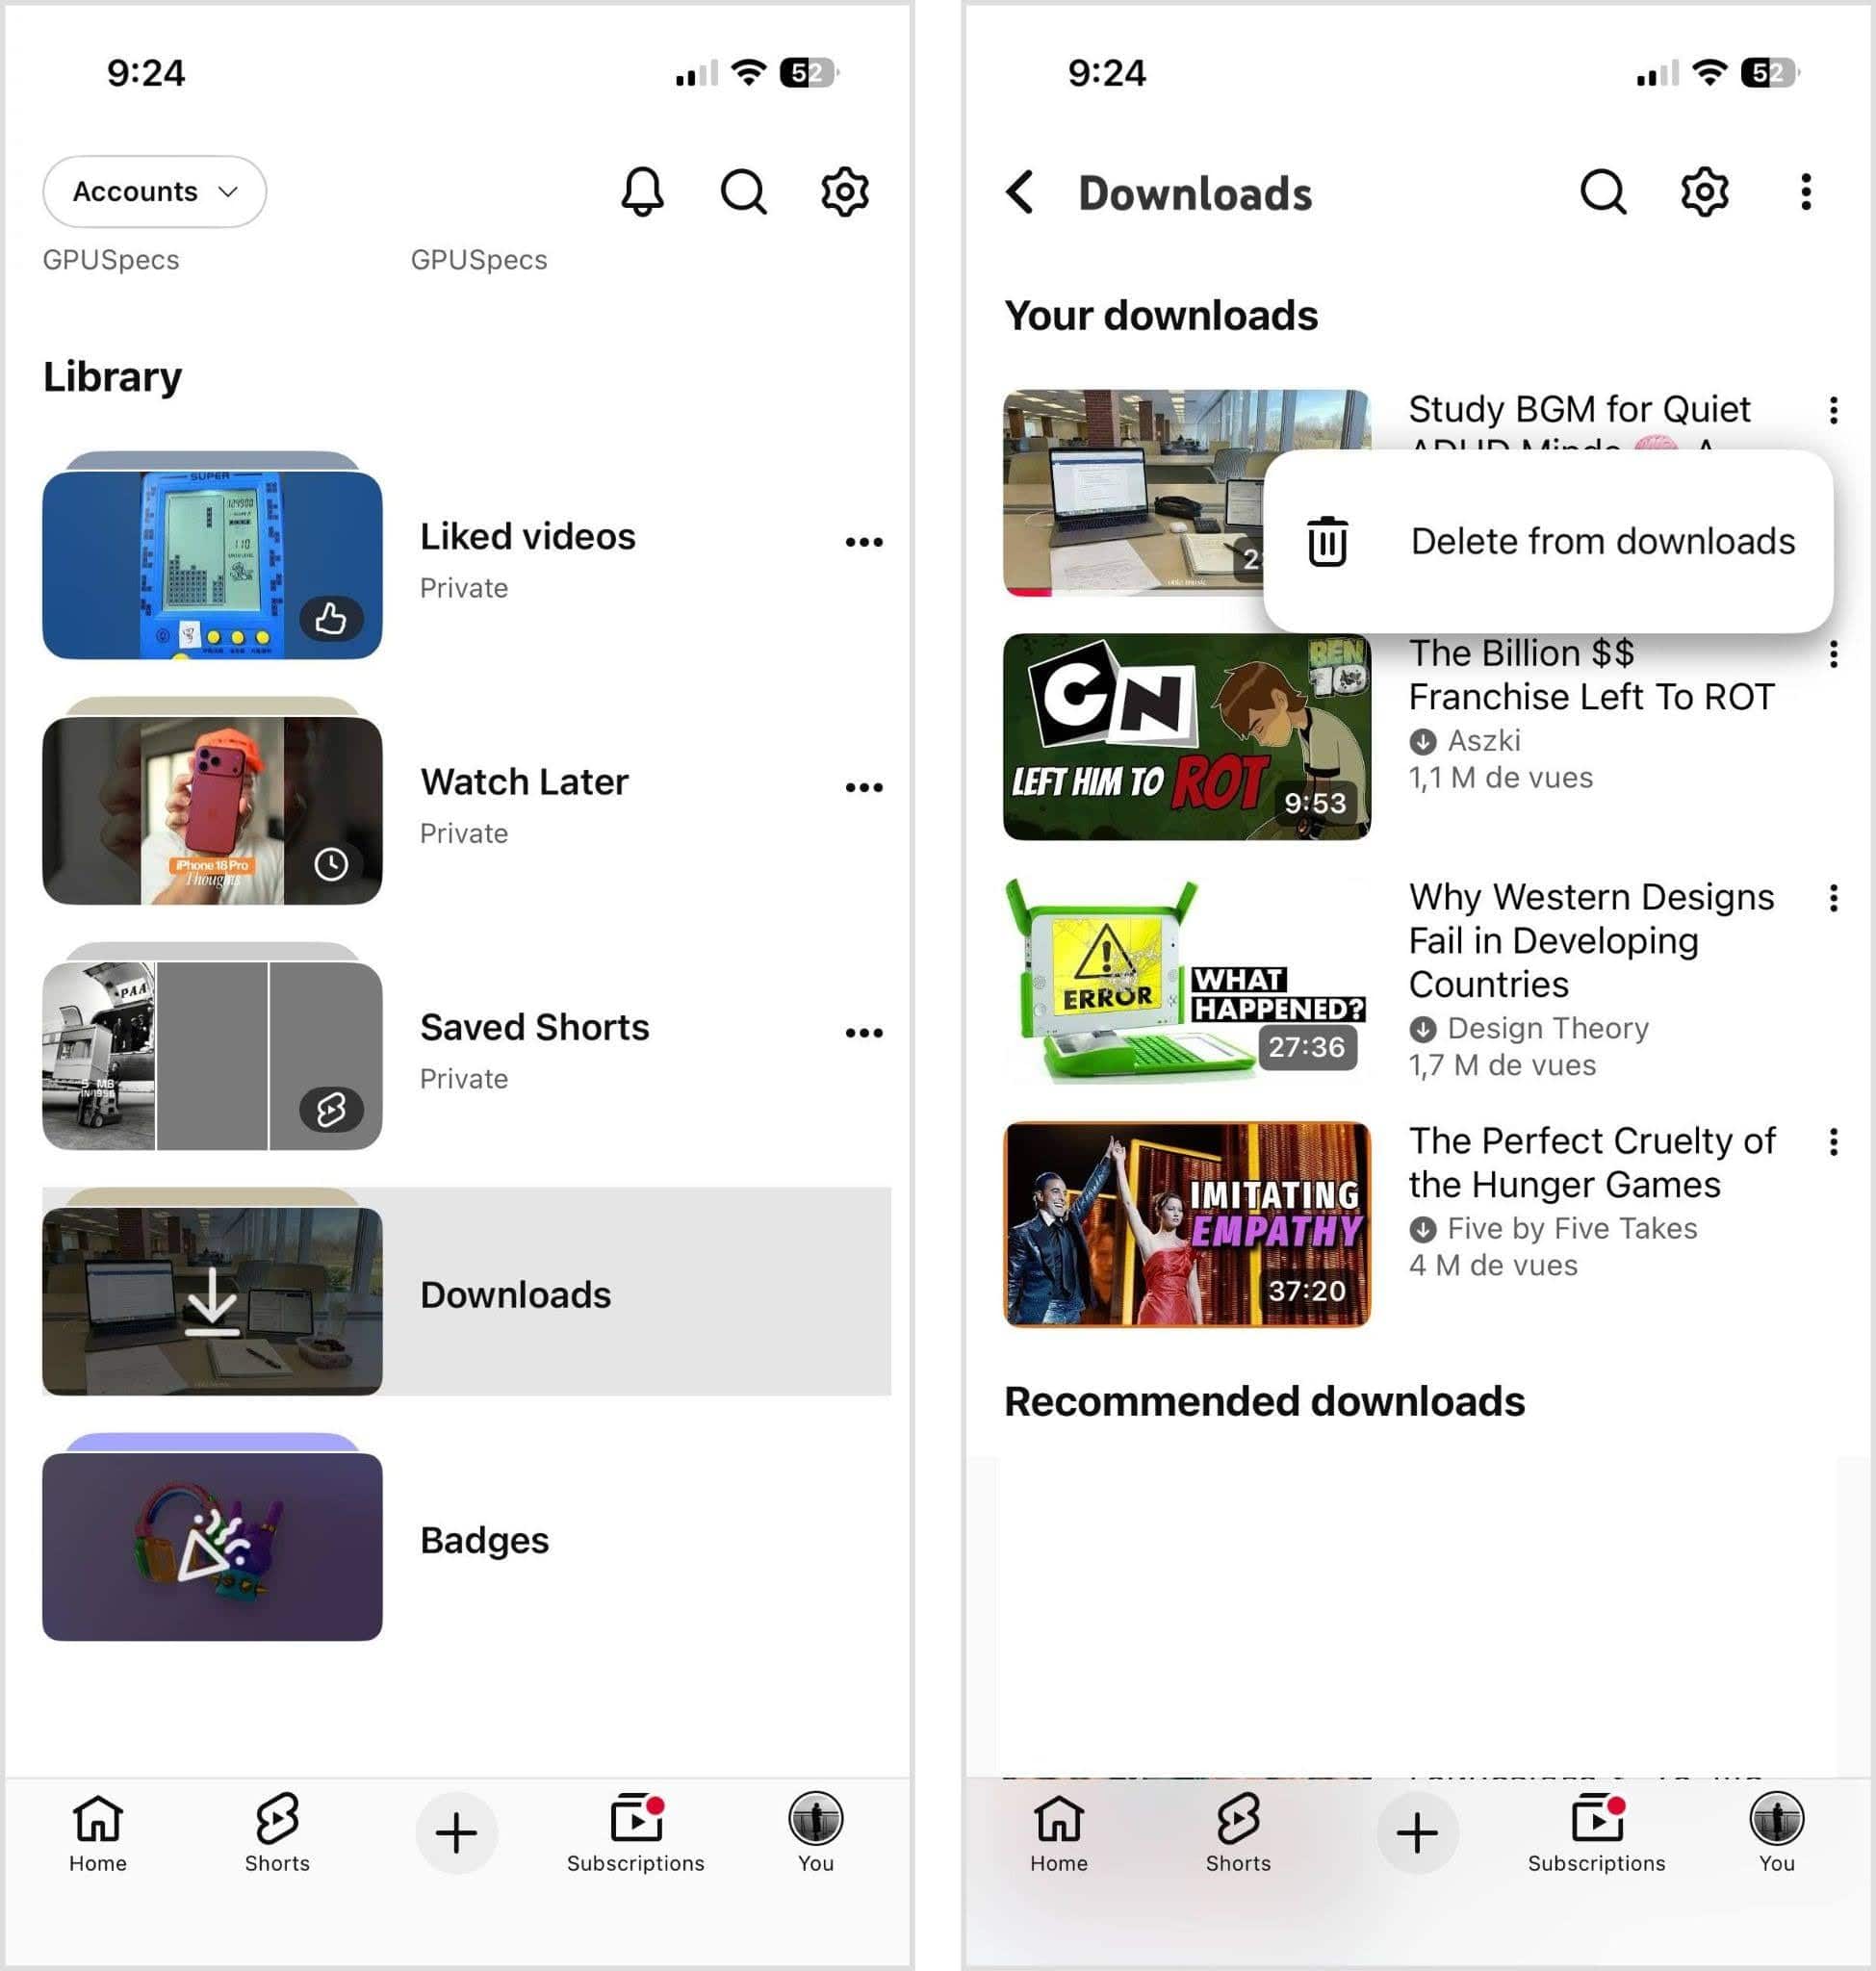
To remove all YouTube downloads at once, YouTube > profile picture > Settings > Background & downloads, tap Delete downloads, and confirm.
Other streaming apps have similar controls for offline content. Check their Downloads, Library, or app settings and remove media you no longer need. This can return a substantial amount of space without deleting the app itself.
Method 7: Clear Your Downloads Folder
The Downloads folder can collect files you saved from Safari and other apps. If you haven’t checked it for a while, you may find documents, images, archives, and other files you no longer need. You can review and delete them through the Files app.
Before you delete anything, check that you no longer need the file or have another copy. Deleted files usually move to Recently Deleted, where they remain temporarily unless you remove them permanently.
To clear downloaded files on your iPhone:
- Open the Files app and tap Browse.
- Open iCloud Drive > Downloads or On My iPhone > Downloads, depending on where your downloads are saved.
- Tap the More (•••) button and select Select.
- Choose the files you want to remove, then tap the Trash icon.
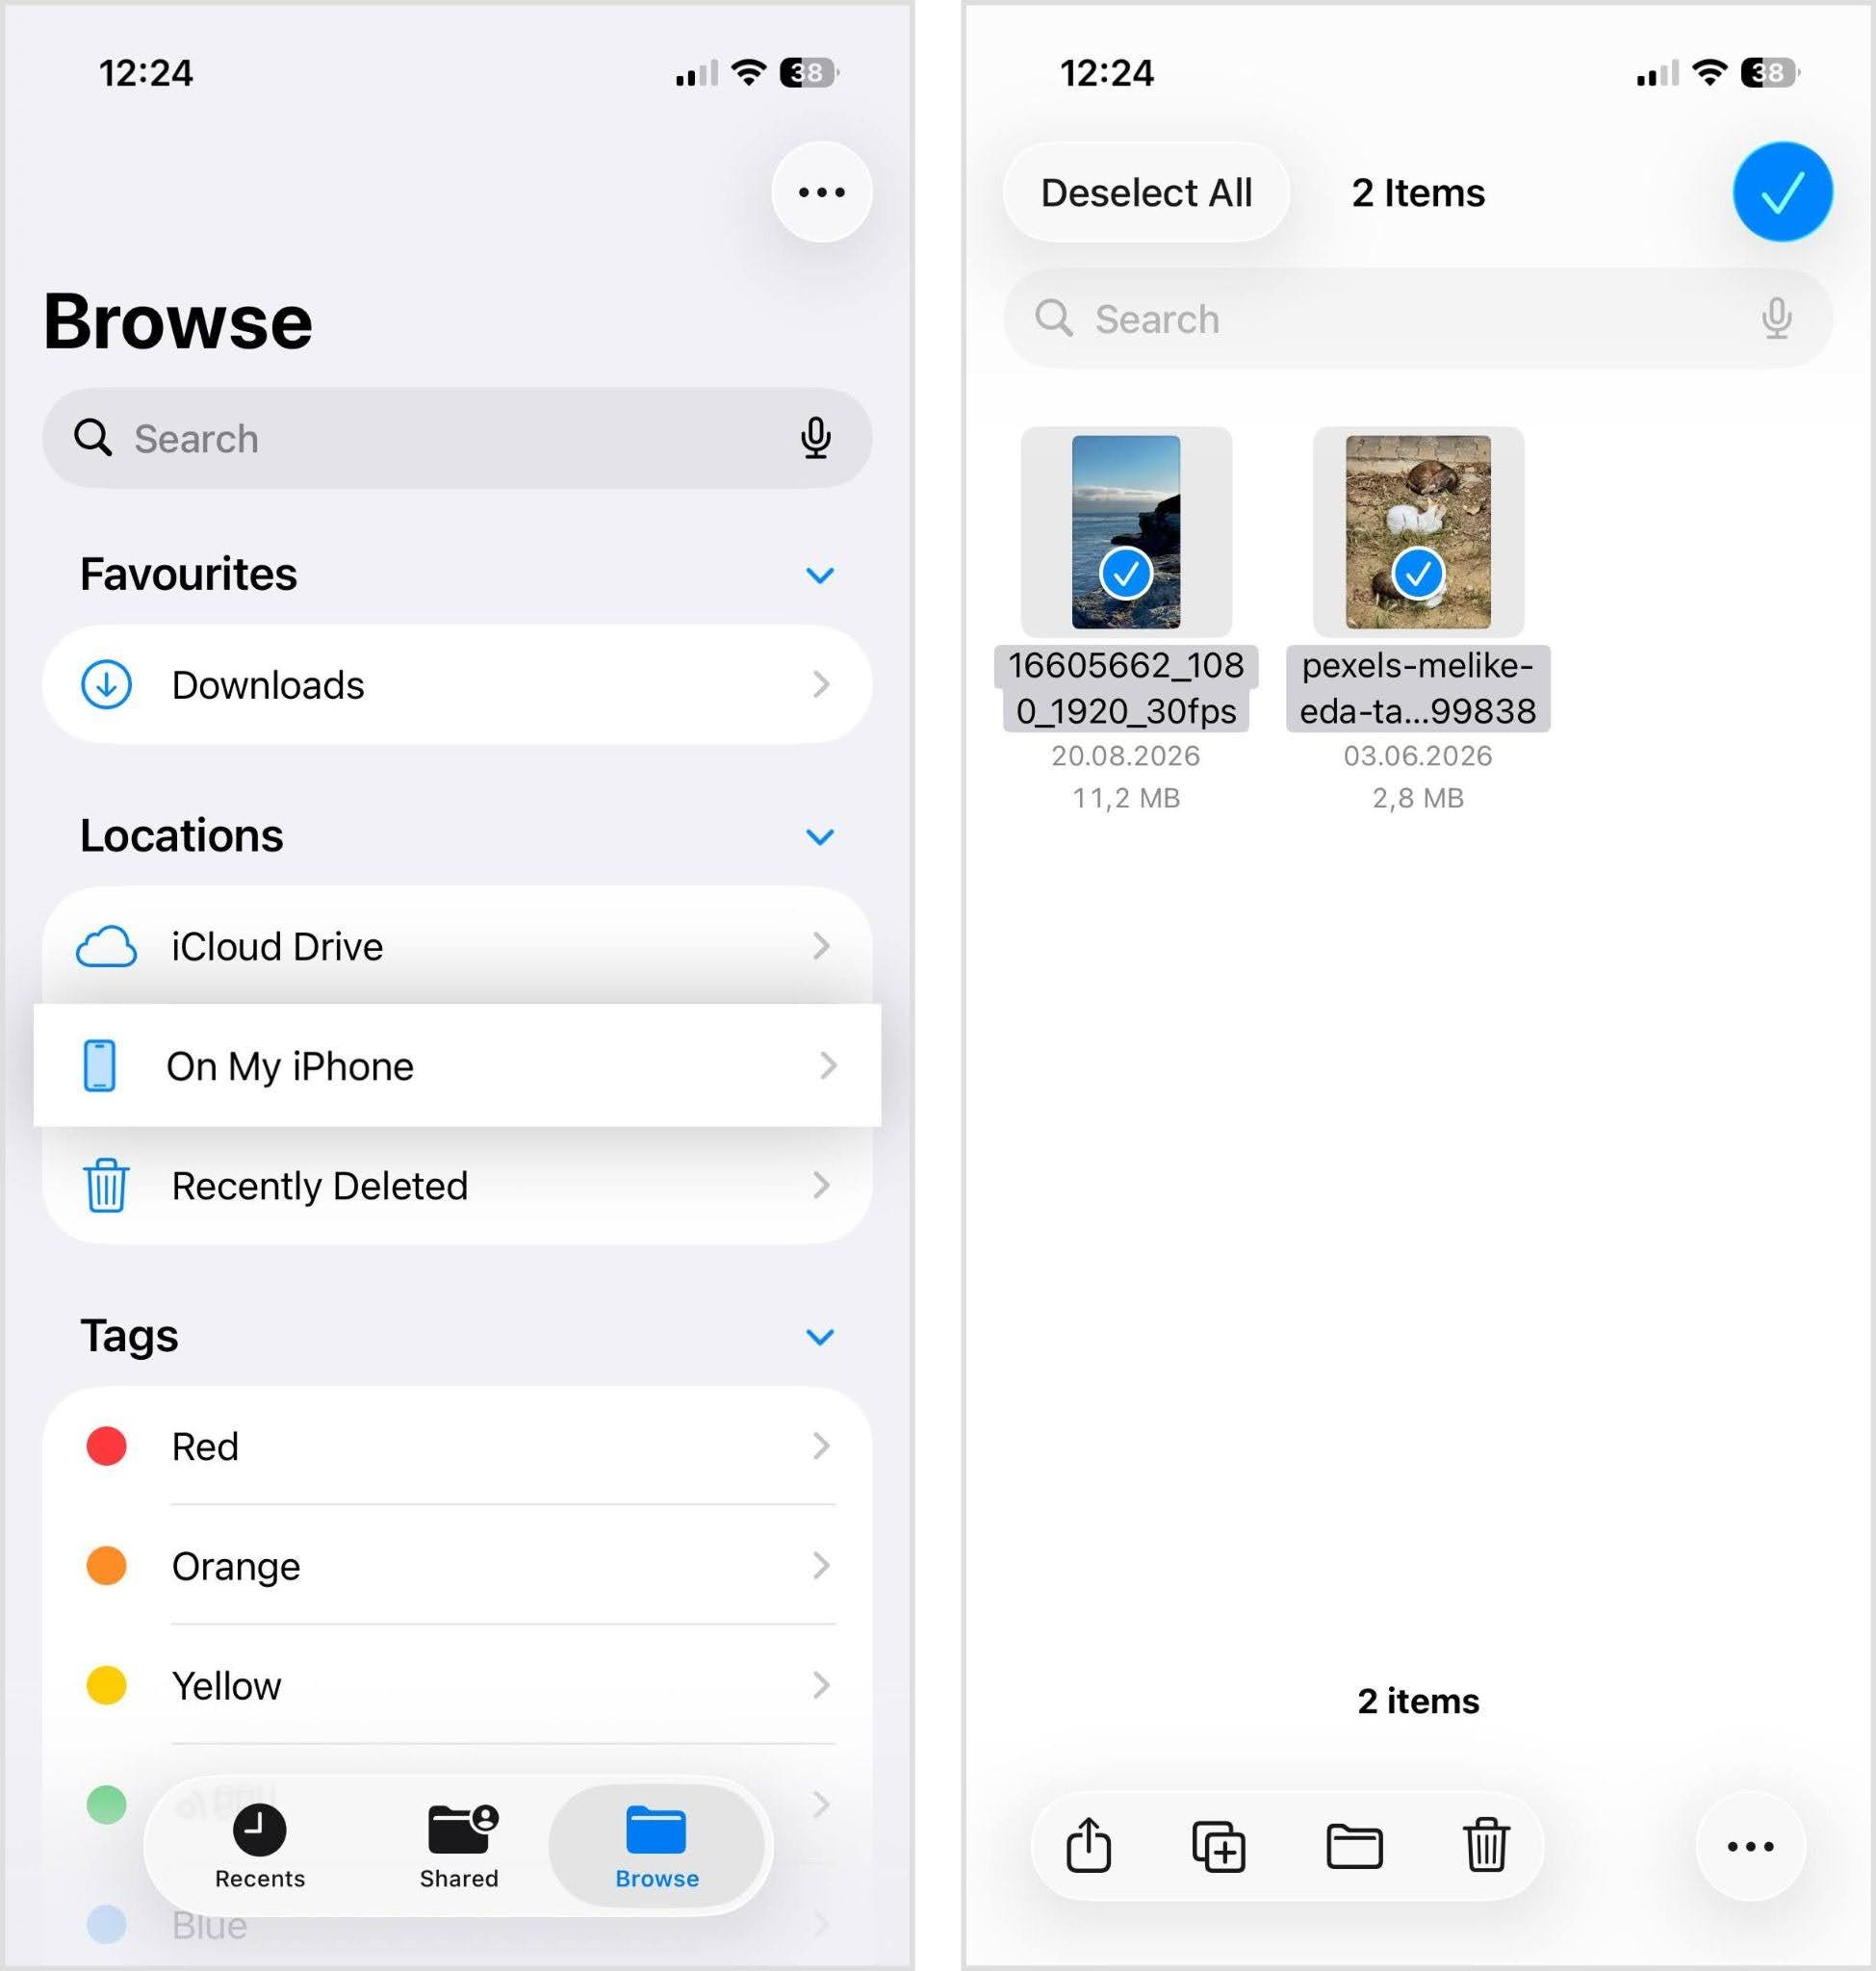
Files stored in iCloud Drive work a little differently from files under On My iPhone. A file you recently downloaded or opened may have a full local copy on your iPhone, but iOS can later remove that local copy when it needs space while keeping the file safely in iCloud. The file will download again the next time you open it. Because of this, older iCloud Drive downloads may already take up little or no local storage.
If you want to free up local space immediately without deleting a file from iCloud, press and hold it and choose Remove Download. Avoid using Delete for this purpose, as deleting a file from iCloud Drive also removes it from other devices connected to the same iCloud Drive.
Method 8: Delete Message Attachments
If you send and receive lots of photos, videos, and other files through the Messages app, those attachments can take up a surprising amount of storage. Old conversations can contain years of media you no longer need, so it’s worth checking them before you delete entire message threads.
To delete attachments from a conversation:
- Open Messages and select a conversation.
- Tap the contact or group name at the top.
- Scroll to Photos, Links, Documents, or another attachment category and tap See All.
- Tap Select and choose the attachments you want to remove.
- Tap Delete, then confirm.
For a broader view, go to Settings > General > iPhone Storage > Messages. Here, you can review categories such as photos, videos, and other large attachments and remove items that take up too much space.
You can also control how long your iPhone keeps old messages. Go to Settings > Apps > Messages > Keep Messages and choose 30 Days, 1 Year, or Forever. Choosing a shorter period can prevent old conversations and their attachments from accumulating over time, but keep in mind that messages older than the selected period will be permanently deleted.
Method 9: Reset Your iPhone and Start Fresh
If storage problems persist even after a thorough cleanup, a factory reset is the most drastic option. It erases the iPhone completely and gives you a clean start. You can then restore your data from an iCloud backup.
A factory reset erases the content and settings stored on your iPhone. Before you proceed, check that the data you want to keep is synced to iCloud or included in a recent backup. Also make sure you know your Apple Account password.
First, create an iCloud backup:
- Connect your iPhone to Wi-Fi.
- Open Settings and tap your Apple Account at the top.
- Tap iCloud > iCloud Backup.
- Turn on Back Up This iPhone if it isn’t already enabled.
- Tap Back Up Now and keep your iPhone connected to Wi-Fi until the backup finishes.
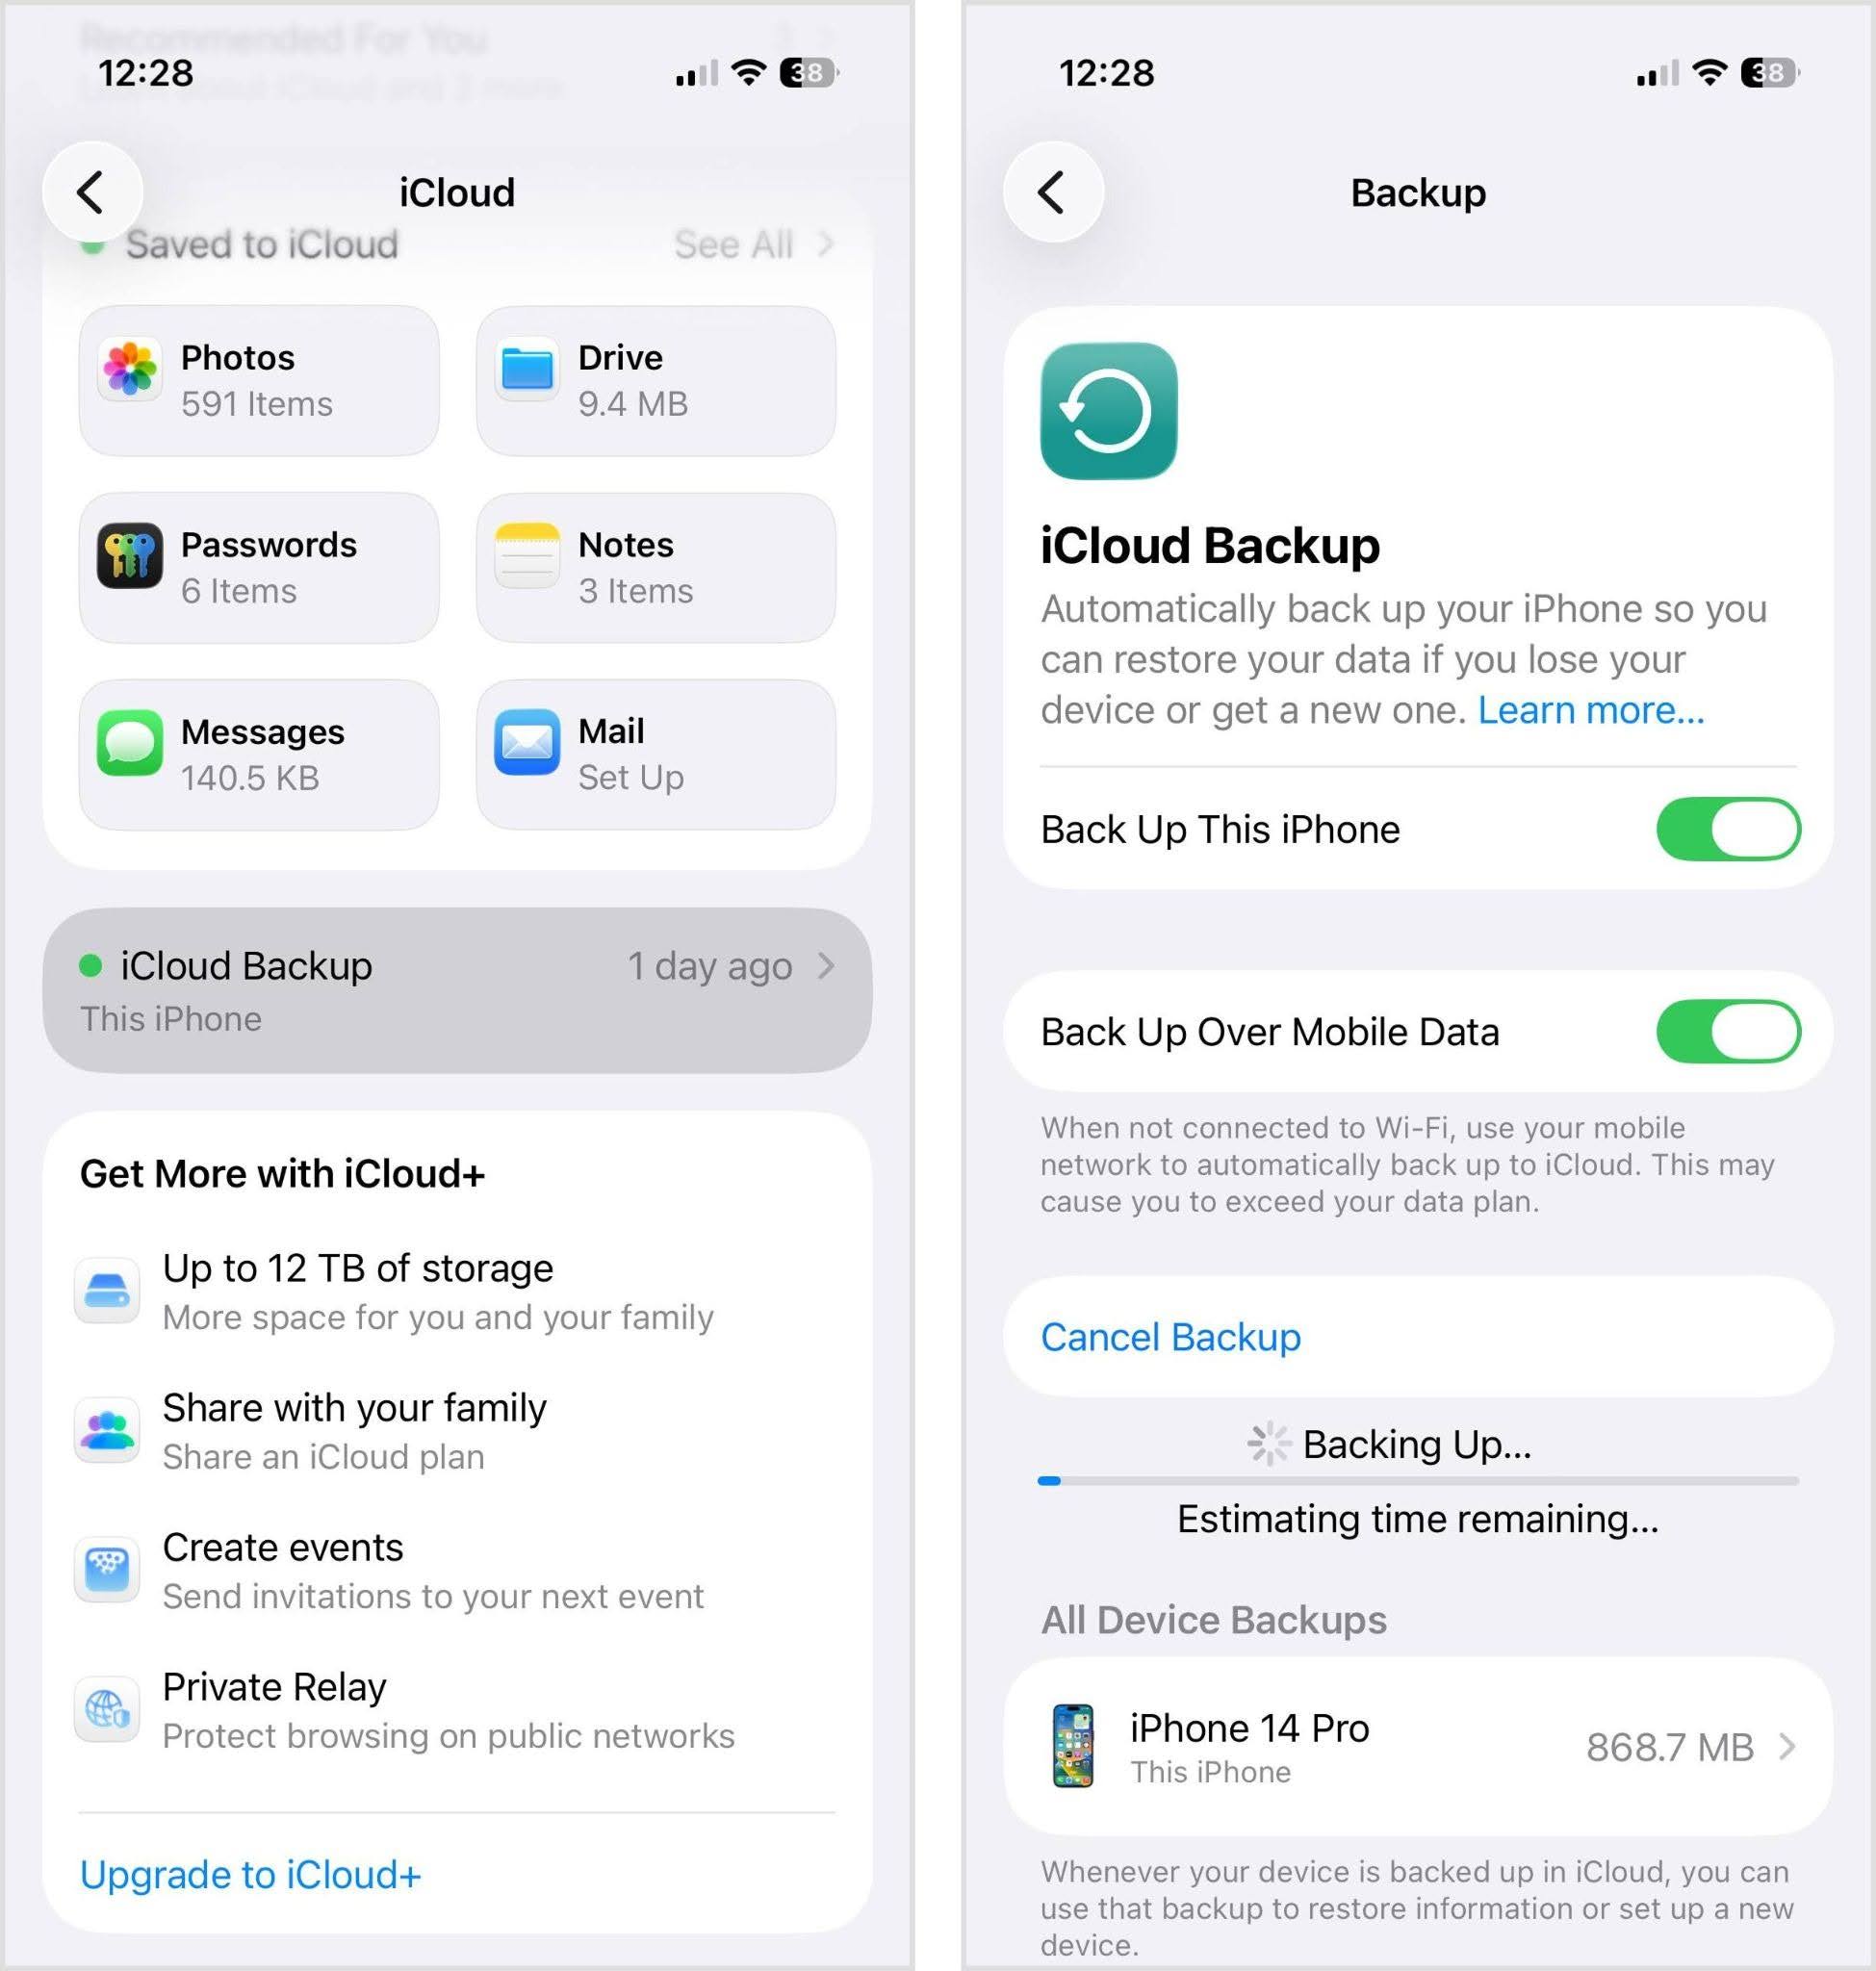
- Check the date and time of the latest successful backup before you continue.
Then, erase the iPhone:
- Open Settings > General.
- Scroll down and tap Transfer or Reset iPhone.
- Tap Erase All Content and Settings.
- Review what will be removed, then tap Continue.
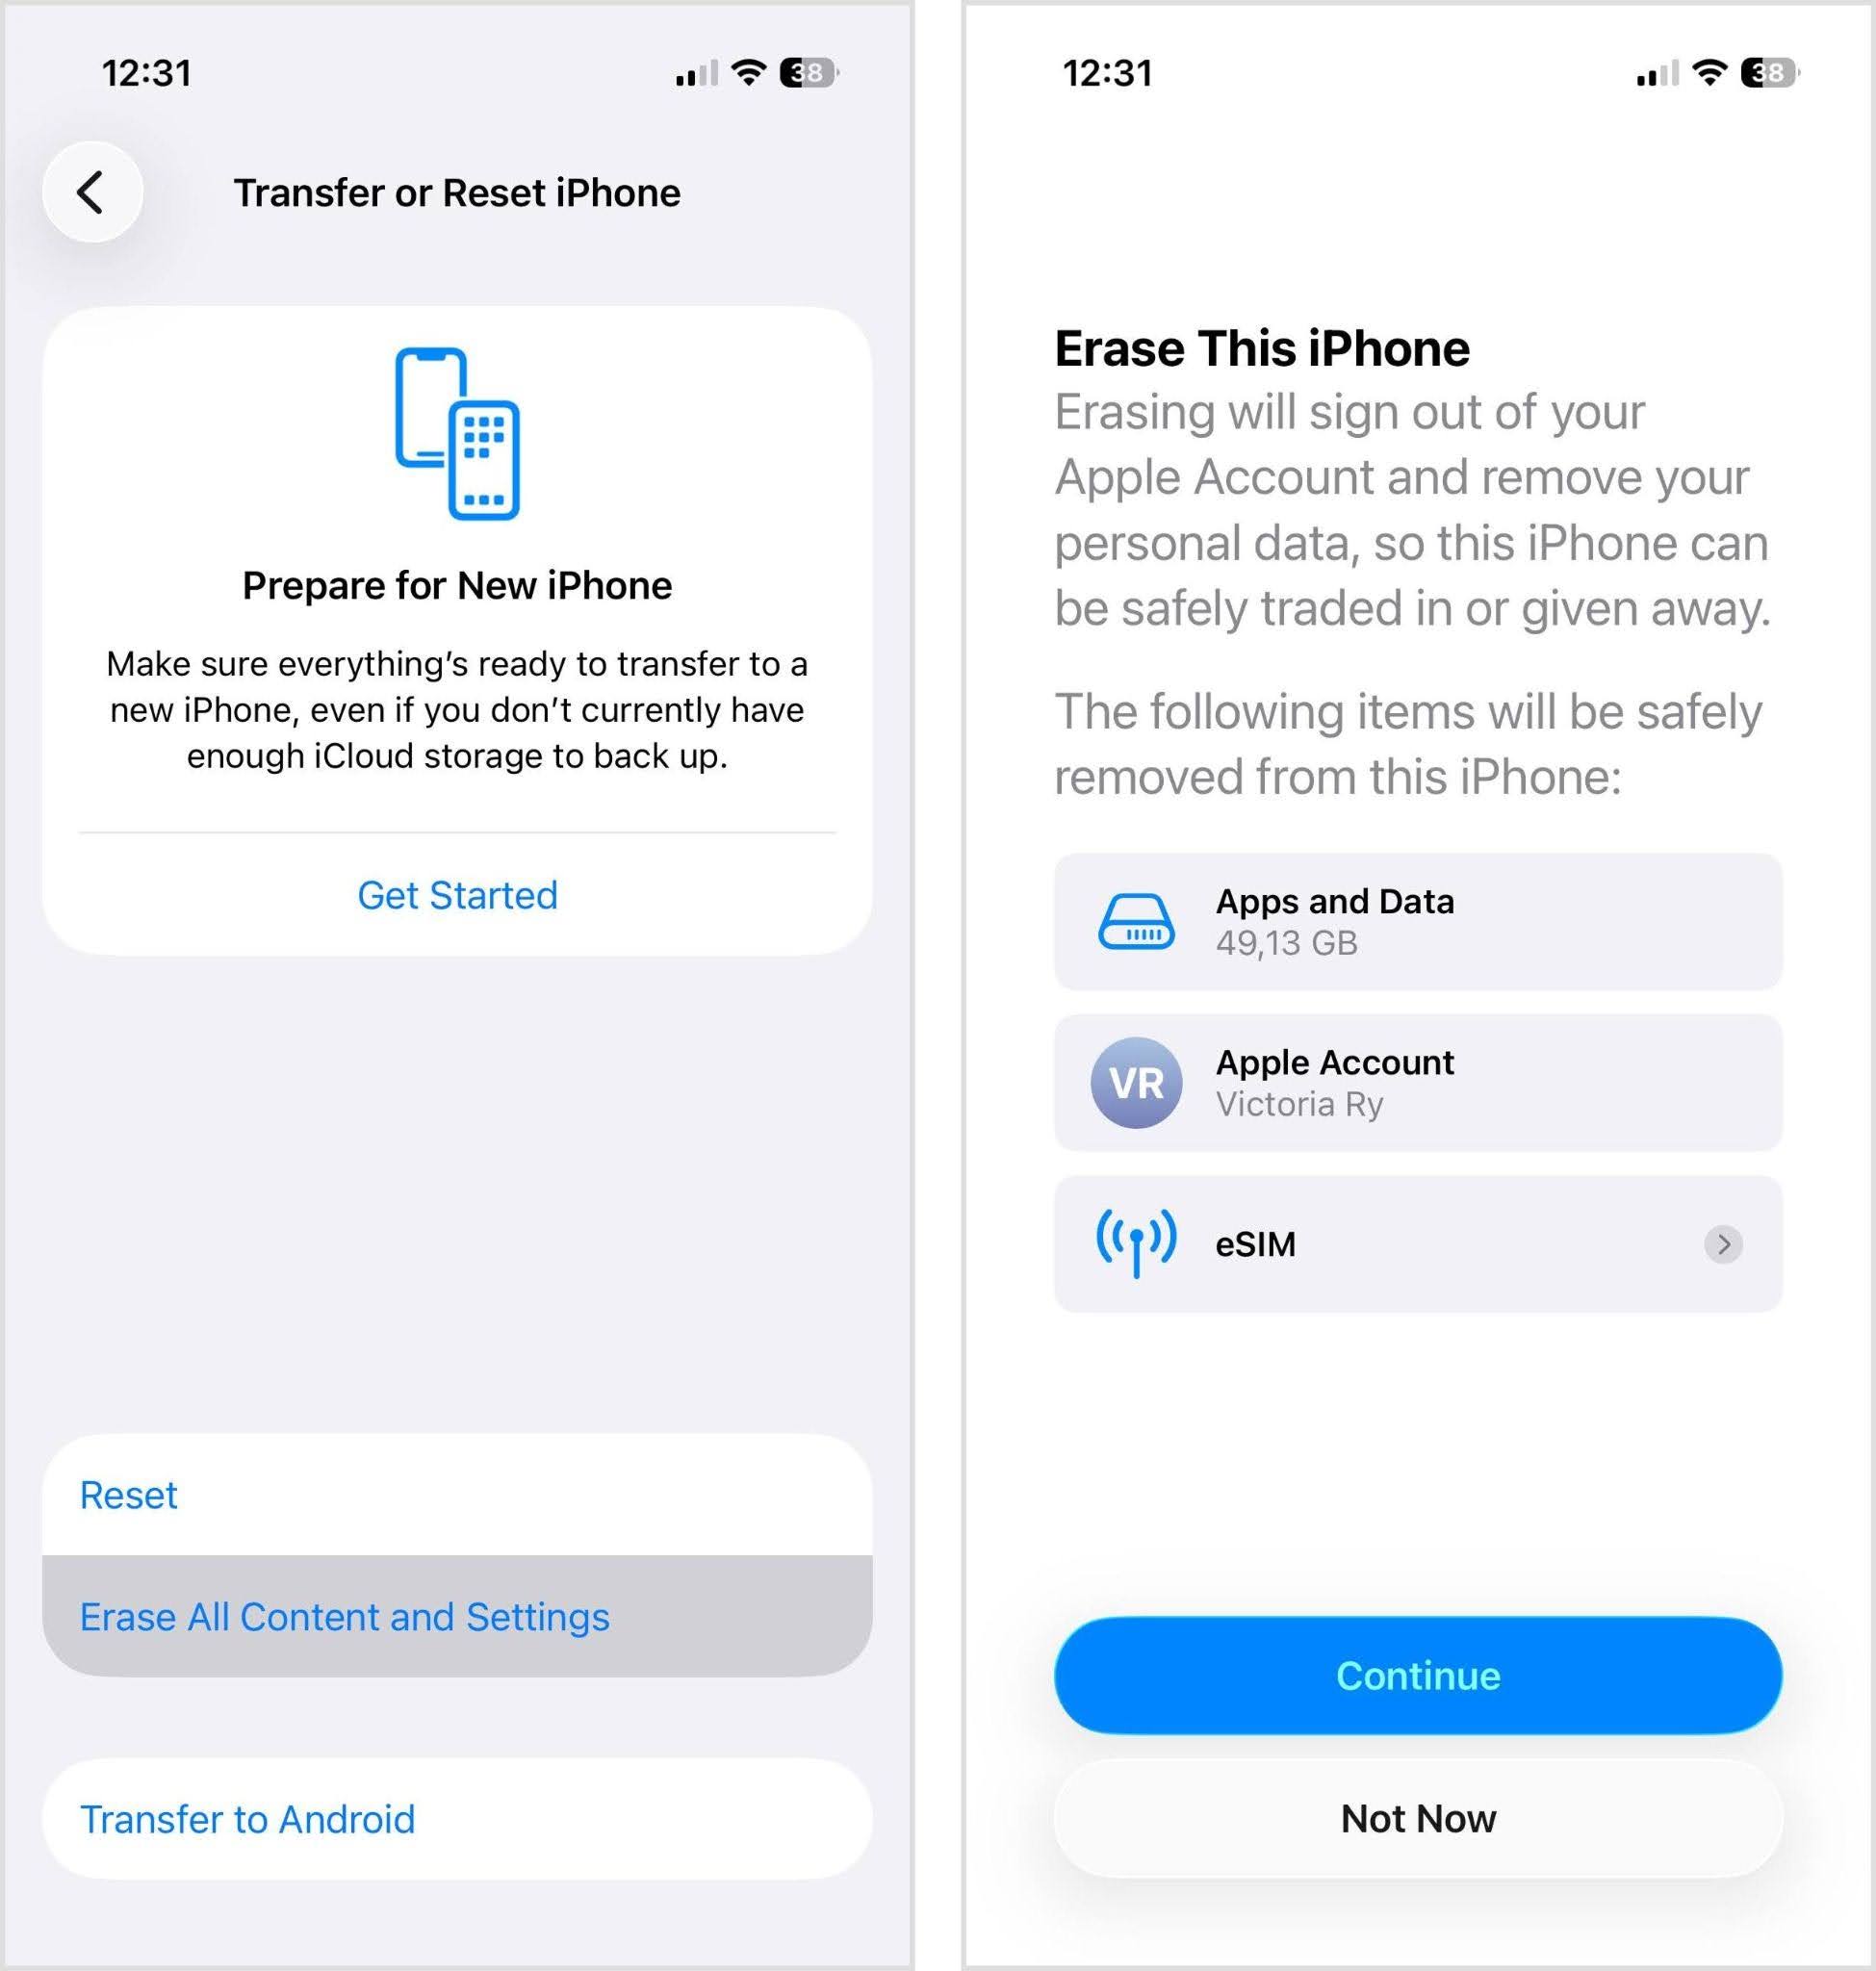
- Enter your passcode or Apple Account password if requested and confirm the reset.
- Wait for the iPhone to erase its data and restart.
During setup, follow the on-screen instructions until you reach the data transfer options. Choose From iCloud Backup, sign in to your Apple Account, and select the backup you want to restore.
Keep in mind that a full restore can also bring back much of the data you had before the reset. If your goal is a truly clean start with less clutter, you can set up the iPhone as new and then sign in to iCloud to sync back only the data you need.
How to Buy More Storage on iPhone
If you already cleared everything you could and still don’t have enough storage, the next option is to expand where you keep your files. You can’t upgrade the built-in storage of an iPhone after purchase, but you can pay for more cloud storage or move files to an external storage device.
Option 1: Buy More Cloud Storage
For most iPhone users, the first cloud option to consider is iCloud+ because it’s built directly into iOS. Apple gives every account 5 GB for free, but that can fill up quickly once you use iCloud for photos, videos, files, and iPhone backups.
If you need more space, iCloud+ offers several paid tiers:
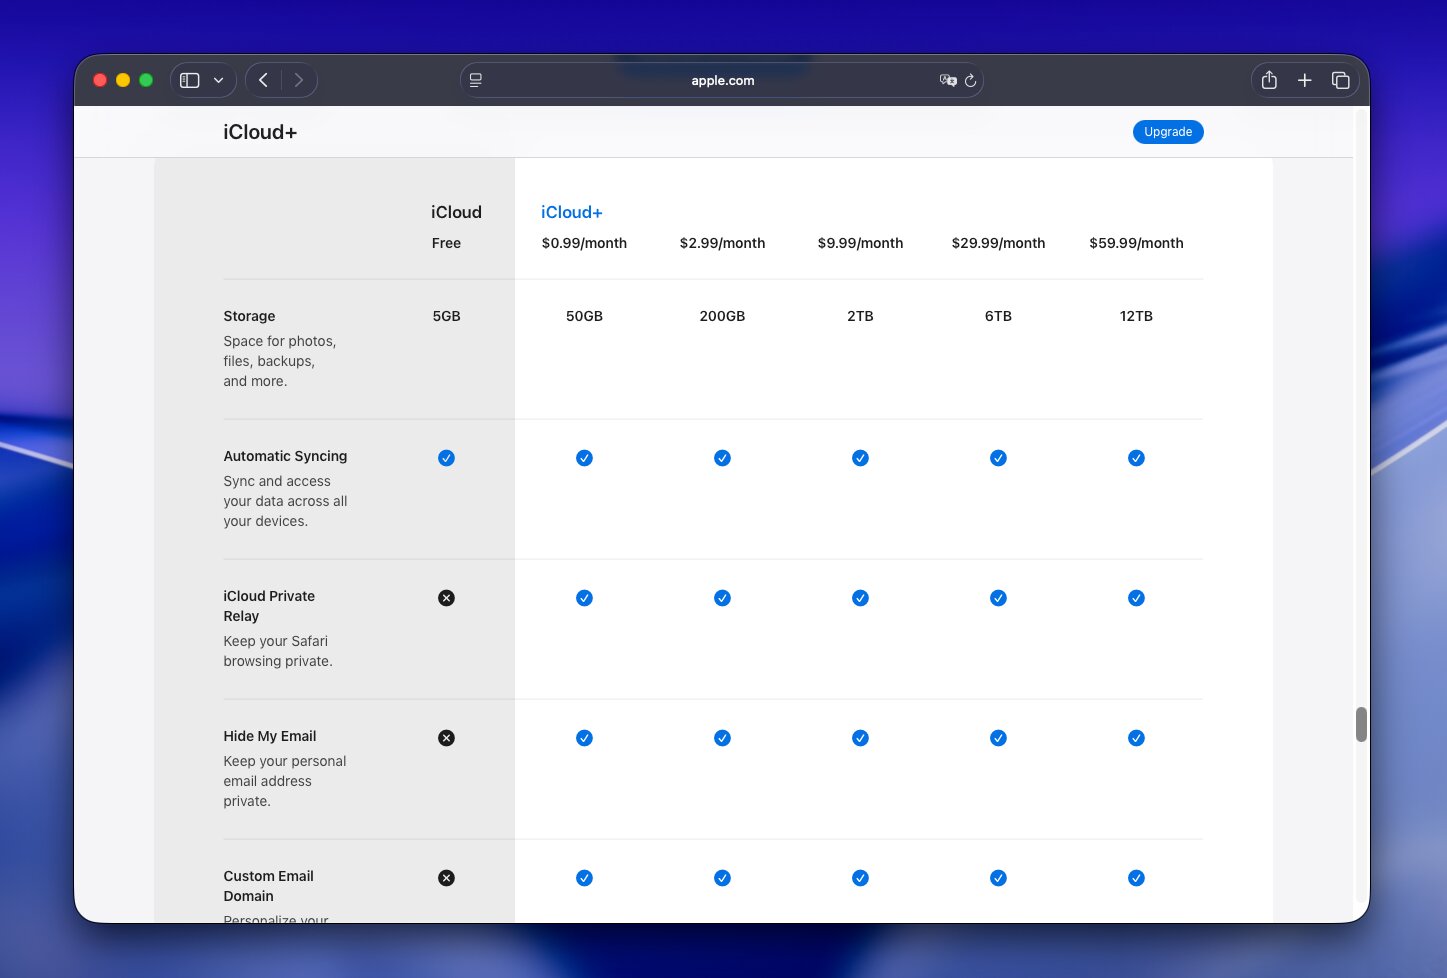
The prices listed above are for users in the United States. If you live in another country, you can find your price list here.
To subscribe to iCloud+ directly from your iPhone:
- Open Settings and tap your name/Apple Account at the top.
- Tap iCloud.
- Tap Upgrade to iCloud+.
- Choose the storage plan you want and follow the on-screen instructions to complete the purchase.
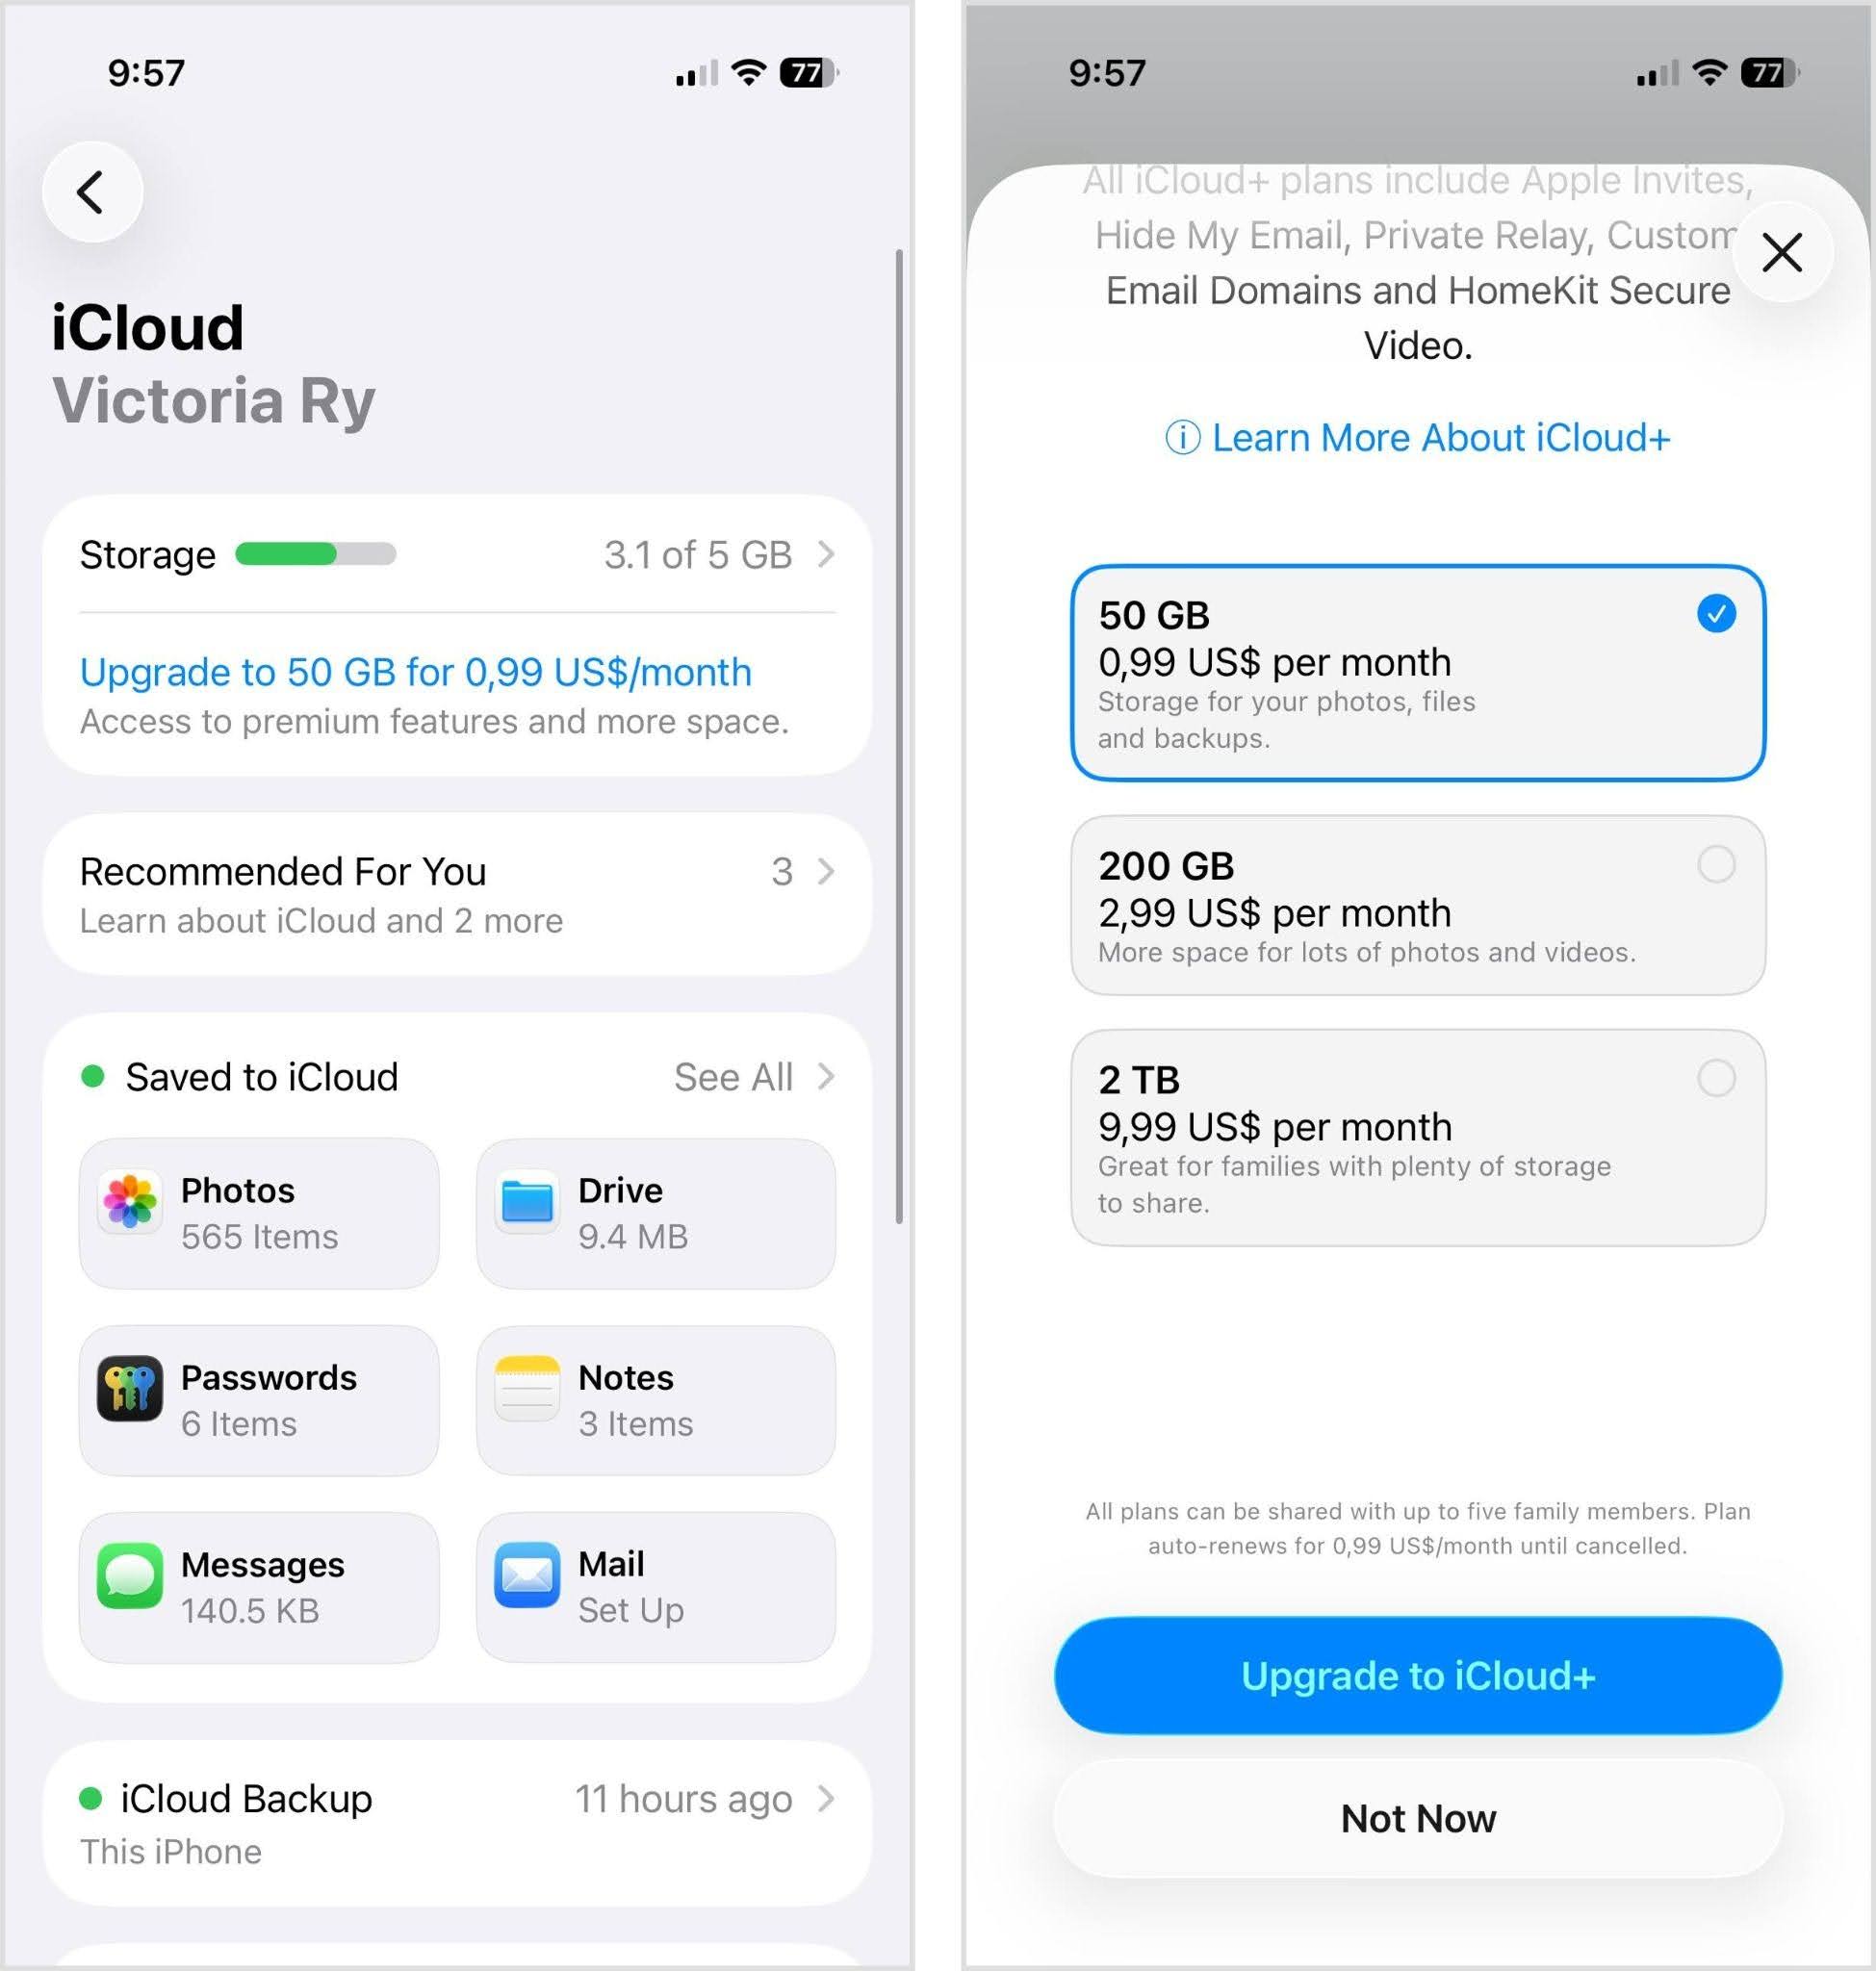
Paid plans can also be shared with up to five family members, which can make the larger tiers more practical if several people use Apple devices. For photos and videos, you can pair iCloud Photos with Optimize iPhone Storage. Full-resolution originals stay in iCloud, while your iPhone can keep smaller versions locally to reduce the amount of device storage your library uses.
Other services such as Google Photos, Google Drive, OneDrive, and Dropbox are also worth considering, especially if you already have a subscription or use non-Apple devices. However, they don’t integrate with iPhone storage management as closely as iCloud, and you may need to remove local copies manually after your files are safely uploaded.
Option 2: Use an External Storage Device
If you don’t want yet another monthly subscription, you can move large files to an external SSD, USB flash drive, SD card, or another compatible storage device. This doesn’t increase your iPhone’s built-in storage, but it gives you somewhere else to keep files that don’t need to constantly stay on the phone.
Recent iPhones (15 and up) with USB-C make the process even more convenient. Connect a compatible drive, open the Files app, and look for it under Locations. You can then copy or move supported files between your iPhone and the external drive. You can also export photos and videos from the Photos app directly to external storage.
This option will be useful if you:
- Have many large videos, RAW photos, or other media that takes up tens or hundreds of gigabytes.
- Want to keep older photos and videos without paying for a larger cloud storage plan.
- Regularly transfer files between your iPhone and Mac or PC.
- Travel or work somewhere with limited internet access and want your files available offline.
There are a few drawbacks. You need to carry the drive with you whenever you want access to those files, and external storage isn’t as seamlessly integrated with iOS as iCloud. Some drives may also require an adapter or additional power, particularly with older Lightning iPhones.
Prices for external SSDs and other storage devices have also risen recently, so the upfront cost can be noticeable. On the plus side, it’s generally a one-time purchase rather than a recurring monthly or yearly cloud storage fee.
Final Thoughts
More iPhone storage is always a plus for you. Even if you don’t immediately need it, enough free storage means you can continue to receive new messages, your device can perform better, and background processes such as iCloud sync can work properly.
So instead of waiting until your device is way too bloated to manage yourself, try purging unwanted data on a routine – like every week or two. And don’t just clean up your photos and videos! Make sure to manage your caches, attachments, and other files that tend to add up over time.
FAQ
How to add more storage to an iPhone without paying?
You can’t increase your iPhone’s built-in storage for free, so we recommend making better use of the space you already have. Start with unused apps, duplicate and similar photos, screenshots, large videos, downloads, and old Messages attachments. You can also offload apps or compress photos and videos to save space without losing the content you want to keep.
How do I get more storage on my iPhone without deleting anything?
To free up or get more storage without permanently deleting your files, you can:
- Offload unused apps, which removes the app itself but keeps its documents and data on your iPhone (Settings > General > iPhone Storage).
- Subscribe to iCloud+ with 50 GB, 200 GB, 2 TB, 6 TB, or 12 TB of cloud storage.
- Enable Optimize iPhone Storage with iCloud Photos so full-resolution originals can stay in iCloud while smaller versions remain on your iPhone.
- Compress large photos and videos to reduce how much local storage they use while keeping the content.
- Move files to an external SSD or USB drive if you want to keep them without relying on cloud storage.
What happens when iPhone storage is full?
When your iPhone storage is full, you may notice slower performance, problems installing iOS updates or new apps, failed downloads, and trouble taking new photos or videos. Some apps may also stop working properly because iOS needs free space for temporary files and other system processes.
Can iPhone storage capacity be increased?
When we’re talking about built-in iPhone storage, you can’t normally increase it after purchase. Hardware storage upgrades are difficult modifications that can cause problems with the device. However, you can get more space for your files through iCloud+ or another cloud service, or use an external storage device.
Why is my iPhone storage still full after deleting everything?
In most cases, people just forget to clear the Recently Deleted album, where deleted photos and videos can continue to take up space for up to 30 days. You may also have freed less storage than expected, or iOS may need some time to recalculate it. Storage reporting glitches can happen too, so restart your iPhone and check Settings > General > iPhone Storage again.
What is “Applications” in iPhone storage?
Applications is the space your apps use, including the apps themselves plus their documents, downloads, and cached data. If it’s one of the largest categories, deleting unused apps or clearing their stored data usually frees a lot of space.
What uses the most iPhone storage?
Everyone’s situation is different, but what we see most often is photos and videos, large apps and their cached data, Messages attachments, and downloaded media taking up the most iPhone storage. Photos can become especially large if you record lots of 4K video, keep Live Photos, or shoot in RAW. Apps such as social media, messengers, and streaming services can also build up several gigabytes of cache and downloaded content over time.
This article was written by Alejandro Santos, a Staff Writer at Handy Recovery Advisor.
Curious about our content creation process? Take a look at our Editor Guidelines.