
Reinstalling Windows 10 is necessary for many scenarios, such as addressing severe infections or corruption, cleaning your computer, or downgrading from Windows 11. However, your drive needs to be prepared in order to set up the operating system – that means your data may become collateral during the cleanup.
This article is a guide on how to reinstall Windows 10 without losing data. Below are 4 safe methods with step-by-step instructions to secure your data before and during reinstallation. Read on.
Can I Reinstall Windows 10 Without Losing Files?
Yes! It’s possible to reinstall Windows 10 without losing files. In fact, there are a few different ways a user can do it. However, the ideal method for each user depends on a couple of factors. To make it easier for you to figure out which method to use, we created a menu where you can jump to the recommended method for your specific case.
Before proceeding with reinstalling Windows 10, we strongly suggest you follow the backup section of this article first.
| Scenario | Method |
|---|---|
I can’t boot into Windows and I have a bootable flash drive (like a USB stick). |
|
I have Windows 10 Previous Versions. |
|
I don’t have Windows 10 Previous Versions and I don’t have a bootable drive. |
Method 4: Retrieve Data From Byte-to-Byte Backup – you’re required to do this step first. |
I can’t boot into Windows and I don’t have a bootable flash drive. |
If you suspect Windows 10 is malfunctioning due to physical damage to the system drive, then we highly suggest you send your device to a professional data recovery service and have them secure your data before your computer stops working. DIY attempts on a physically damaged drive will likely result in permanent data loss.
How to Back Up Data Before Windows 10 Reinstallation
Before proceeding with reinstallation, we highly suggest that you first create an image backup of your drive in case something goes wrong. As opposed to a regular backup, an image backup copies your entire drive byte-per-byte, including cache files and other easy-to-overlook data.
Our backup tool of choice for this demonstration is a data recovery software called Disk Drill Data Recovery. It’s not only powerful and easy to use, but its byte-to-byte backup feature is 100% free. We’ll also be using Disk Drill in one of the methods in the next section.
- Download and install Disk Drill for Windows, then launch it.
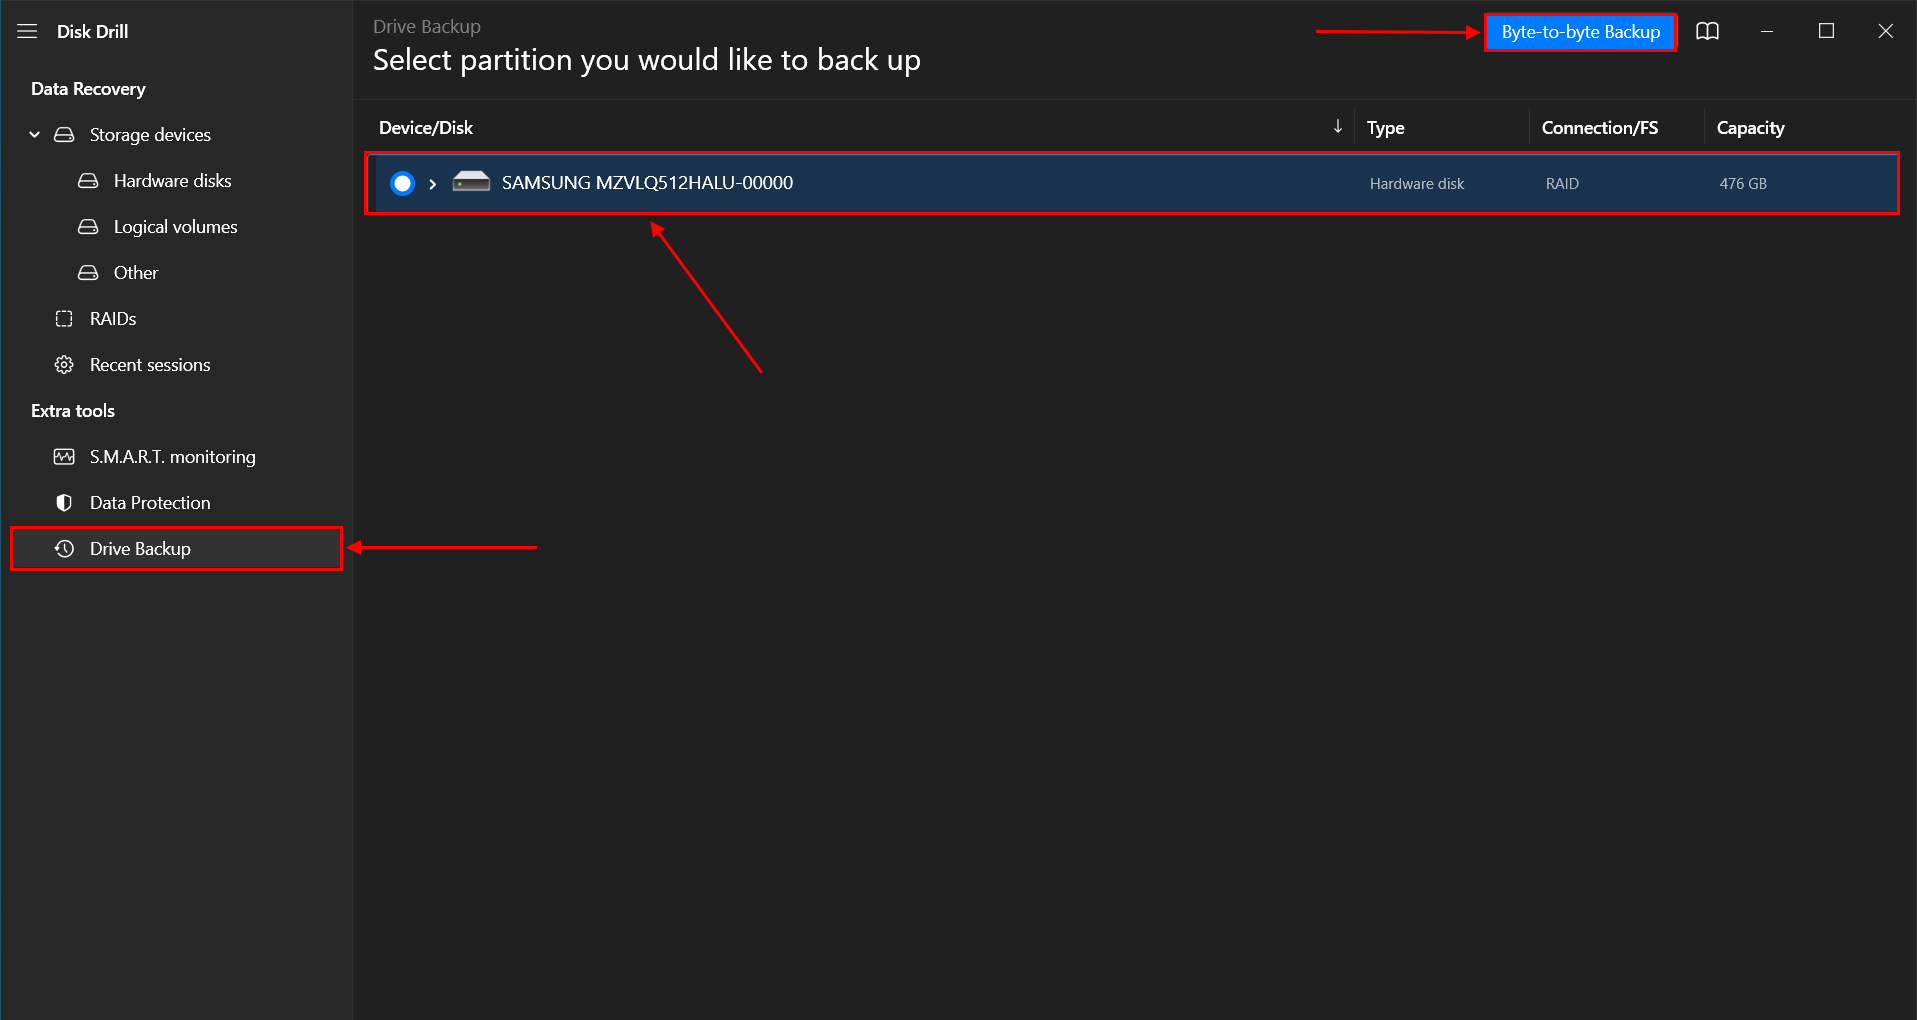
- On the left sidebar, click Drive Backup. Then, select your hard drive from the middle pane and click Byte-to-byte backup.
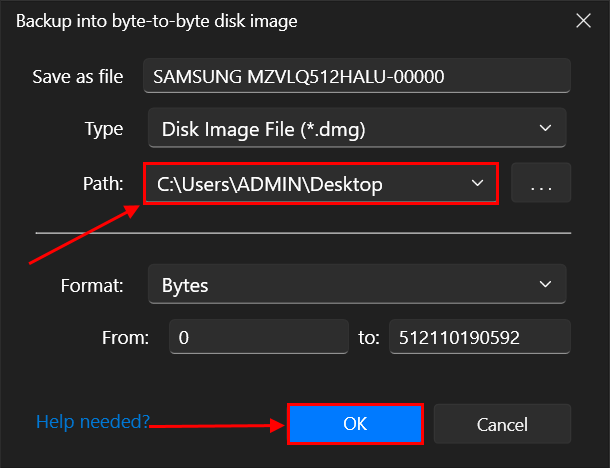
- In the dialogue box that appears, select a destination folder on a separate drive (like a USB stick) for your image backup file. Click OK to proceed.
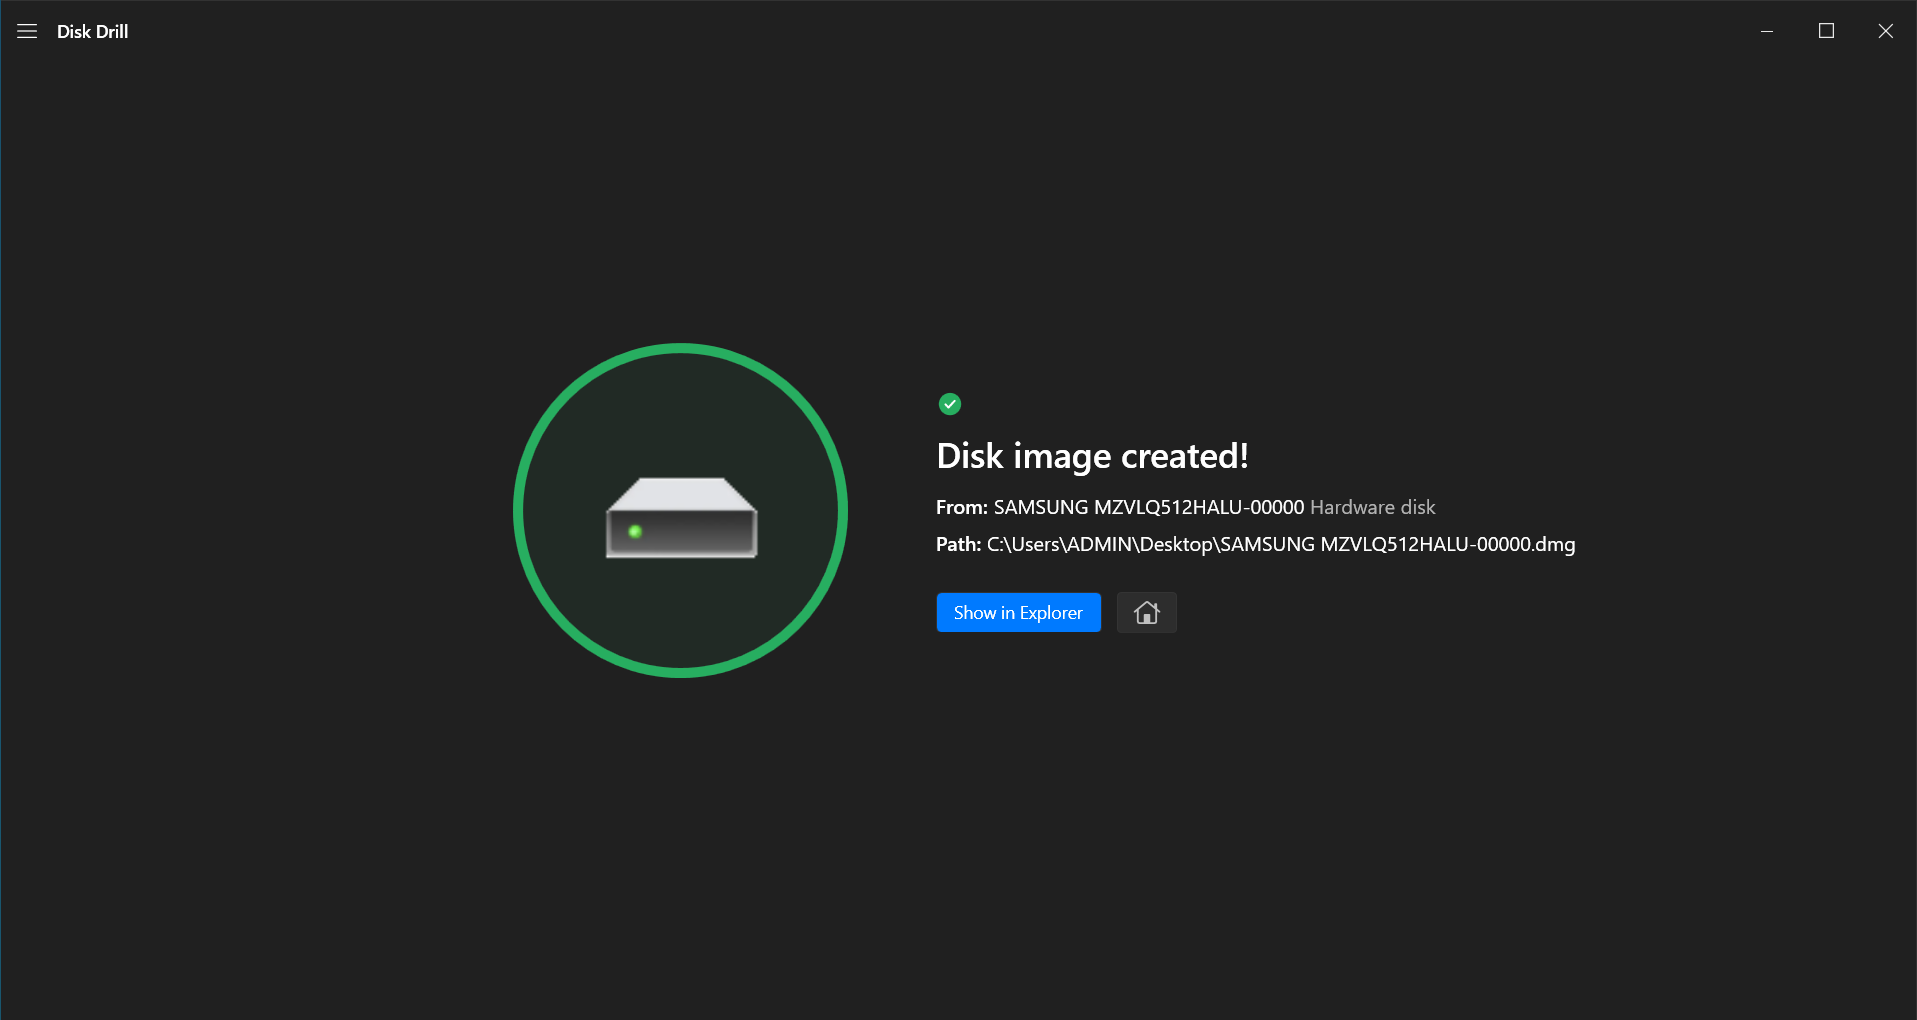
- Once the image creation is complete, you will see the screen below.
While Disk Drill’s image backup feature is free, recovery is free for only 500 MB. Disk Drill is an excellent software overall, but you can also choose to back up your files by copying and pasting them to a different drive. It’s just not going to be as comprehensive. For more info on Disk Drill, read our full Disk Drill review.
You can also use Disk Drill to recover files after a factory reset or for reinstalling Windows 10 without creating a backup, but this step ensures 100% recoverability.
How to Reinstall Windows 10 Without Losing Data
Below are 4 solutions that will allow you to reinstall Windows 10 without losing data. Whichever you choose should depend on your personal situation (we built you a menu here). We also highly recommend you read the last section if you haven’t, where we show you a reliable way to back up your data before proceeding with reinstallation.
Method 1: Repair Windows 10 from Installation Media
Method 1 is to use Windows installation media to perform a system restore on your computer. This process will repair Windows 10 without losing data, but it will clear out any recently installed apps or drivers (but you can opt to keep programs). However, you’ll need a flash drive to store the installation media and a working computer to install the tool on your drive. We’ll show you how to do it:
If you can boot into Windows on your computer, you don’t need a bootable drive. Follow this guide on your own PC but select ISO File in Step 6. Once the process is complete, right-click the ISO file and click Mount. Run setup.exe from the ISO and follow the wizard. On the “Choose what to keep” screen, you can opt to reinstall Windows 10 without losing apps or just keep your personal data.
- Connect your flash drive to a working computer.
- On the working computer, download the Windows Installation Media from Microsoft’s official website.
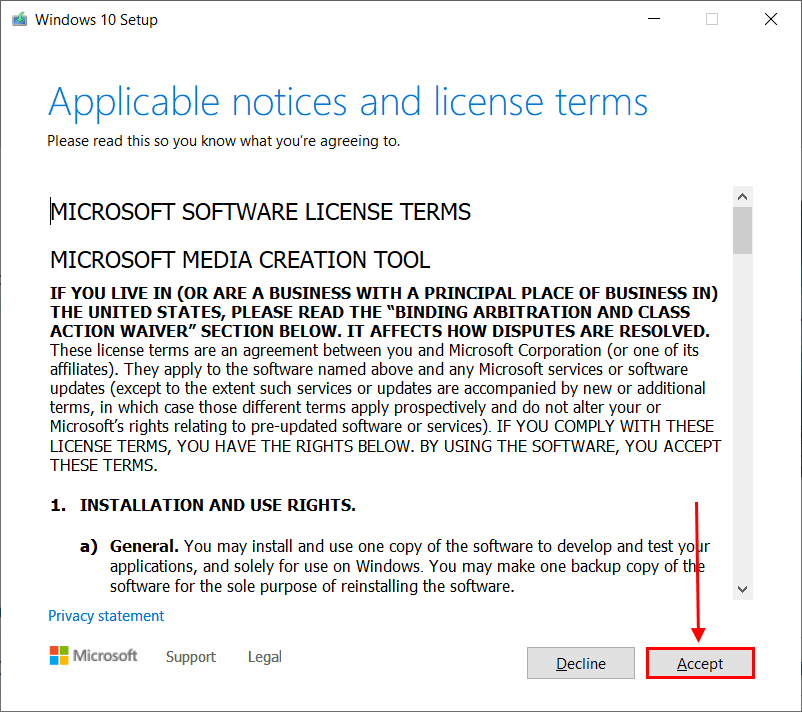
- Read the license terms and click Accept.
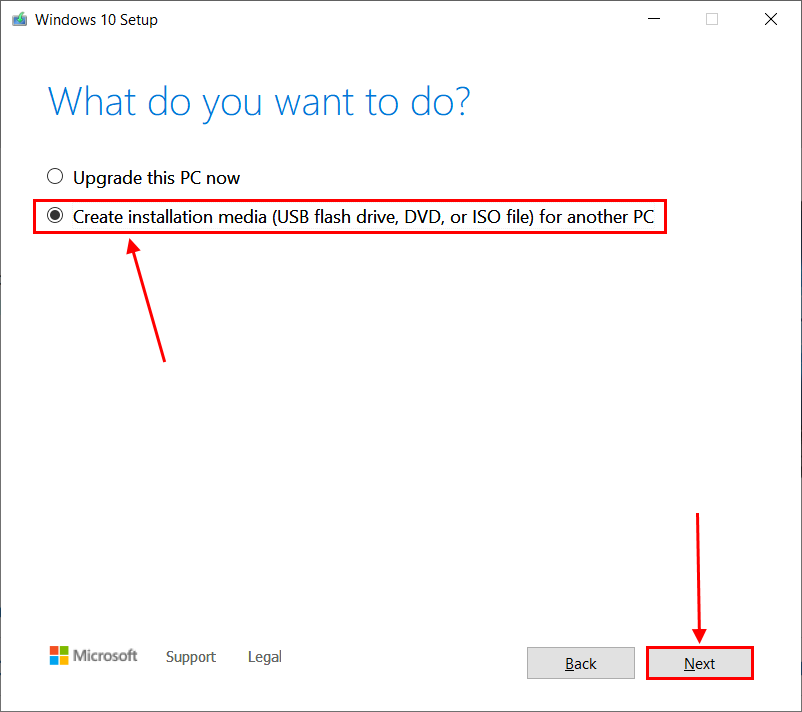
- Select Create installation media for another PC and click Next.
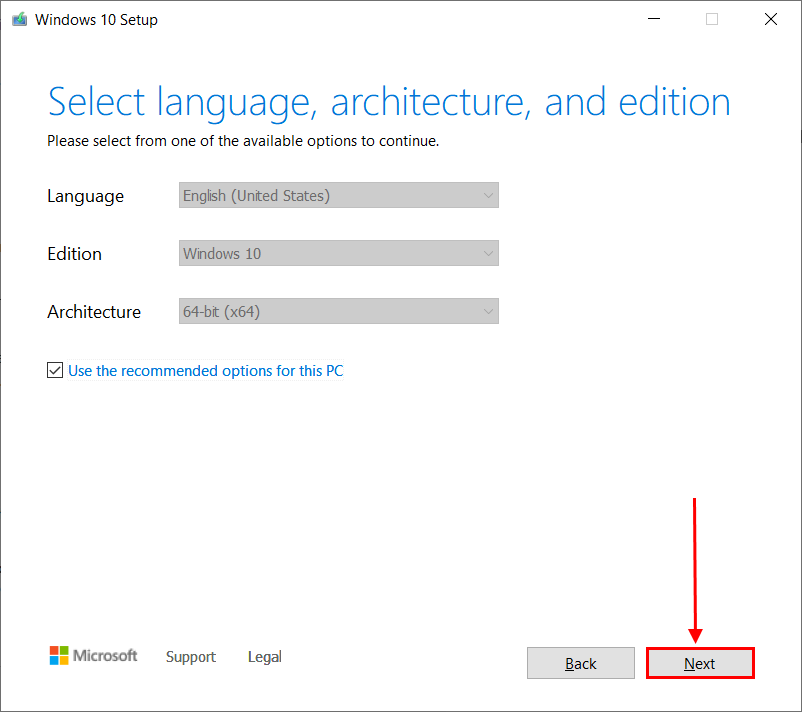
- Select your language, edition, and whether you want to install a 64-bit or 32-bit version of Windows. You can also allow Windows to recommend your settings. Then, click Next.
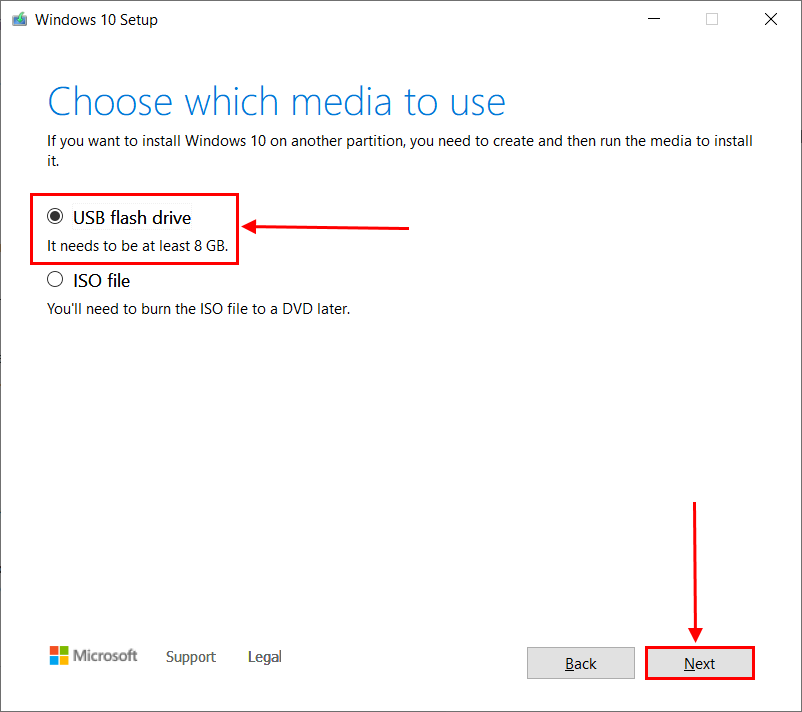
- Select USB flash drive and click Next.
- Select your flash drive and click Next.
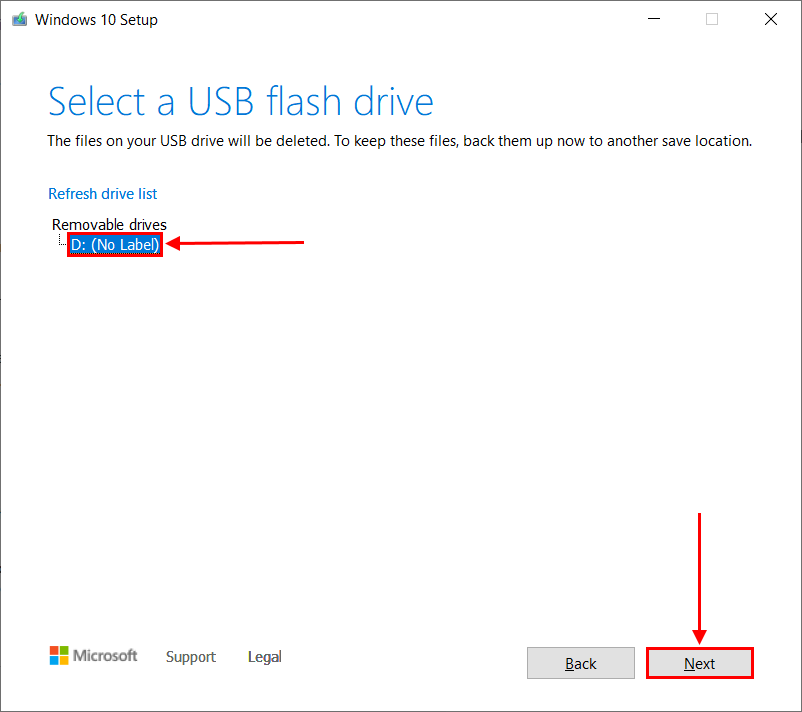
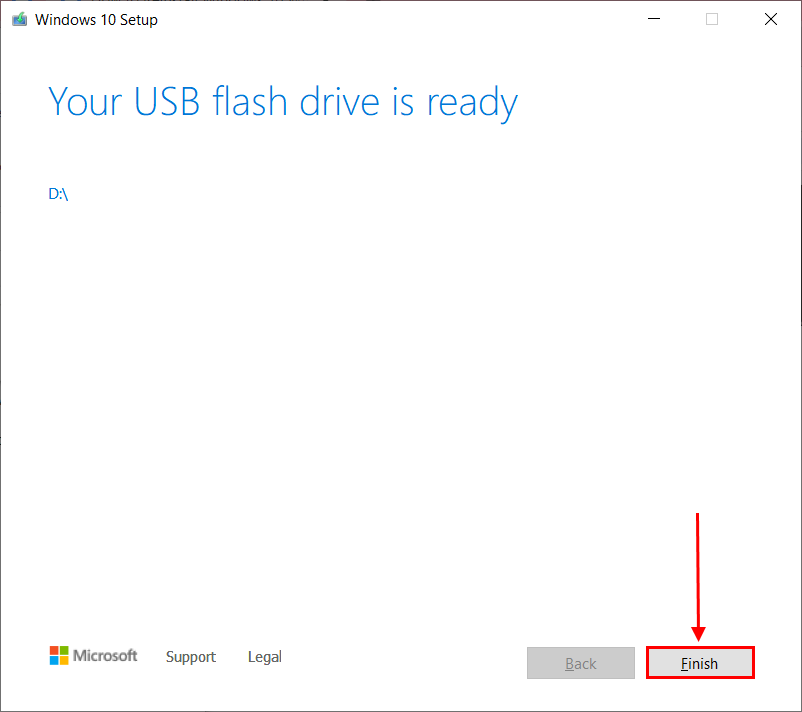
- Once the installation process is complete, click Finish.
- Safely eject your drive from the working computer and connect it to your non-booting PC. Then, turn it on.
- Your computer should automatically boot into the installation media. If it doesn’t, you’ll have to change your boot order – check your computer’s manufacturer’s website for directions. In the initial screen, set up your preferences and click Next.
- Click Repair your computer.
- Select Troubleshoot > Advanced Options, and click System Restore to proceed.
Method 2: Perform Startup Repair
If you can’t boot into the Windows environment and you don’t have a bootable flash drive to repair Windows, you can perform a Startup Repair. This built-in tool diagnoses and automatically fixes startup problems. Once you can boot into Windows, you can proceed to Method 4. To access Startup Repair:
If you are dealing with a problematic operating system, performing just this method will allow you to fix Windows 10 without reinstalling.
- Turn off your PC.
- Then, turn it on and hold the power button once you see anything show up on your screen. Do this one more time (total of 2x).
- On the third time powering up your PC, let it continue to start until you see the Automatic Repair screen.
- Click Advanced options > Troubleshoot > Advanced options > Startup Repair and follow the instructions.
Method 3: Recover Windows 10 Using Previous Versions/Reset This PC
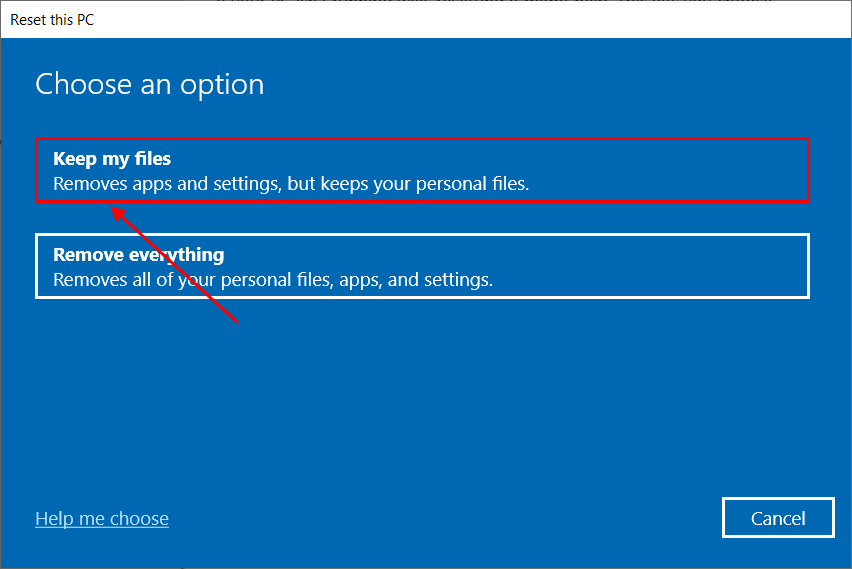
Windows has a built-in tool that allows users to reverse any changes to the operating system that caused problems. To do this, it rolls back your PC and removes recently installed apps and settings but keeps your personal files. Here’s how to use it:
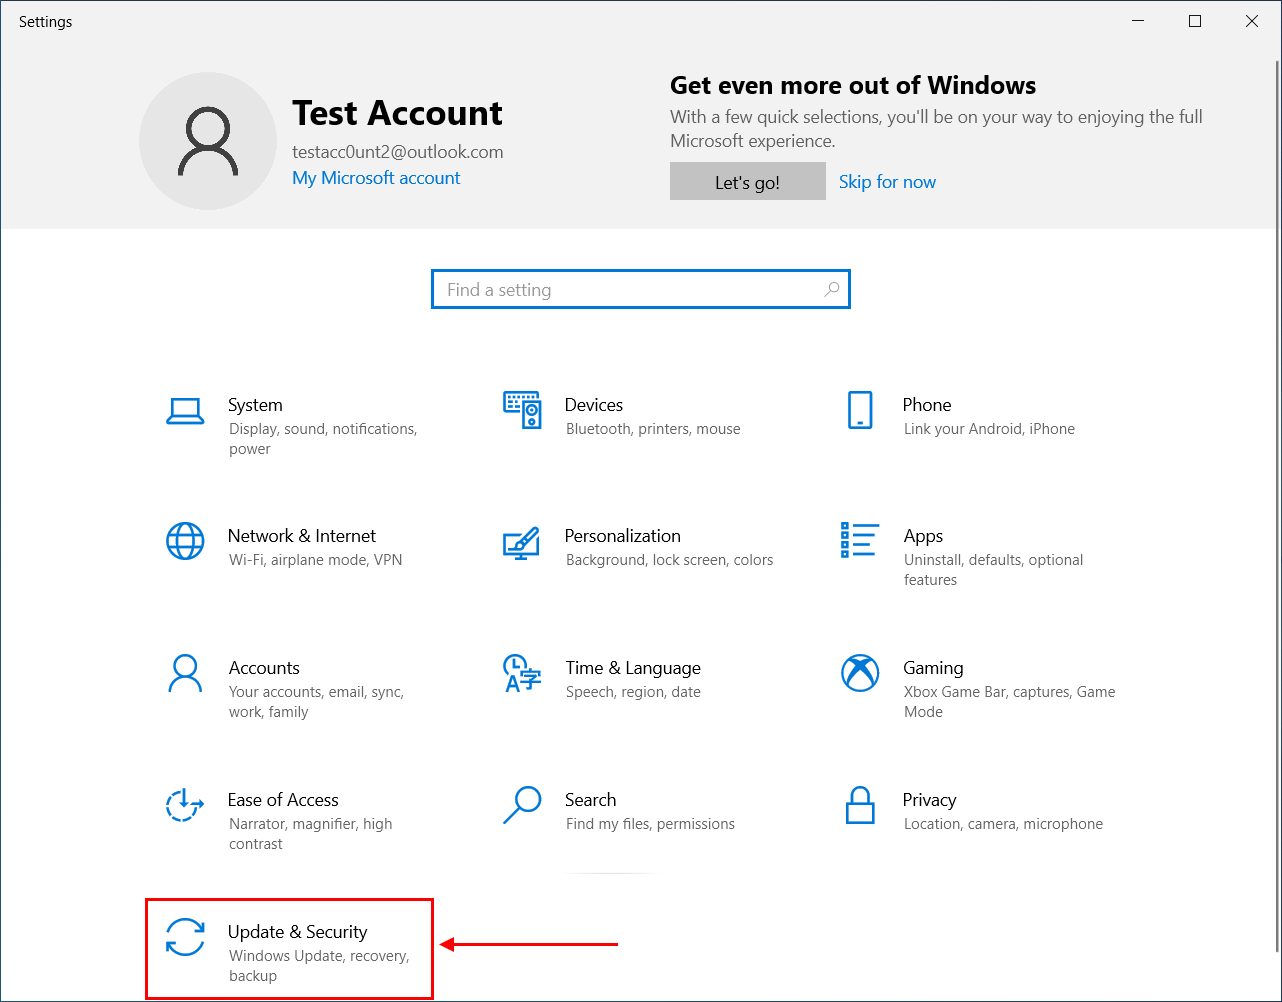
- Hit the Windows + X keys and click Settings.
- Select Update & Security.
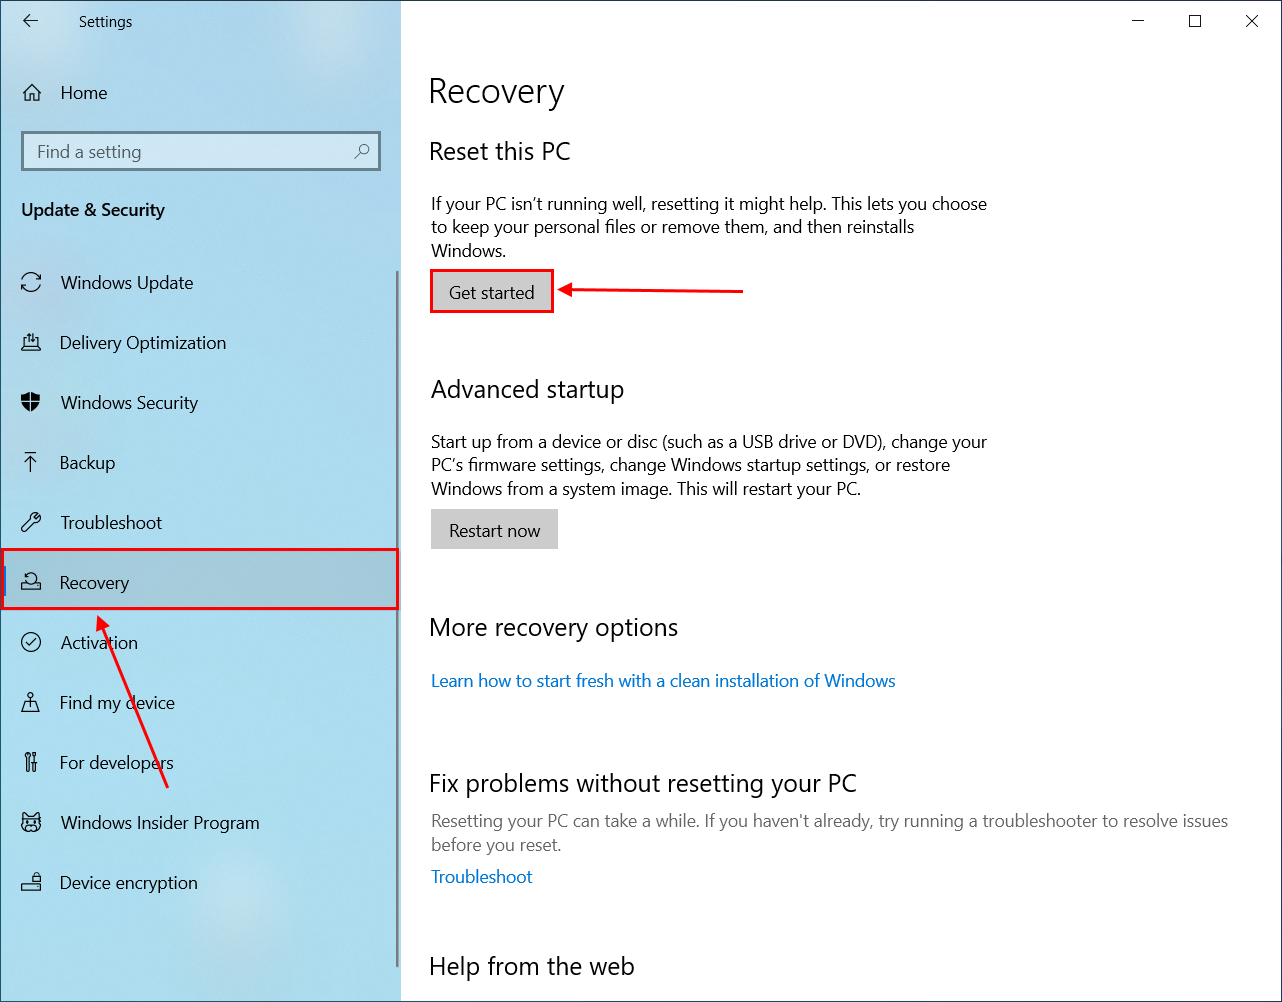
- Select Recovery on the left side bar and click Get Started under Reset this PC (or Go back to the previous version of Windows 10).
- Select Keep my files.
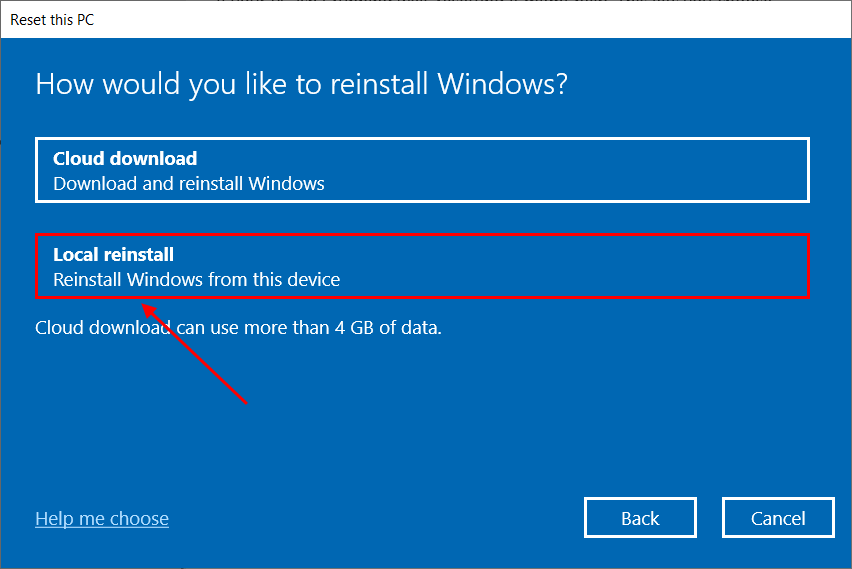
- Select Local reinstall.
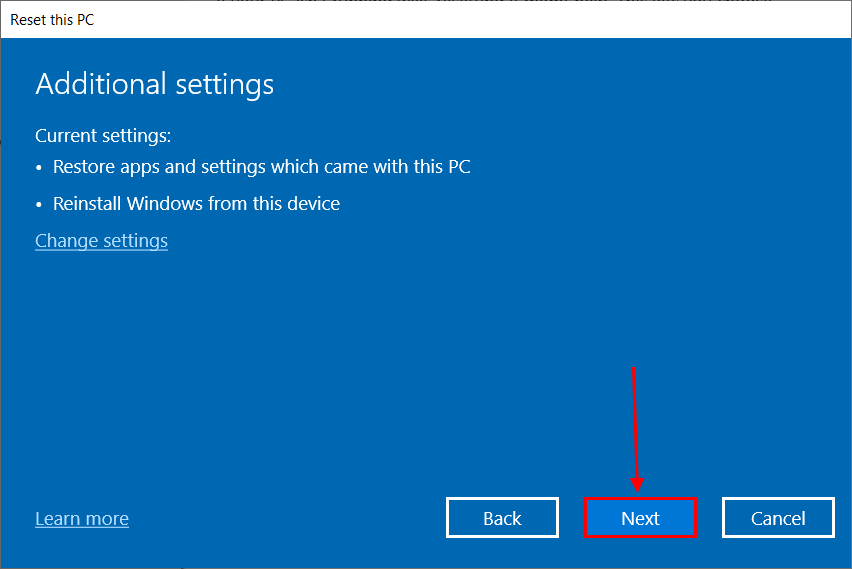
- Click Next and follow the wizard to reinstall Windows 10 on your PC.
Method 4: Install Another Windows Copy Side-by-side
If you’re currently running Windows on a healthy drive with enough space, you can install a new version of Windows on that same drive. Once you’ve got your new operating system up and running, you can simply get rid of the old Windows installation to free up space again.
You’ll even get to bring all your important files. But this is a multi-step process and there are a few things you need to prepare: (1) an external storage device that can store ALL your old data (both personal and system files) and (2) a USB stick with 8 GB of free space or more.
This is an excellent solution if you want a true fresh install of Windows without losing any of your data. Once you’re ready, begin with Step 1.
Step 1: Back Up Your System
To back up your system using Windows Backup and Restore tool:
- Connect an external storage device to your PC, ensuring it has enough space to store a system image of your PC (equivalent to your “used disk space”).
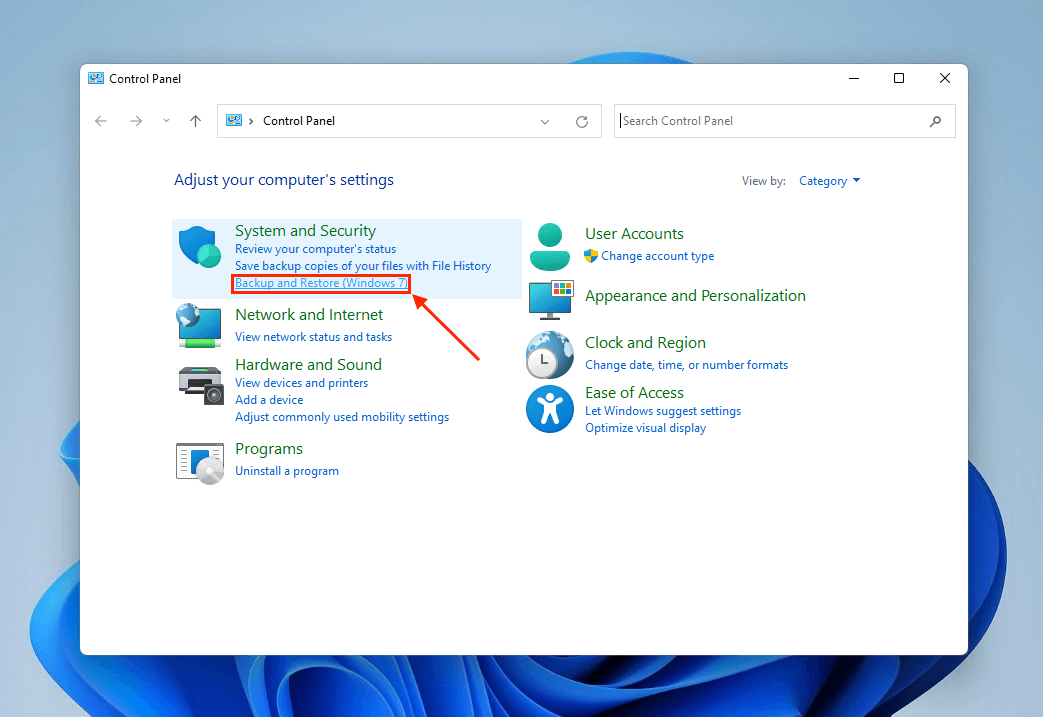
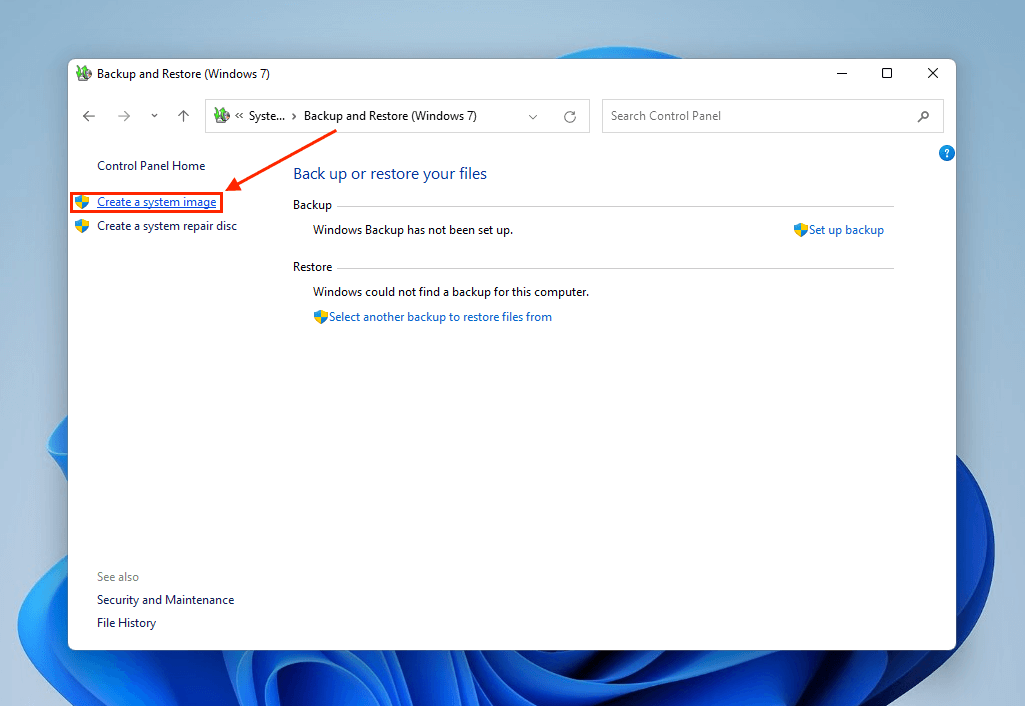
- Open Control Panel (from the Windows search menu). Then, under System and Security, click Backup and Restore (Windows 7).
- In the left sidebar, click Create a system image.
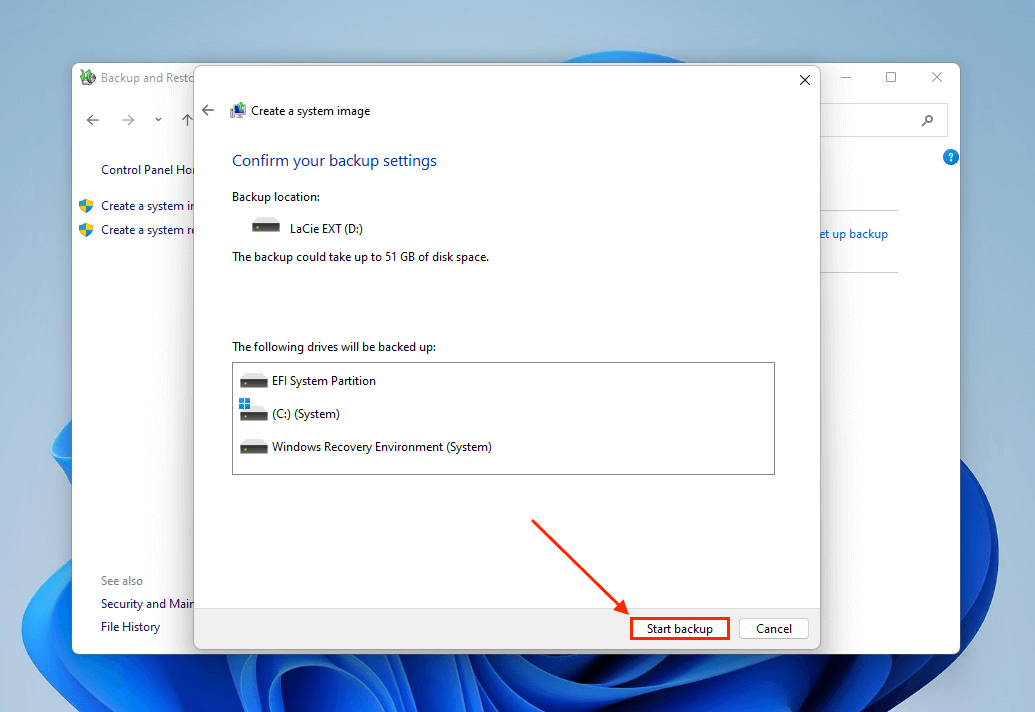
- Choose On a hard disk and use the dropdown menu to select the drive you connected in step 1. Then, click Next.
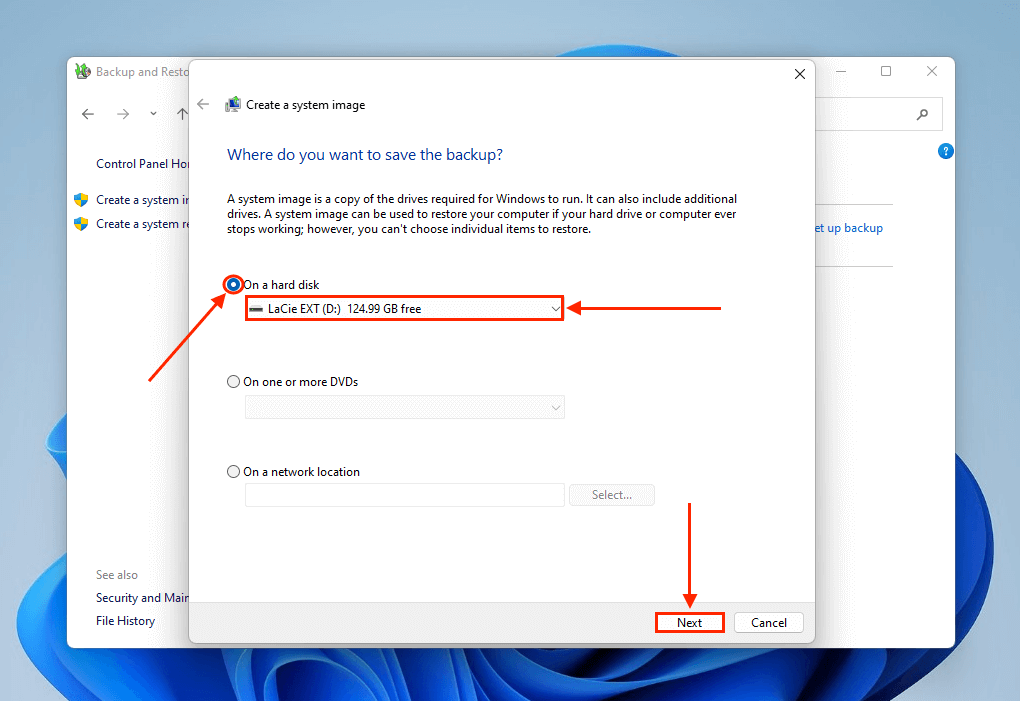
- Click Start backup.
Step 2: Create a Partition for the New Windows Installation
To create a new partition using Disk Management:
- Open Disk Management (search “Disk Management” from the Start menu – sometimes labeled “Create and format hard disk partitions”). Then, right-click your system partition (where your current Windows system is installed – usually C:) and click Shrink Volume…
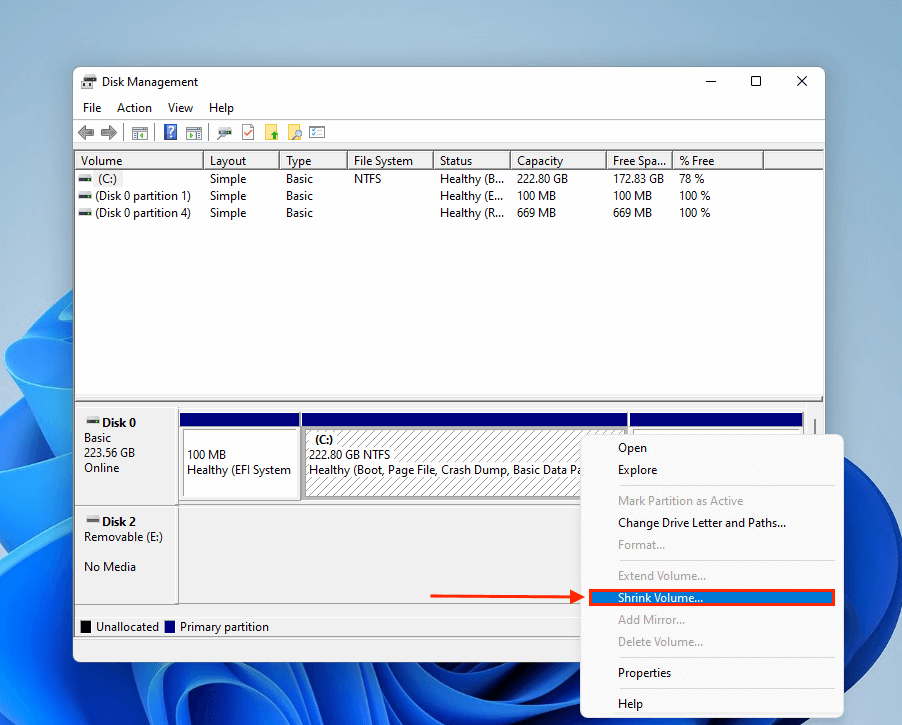
- In the field beside Enter the amount of space to shrink in MB, enter the following value: (your system image size in MB + 20000 MB for Windows 10 + 10000 MB extra space). For example: my system image is about 51000. Adding the rest of the values, I’ll input 81000. Done? Click Shrink.
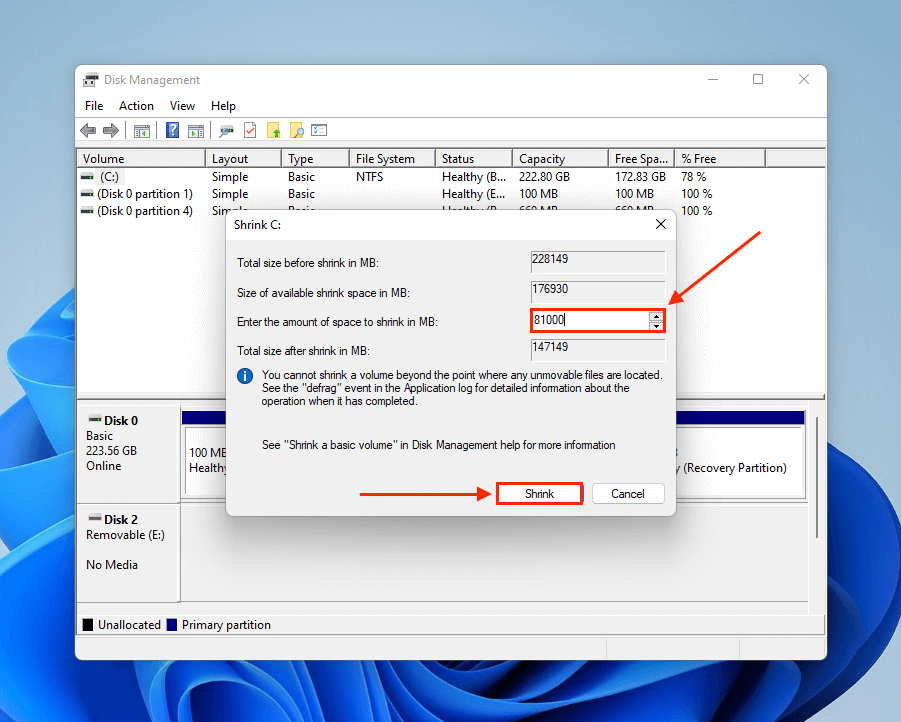
Make sure you remember to take note of which disk the new partition is located (usually it’s Disk 0) and remember how much space is allocated to it. This information will be useful when you reinstall Windows.
Step 3: Create a Bootable Windows Installation and Install It
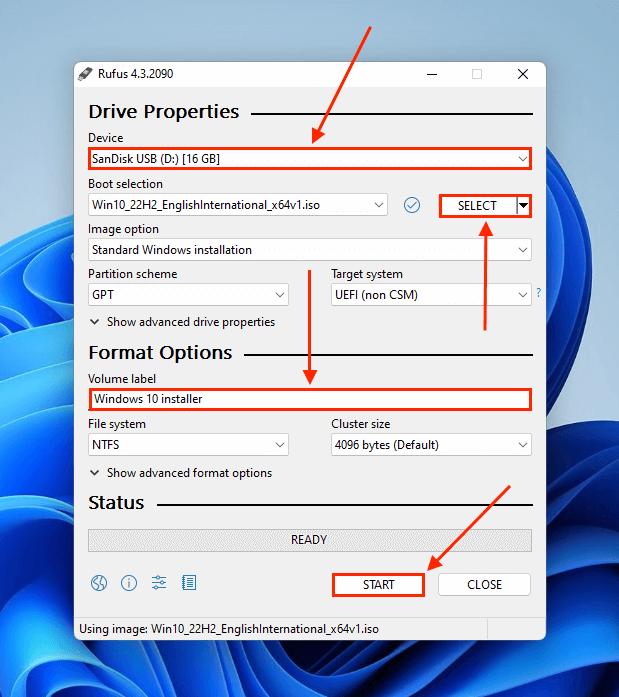
To create a bootable Windows installation using Rufus:
- Download the Windows installation ISO file you want. Here’s the page for Windows 10 2023 Update Version 22H2.
- Connect a storage device to your PC, ensuring it has enough space to store the Windows 10 installer
- Download and install Rufus.
- Open Rufus. Under Device, use the dropdown menu to select the drive you connected in step 2. Under Boot selection, click SELECT and choose the ISO you downloaded in step 1. Enter a Volume label and click START.
Once you’ve created the installer, shut down your computer and proceed with the next section.
Step 4: Install the New Windows System
To install the new instance of Windows on the partition:
The steps may vary slightly depending on the brand and model of your computer and the Windows version you choose to install. However, the process is very similar in most scenarios.
- Connect your USB installer to your computer.
- Open it and immediately press your machine’s boot menu hotkey. In the boot menu, choose to boot from your Windows USB – this should start the installer.
- Select your language, Time and currency format, and Keyboard or input method. Then, click Next.
- Click Install now (you may be asked to enter the product key and accept the License terms).
- Click Custom: Install Windows only (advanced).
- Select the NEW partition you created in Step 2 of this method guide. The value under Free space should be the same as the value you entered in the partitioning guide. Then, click New.
- At this point, the installation process will begin. Your computer will reboot a few times. Once it reboots into your old Windows instance, shut it down.
- Open your PC again and, using your specific computer model’s BIOS key, boot into the BIOS menu.
- Navigate to the Boot section and move your new partition (which contains the new Windows installation) to the top of the list. Then, save your settings and exit BIOS.
- Your computer should now boot into your new operating by default. Follow the setup wizard and safely eject your USB installer once done.
At this point, you can delete the old Windows partition using the Disk Management tool to free up space. You can also “move” your data to the new operating system by restoring the image backup you created in Step 1 of this guide.
To restore the image backup, open Control Panel > System and Security > Backup and Restore (Windows 7) > Restore section > Restore my files.
Method 5: Retrieve Data from Byte-to-Byte Backup
If you performed a byte-to-byte backup by following this guide at the beginning of the article, you can easily restore your data after formatting your computer, even if you don’t use any of the other methods we went through above and even after a fresh install of Windows 10 or 11. This applies to any backup tool and recovery tools you used.
However, because Disk Drill creates an image backup and not just a file backup, you can reinstall Windows 10 without losing programs as well as your personal data. For this task, we’ll use the data recovery function of Disk Drill and set the image backup file as our recovery target. Here’s how:
You can also use Disk Drill to recover your data after reinstalling Windows even if you don’t create a backup. Just set your system drive as the recovery target in the drive selection screen of the Disk Drill app and make sure to save the recovered data in a different drive to avoid overwriting. However, creating a byte-to-byte backup ensures 100% recoverability, while this method does not.
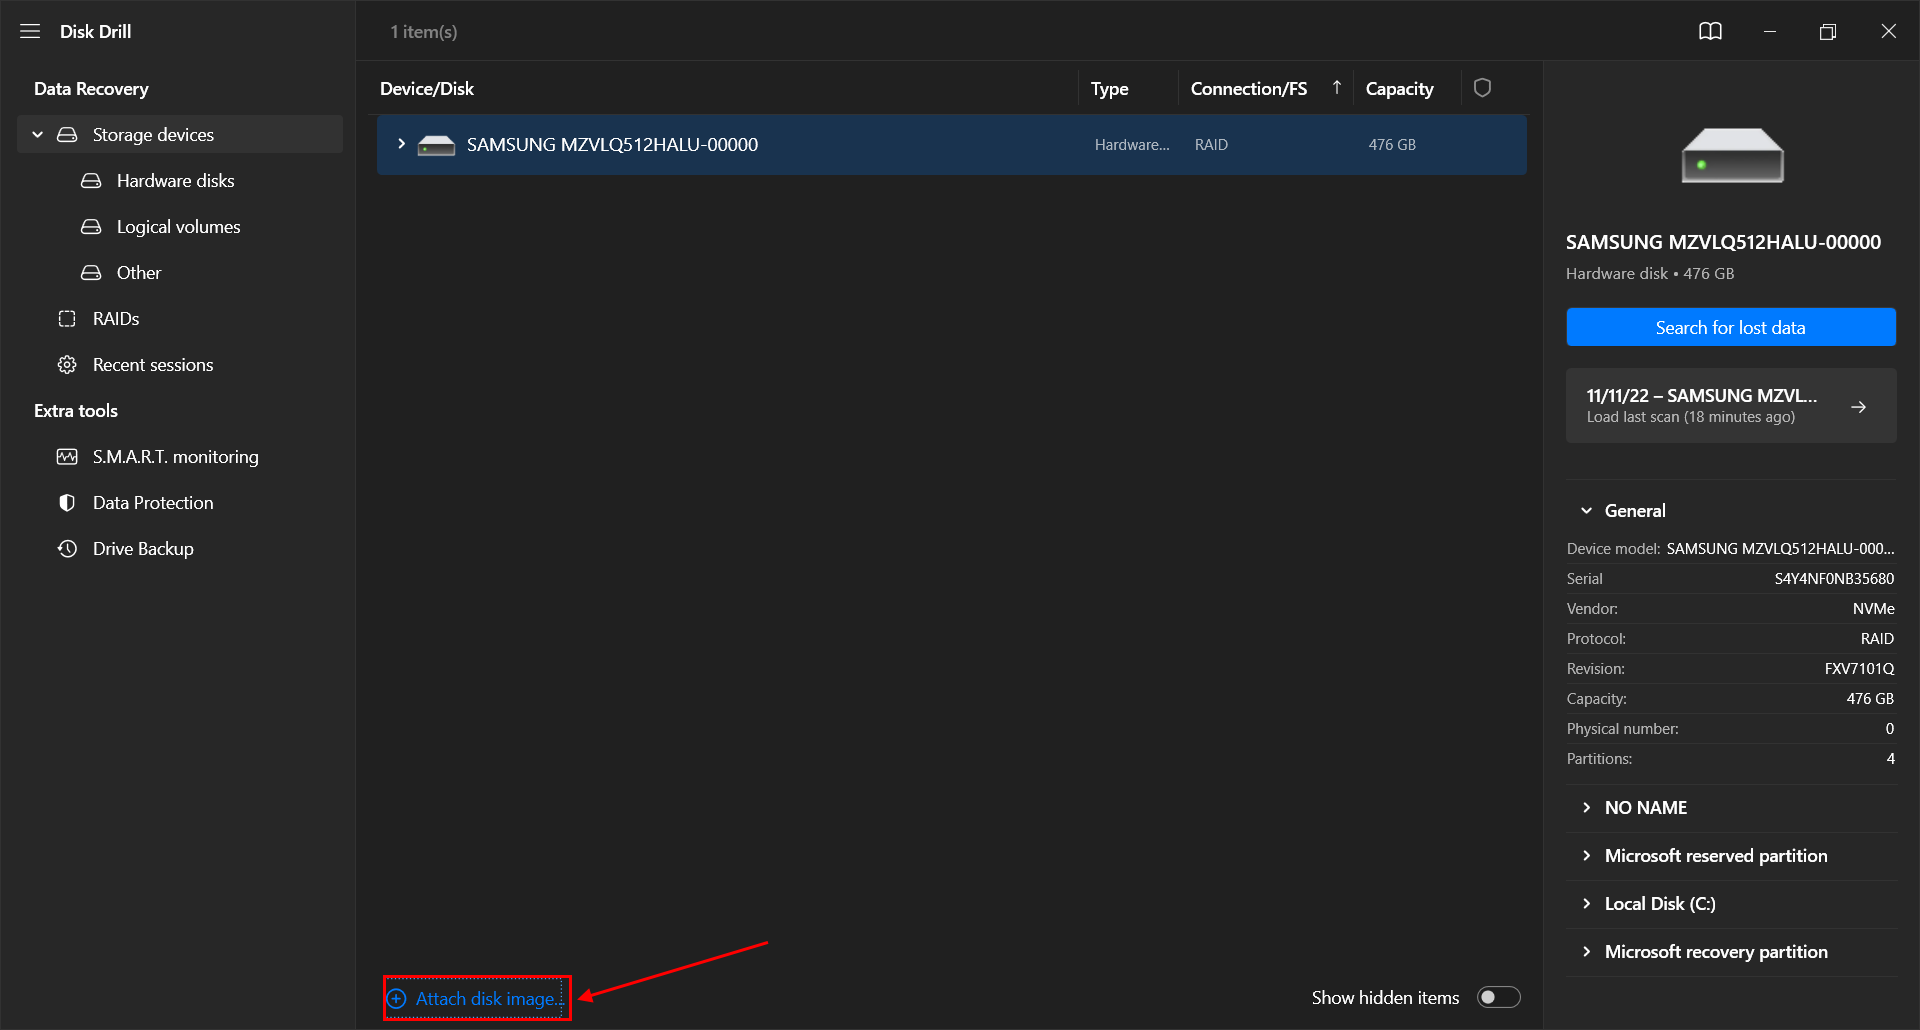
- Launch the Disk Drill app.
- At the bottom of the main window, click Attach disk image…
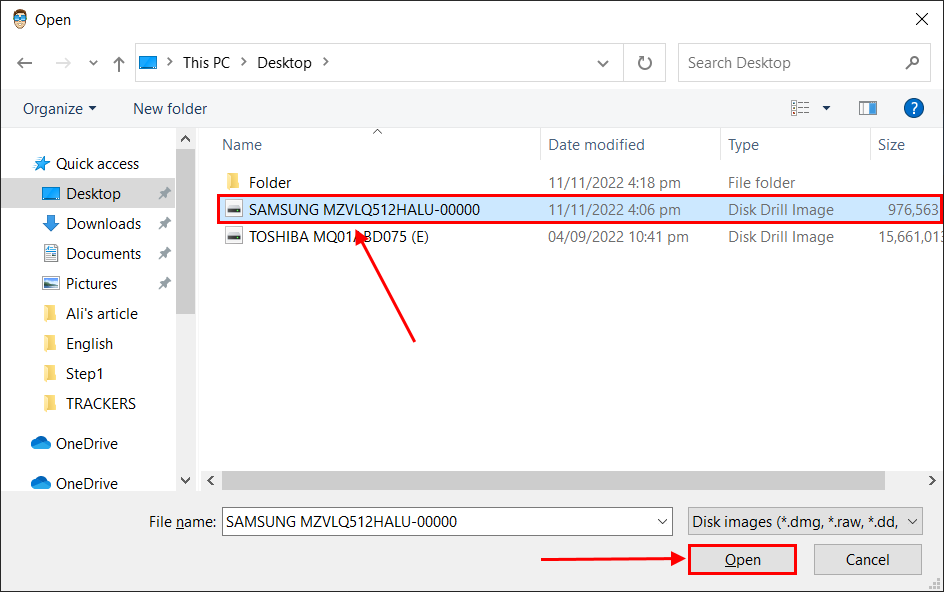
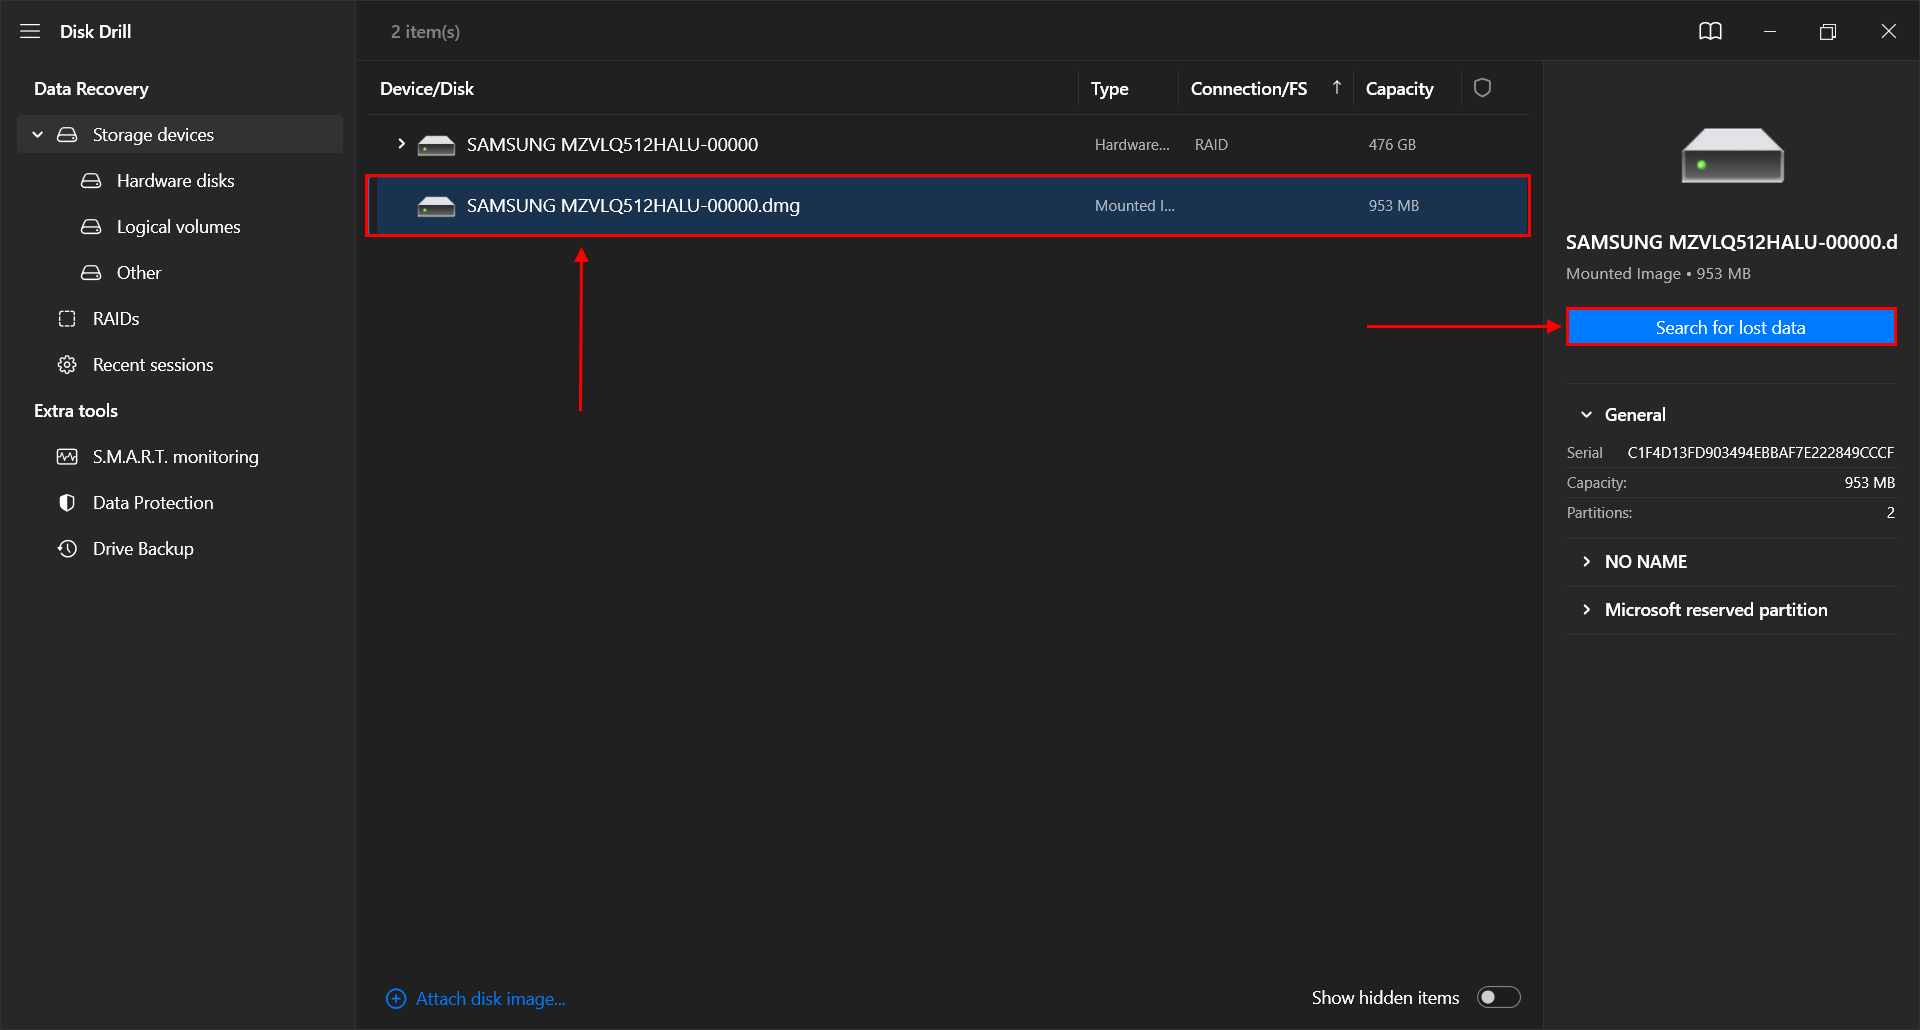
- Locate the image backup file we created earlier in the article and select it. Then, click Choose.
- Select your image backup from the main window and click Search for lost data.
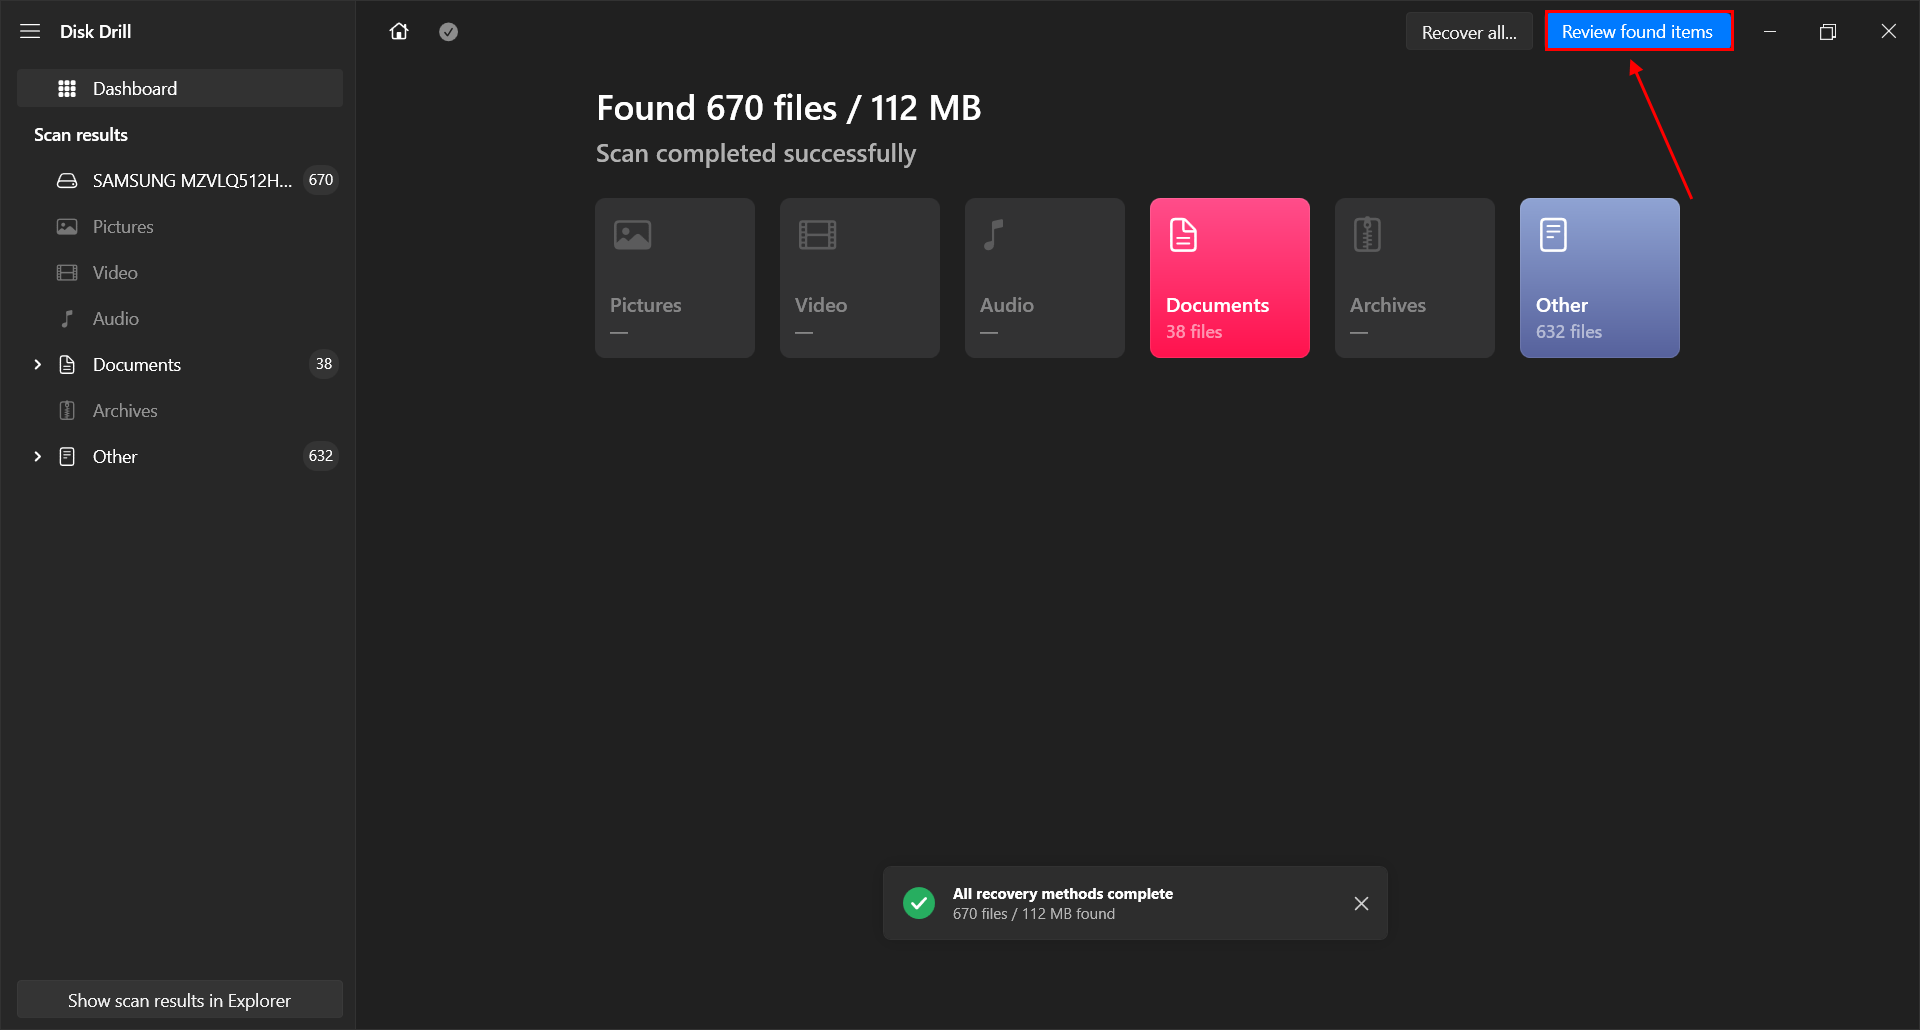
- Wait for Disk Drill to complete its scan. Then, click Review found items.
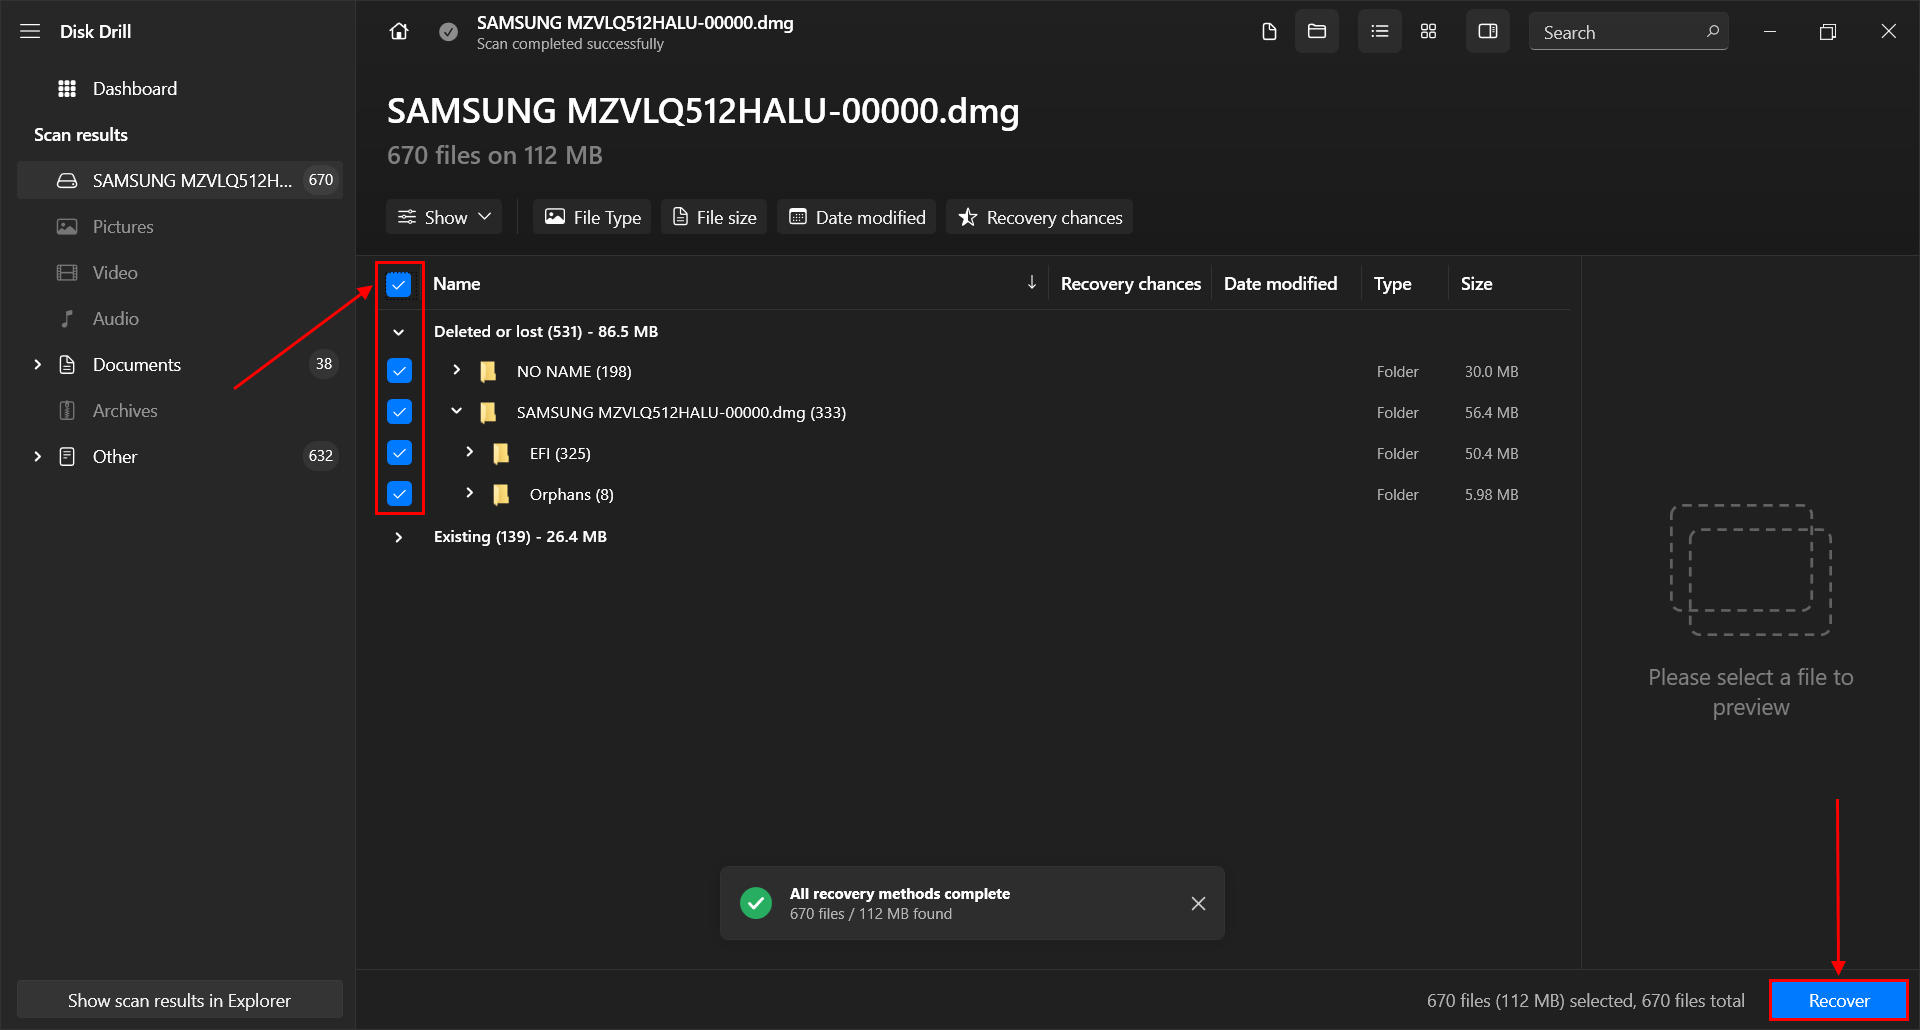
- Disk Drill can usually recover data with original folder structure (especially from a backup), so you can review files and folders the same way as you would in Explorer. If you use the search bar in the top-right corner, you can recover deleted files by name or extension. Select your files one by one by ticking the boxes in the leftmost column or tick the box beside the Name category to select everything. Then, click Recover.
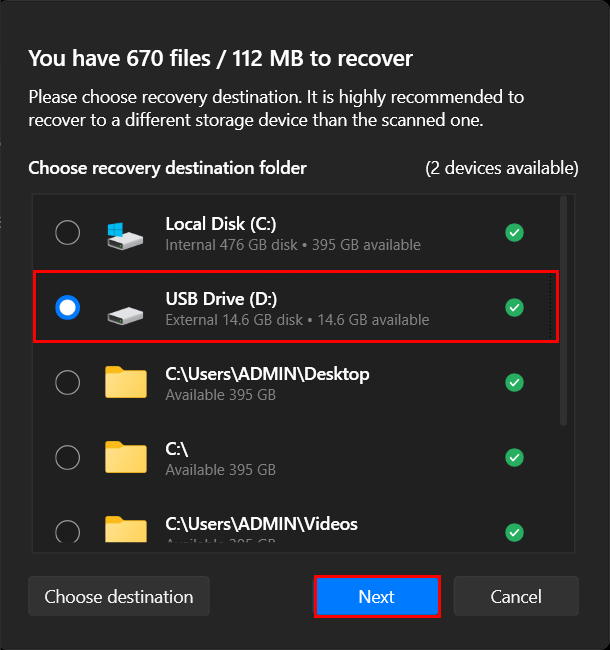
- Select a destination folder for your recovered files and click Next to proceed with the recovery.
Method 6: Repair Windows 10 System Files Without Losing Data
A fresh install isn’t always needed to fix Windows even if it’s misbehaving. Instead, you can try certain tools that help you fix even severe problems without having to reinstall Windows and lose your data.
Specifically, you can use the DISM and SFC tools, which are built-in Windows utilities you can access through Command Prompt. While DISM services any Windows images, SFC will fix most instances of file system corruption.
Together, they may be able to get your version of Windows back to optimal performance.
To repair Windows using DISM:
- Open Command Prompt as administrator (from the Start menu).
- Type the following command and hit Enter:
DISM /Online /Cleanup-Image /ScanHealth
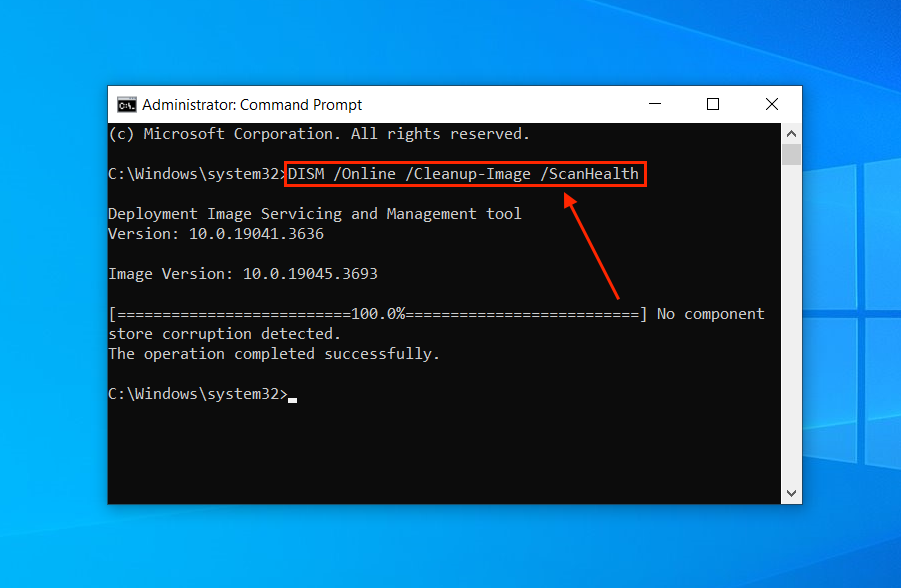
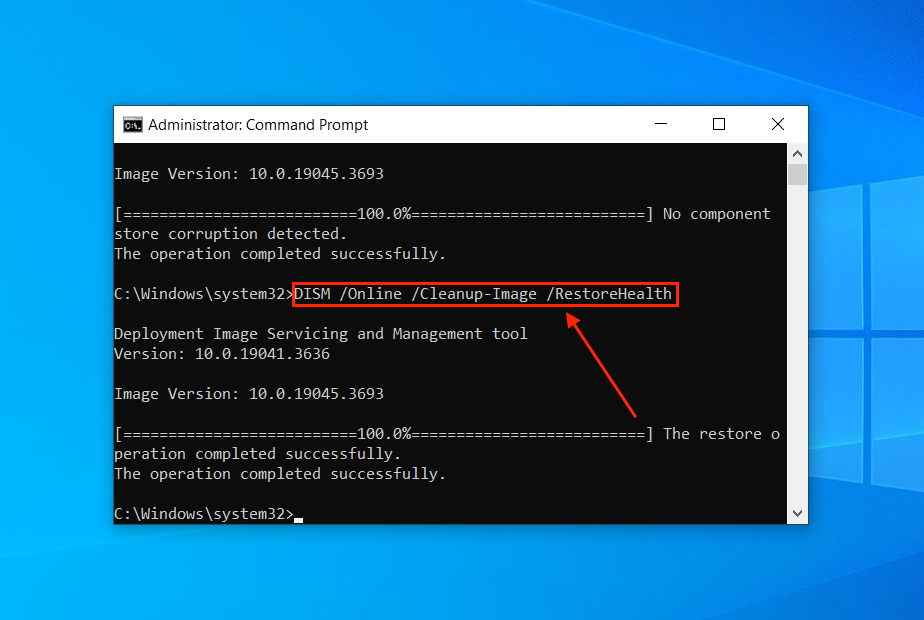
- If DISM finds any problems, type the following command and hit Enter:
DISM /Online /Cleanup-Image /RestoreHealth
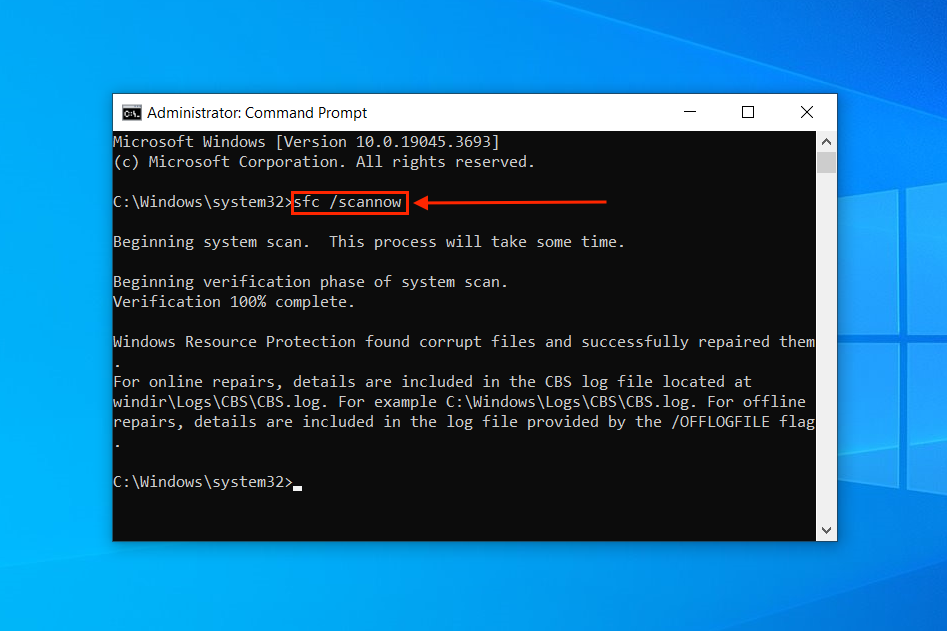
To repair Windows using SFC:
- Open the command prompt as administrator (from the Start menu).
- Type the following command and hit Enter:
sfc /scannow
FAQ
Does reinstalling Windows delete files?
In most cases, yes. However, there are ways to avoid losing your files when reinstalling Windows:
- Repair Windows 10 with installation media.
- Perform Startup Repair and create a backup.
- Recover Windows 10 Using Previous Versions/Reset This PC.
- Retrieve your data from a backup.
How do I reinstall Windows 10 without losing programs?
To reinstall Windows 10 without losing programs, we recommend these 2 methods:
- Use the Windows Backup and Restore tool to create a system image of your drive. Then, install a new Windows installation on a different partition and use the Backup and Restore tool to restore the system image you created earlier.
- Download a third-party backup tool to create an image backup of your system drive and restore it after installing a new instance of Windows 10.
How do I reinstall Windows 10 with a bootable USB?
To reinstall Windows 10 with a bootable USB, download the Windows installation media from Microsoft’s official website on a working computer. Follow the wizard to prepare your USB. Once the process is complete, connect your USB to your non-booting computer and select Repair your computer > Troubleshoot > Advanced Options > System Restore.
How do I restore a Windows 10 profile from a backup?
To restore a Windows 10 profile from a backup created with Windows Backup and Restore tool, hit the Windows + X keys > Settings > Update and Security. Select Backup from the left sidebar and click Go to Backup and Restore (Windows 7). You should find your backup data under the Restore section. By default, Windows backs up your profiles whenever you use this tool to create a backup – so restoring your backups should restore your profiles.
How to reset Windows 10 without losing data using Command Prompt?
Click the Start button and type cmd in the search bar. Right-click the Command Prompt app and select Run as administrator. Then, type the following command and hit Enter:
systemreset -factoryreset
In the initial window, select Keep my files and follow the wizard to proceed with resetting Windows.
How to reinstall Windows 10 from BIOS?
To reinstall Windows 10 from BIOS, perform the following steps:
- Download a Windows 10 installer ISO from the Microsoft website.
- Create a bootable USB using the Windows 10 installer and a utility like Rufus.
- Boot your computer from the USB.
- Use the Windows 10 installer media to install Windows.
Are there any tools to repair Windows 10 without losing data?
Yes, there are multiple tools to repair Windows 10 without losing data:
- Windows 10 installation media repair tool
- Windows Startup Repair
- DISM and SFC commands via Command Prompt
Alternatively, you can create a backup of your system and restore it on a fresh Windows 10 installation (we recommend Windows’ own’ backup and restore tool in Control Panel’s System and Security menu or use a third-party app to create a system image backup).
Conclusion
The process of reinstalling Windows 10 will usually wipe your data – however, as we discussed in this article, it’s possible to do it without losing any data. You’ll just have to take a few extra steps to secure your files. For even more security, we strongly urge our readers to routinely create both image and file backups on external storage devices and in the cloud. There are a lot of factors out of the user’s control that can cause Windows and its tools to malfunction.
This article was written by Alejandro Santos, a Staff Writer at Handy Recovery Advisor. It was also verified for technical accuracy by Andrey Vasilyev, our editorial advisor.
Curious about our content creation process? Take a look at our Editor Guidelines.