
While cutting and pasting files is usually just a routine activity, in some cases, it may lead to data loss. Here, we will cover the possibility of this happening as well as solutions for recovering data in the case of data being lost during a cut and paste exercise.
How Files Can Get Lost During Cut and Paste
There are a few reasons that may result in files being lost during cut and paste. These include:
- Abrupt/unexpected shutdown: If your computer is shut down abruptly during a cut and paste operation, there is a chance that the data that was being cut might be lost.
- Incorrect storage device removal: If you are making use of a storage device such as a USB flash drive or an external hard drive, there is a possibility that if the device is removed during the process of a cut and paste operation that data might be lost.
- Hardware Failure: If storage hardware fails fully or partially during a cut and paste operation then this will result in data loss.
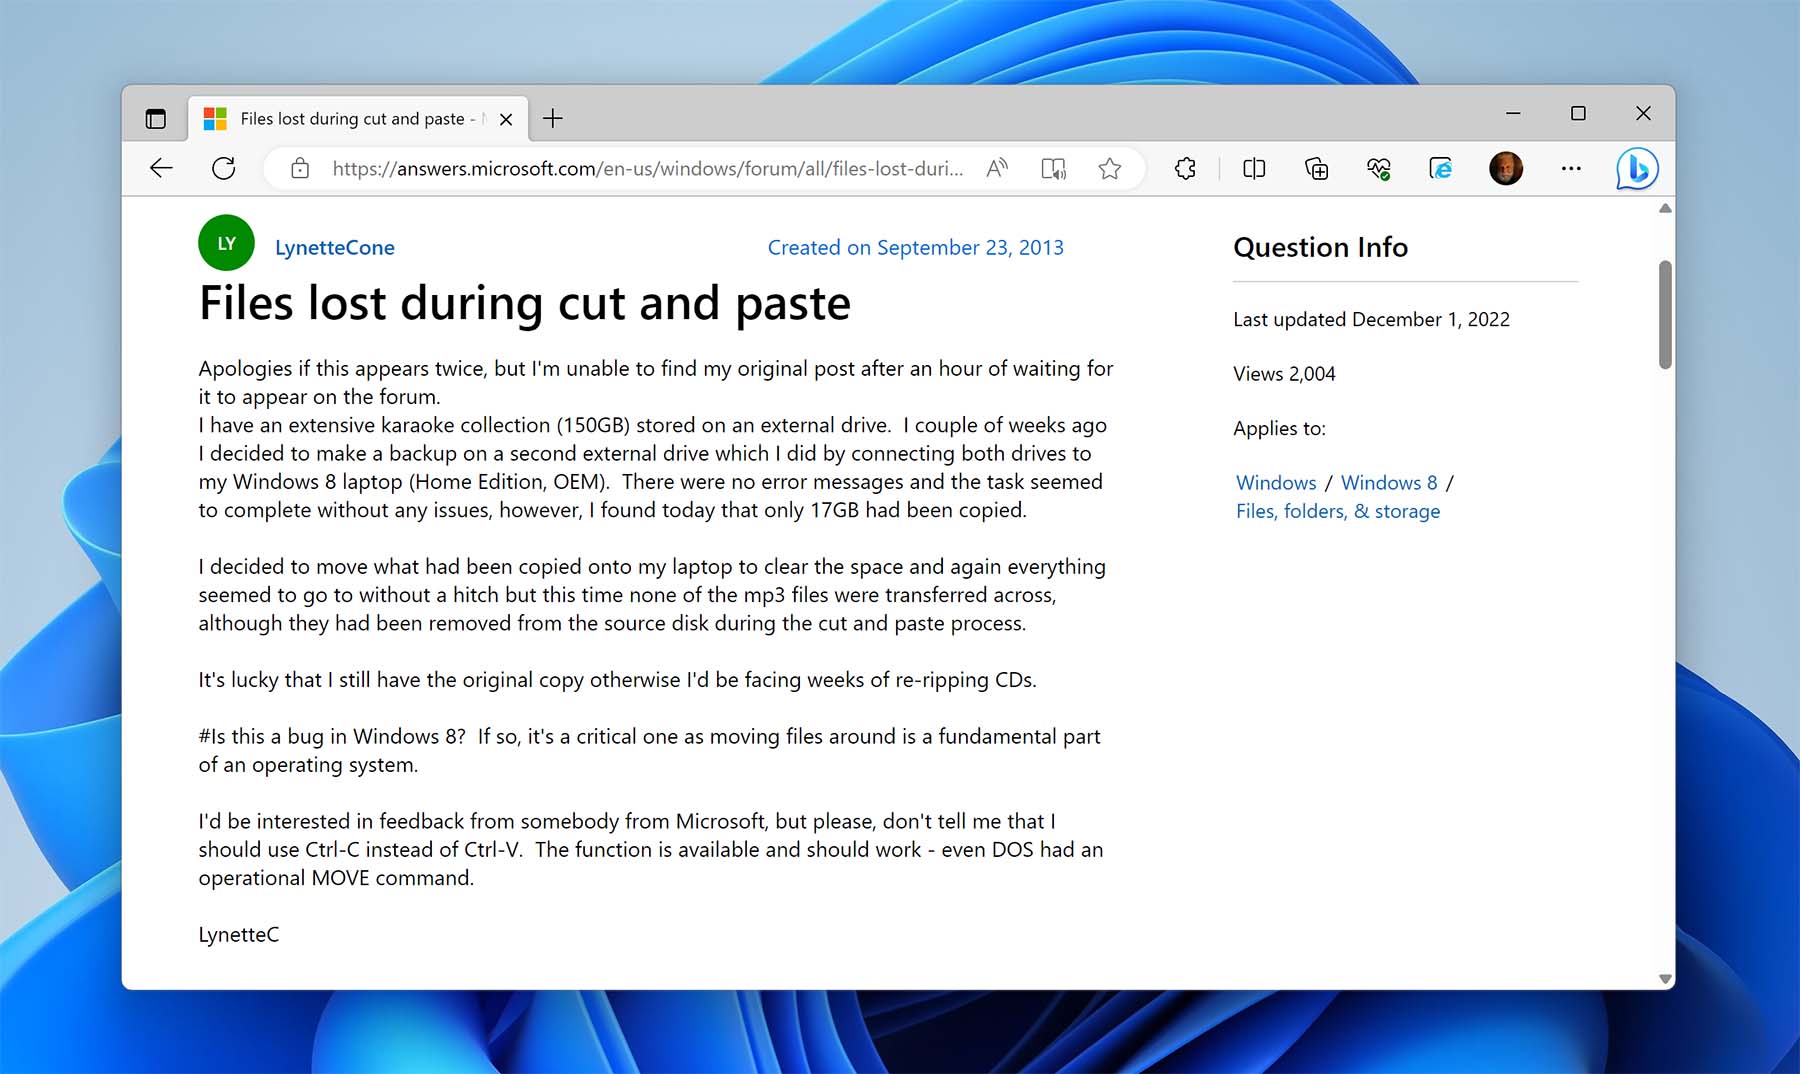
Unfortunately for Windows user LynetteCone, she lost her precious karaoke files while trying to transfer files between external drives as well as between her laptop and an external drive.
Below, we will walk you through the process of recovering files lost during cut and paste if you have experienced something similar due to your files being lost during a cut and paste operation.
How to Recover Files That Have Disappeared During Cut and Paste
Even though you may not be able to see the files that disappeared during a botched cut and paste operation, this doesn’t mean that they are totally lost. The files are still on your storage device but because your operating system likely thinks that they were successfully pasted, they may be earmarked for being overwritten.
If you act quickly, you can recover these files before they are overwritten. One of the best tools available for recovering deleted/lost files is Disk Drill Data Recovery which is a powerful data recovery application that has several advanced recovery algorithms that can scour drives carefully to find lost files.
Method 1: Use Disk Drill to Recover Deleted Files During Cut and Paste
Disk Drill has several features that make it one of the best data recovery applications available. For instance, it can be used to recover over 400 different file types. It also combines an intuitive user interface with advanced scanning algorithms that allow it to uncover the maximum amount of files possible. It is available for both Windows and macOS. To recover cut files with Disk Drill, do the following:
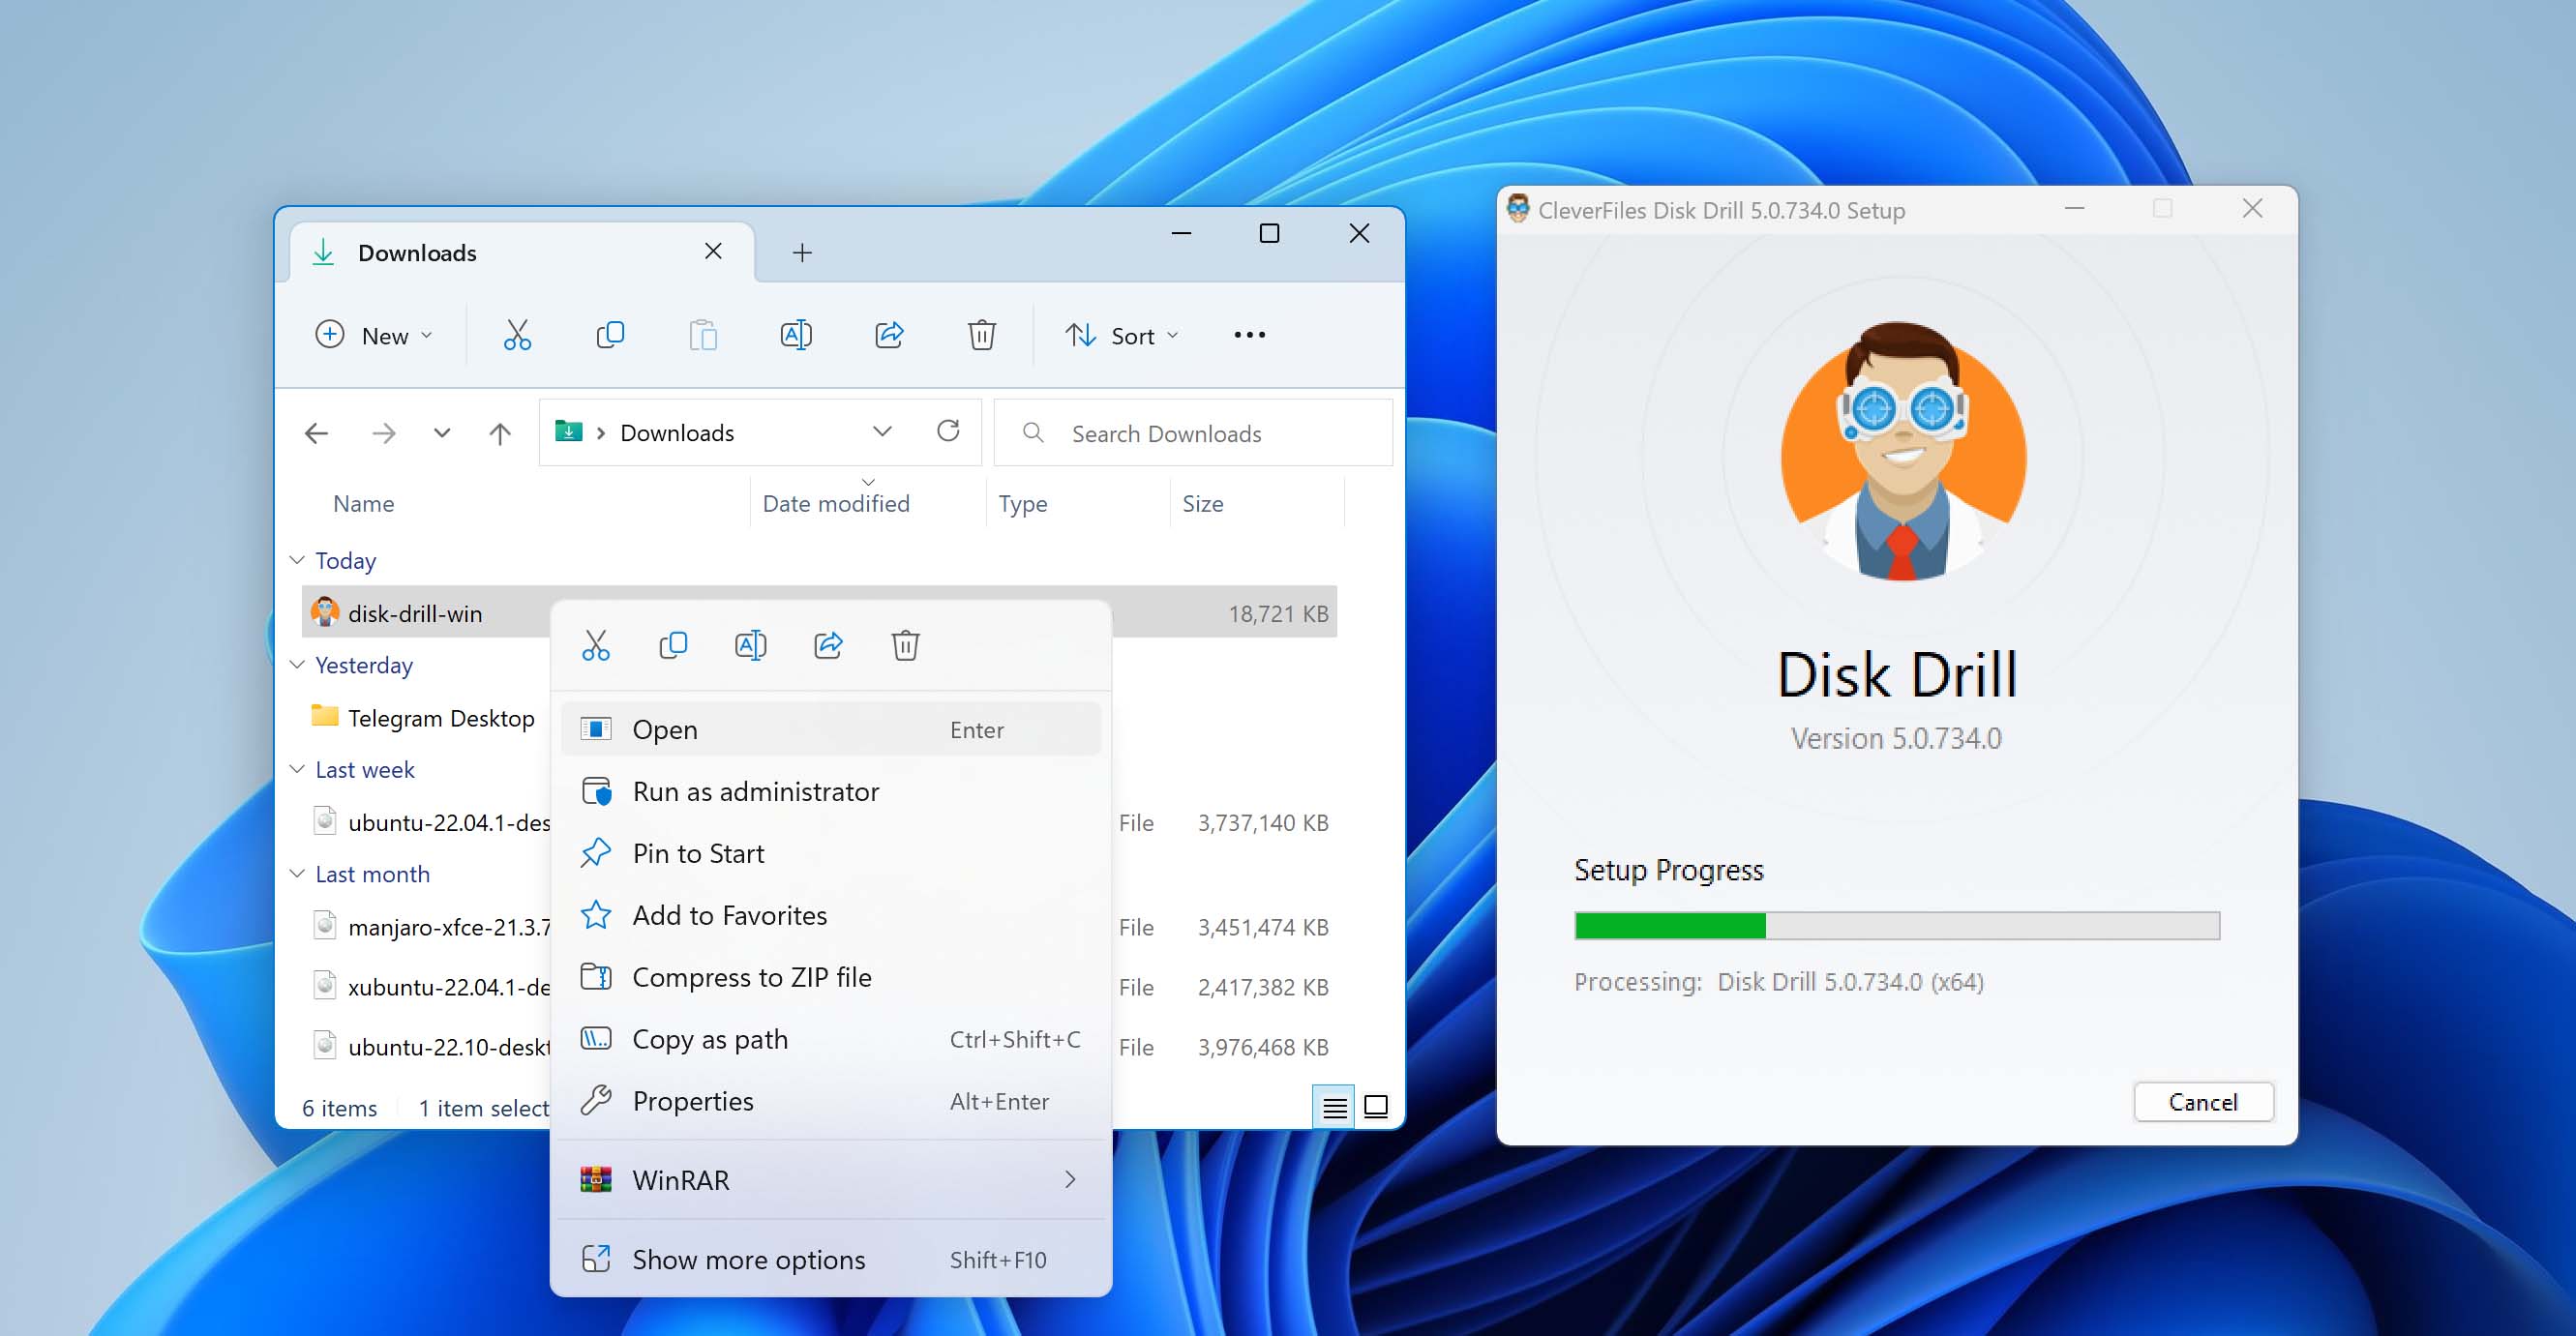
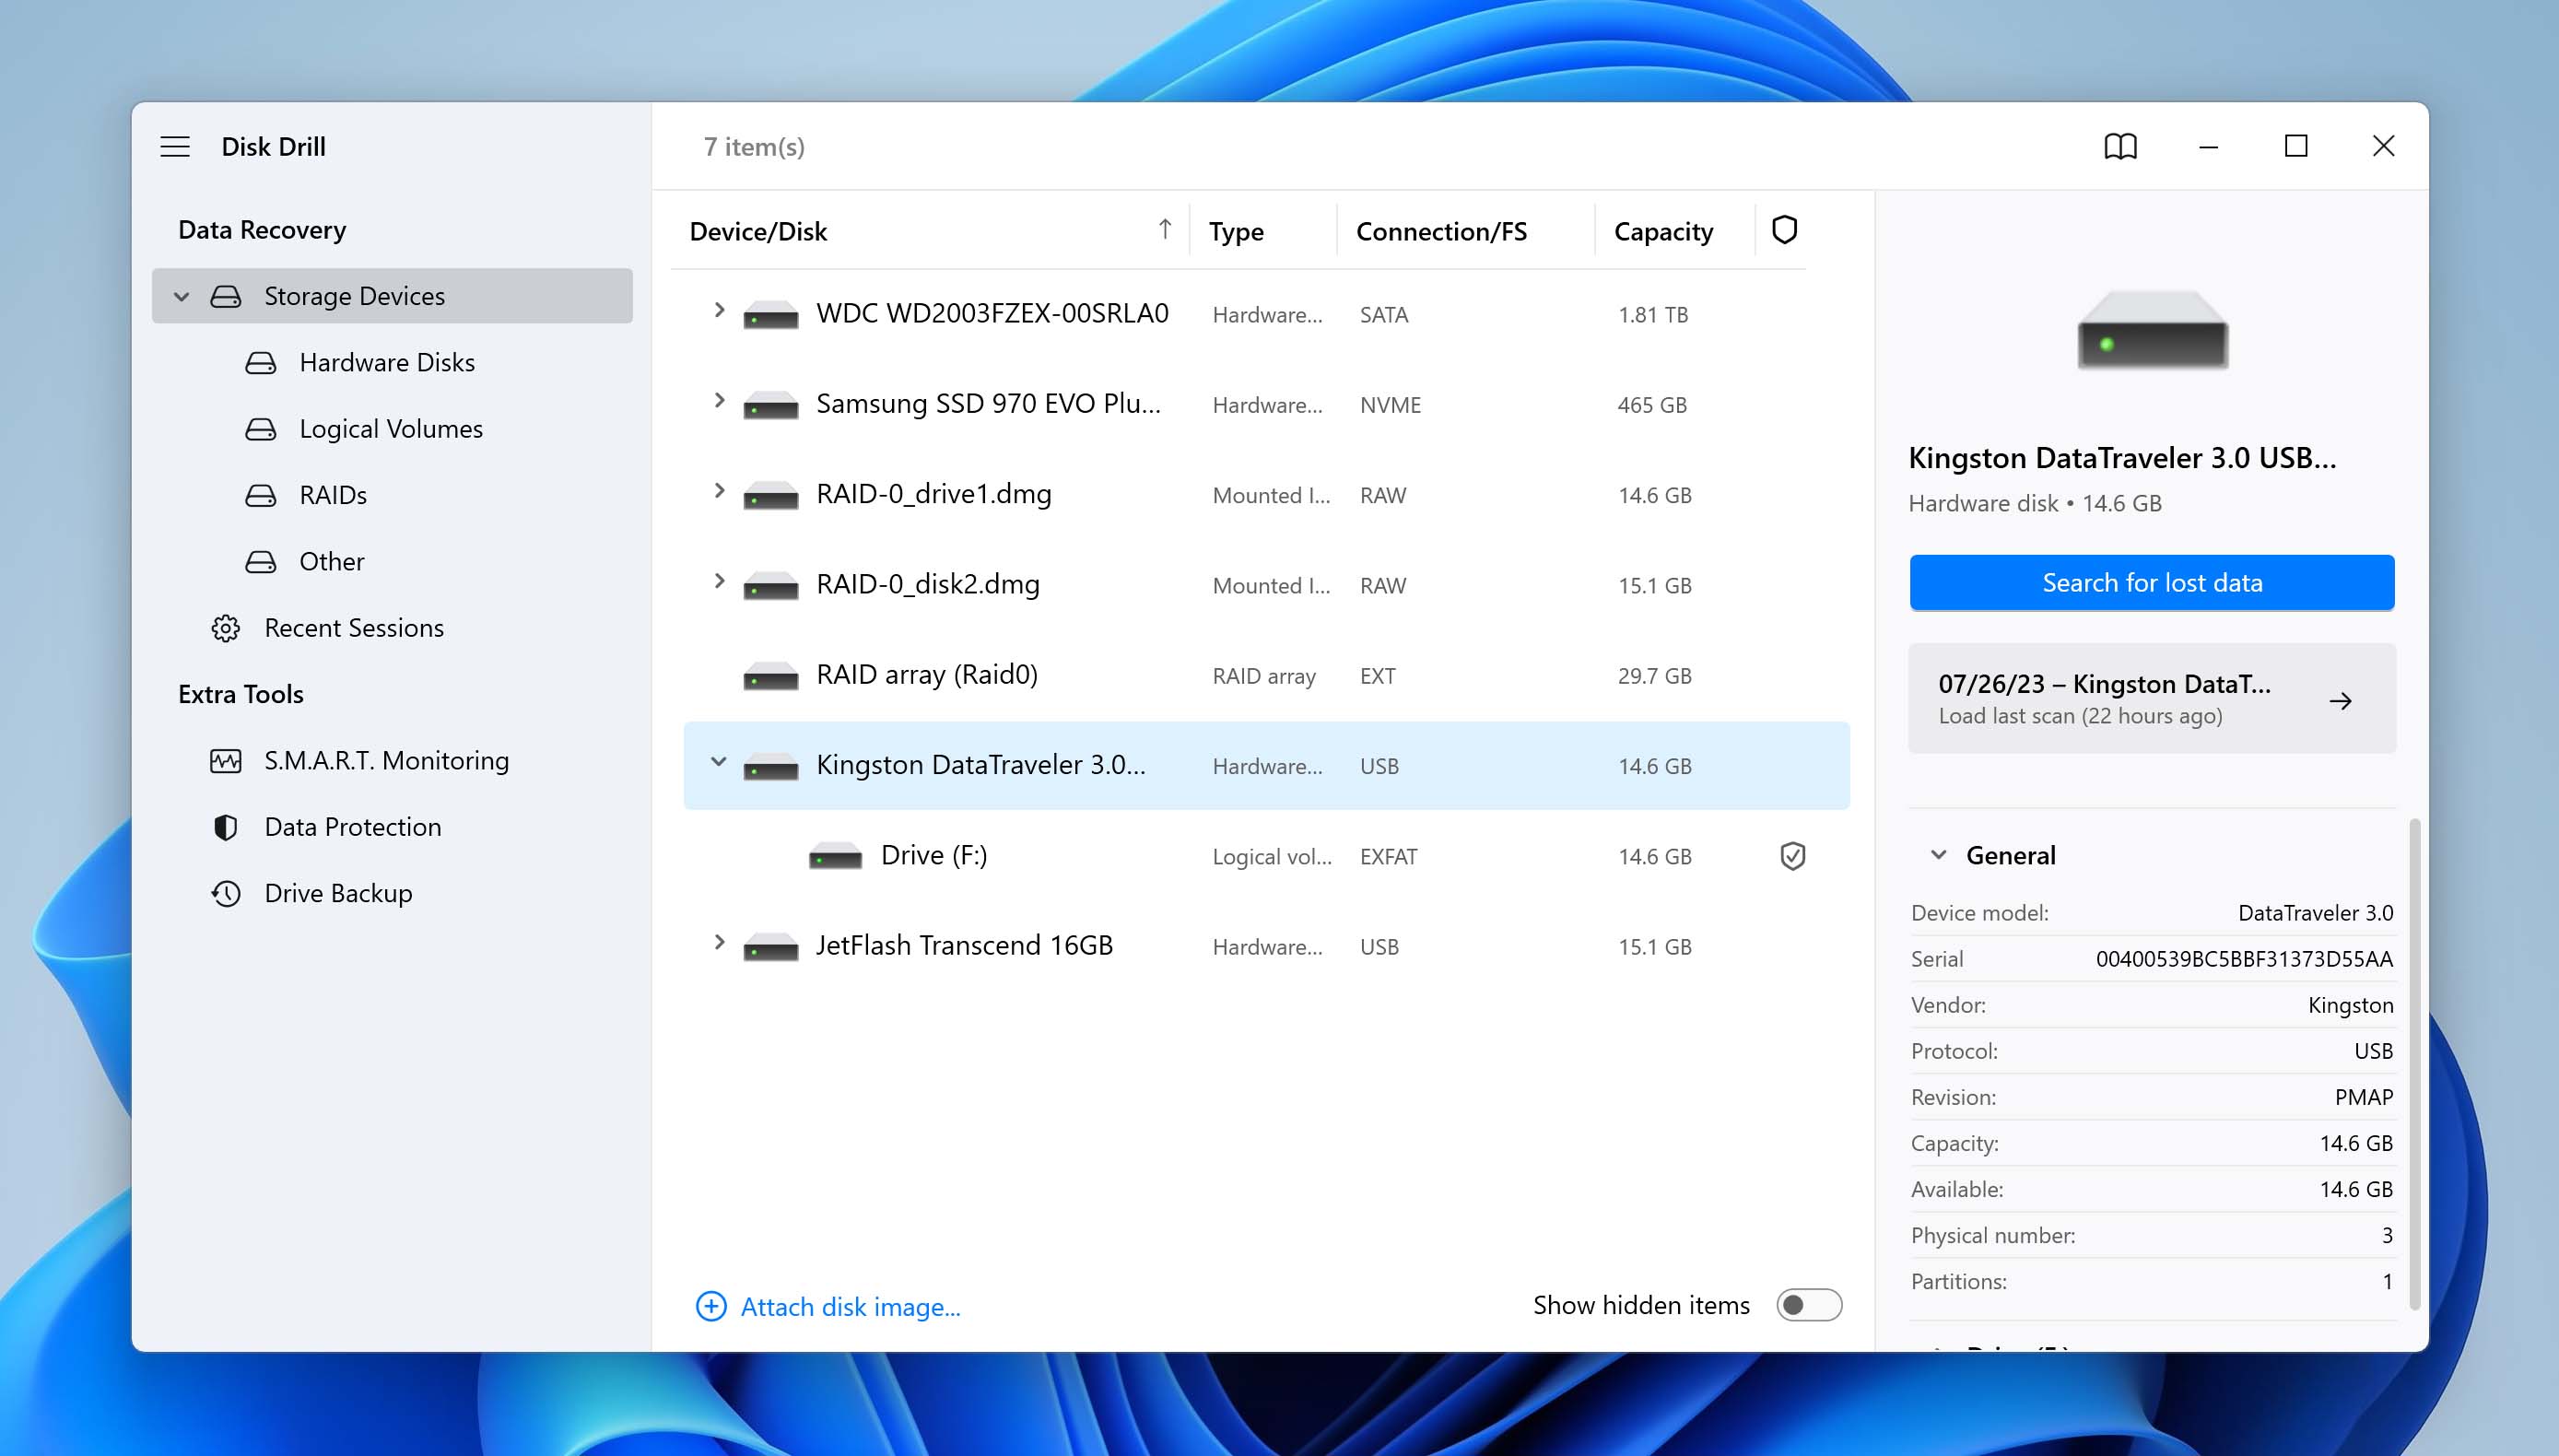
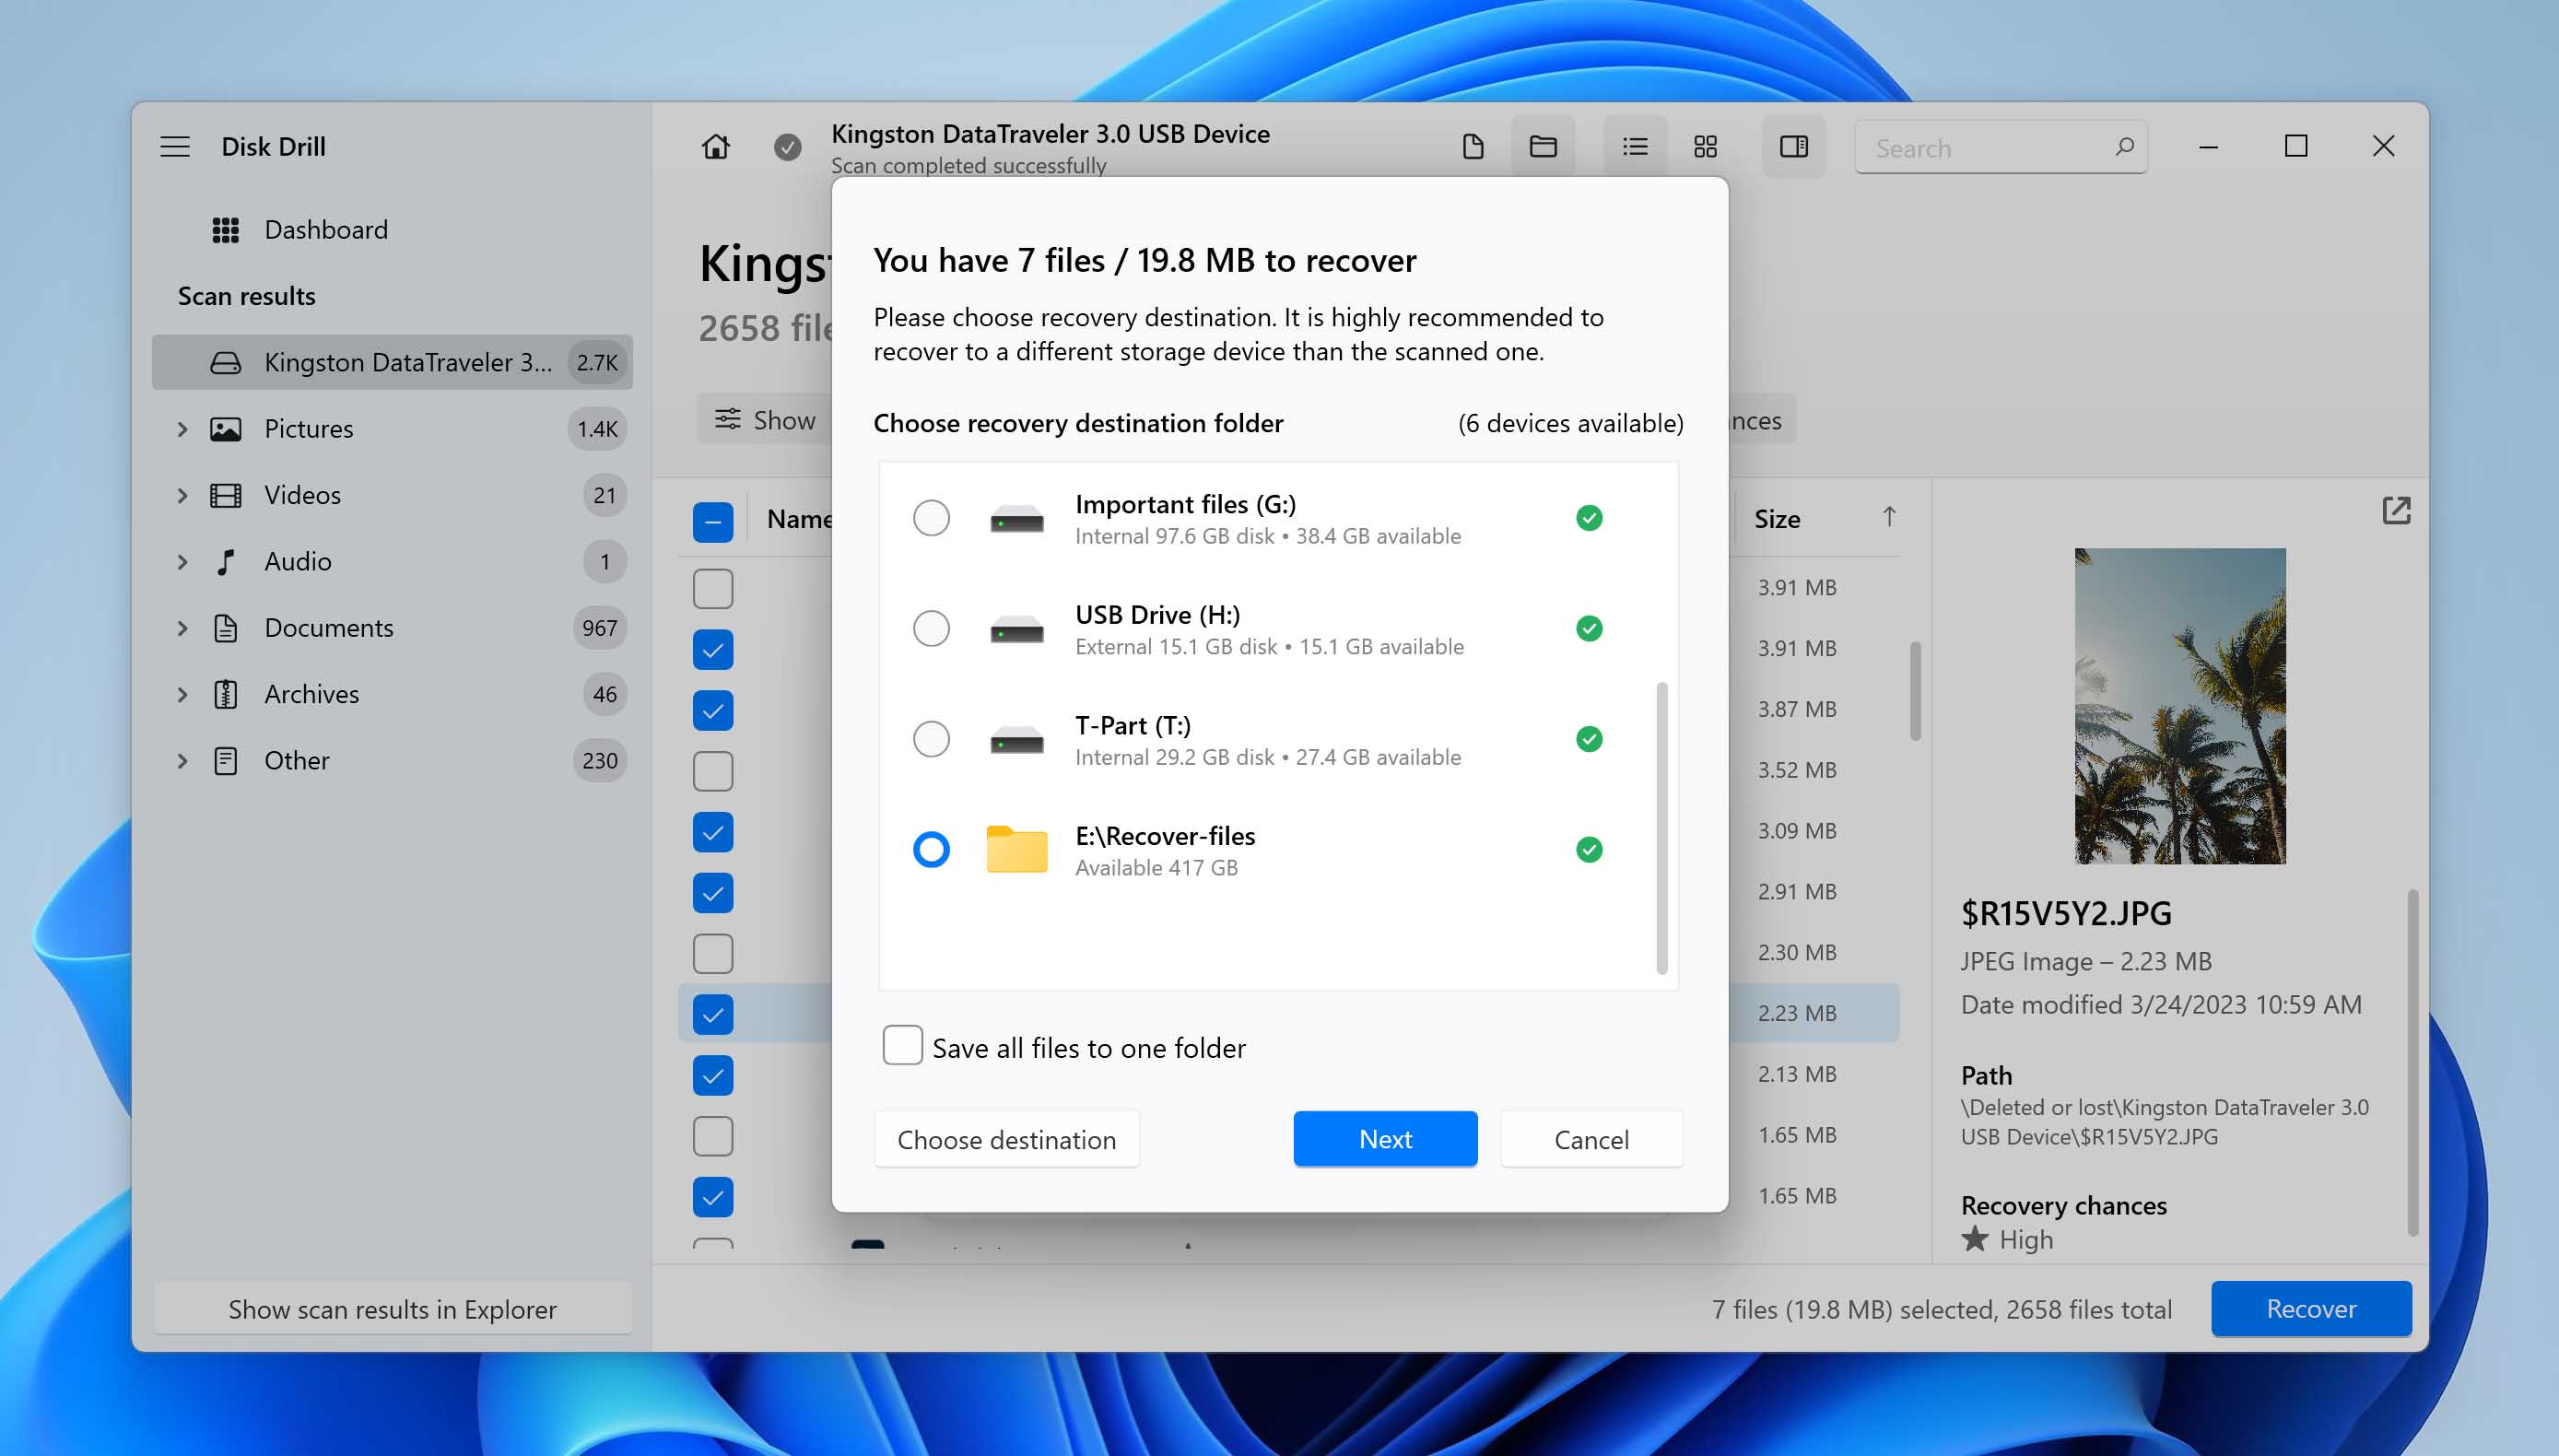
- First, you will need to download Disk Drill and then install it: After the installation has been completed, run Disk Drill and give it admin permissions so that it can recover the most files possible. Once the Disk Drill interface launches, choose the specific drive from which you aim to retrieve files.
- Select Search for lost data to get the search process started: Doing this will start the process of thoroughly scanning your storage media for deleted files, including files that may have been deleted during a cut and paste operation.
- After the search process is done, you will need to locate and select the files that you actually want to recover: Disk Drill displays a list of files that can potentially be recovered after the search process. You can filter by category to quickly locate the files you’re looking for. For example, searching under Documents will show you a list of all document files that can potentially be recovered.
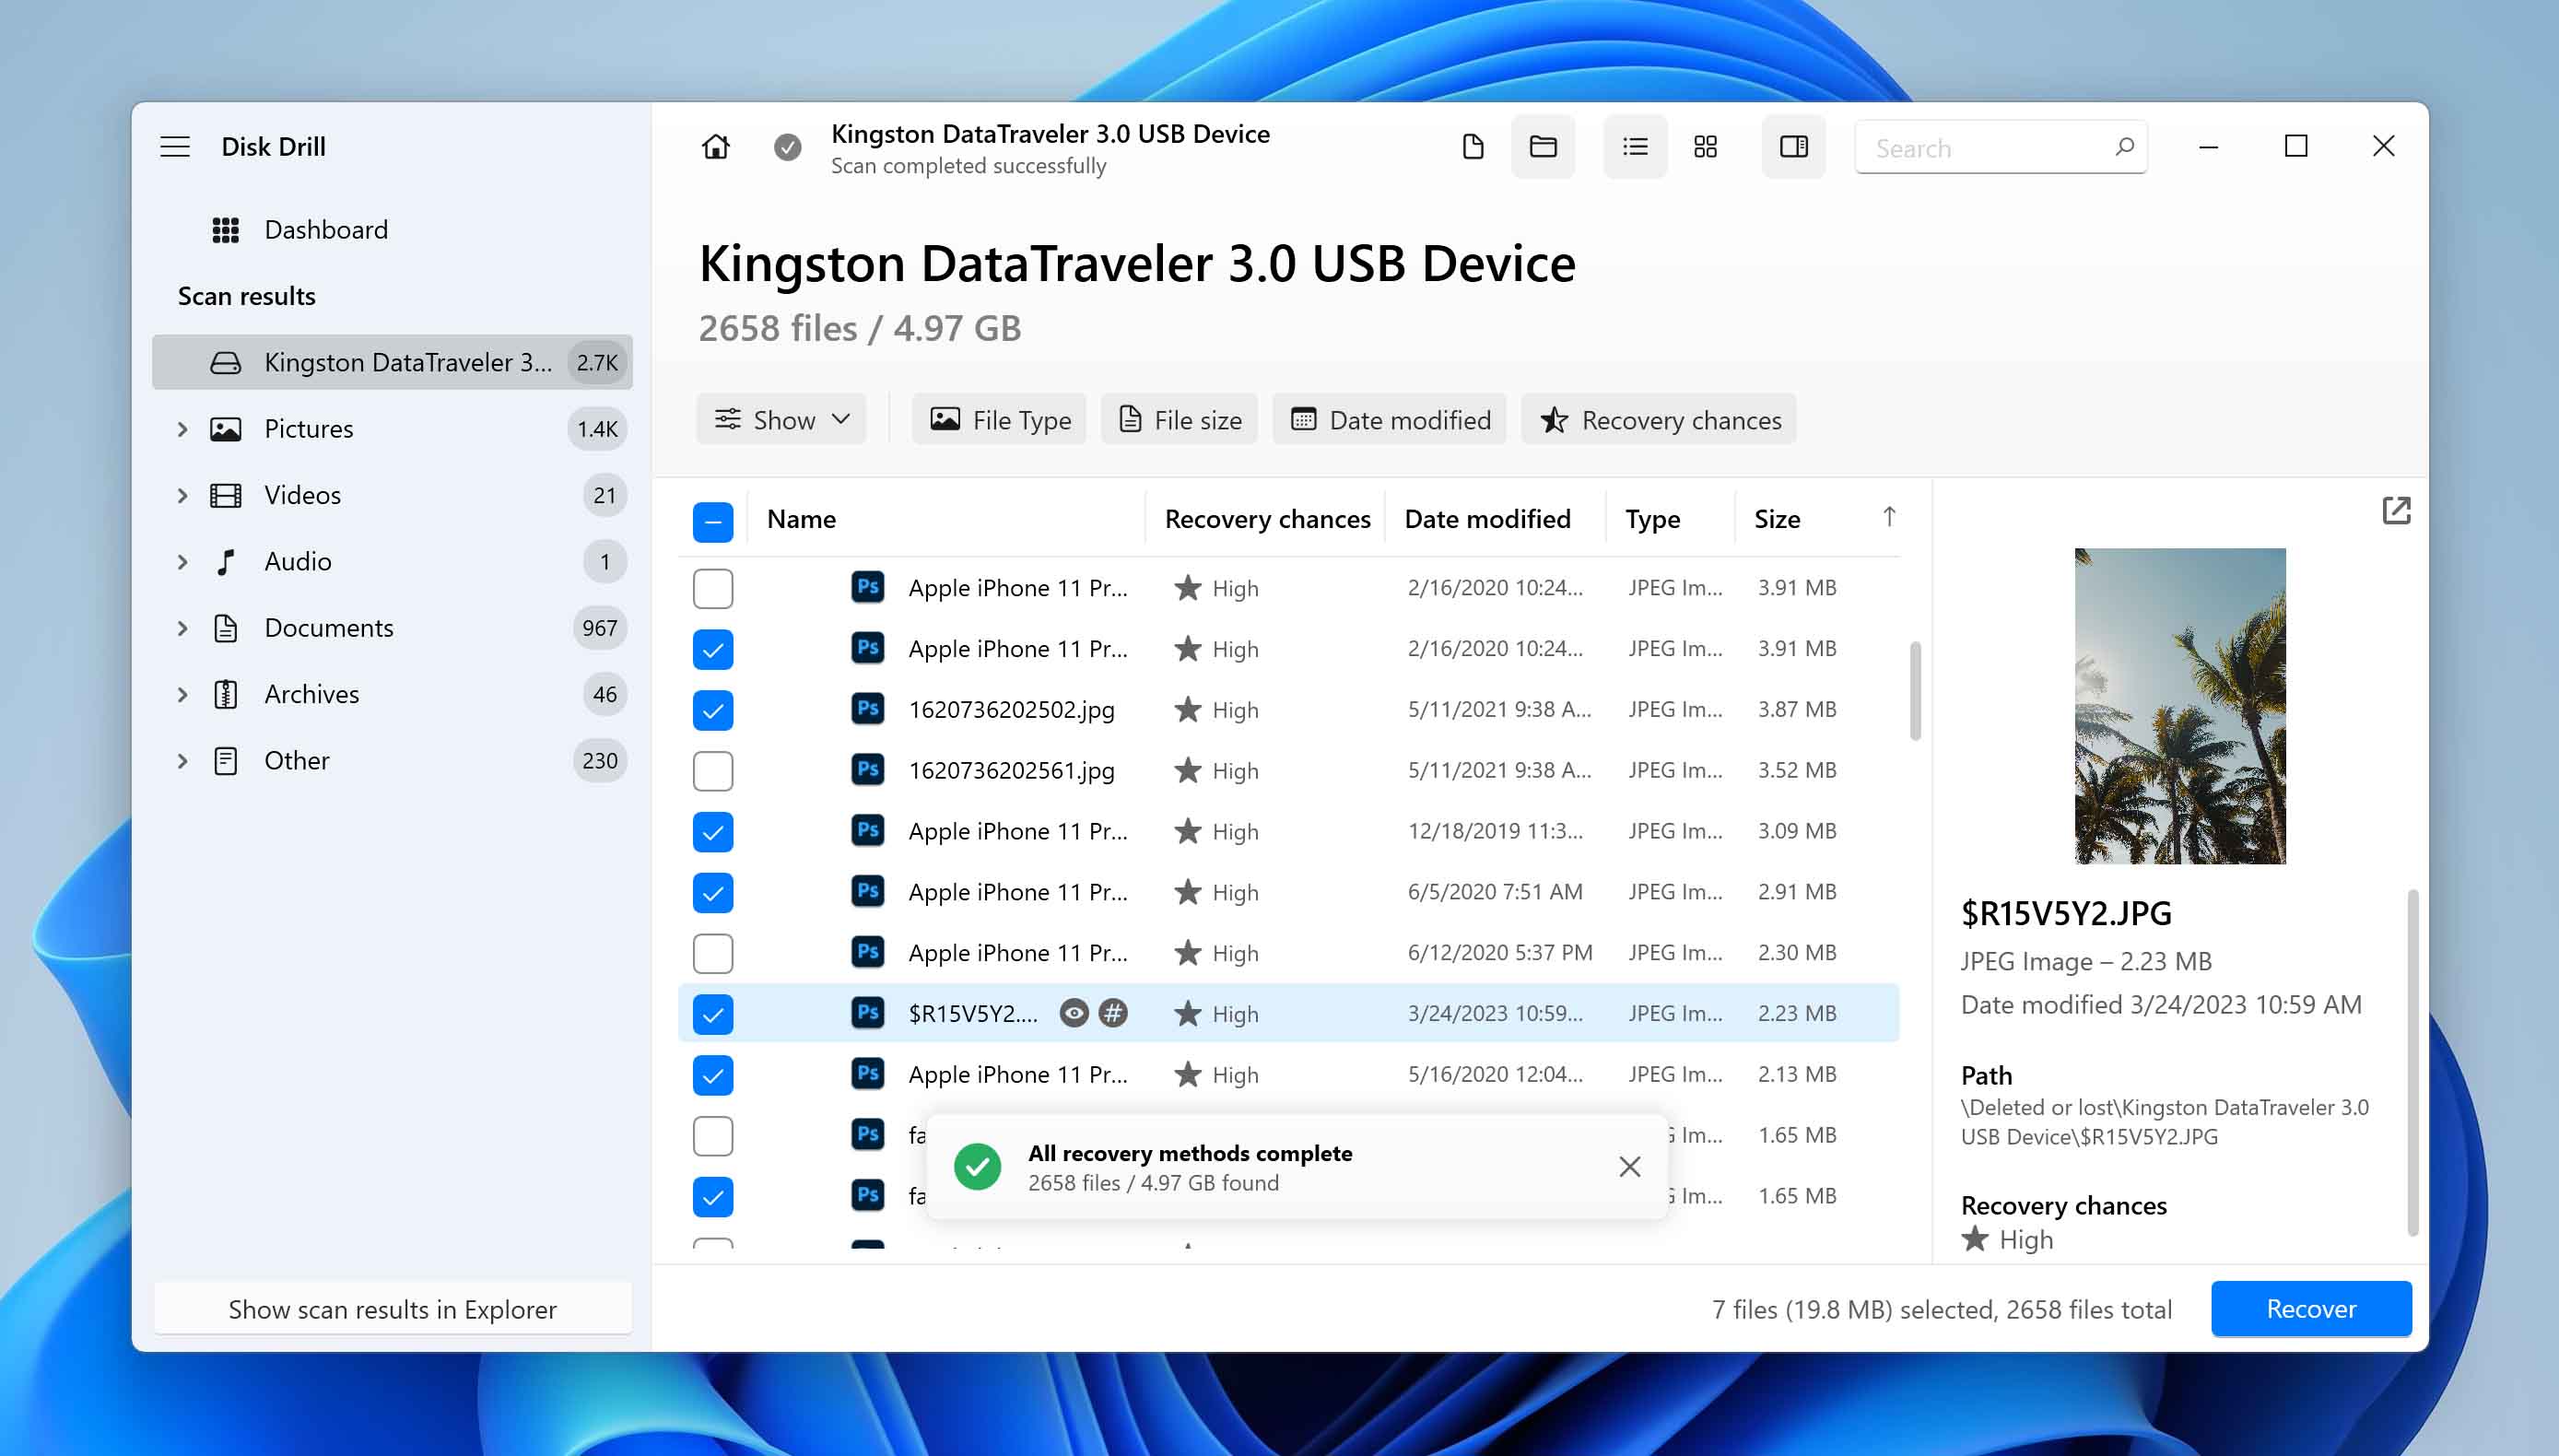
- You will now have to save the files that you want to recover: You should save these files to a storage device that isn’t the one you’re recovering from. If you attempt to save files to the same storage device that you’re recovering from, then you could actually end up overwriting some of the same files that you’re trying to recover. Disk Drill will display a confirmation message letting you know if the process was successful or not.
Method 2: Recover Files Lost During Transfer Using Built-in Windows Utilities
Windows comes with tools already built-in that can help you to recover files. These tools make use of Windows’ File History Feature. If you had File History enabled beforehand, you have the ability to restore files that may have been lost during a cut and paste operation. Here’s how you can do it:
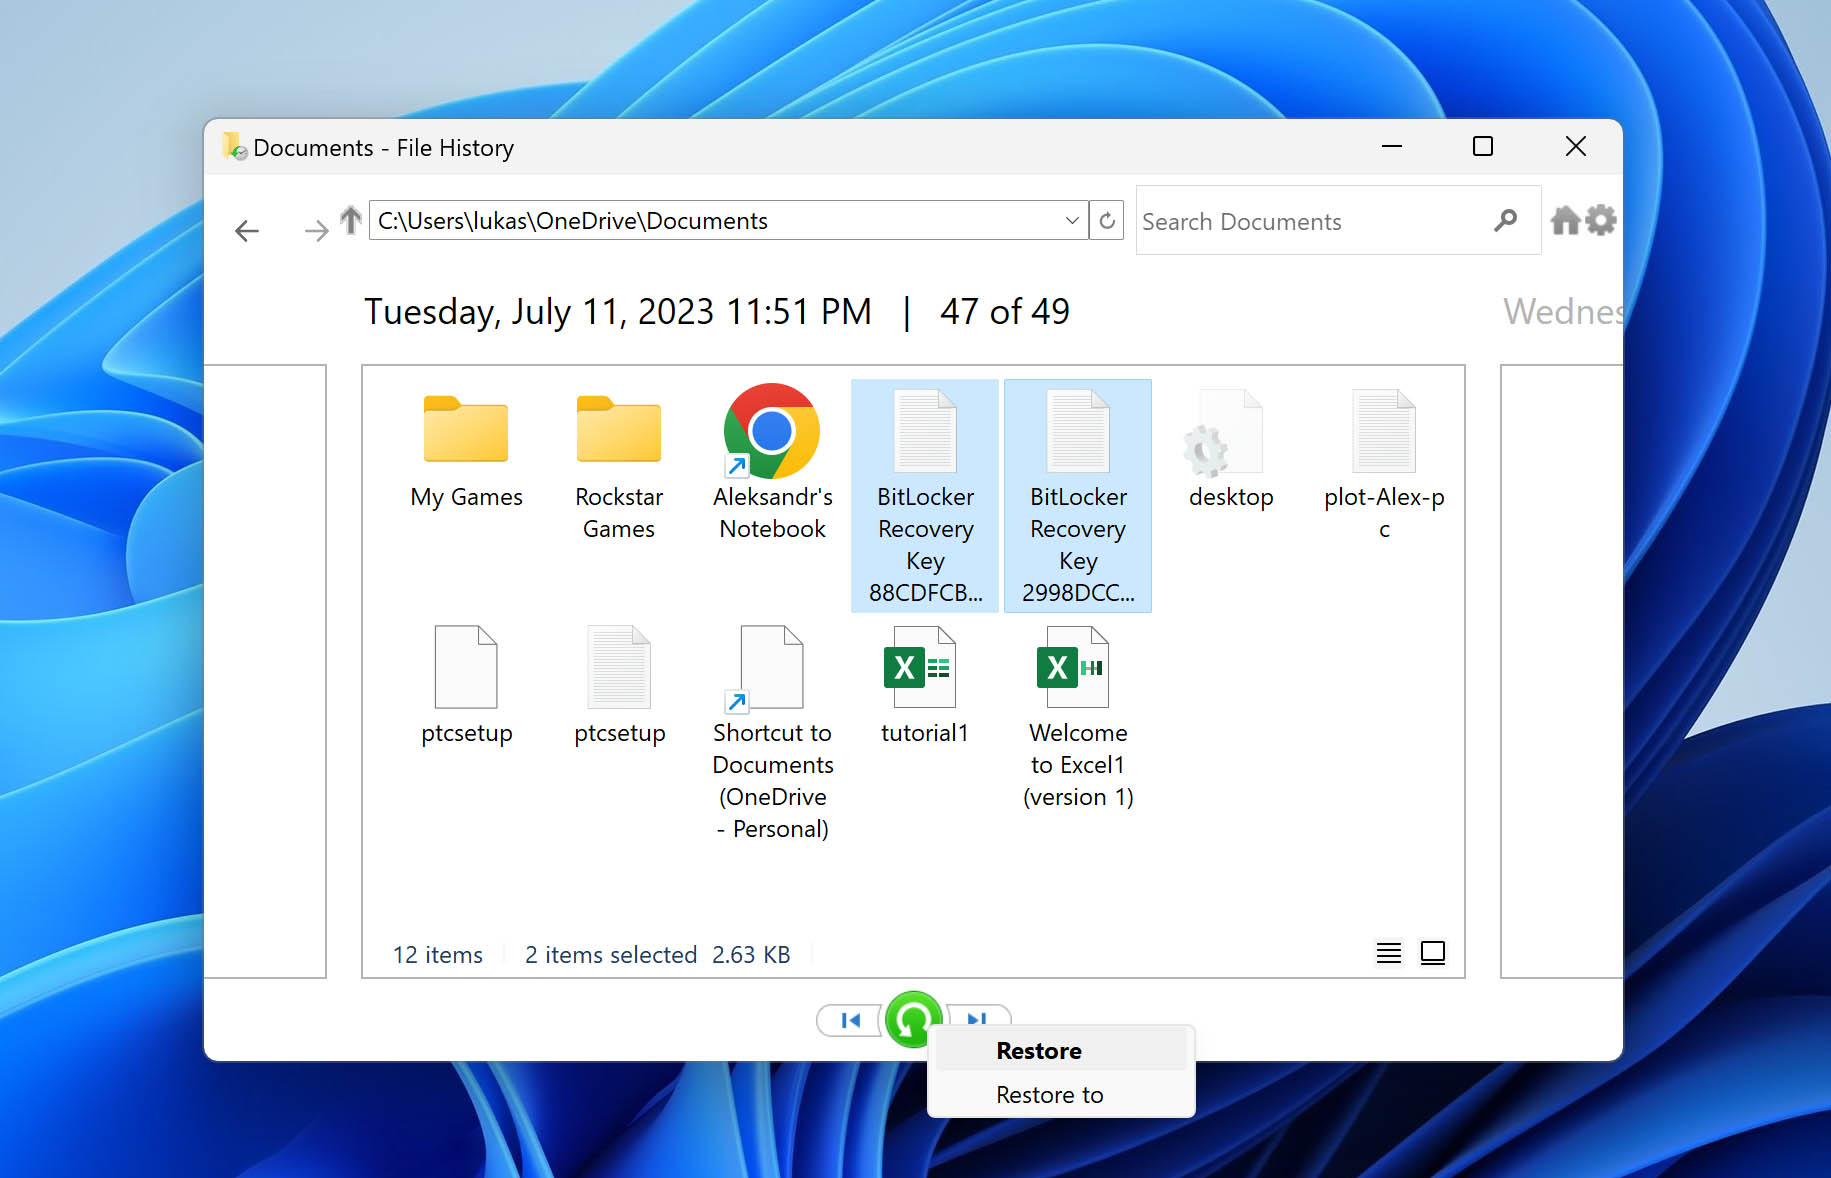
Follow these steps to restore your files:
- Press Win + S to launch a search, type in “Restore your files with File History“, then select the matching option.

- Proceed to the file location. Use the arrows to browse and select the backup version you desire. Highlight your chosen file, then click the green ‘Restore‘ button.
If ‘File History’ isn’t configured, you’ll encounter the message: ‘File History is currently turned off’. To set up File History for future use, either click ‘Configure File History settings’ within the same window or adhere to the guide below:
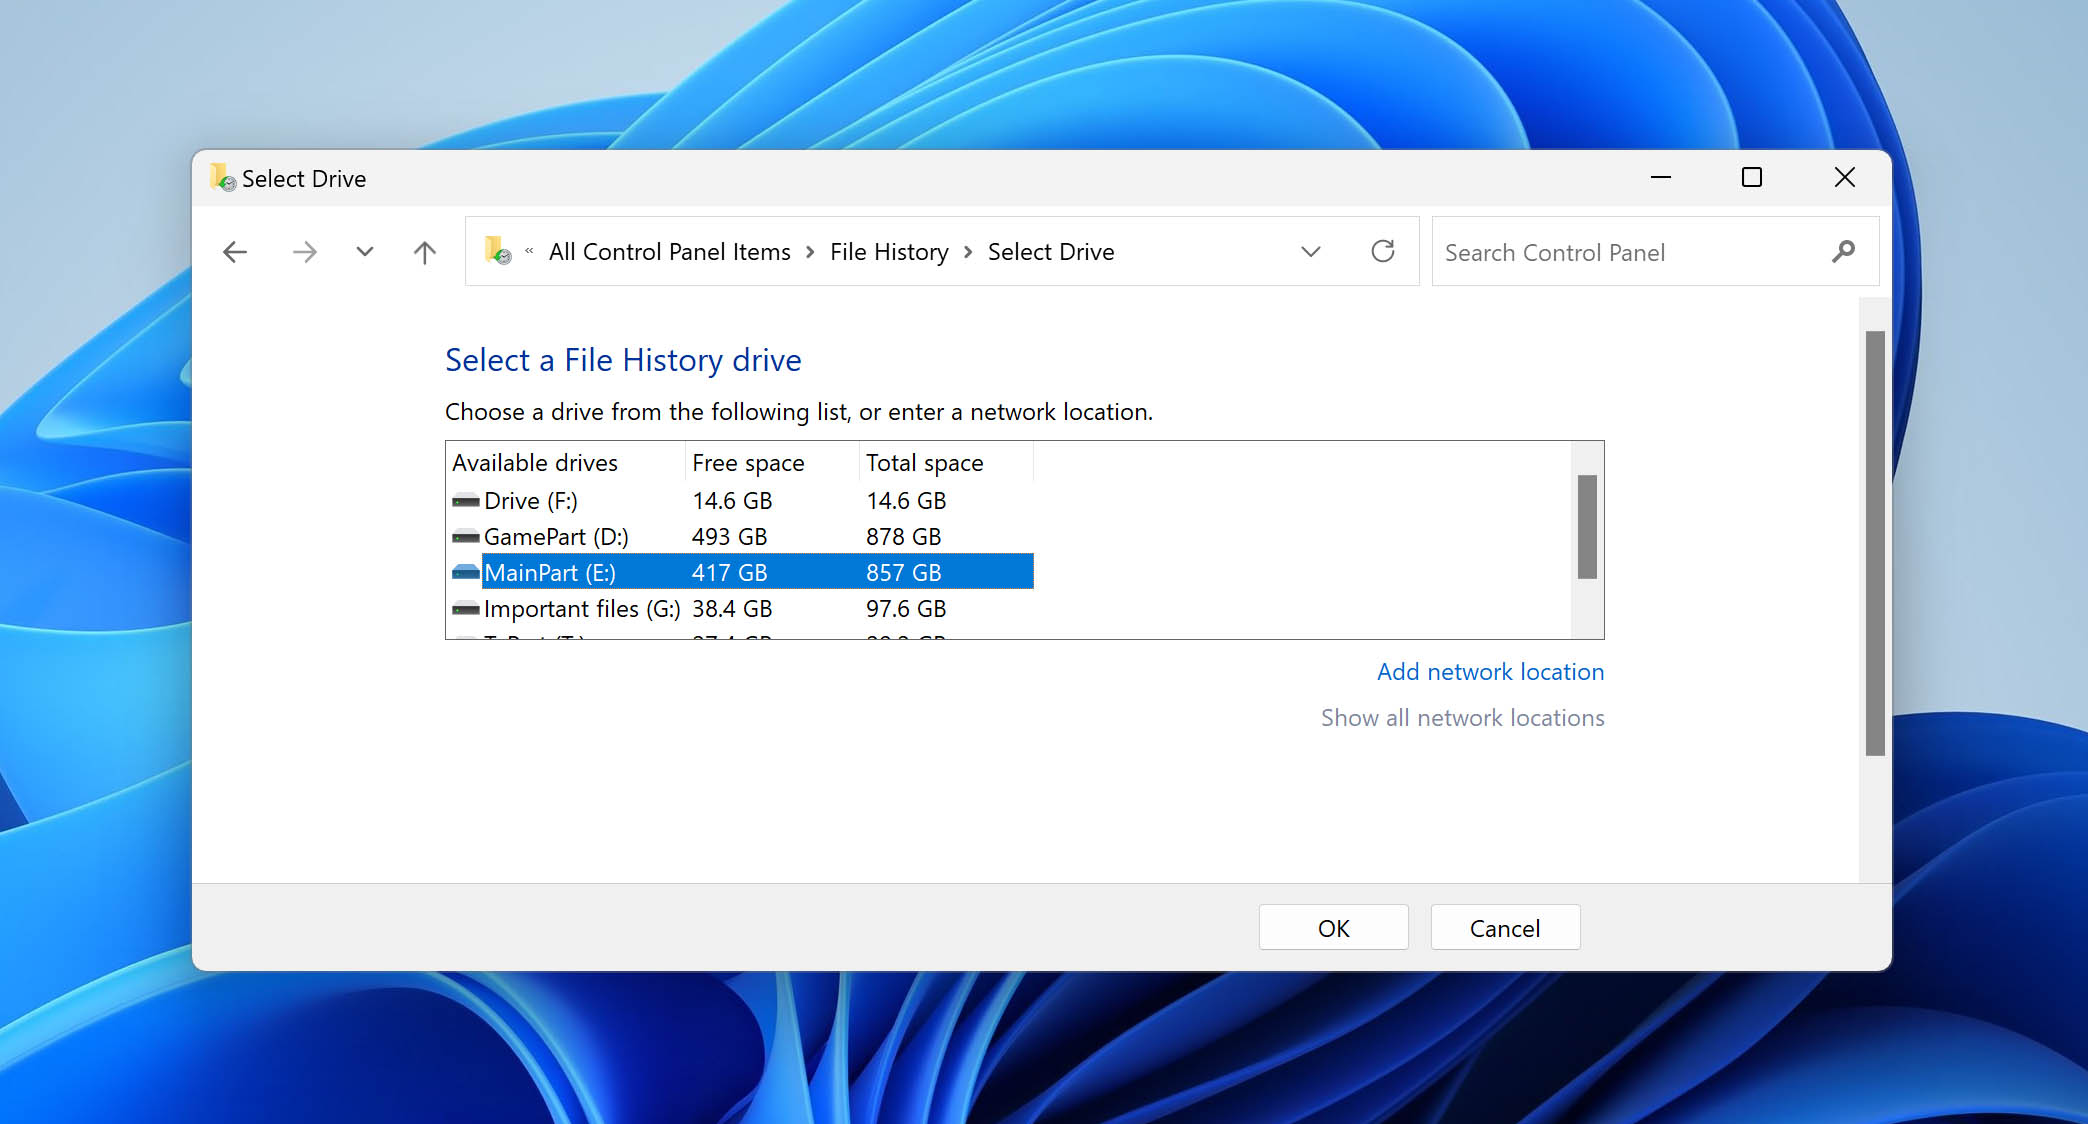
- Press Win + S, type in “File History“, and select the matching option.

- In the window that appears, click “Select drive” situated on the left, then select your preferred disk for storing backups, followed by clicking “OK“.
- Within the File History window, select “Turn on“. Should you need an immediate backup, click “Run now“.
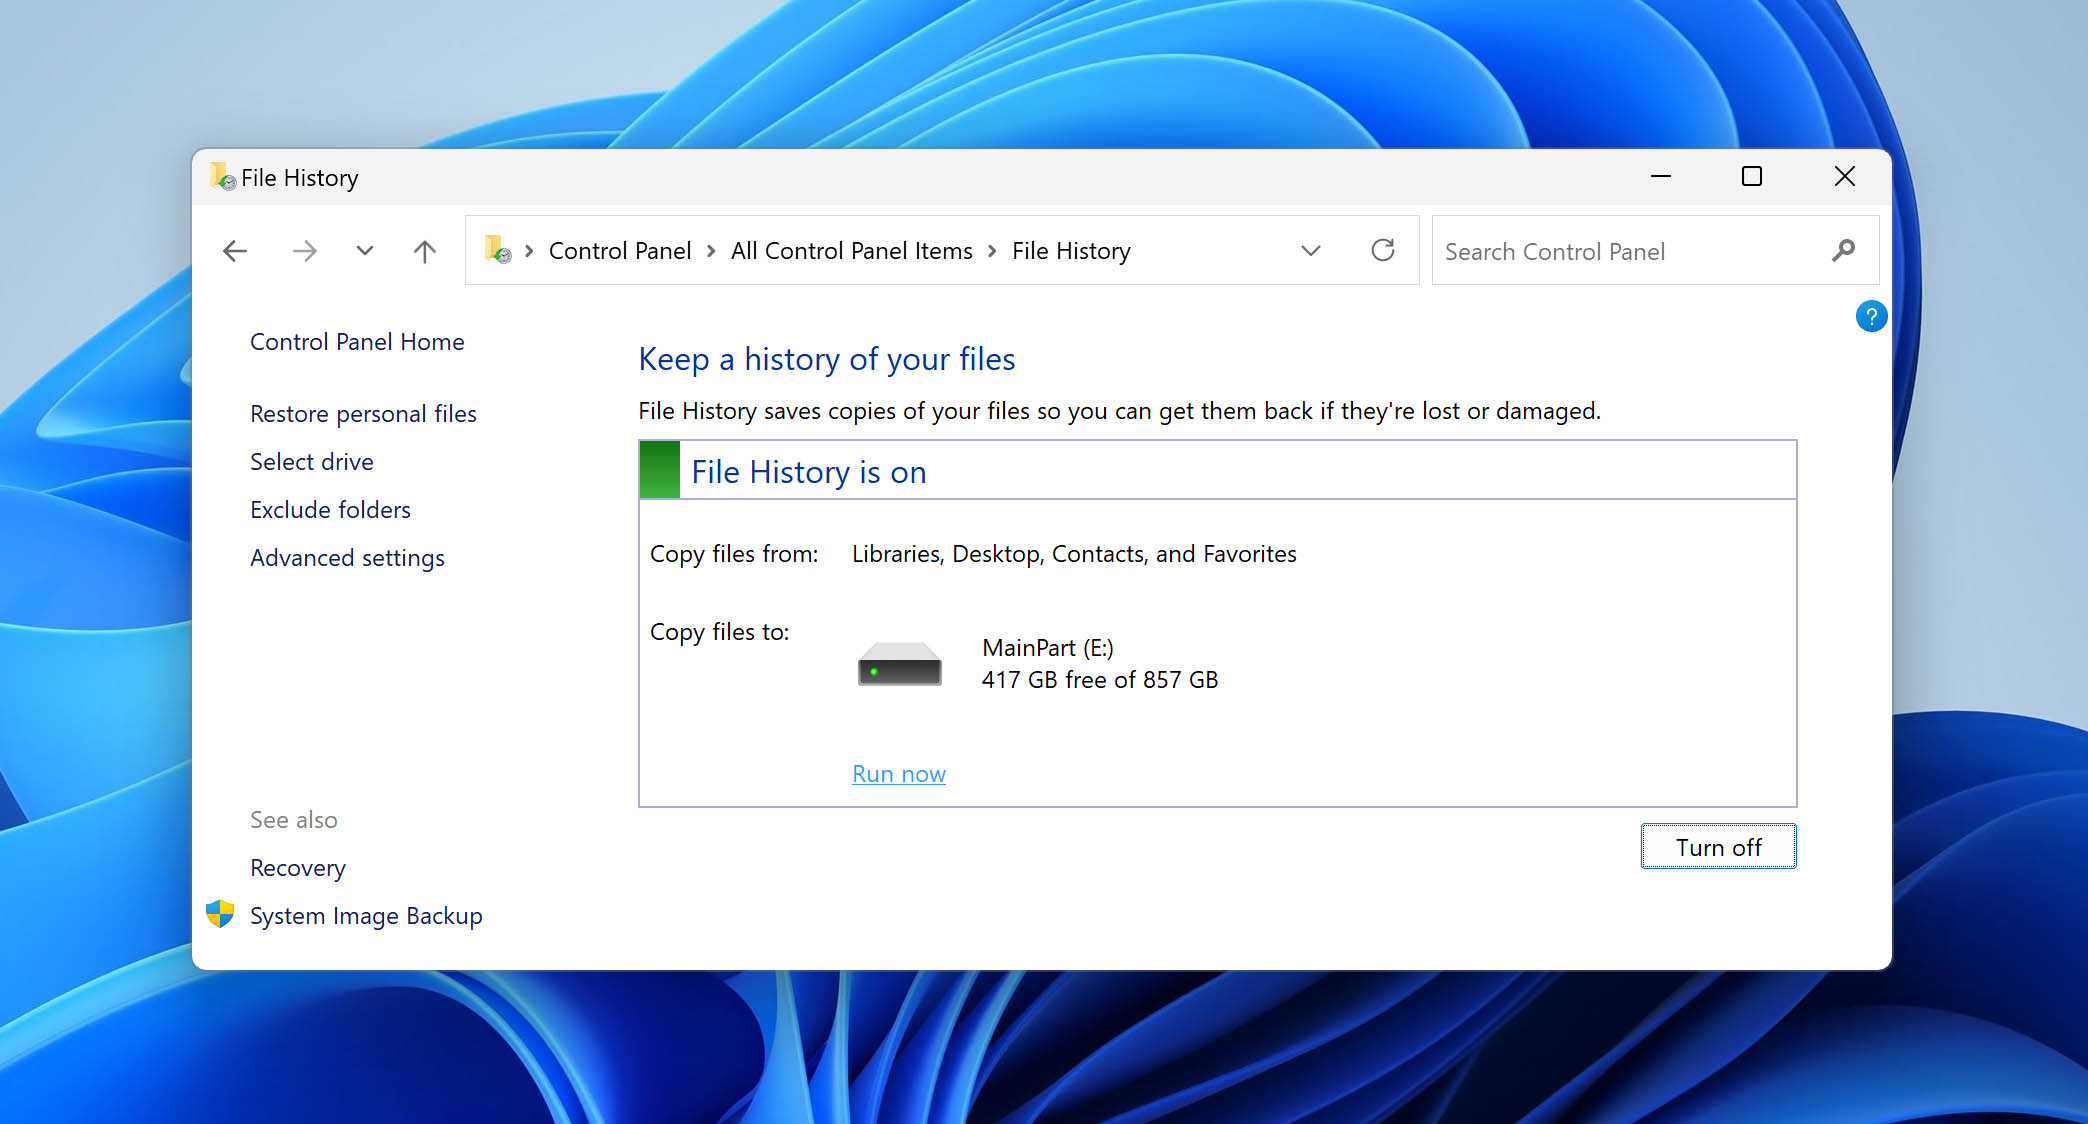
- To modify the backup schedule, if necessary, select “Advanced settings” from the left panel.
Method 3: Restore Cut and Paste Files from OneDrive Backup
Using Microsoft OneDrive as a cloud backup option is also a powerful way of keeping your files safe. With OneDrive, you can keep your files backed up by selecting the folders you want to back up from OneDrive’s settings. If you happen to lose files during a cut and paste operation, you will be able to recover them from your OneDrive account. Before attempting file recovery, you will need to make sure that the folder where the file that was deleted was located was being backed up to OneDrive. If the steps below were completed before the accidental deletion, then you will be able to recover your file:
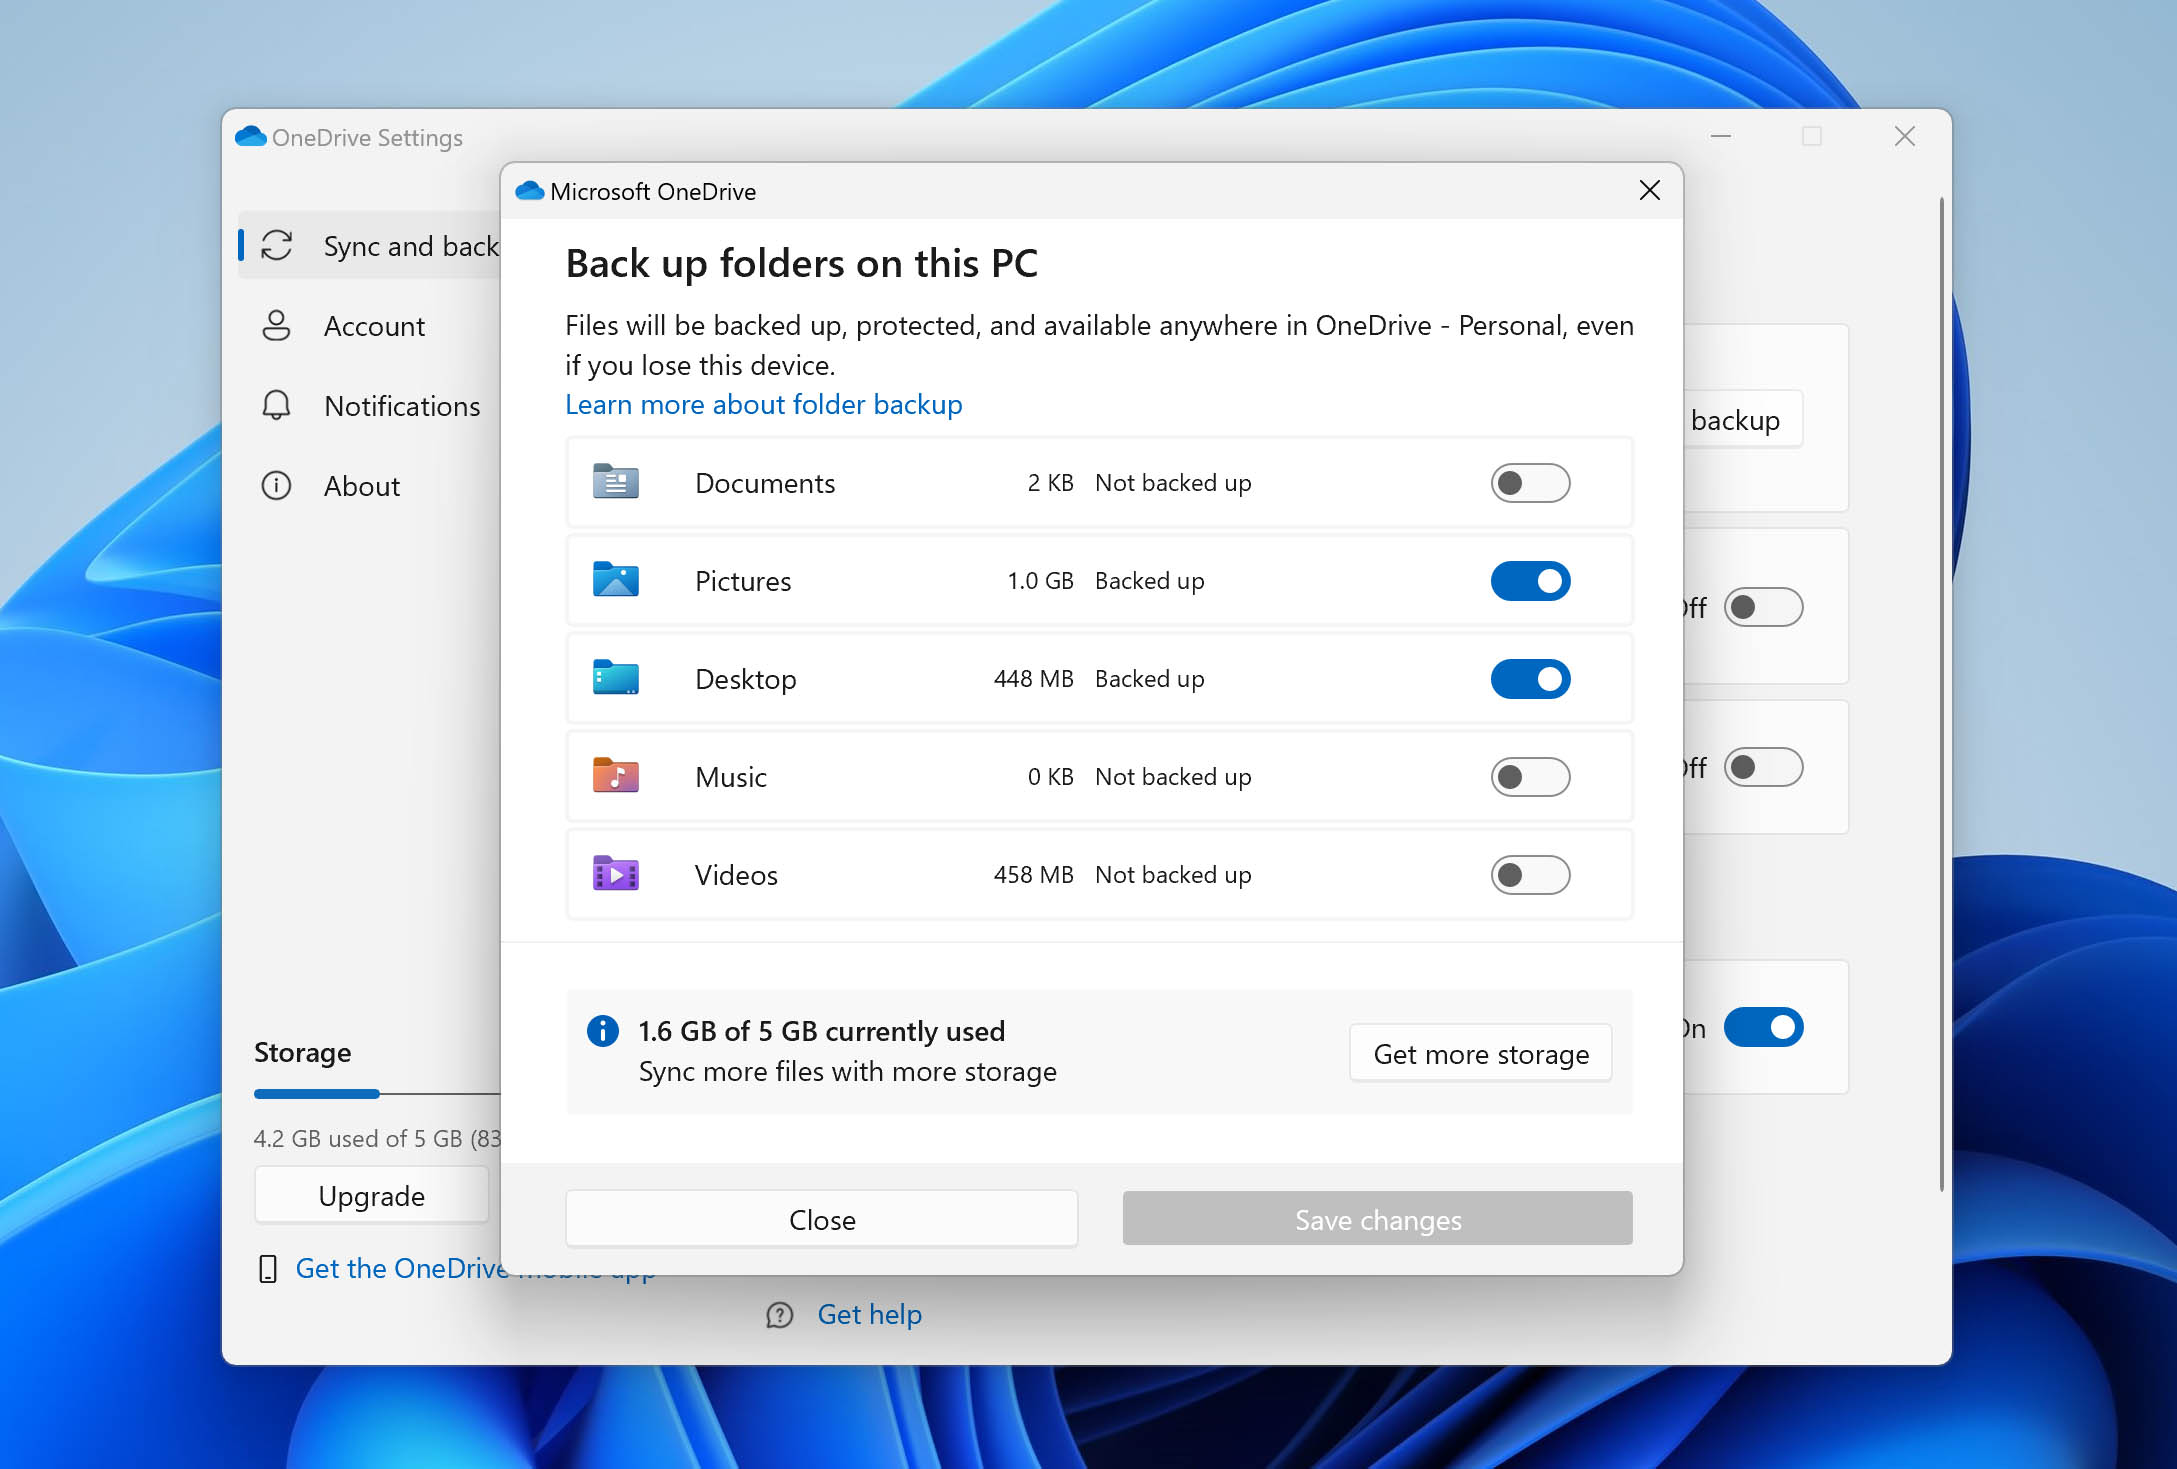
Keep in mind that OneDrive Backup is exclusively designed to back up the Documents, Desktop, and Pictures folders.
- In the settings of the OneDrive client, in Sync and backup tab, choose Manage backup.
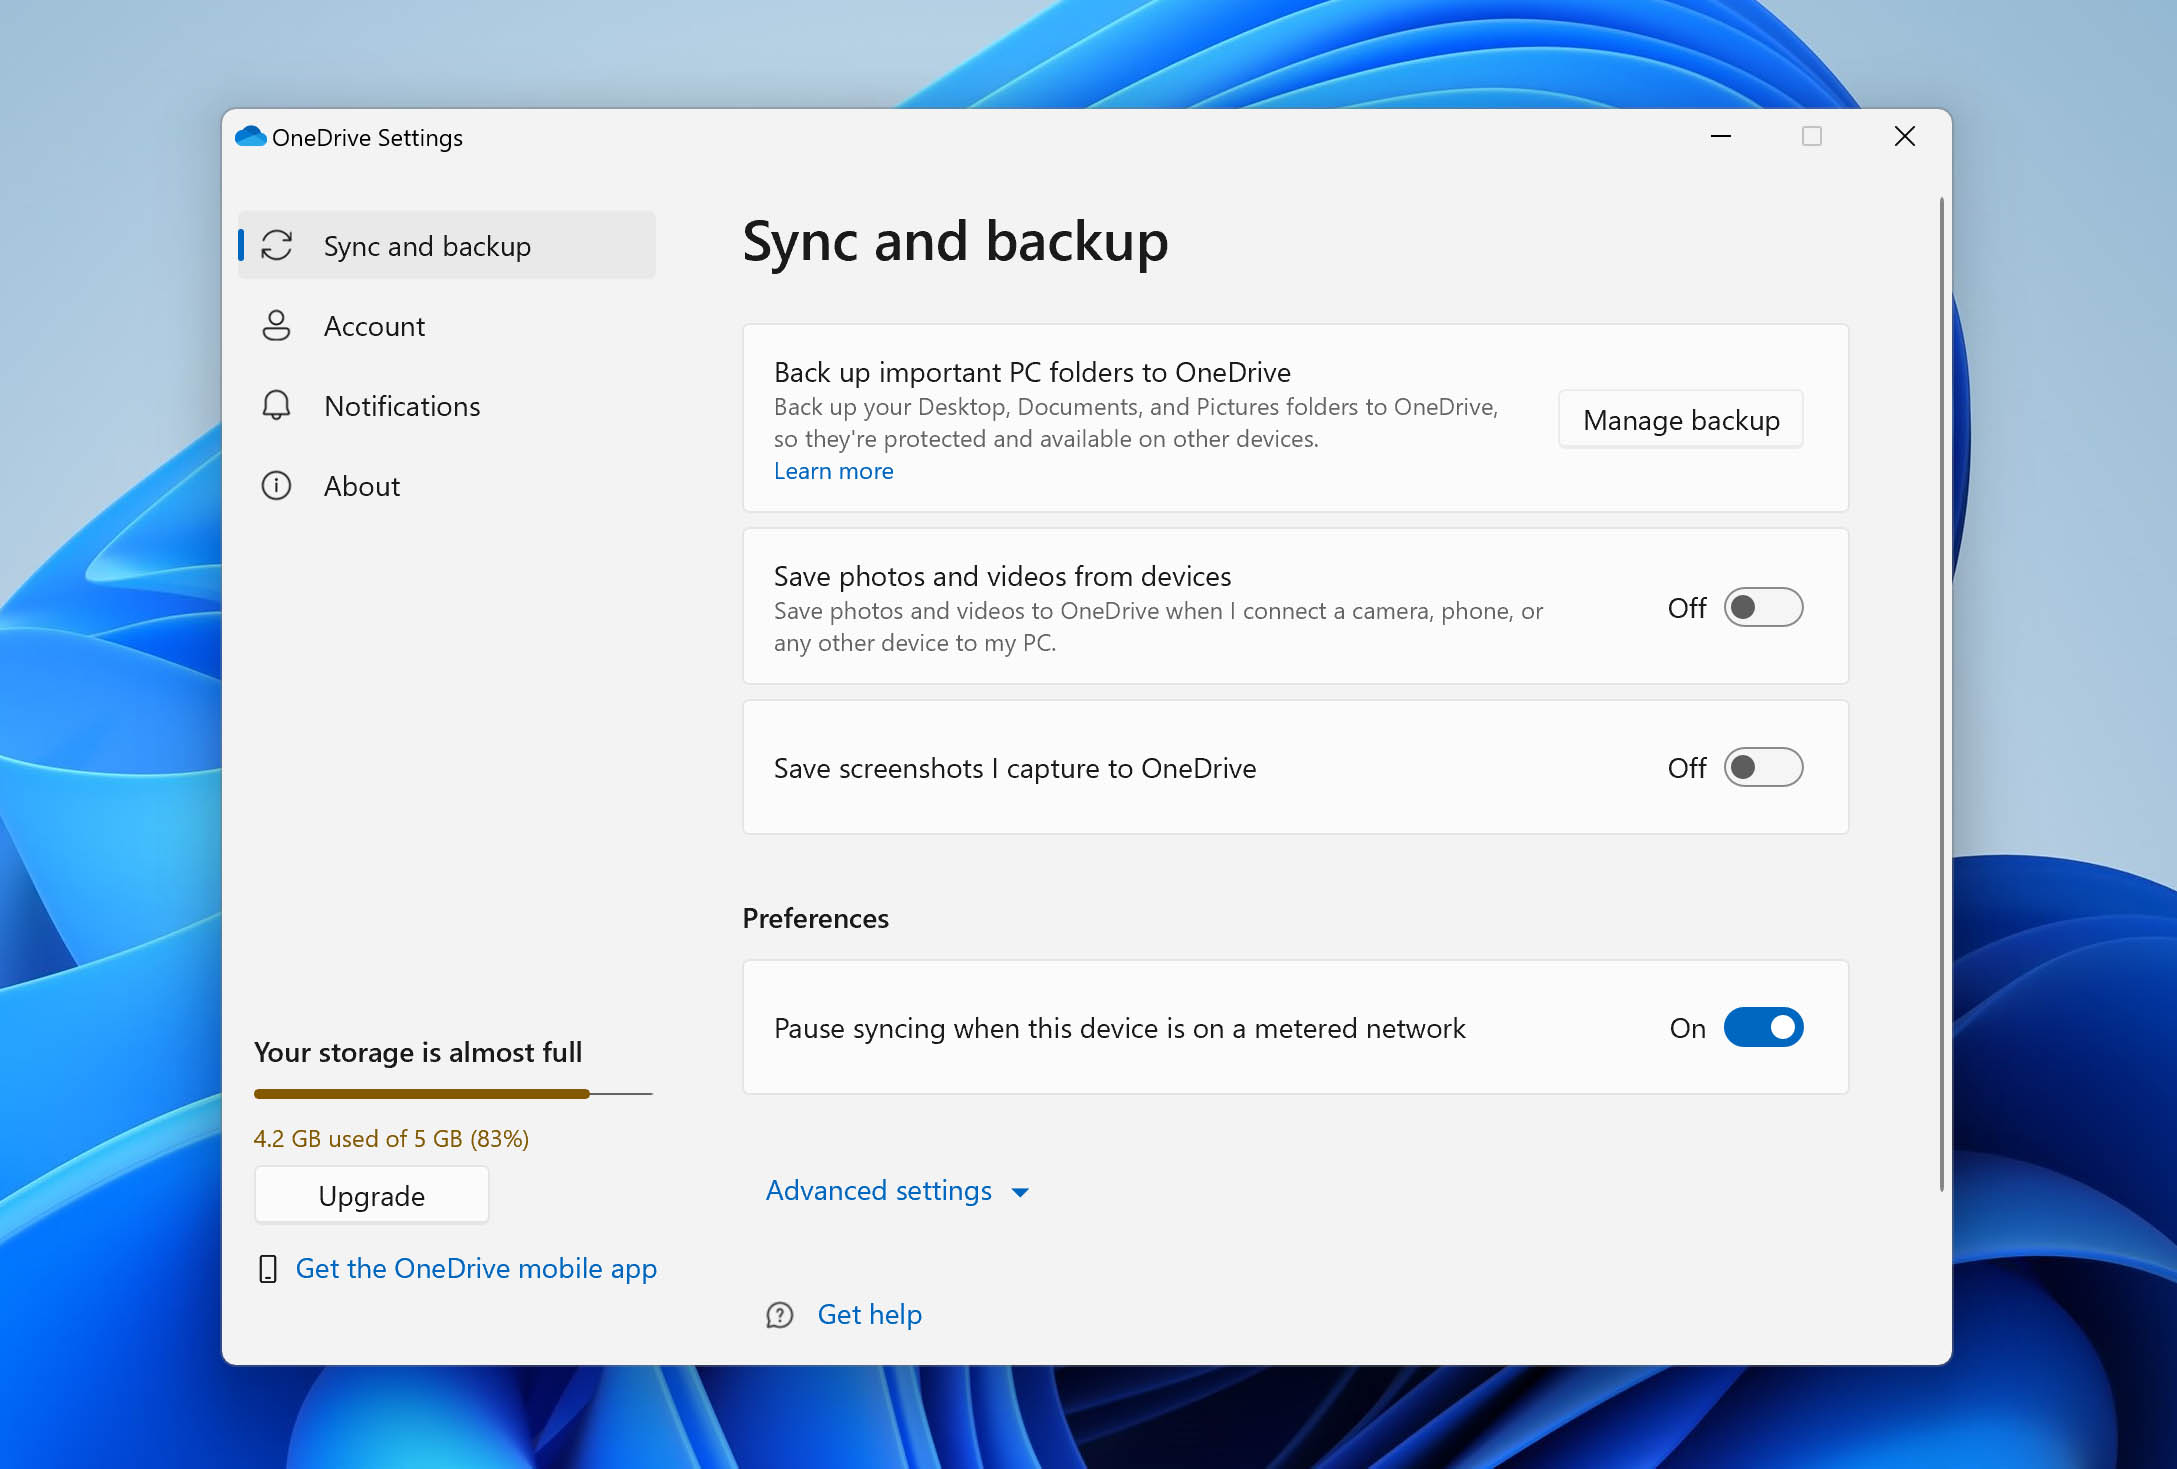
- You can choose to back up your Libraries folders. Choose the combination of these options that you want and then hit Save changes.
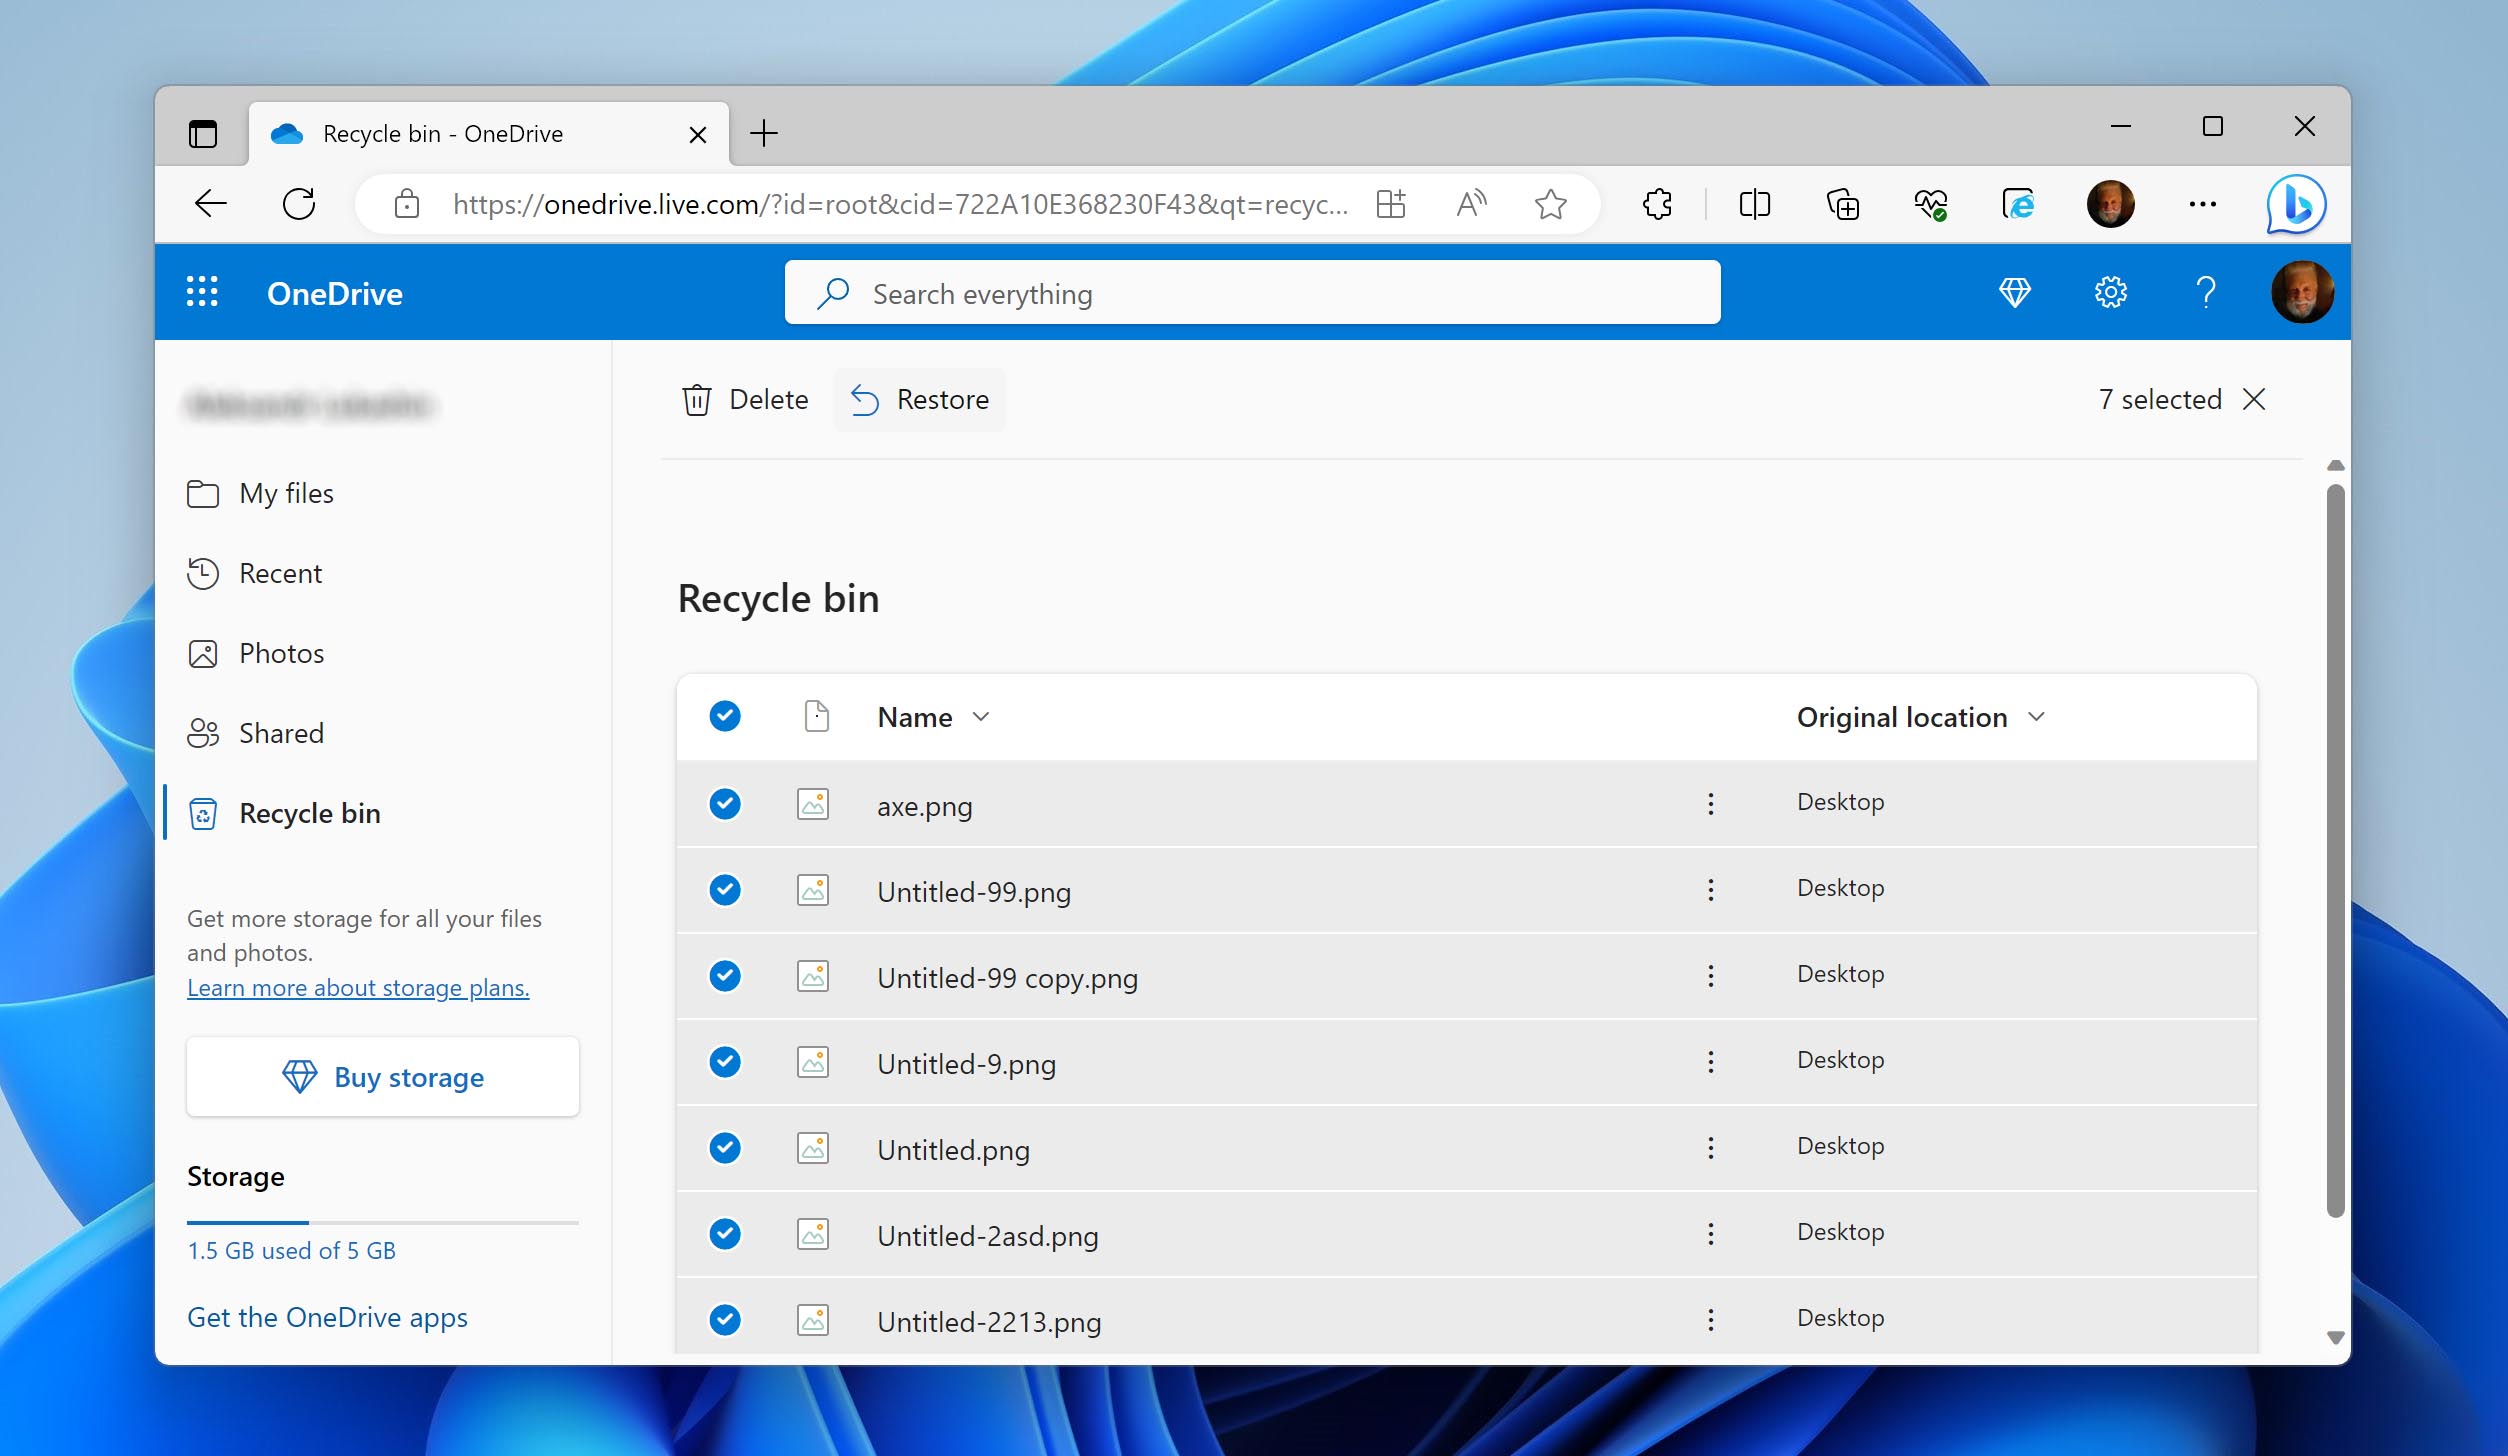
To recover files deleted by cut and paste with one drive, follow these steps:
- First, log in to your OneDrive accounts.
- In the left side panel of your account, select Recycle bin.
- If you see the file that was accidentally deleted, select it and then hit Restore to recover your file.
FAQ
How does cut and paste cause data loss?
Here are some scenarios that can cause data to be lost during a cut and paste operation:
- Power failures: In the case of a power failure, the cut and paste may be interrupted, causing the files being transferred to be lost.
- Improper storage device removal: If a storage device is removed during a cut and paste operation then data may be lost.
- Storage device failure: If a storage device fails during a cut and paste operation, then data will be lost.
Are the files that I lost because of a cut and paste operation gone forever?
If you act quickly you will be able to recover your files. Even though your files may not be visible after a botched cut and paste operation, these files will remain on your drive until they are overwritten by new data. After a failed cut and paste operation, the files are there but because your operating system assumes that the procedure must have worked, the files are removed from their folder and earmarked for being overwritten. Don’t copy any new information to the storage device that you will recover the files from to ensure that the lost files aren’t overwritten and lost forever.
How do I recover files lost because of a cut and paste operation?
The best option for recovering files lost because of a failed cut and paste operation is to use data recovery software. This type of software thoroughly scans your drive for lost files and increases the chance of file recovery. One of the best data recovery applications available on the market is Disk Drill. It is available for both Windows and macOS. It uses powerful scanning algorithms that increase the chances of you recovering files. In addition, while powerful, it is safe and easy to use.
Wrapping Up
If a cut and paste operation is interrupted, you might lose the files that you were trying to transfer. There are solutions to remedy this such as using data recovery software to try to retrieve the lost files or you could restore the lost files from a backup solution such as what is offered through Windows’ File History feature.
There are also many other backup solutions available that can help you to keep your files safe. In fact, a strong backup strategy can even prevent you from having to use attempt to recover your files in the first place, so consider putting one in place so that you don’t have to potentially suffer if you ever encounter any type of data loss, whether it be because of a botched cut and paste operation or otherwise.
This article was written by William Elcock, a Contributing Writer at Handy Recovery Advisor. It was also verified for technical accuracy by Andrey Vasilyev, our editorial advisor.
Curious about our content creation process? Take a look at our Editor Guidelines.