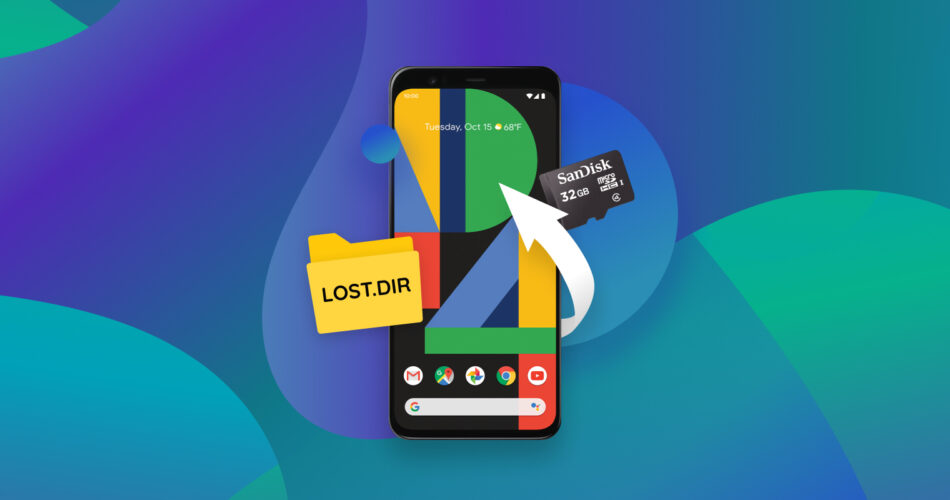
Have some of your precious photos, notes, or other files disappeared from your Android device? Then, it’s time to learn about the methods that allow you to recover LOST.DIR files on Android.
The solutions we’ll see in this article are what you need to get your files back out of Android’s LOST.DIR. This “LOST.DIR” is a system-created folder most people don’t realize exists in their Android devices.
What is the LOST.DIR Folder on an Android Device?
Like its name states, the LOST.DIR folder on an SD card or internal storage of an Android device “holds” all files that were somehow “lost”.
- 💾 Was a copy or move process interrupted?
- ⚡ Did your smartphone reboot while grabbing a video?
- 🔥 Has your overheated tablet crashed while a demanding game was saving your progress?
In those examples and all similar situations where your Android device couldn’t finish writing data on a storage device, the failed results are moved to the LOST.DIR.
Thus, although not identical, it’s similar to the more familiar concept of the Trashcan/Recycle Bin on our desktops. We’ve already covered that it is possible to recover deleted files from the Recycle Bin, even after you empty it. Thankfully, it’s almost as easy to get back your files from Android’s LOST.DIR equivalent.
Can I Recover Deleted LOST.DIR Files or Folder?
Thankfully, it’s possible to recover files from the LOST.DIR on Android devices, as long as you act fast.
The contents of the LOST.DIR, and even the folder itself, are temporary. Eventually, Android will dispose of any files within that folder it believes are useless. However, some of those “useless” files might be precisely what you’d want to get back.
As we’ll see next, LOST.DIR Android recovery is easily achievable with specialized software and a connection to your PC.
Although we’re referring to a singular LOST.DIR, you may find more than one on your Android device. Android may create a separate instance of this folder for each storage device.
How to Recover Permanently Deleted LOST.DIR Files
If you accidentally deleted the LOST.DIR folder or some of the files within, it may be possible to get them back. That is, as long as:
- 🔌 Your Android device is detected as a storage device when connected to your PC or…
- 💿 The LOST.DIR, from which you want to recover files, was on your phone’s external storage.
In both those cases, you can connect your Android device or its external storage to your PC and use a data recovery solution to get your files back. Let’s see how you can do that with two of the best solutions for the cause, the full-featured Disk Drill and the somewhat restricted but zero-cost PhotoRec.
- After connecting your Android device to your PC, drag down on its screen to reveal its notifications list. Among them, you’ll see the current state of the USB connection.
- Depending on your Android device, you’ll see an option to enable Mass Storage or File Transfer mode. However, also depending on your Android device, this may not lead to the intended outcome.
- The newest Android devices restrict access to their storage to minimize the chances of system corruption and offer increased security. If that’s the case with yours, you’ll have to disconnect your SD card from it. Then, scan the SD card on your PC to locate the LOST.DIR’s contents on it.
If your computer doesn’t come with an SD card slot, you can purchase a standalone Memory Card Reader. Those devices are small, affordable, and usually also offer slots for connecting other types of memory cards – like Compact Flash or Sony’s Memory Stick Pro Duo.
Note that if you don’t want to recover files from the LOST.DIR folder on your SD card, but from a fully formatted SD card, it’s best to check our guide on how to recover files from a formatted SD Card on Windows 10.
When your Android device or SD card is accessible from your PC, proceed to scan it with Disk Drill or PhotoRec, as we’ll see next.
Method 1: Using Disk Drill
Scanning your Android phone’s or tablet’s storage with Disk Drill and recovering files from its LOST.DIR is an effortless affair. However, as noted above, if you need to scan your Android device’s internal storage, that’s only possible on older devices.
If you’ve got such a device, you’ll have to connect it to your PC with a USB cable, and change the USB connection mode to Mass Storage.
If you’ve got a newer Android device, it’s impossible to scan its internal storage on Windows. Still, you can do that with the Mac version of Disk Drill if your device is rooted. Thankfully, if you’re on Windows and your LOST.DIR was stored on your Android device’s external storage, you can use a device like an SD card reader to directly connect it to your PC and scan it without your Android device restricting you.
Check our Disk Drill PRO v5 review to see why it’s regarded as one of the best options for such tasks, and why we chose it for this article.
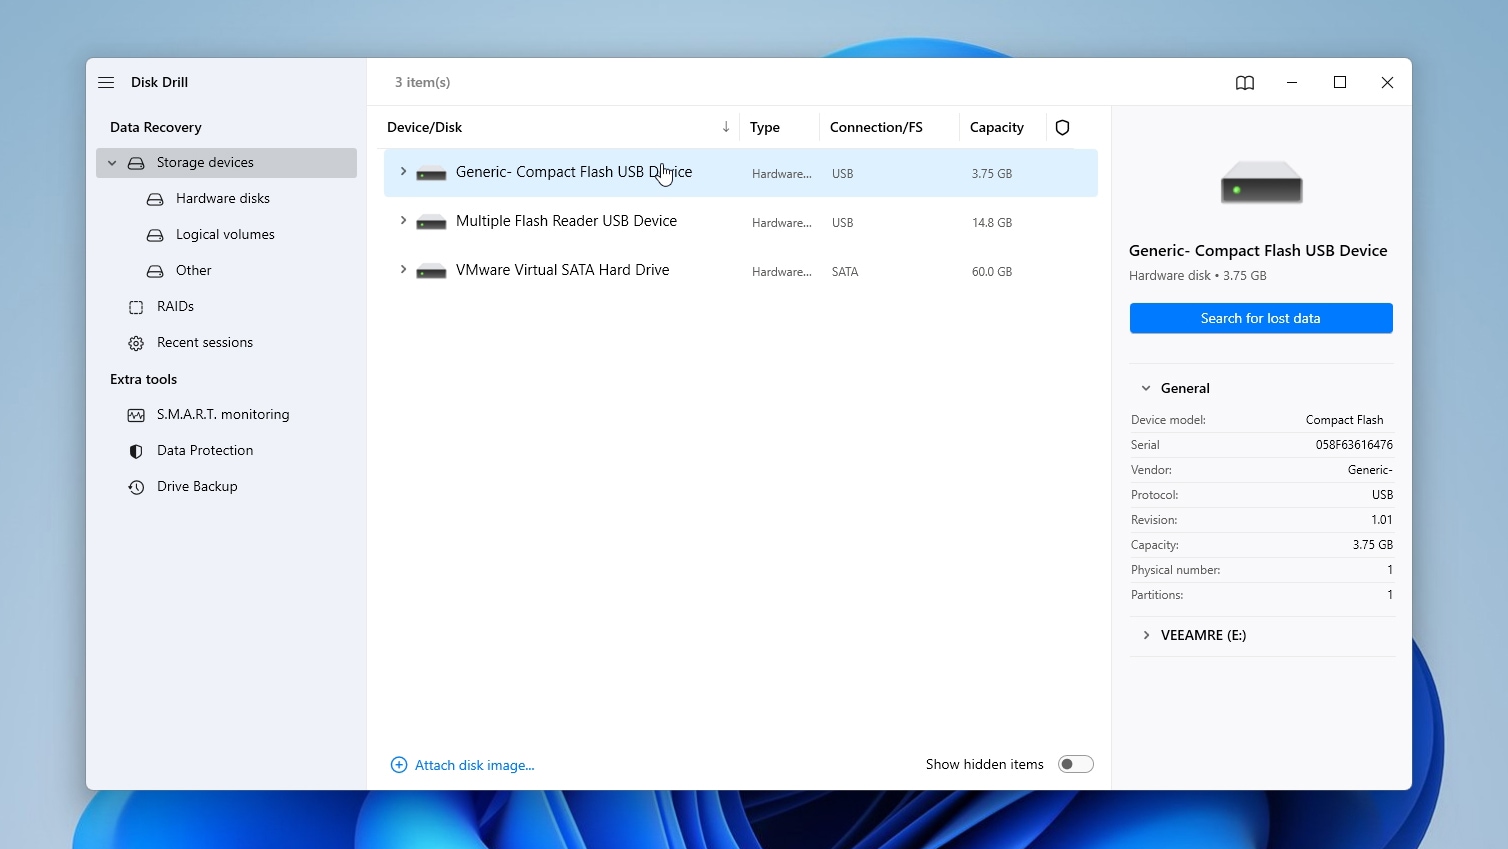
- Download Disk Drill from its official site. Install the application, run it, and select the device you want to scan to recover files from the LOST.DIR on it. You’ll find it on the Disk/Devices list that dominates its initial window. Click on Search for lost data to begin the scanning process.
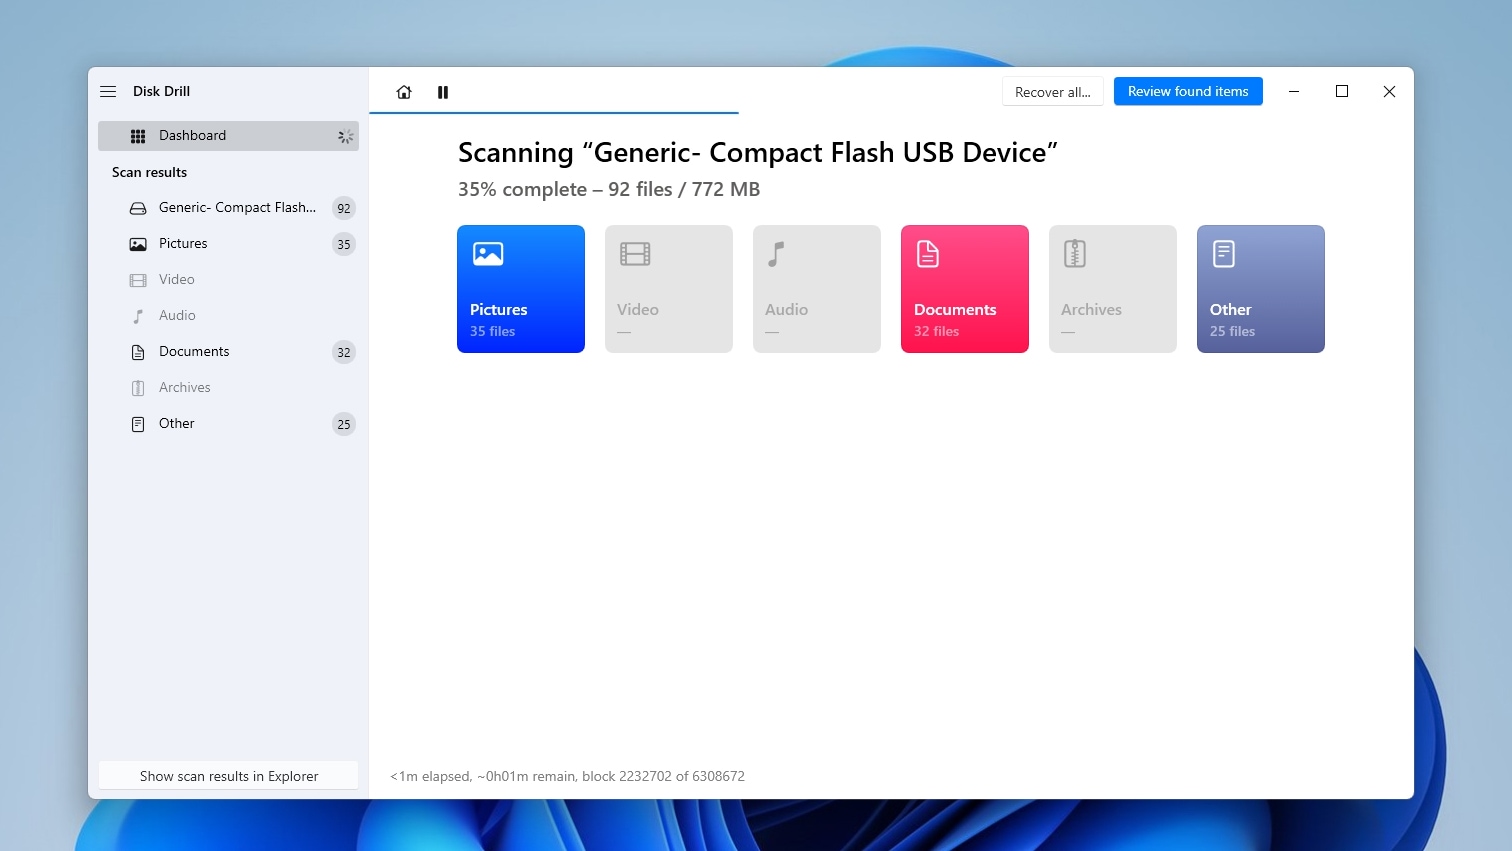
- You can pause the scanning process or check out its findings at any time. Still, it’s best to let it run its course to allow Disk Drill to find as many files as possible and correctly estimate their “recoverability” chances. Especially if you accidentally deleted the LOST.DIR folder, since a longer scan will enable Disk Drill to find more data that’s marked as “deleted”. When done, click on Review found items.
- Go through Disk Drill’s results list, and place a checkmark on the left of every file you want to recover.
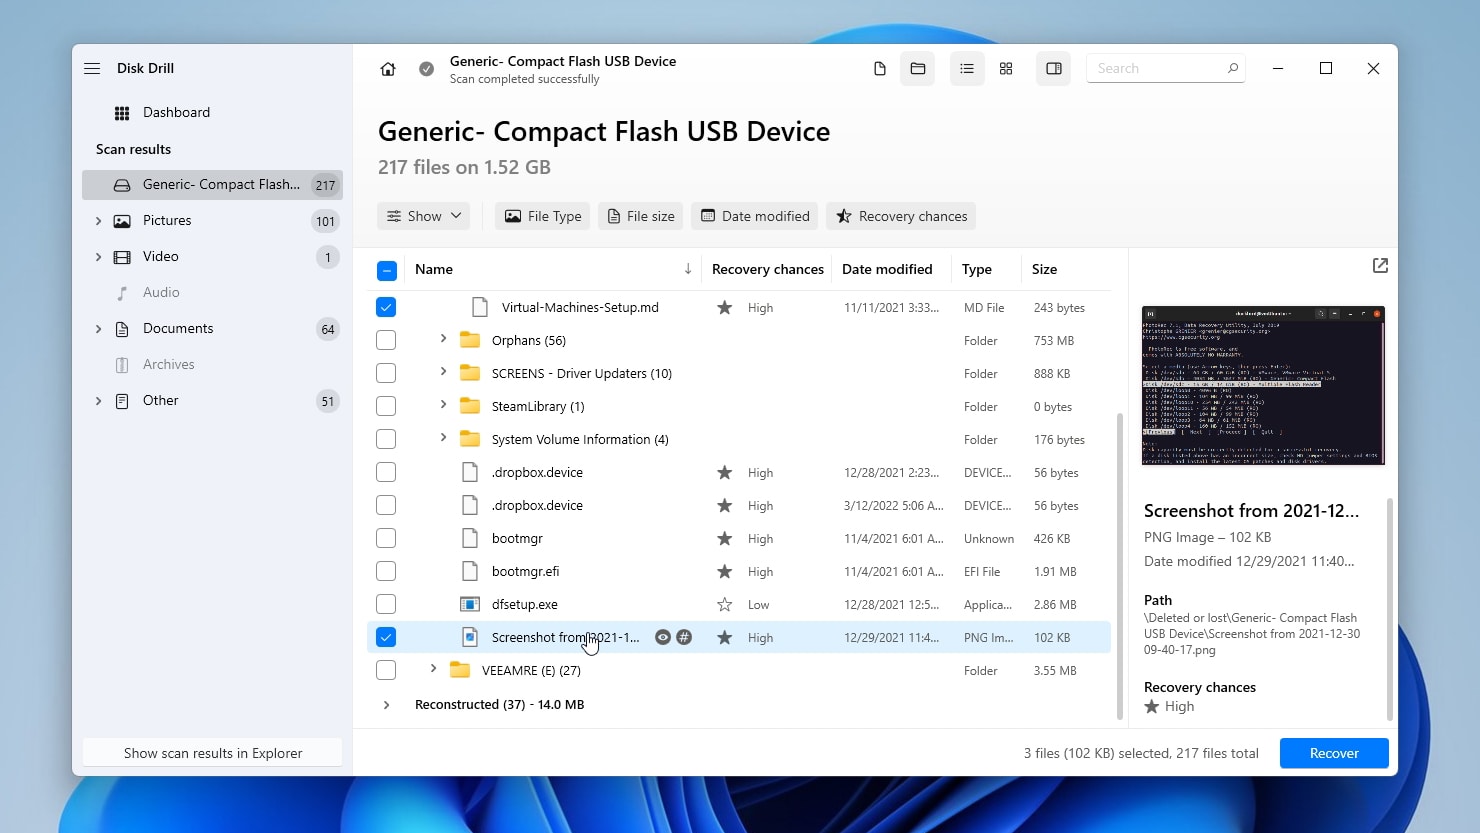
- If you can’t easily locate the files you need, you can filter down Disk Drill’s results into more manageable groups. For that, use either the categories on the left of its window or the filters above the results list. You can also check out a preview of many popular file types’ contents. For that, right-click on a file and select Preview, or point your cursor at them and click on the little “eye” icon that shows up next to their filename.

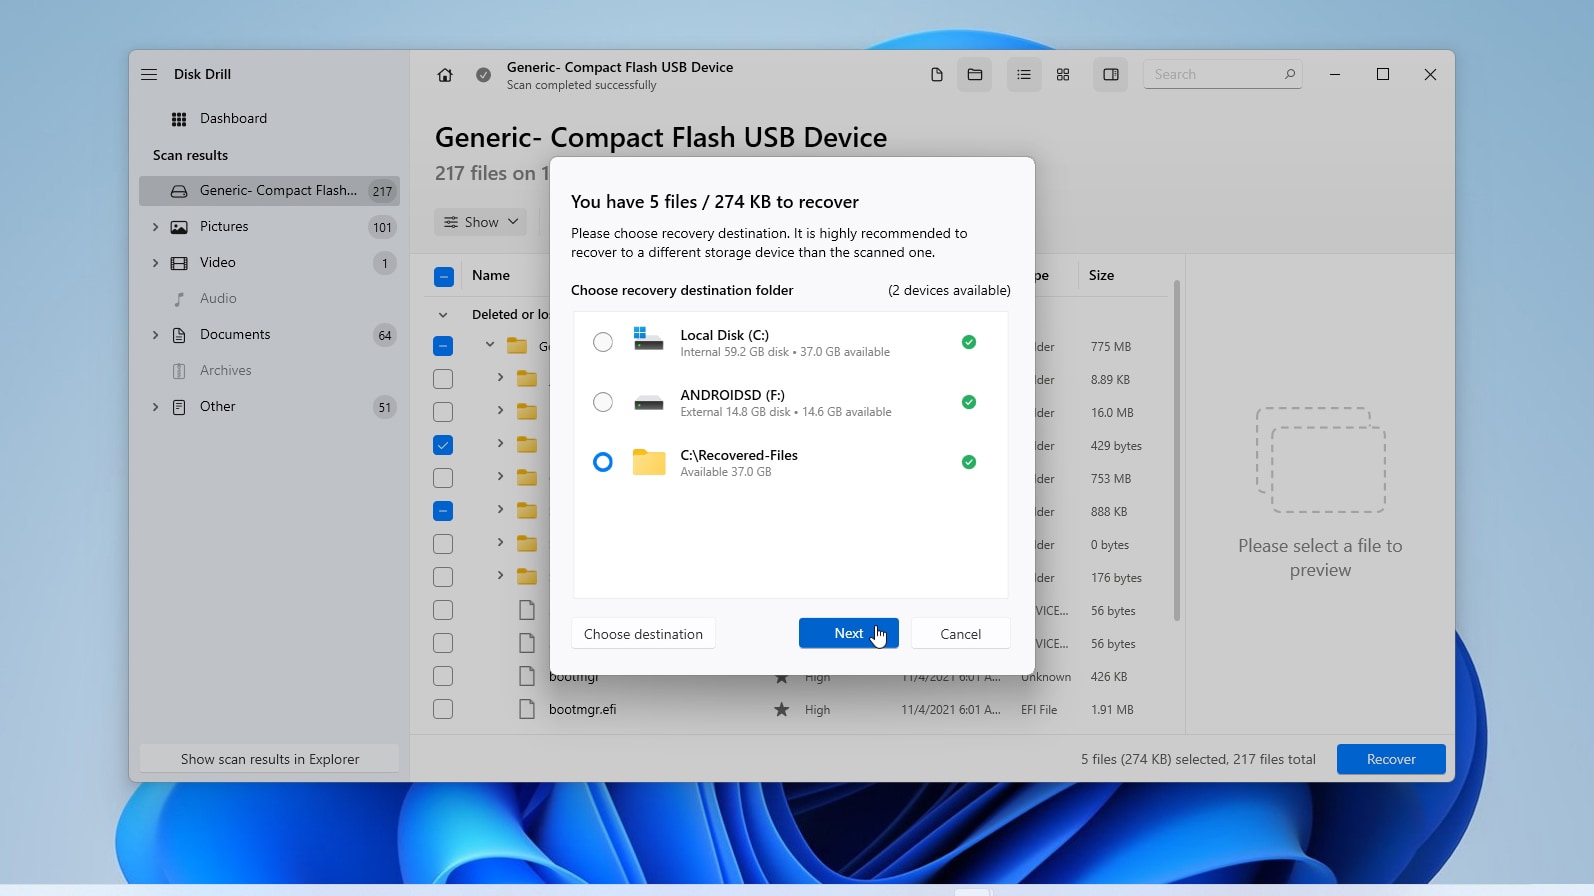
- With your files selected, click on Recover at the bottom right of Disk Drill’s window. Then, choose a target folder where you want Disk Drill to recover files from your LOST.DIR (or any other folder on your storage device).
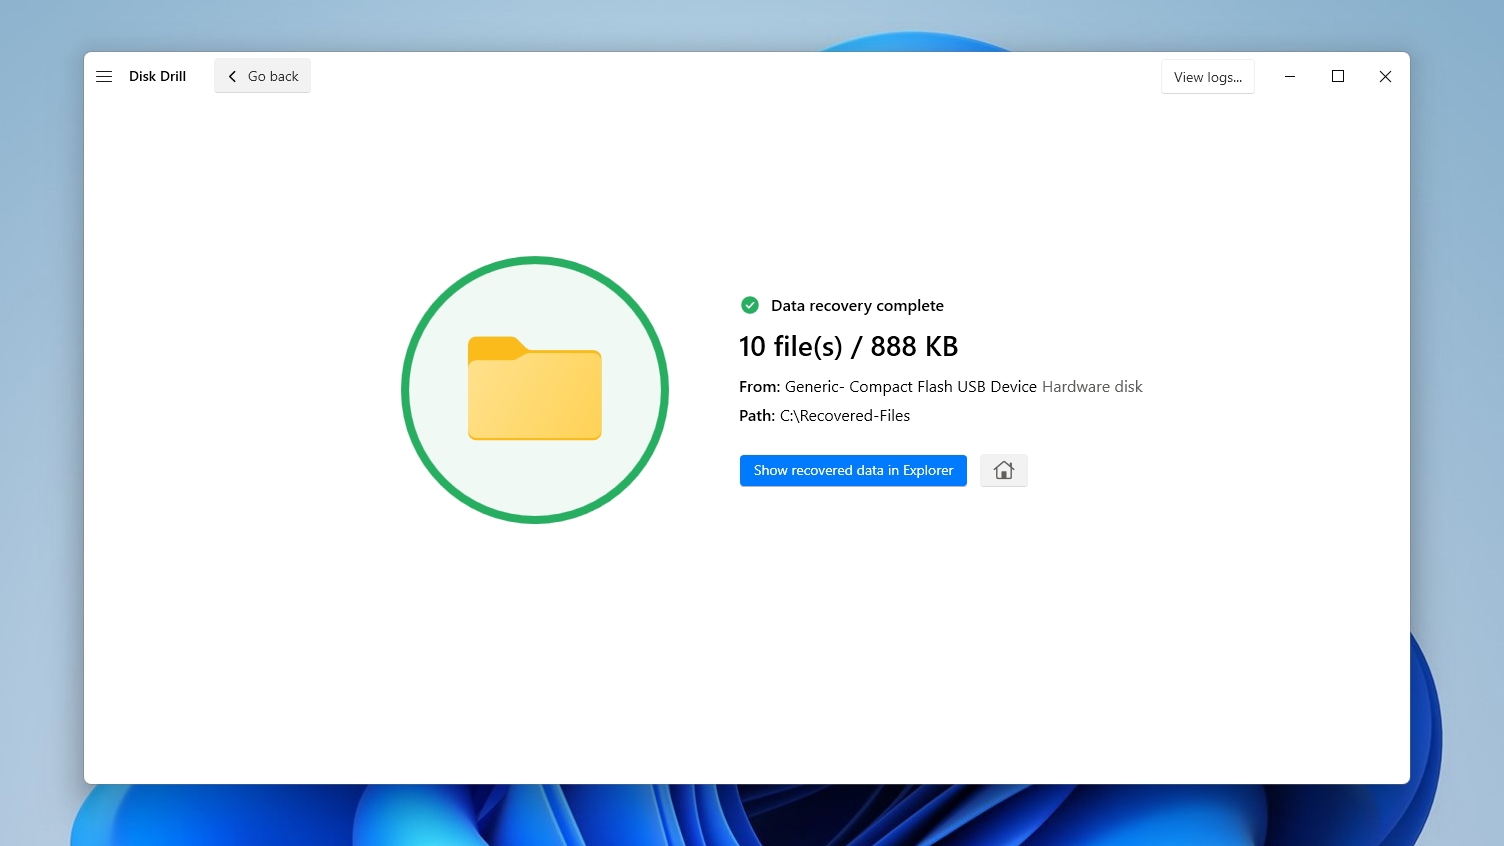
- Depending on the amount of data recovered, the recovery will probably be complete in seconds. Disk Drill will show you a brief report with its results. By clicking on Show recovered data in Explorer, you can directly open the folder with the recovered files in your OS’s default file manager.
Method 2: Using PhotoRec
Do you want to get back your accidentally deleted LOST.DIR folder’s contents for free? Try out PhotoRec, which comes bundled with the more popular Testdisk app. If you want to learn more about PhotoRec, check our PhotoRec Review.
For this article, we’ll be using qPhotoRec, which is also included in the bundle. Its functionality is identical to the “plain” PhotoRec app, but it offers a more user-friendly GUI.
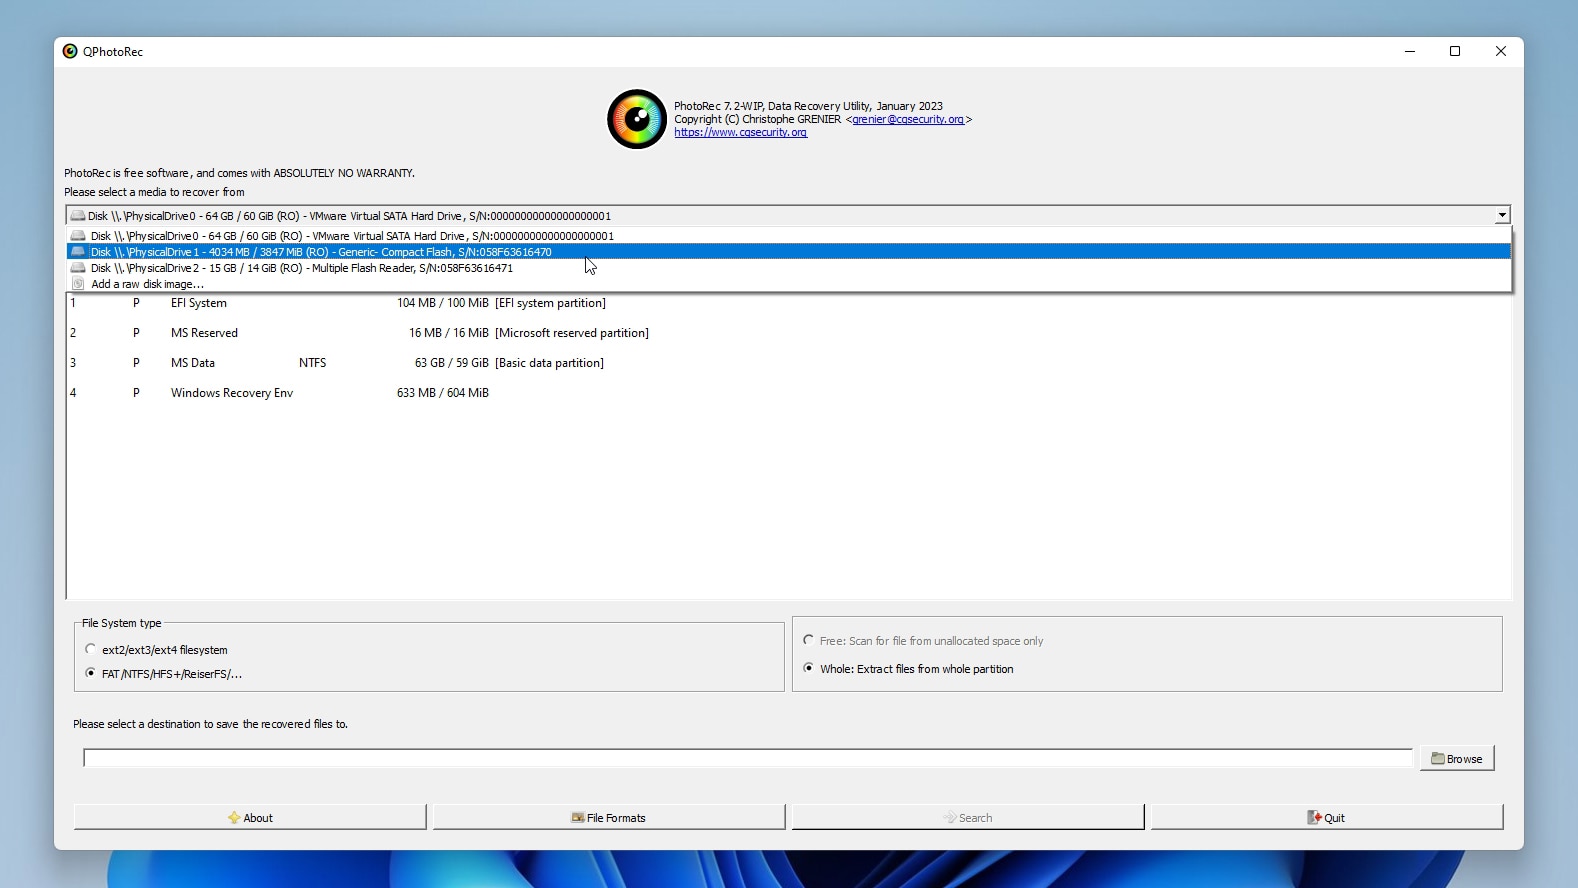
- Download Testdisk/PhotoRec from its official site. Since it doesn’t come with a user-friendly installer, you’ll have to manually extract its archive’s contents to a folder on your computer. Then, find qPhotoRec inside that folder and run it. Use the drop-down menu at the top of qPhotoRec’s window to select the device you want to scan.
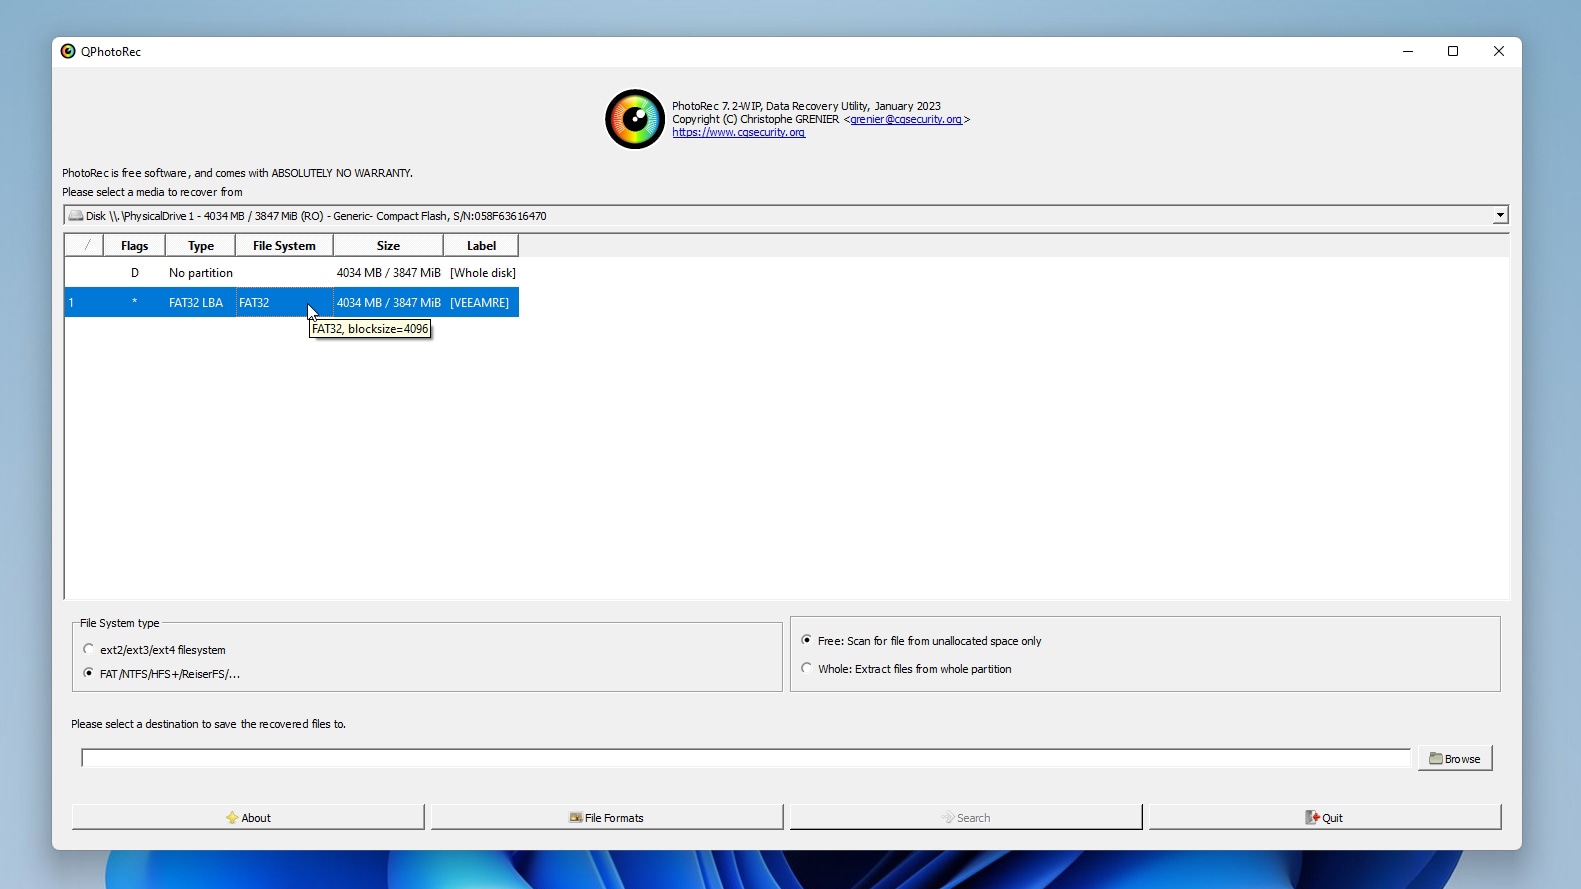
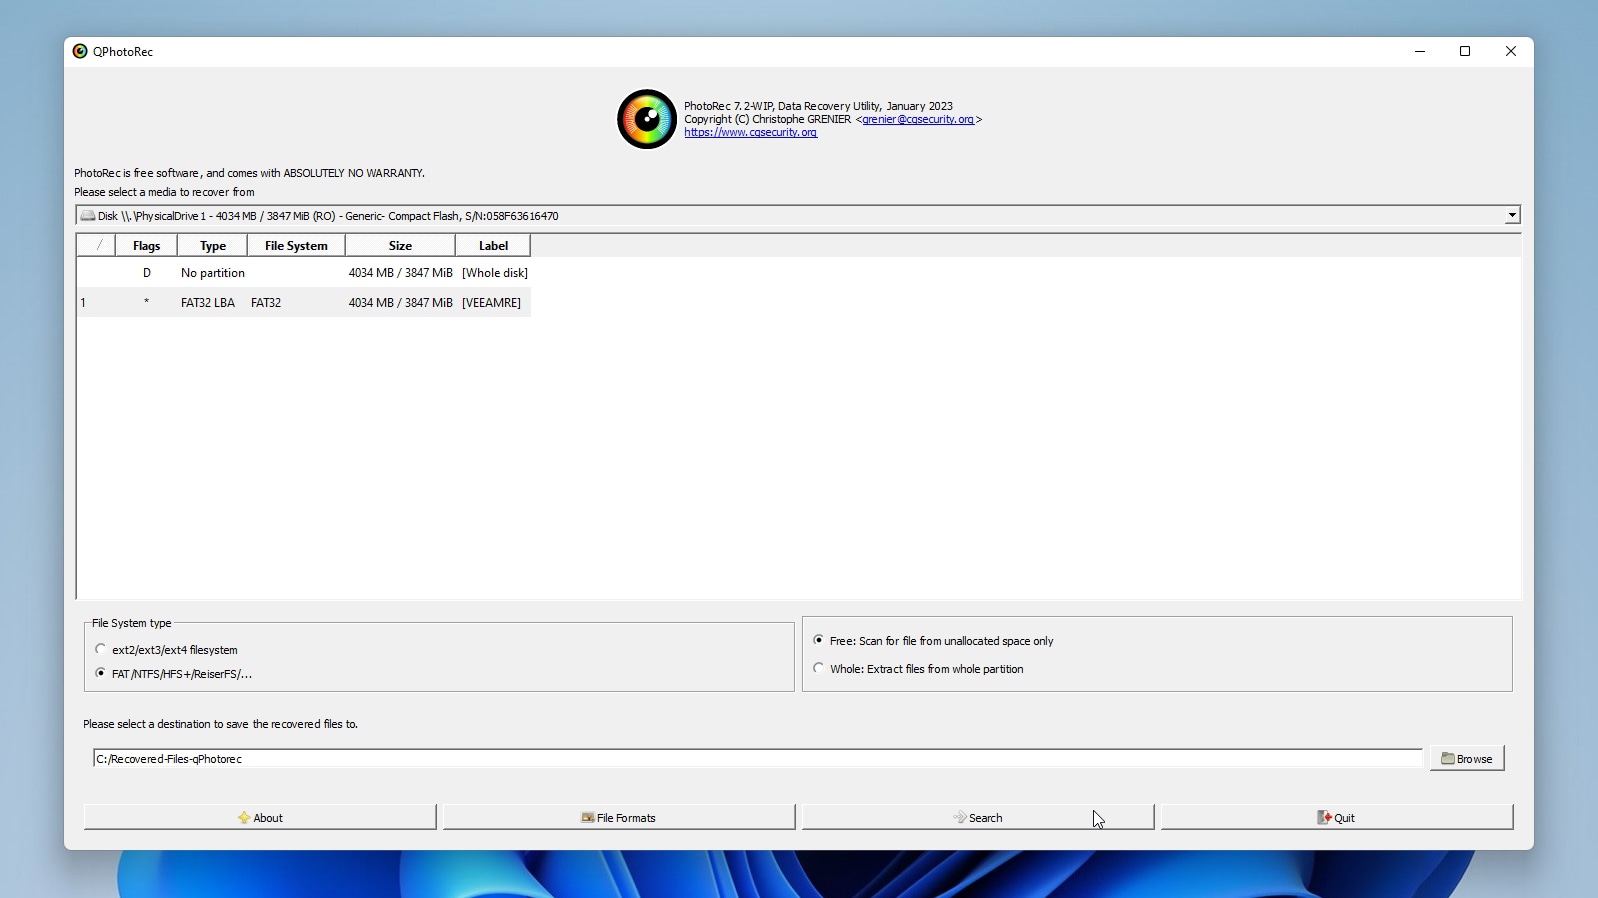
- qPhotoRec will show you the data structures of the device you selected under the drop-down menu. You can choose a specific partition to scan, or select No partition to check the whole storage.
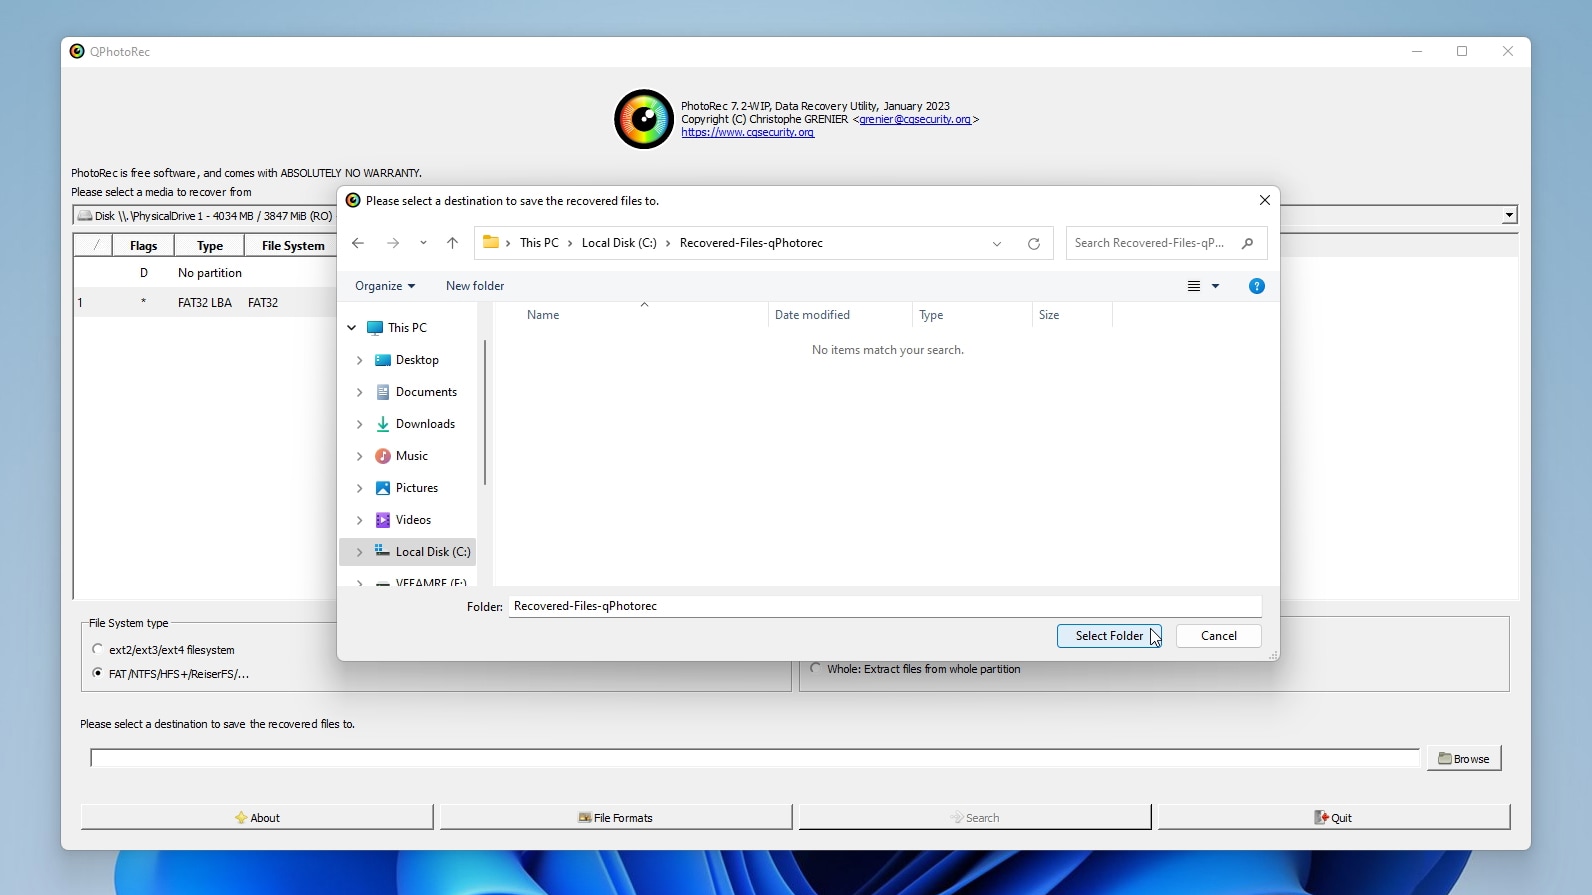
- Click the Browse button on the right of the empty field near the bottom of the window. It’s under Please select a destination to save the recovered files to. Do as instructed and choose a folder where you want to recover files from the LOST.DIR, or anywhere on your storage. Preferably, you should go for a different device than the one you’re scanning.
- Click on the Search button to have qPhotoRec begin scanning your device and recovering files. Note that this isn’t a process specifically about LOST.DIR Android recovery. It’s a full-blown data recovery procedure that will need enough time to scan your whole storage.
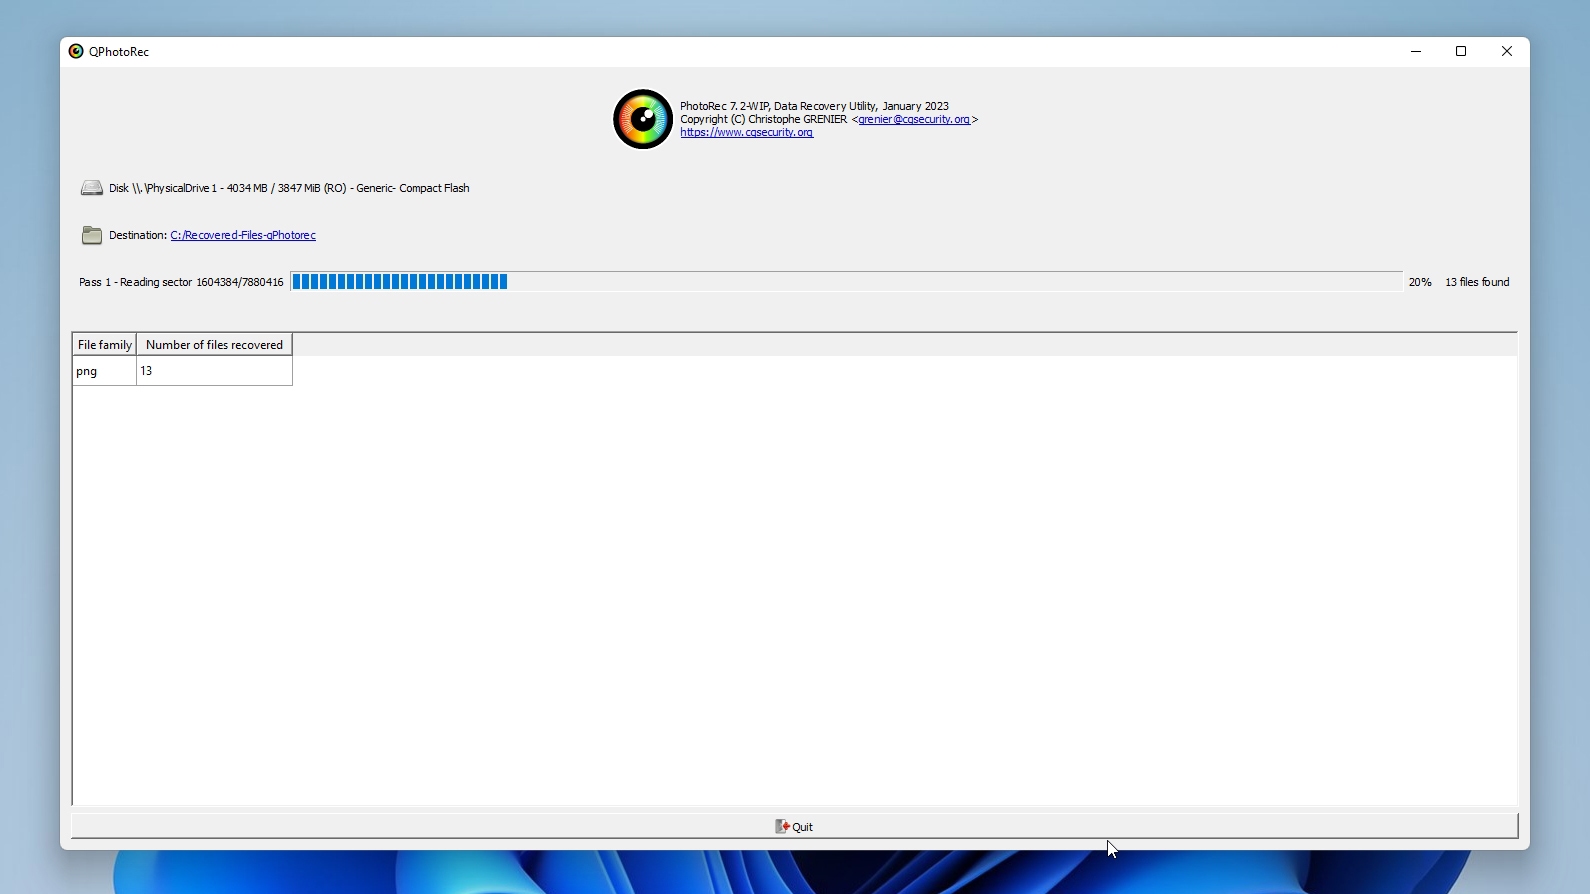
- qPhotoRec will immediately begin recovering data. Unlike Disk Drill, you don’t have to choose what to recover. However, since (q)PhotoRec recovers any file it finds, you’ll have to locate the files you wanted afterward, potentially among thousands of unwanted-but-recovered-anyway files.
FAQ
How to recover files from LOST.DIR without PC?
You can recover lost files directly on an Android phone or tablet using an Android app like Disk Digger. However, for the best results, your Android device should be rooted.
The process usually boils down to:
- Download the app from Google’s Play store.
- Run the app and scan your Android device’s storage.
- Choose the files to rcover.
- Begin the recovery process.
How to recover LOST.DIR files on SD card for free?
You can recover files lost anywhere on your device, including the LOST.DIR, using an app like Disk Drill or PhotoRec, as follows:
- Connect your Android device or its SD card to your PC.
- Download, install, and run Disk Drill or PhotoRec.
- Have them scan your Android device’s storage
- If using Disk Drill, choose what you want to recover.
- Select a target folder for the recovered data. Then, begin the recovery process.
- Check the recovered files. For PhotoRec, you’ll have to manually locate the files you wanted among all the recovered data.
How to recover LOST.DIR files from USB?
If a transfer failed or the device crashed while using a USB Flash Drive with Android, you might see a LOST.DIR there, too. To recover files from this folder:
- Connect the USB Flash Drive to your PC.
- Download, install, and run a data recovery solution like Disk Drill.
- Have it scan your USB Flash Drive.
- Choose what you want to recover.
- Select a destination folder (preferably on a different storage device).
- When the process completes, you’ll find all recovered files in the selected destination folder.
What files are stored in LOST.DIR?
The Android OS may use the LOST.DIR as temporary storage for “active” files that are either being copied, moved, or in use by some app. If something goes wrong, the LOST.DIR and its contents might remain in the storage.
What happens if I delete LOST.DIR Folder?
Theoretically, you can safely delete the LOST.DIR from Android’s storage. Practically, this might lead to problems, so it’s best to leave it as it is.
Conclusion
The Android OS uses the LOST.DIR for “managing files”. Most of the time, you won’t even notice it’s there.
And yet, if it exists, it could be just the spot to check for precious lost data you need to get back. That is, if you act before Android decides the LOST.DIR and everything in it should be removed.
So, make sure to scan your storage and save your most important files with an app like Disk Drill as soon as you realize you need some lost files back from the clutches of the fabled LOST.DIR.
This article was written by Odysseas Kourafalos, a Editor-in-Chief at Handy Recovery Advisor. It was also verified for technical accuracy by Andrey Vasilyev, our editorial advisor.
Curious about our content creation process? Take a look at our Editor Guidelines.