Are you in a position where finding one particular photo in the Photos app on your iPhone seems like an impossible mission? As your photo library grows, keeping the library organized and easily accessible becomes a real challenge. The good news is that with the right approach, you can declutter and efficiently manage your whole iPhone photo collection.
In this article, we’ll get into the details of sorting the photos, decluttering, and cataloging the Photos app and provide you with a specific step-by-step algorithm that will help you organize iPhone photos.
Our Take on the Best Way to Organize Photos on an iPhone
If you’re tired of constantly having a messy library of photos on your iPhone, this dive-deep explainer can help you to finally declutter it and neatly organize your precious photo memories. All you need to do is follow the step-by-step instructions below!
Step 1: Backup Your Photos (If Something Goes Wrong)
Before getting to the main process of organizing your iPhone photos, it is beneficial to ensure you backup your images in case something goes awry. There isn’t much risk when it comes to dealing with the Photos app, but nothing protects you from accidentally deleting the wrong image.
Here are a few options that you can choose from to ensure that your iPhone photos are safely backed up:
- iCloud Photo Library
- Other Cloud Storage (Dropbox, Google Photos, OneDrive)
- Manually Backup to Your Mac via Finder
Step 2: Remove Unnecessary Pictures, Photos, and Screenshots
Once you’re sure that your precious memories are safely backed, you are ready to move forward with managing the photos on your iPhone. This step entails removing all of the clutter from your gallery, which includes deleting unnecessary pictures such as duplicates, similar photos, screenshots, etc. Clearing those files out will make the next steps of the iPhone Photos organization algorithm go more smoothly.
Step 2.1. Remove Duplicates
When it comes to detecting and removing duplicate photos from your iPhone gallery, you have two options: use the Duplicate feature directly in the Photos app or use a specialized photo duplicate remover application. Keep in mind the native duplicate removal feature is available only on iPhones running iOS 16 or later, so if you don’t meet this criteria, use the second option.
Option 1: Using the ‘Duplicate Album’ (iOS 16 and later)
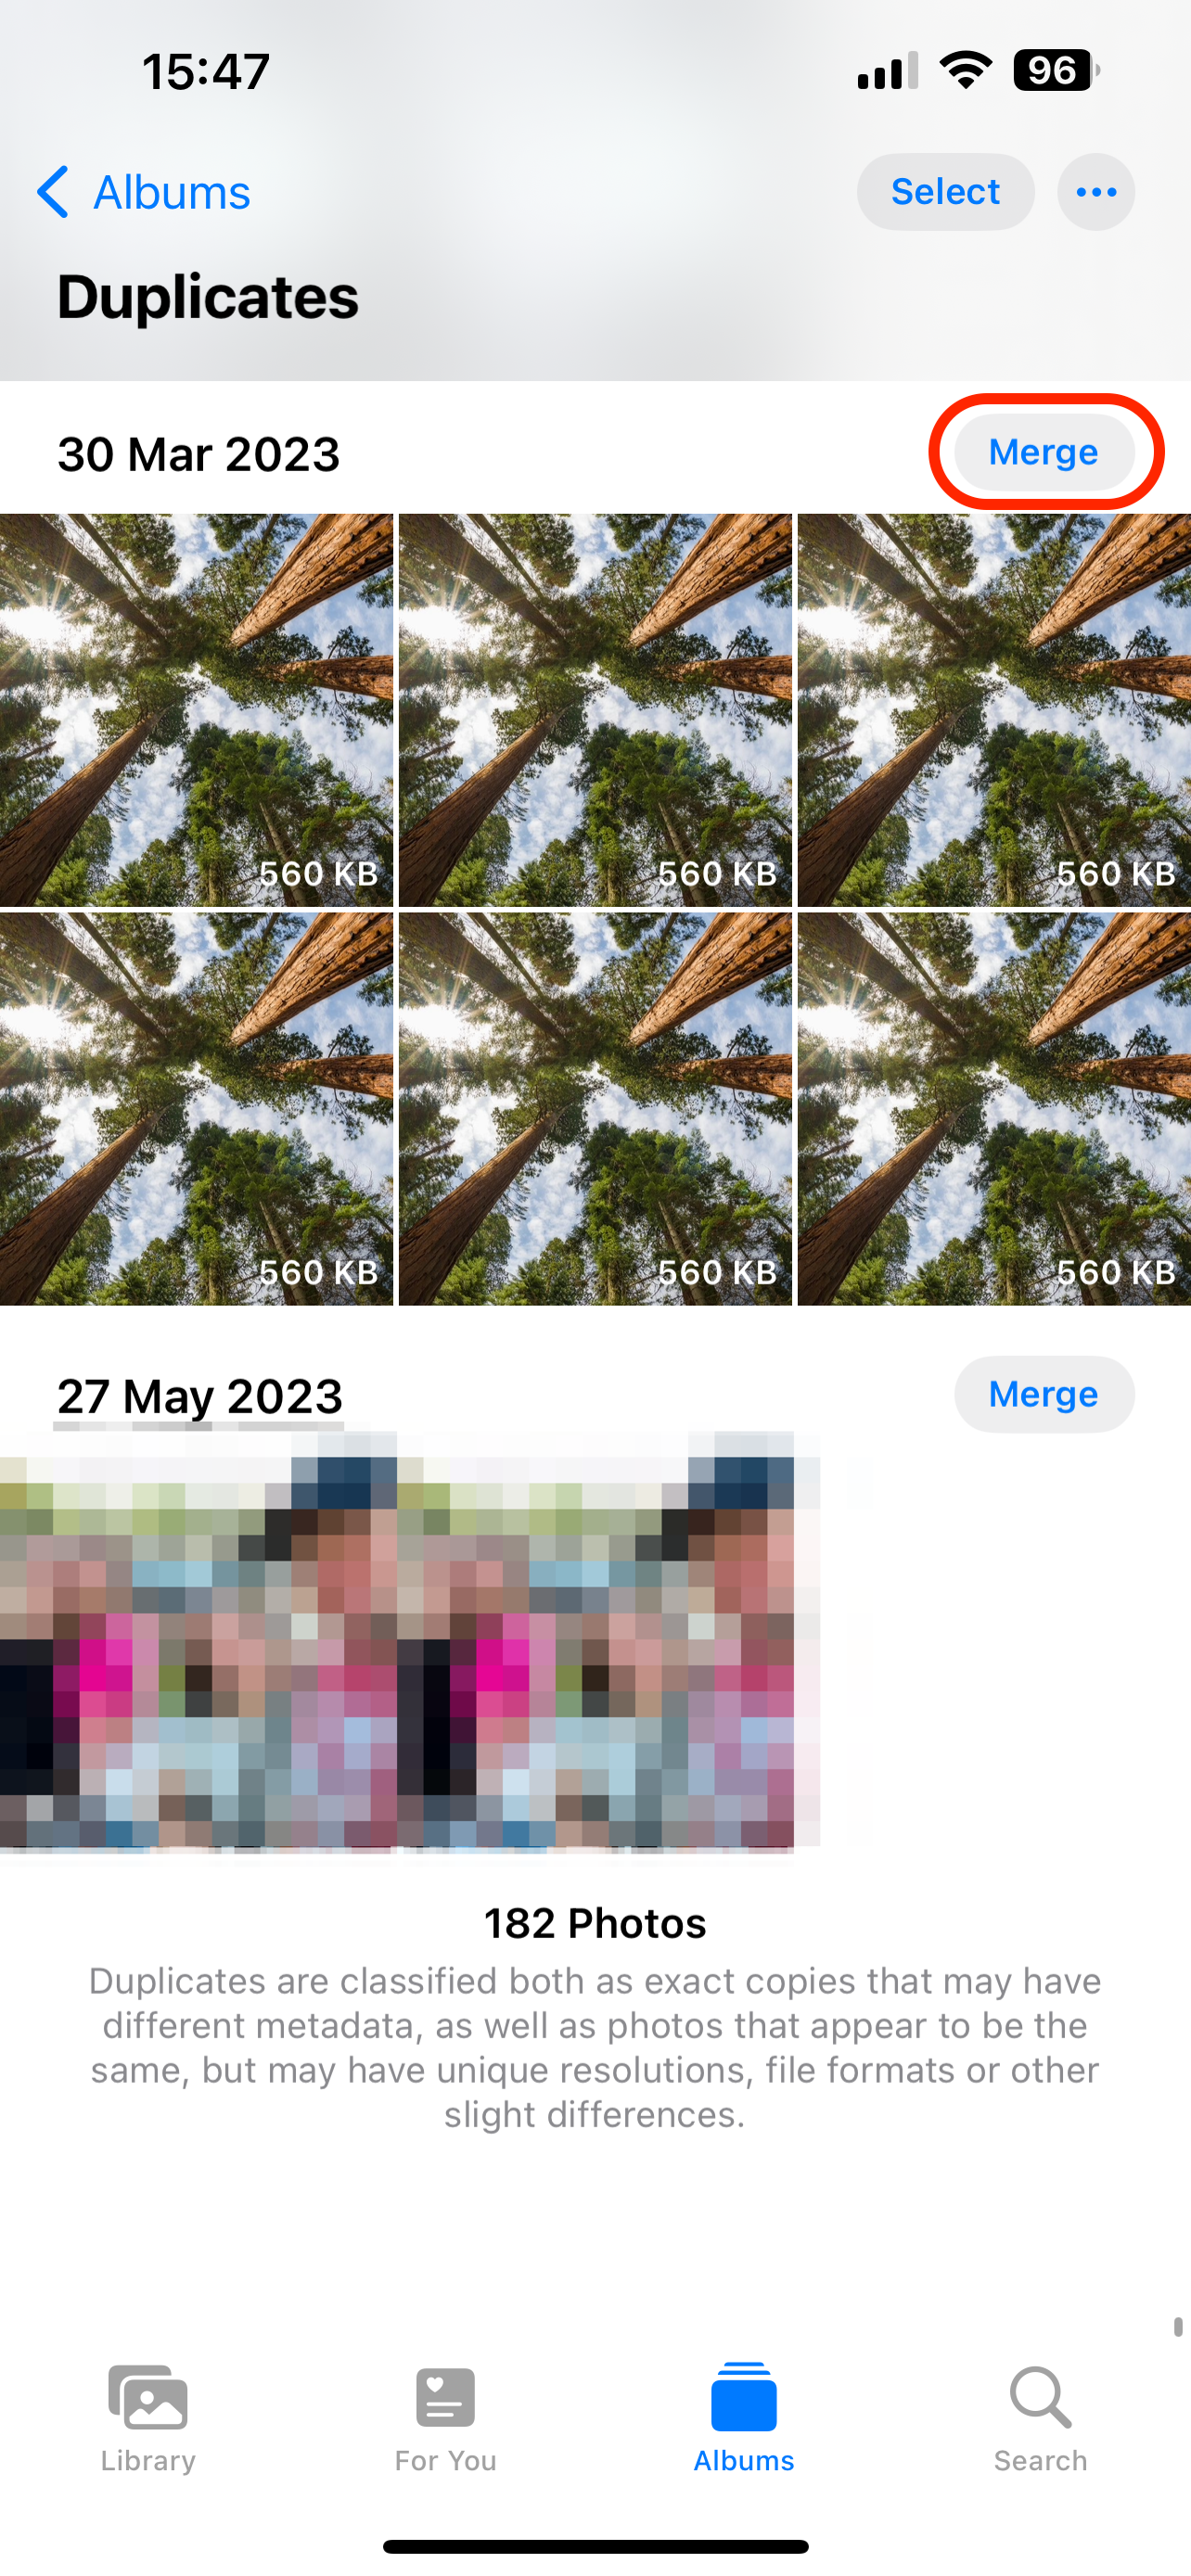
The Apple-native Photos duplicate removal feature is available to all users running iOS 16 or later. This feature detects photo duplicate sets and lets you merge them. It will automatically select the best quality and most relevant photo from the set to keep it, and the rest will move to the Recently Deleted folder.
Follow these steps to locate and remove the duplicate photos from your iPhone using the Duplicate feature in the Photos app:
- Launch the Photos application on your iPhone.
- Go to the Albums tab.
- Scroll down until you find the Utilities section and tap Duplicates.
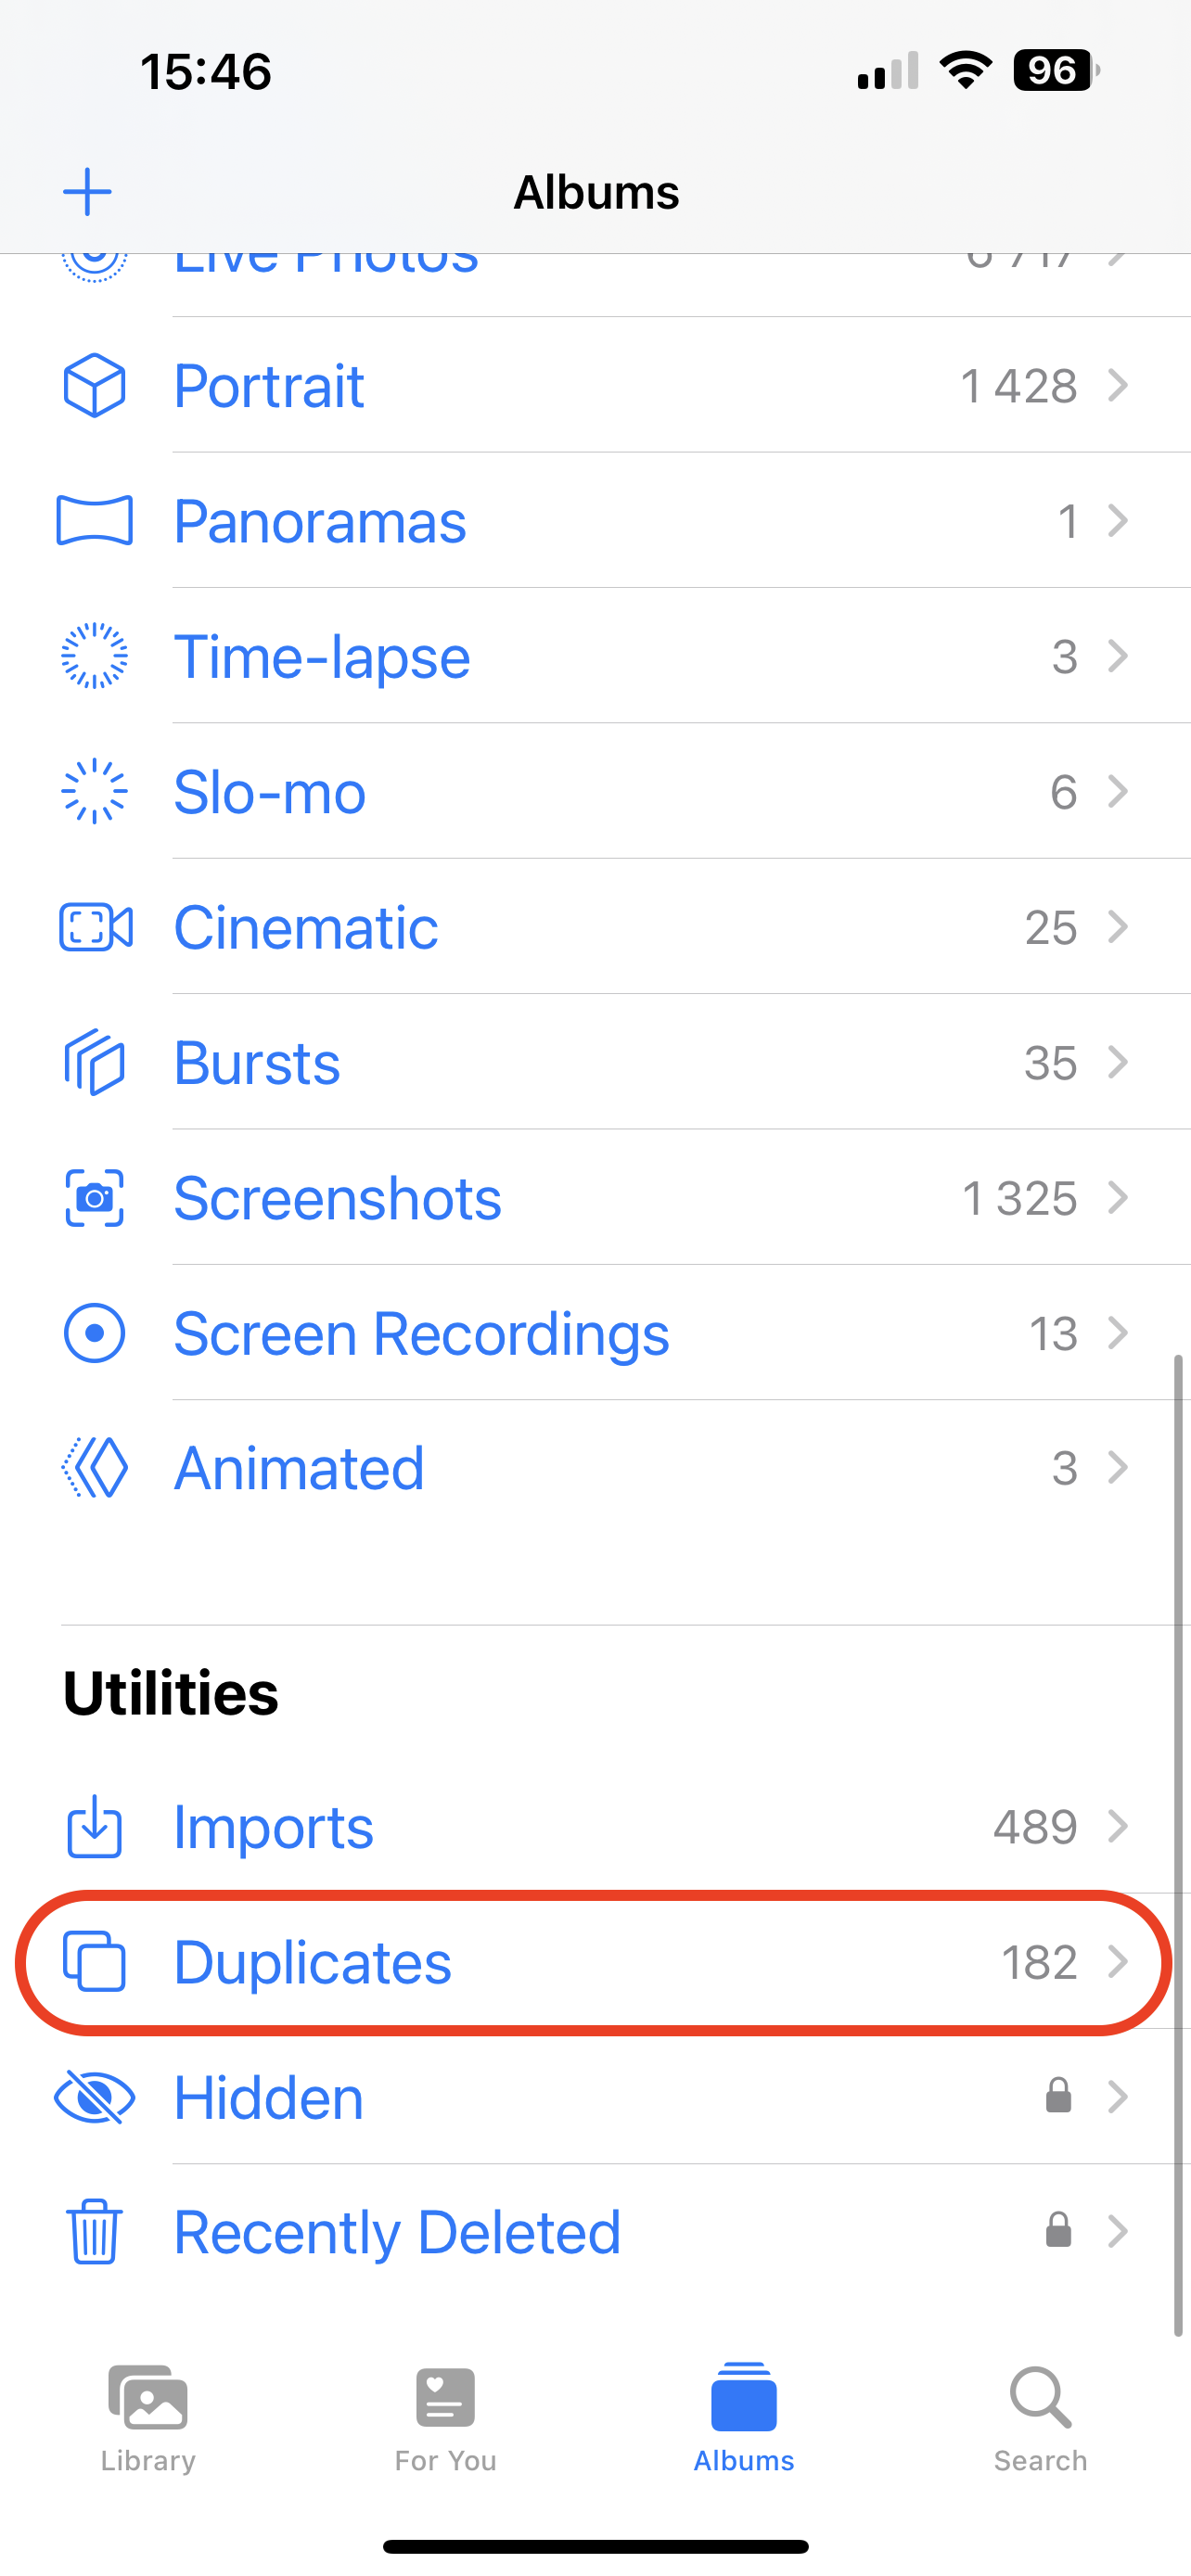
- Tap Merge near a specific set of duplicate photos to merge them, or tap Select > Select All to merge all of the duplicate sets.
Option 2: Using a Duplicate Remover App
While there are quite a few efficient duplicate photo remover apps for an iPhone, our recommendation is Remo Duplicate Photos Removal. The reason why we prefer this tool is that it is entirely free and has a pretty straightforward interface, making it easy to use for all users. Moreover, Remo can successfully detect not only exact duplicates but also similar photos, making decluttering your Photos gallery even more productive.
Step 2.2 Delete Unwanted Photos
Now it’s time to remove all other unnecessary photos from the Photos app on your iPhone. This includes finding and deleting any screenshots, bursts, or any other photos you no longer need. One of the ways to do that is to go to the Albums tab and look through the Media Types folders to delete the photos you no longer need. There, you can find a separate folder for your screenshots, live photos, panoramas, slo-mo, bursts, and more.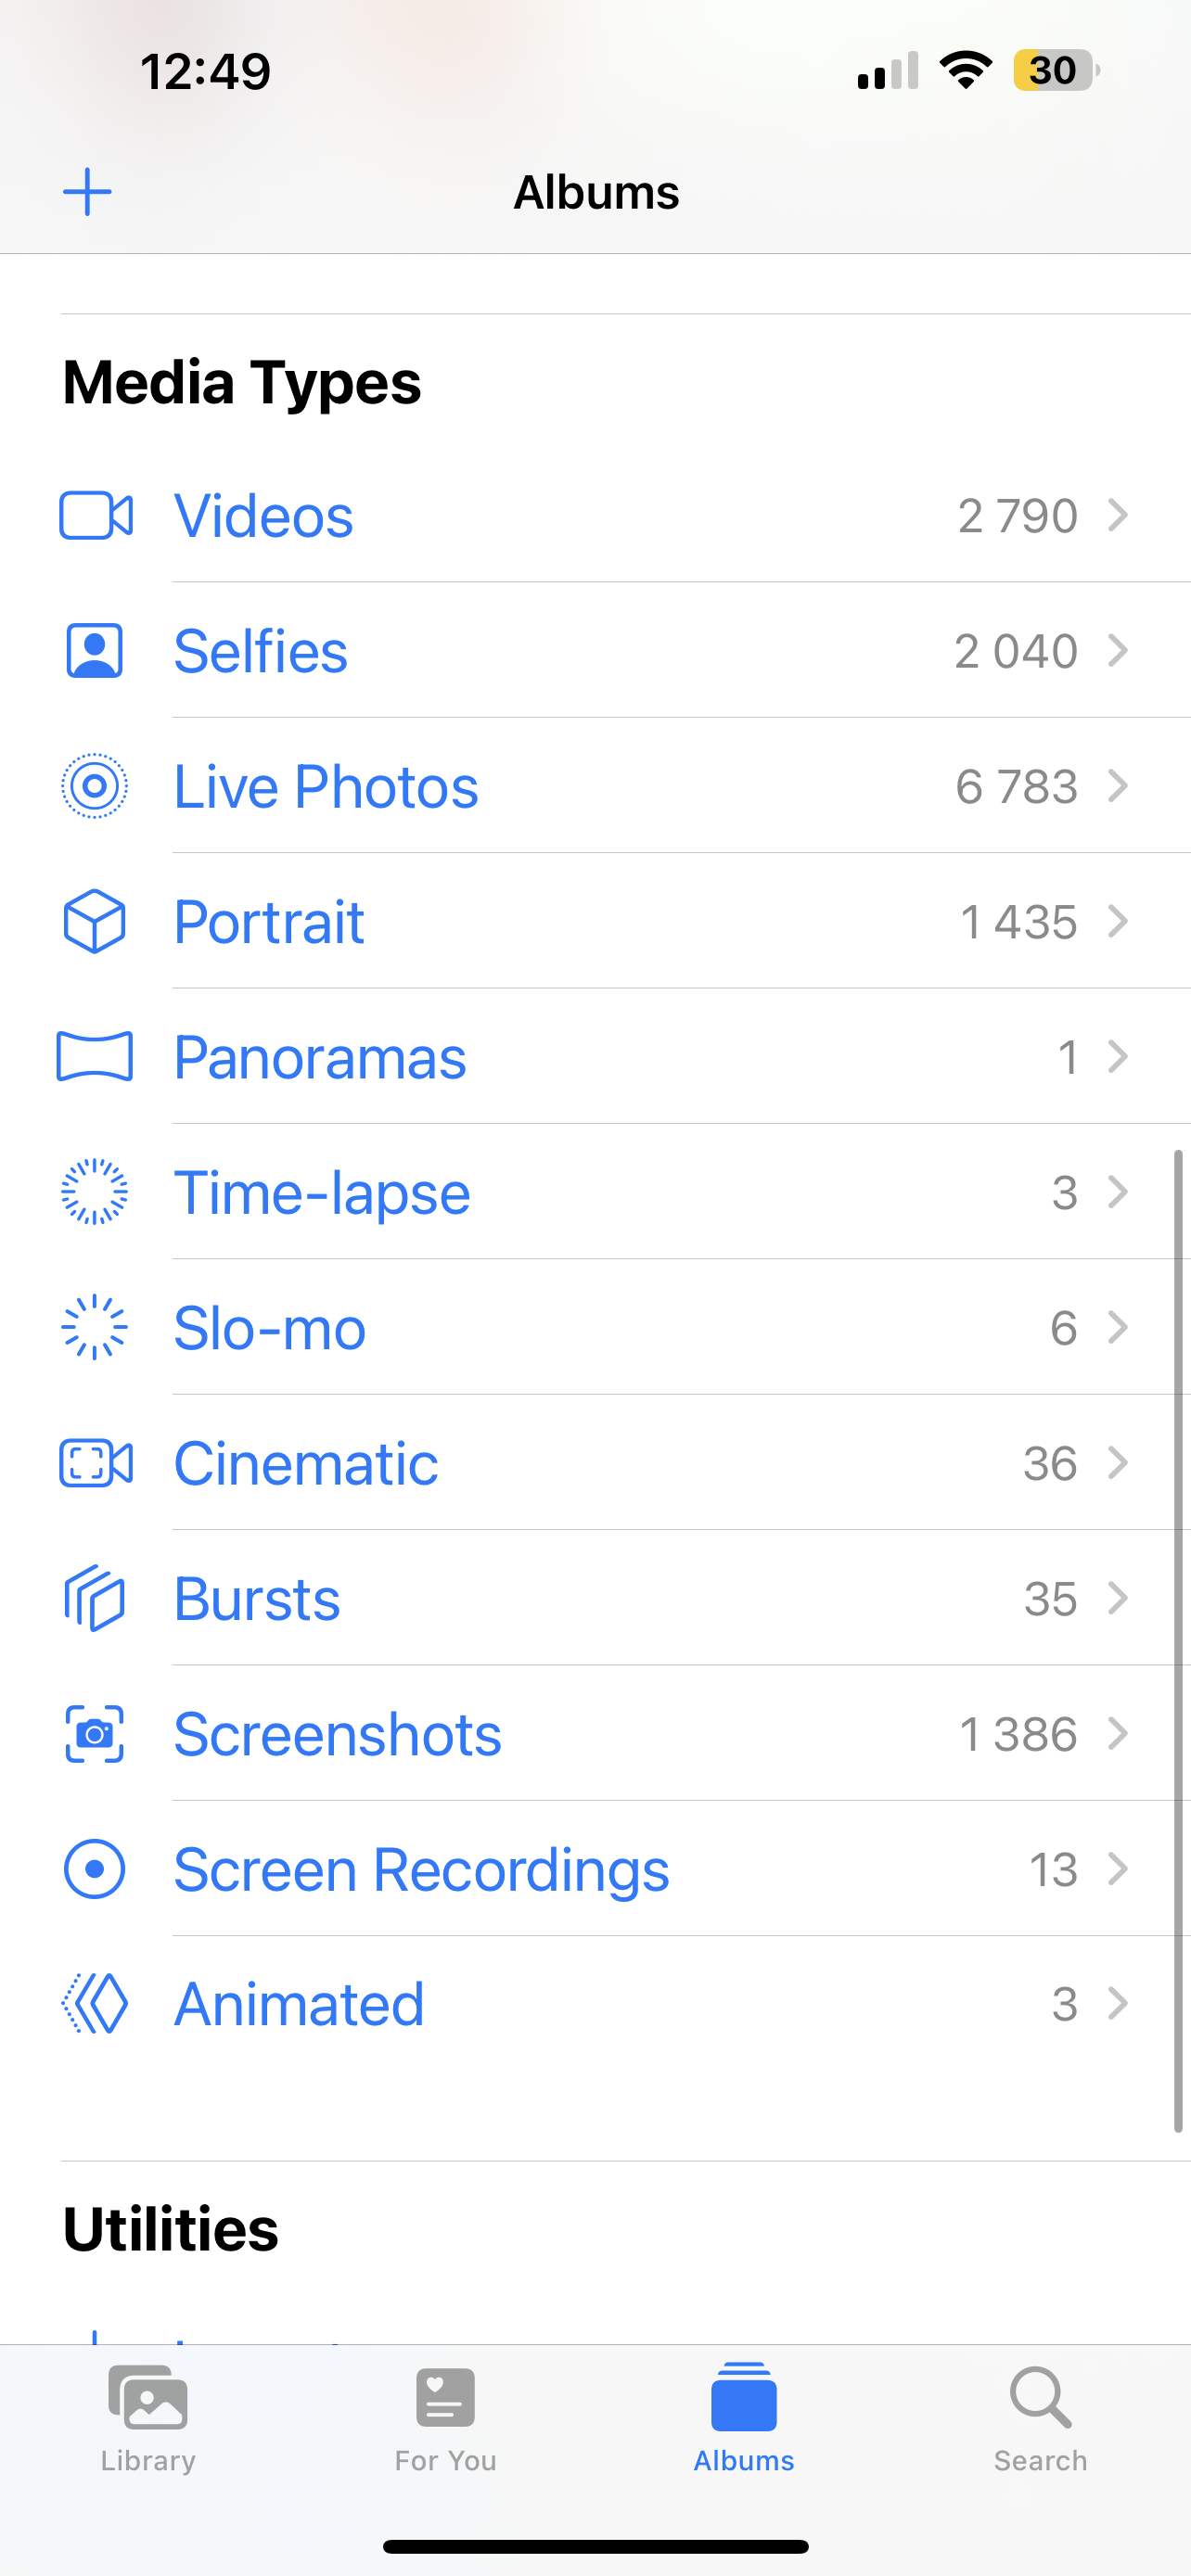
To get more storage on your iPhone for Photos and declutter the gallery even more, it’s a good idea to check the Videos folder to remove any video files you no longer need.
Once you’re done with removing the clutter from the Photos app on your iPhone, you need to make sure that you’ve actually deleted those images once and for all. To do that, go to the Recently Deleted folder (open the Photos app and tap Albums > Recently Deleted, then tap Select > Delete All). Moreover, this will help you to free up more storage on your iPhone to make room for your new memories.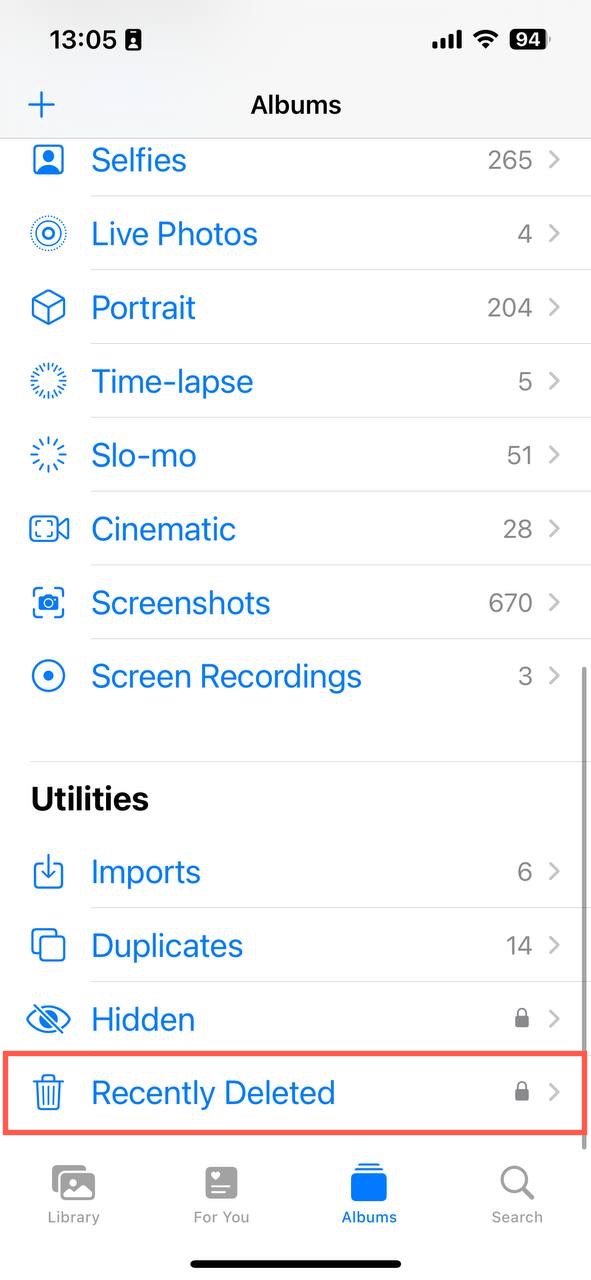
Step 3: Create Your First Album or Folder
Now that you’ve cleared out your Photos app from all the clutter, you can start to actually create an organized gallery. One of the best ways to go about this is to start with organizing the photos located in the Photos app by using Albums and Folders. This way, you’ll have similar photos neatly grouped together according to your specific criteria.
It’s best to think of the albums and folders in the Photos application as a sort of hierarchy: you’ll create albums and add certain photos to them, and then you’ll be able to organize the photo albums on your iPhone into specific folders. Also, keep in mind that when you place a photo in any of the albums, it will not get removed from the main gallery.
You might’ve noticed that your iPhone has already created a few albums in the Photos app. But aside from those already there, you can also create them by yourself. In the same way, you can also create folders to start sorting your Photos gallery. For you to get a better understanding of how this works, we’ll show you how to manage the albums and folders on your iPhone to keep a good structure.
As an example, we’ll categorize recipe photos on our device:
- Open the Photos app on your iPhone.
- Tap the + (plus) icon on the top-left of the screen.
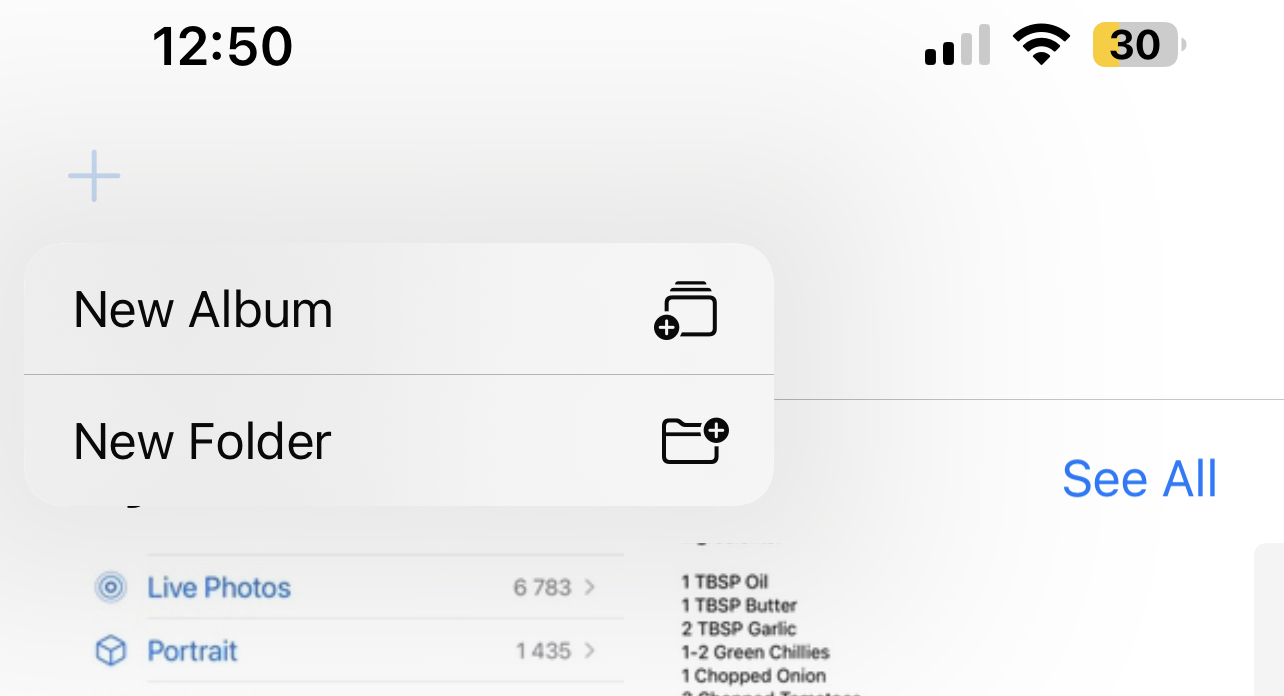
- Choose New Folder.
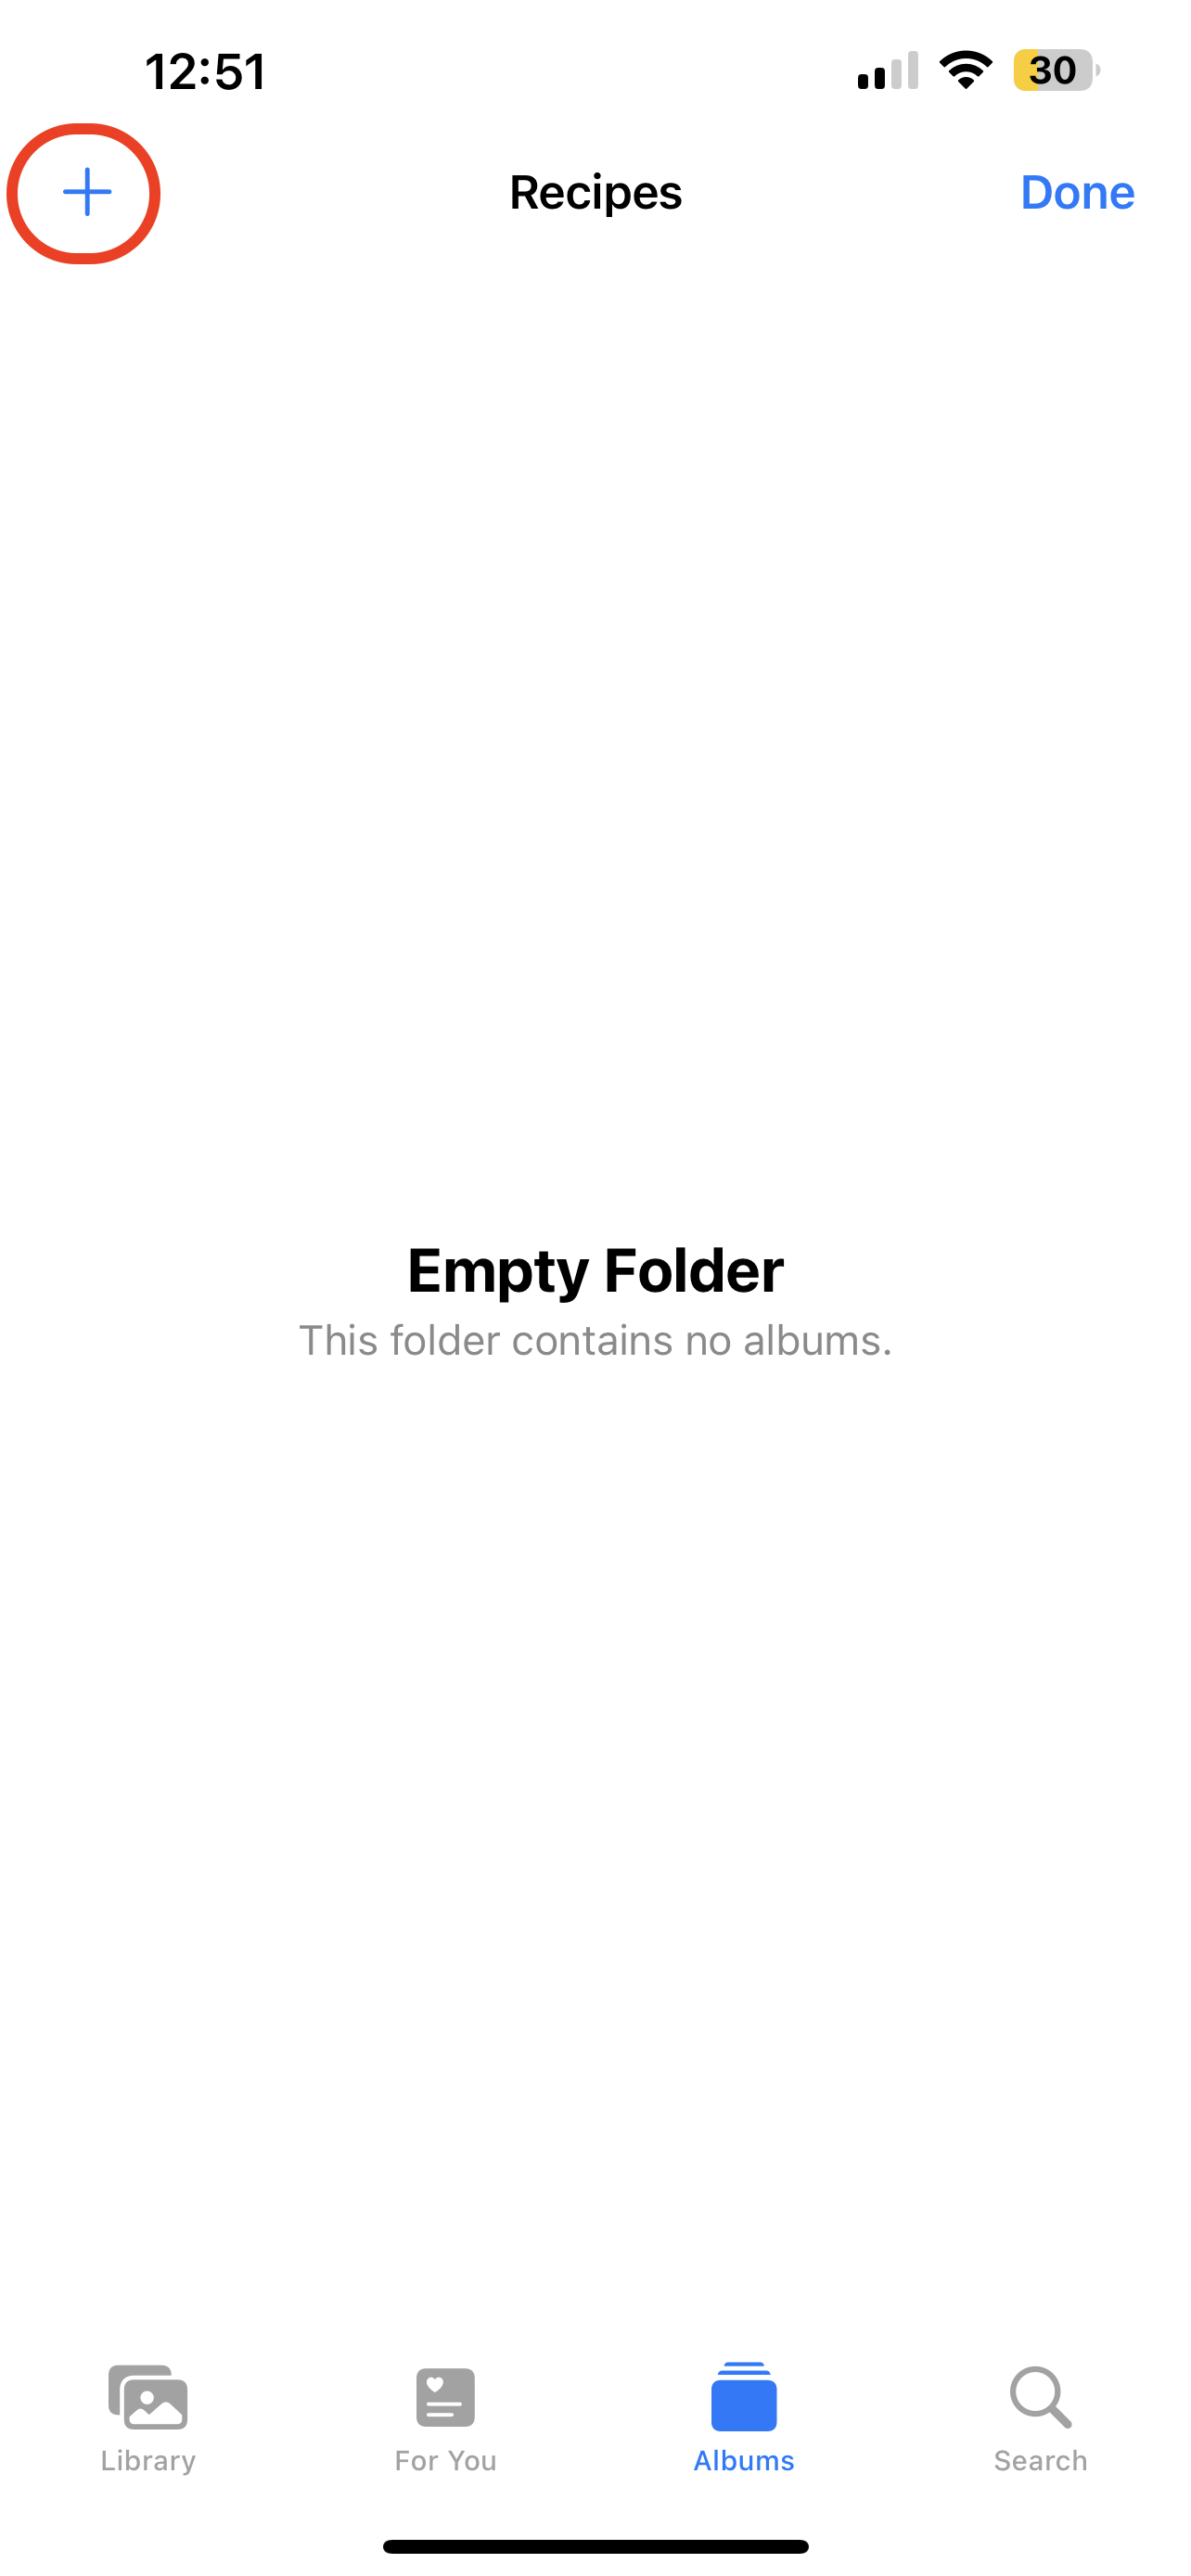
- Type in a suitable name (e.g., Recipes) and choose Save.
- Tap the newly created folder and choose Edit from the top-right.
- Tap the + (plus) icon and choose New Album.
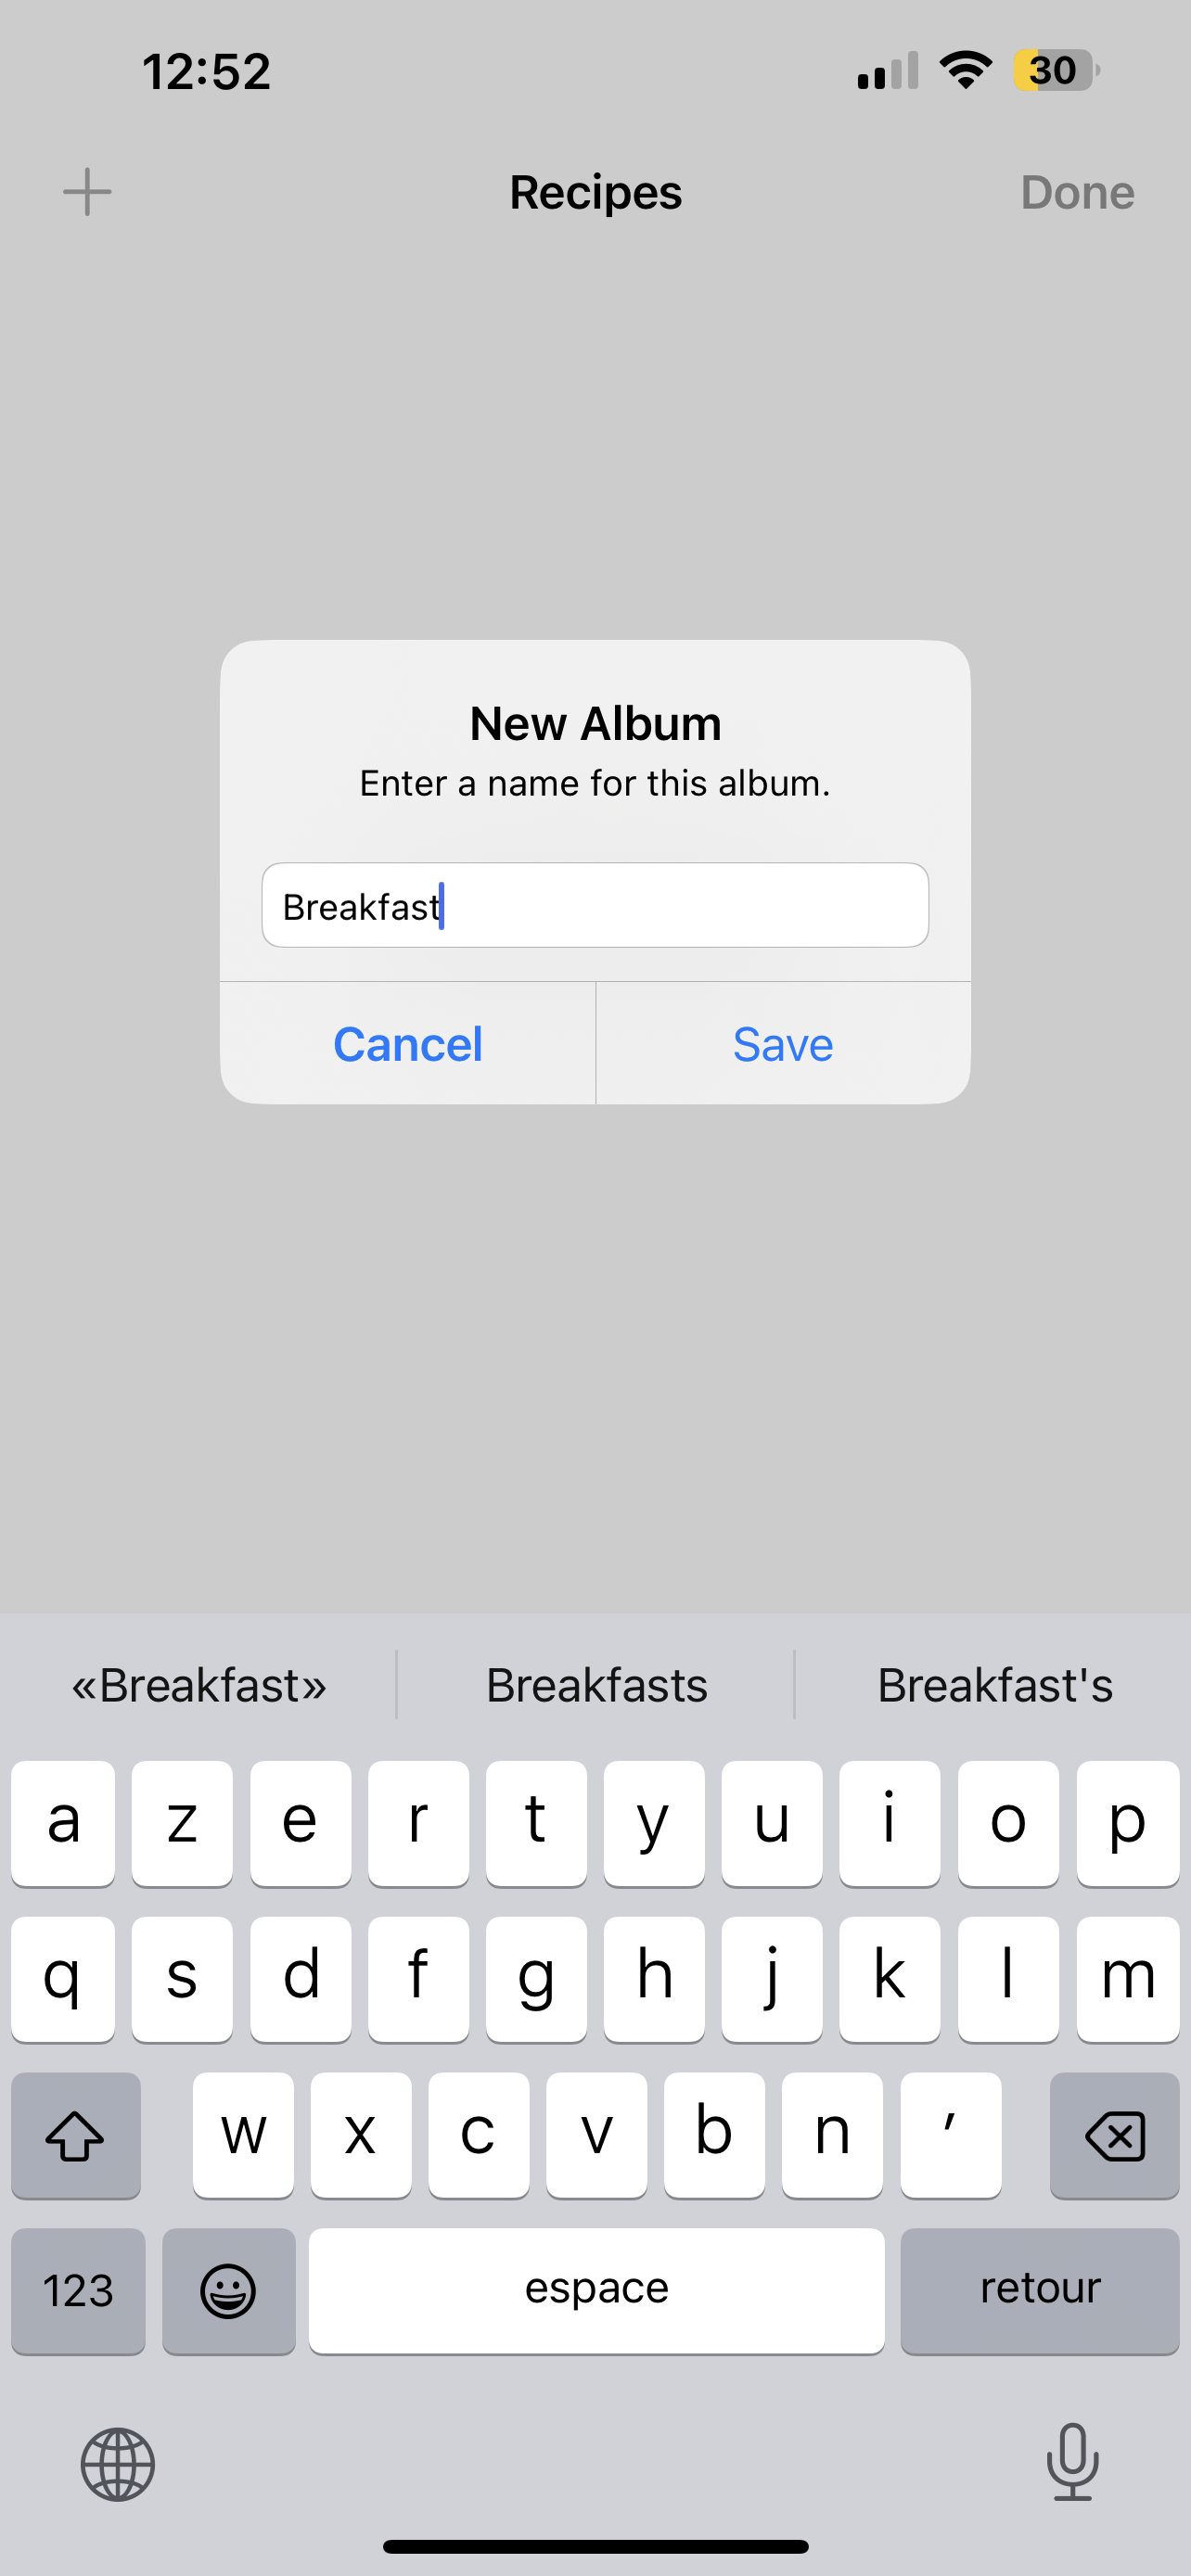
- Type in a name for the Album (e.g., Breakfast) and tap Save.
- Choose the photos you wish to add to the album and tap Add.
This way, you can create as many albums and folders as you need to categorize your photos.
Step 4: Start Sorting and Cataloging Photos
Whenever you want to sort more photos and add specific ones from your gallery to any of the already created Albums, you can use the Search feature in the Photos app to help you with locating the needed photo.
Here’s how to use this feature to locate a specific photo on your iPhone:
- Open the Photos app.
- Tap Search on the bottom-right of the screen.
- Tap the search field at the top and type in a word or a short phrase that best describes the image you’re looking for (for example, pizza or picnic near a river). The tool will automatically show you the best matches.

Once you’ve found the photo you wish to add to one of your Albums, do the following:
- Tap the photo to open it.
- Tap the arrow icon on the bottom left.
- Choose Add to Album.
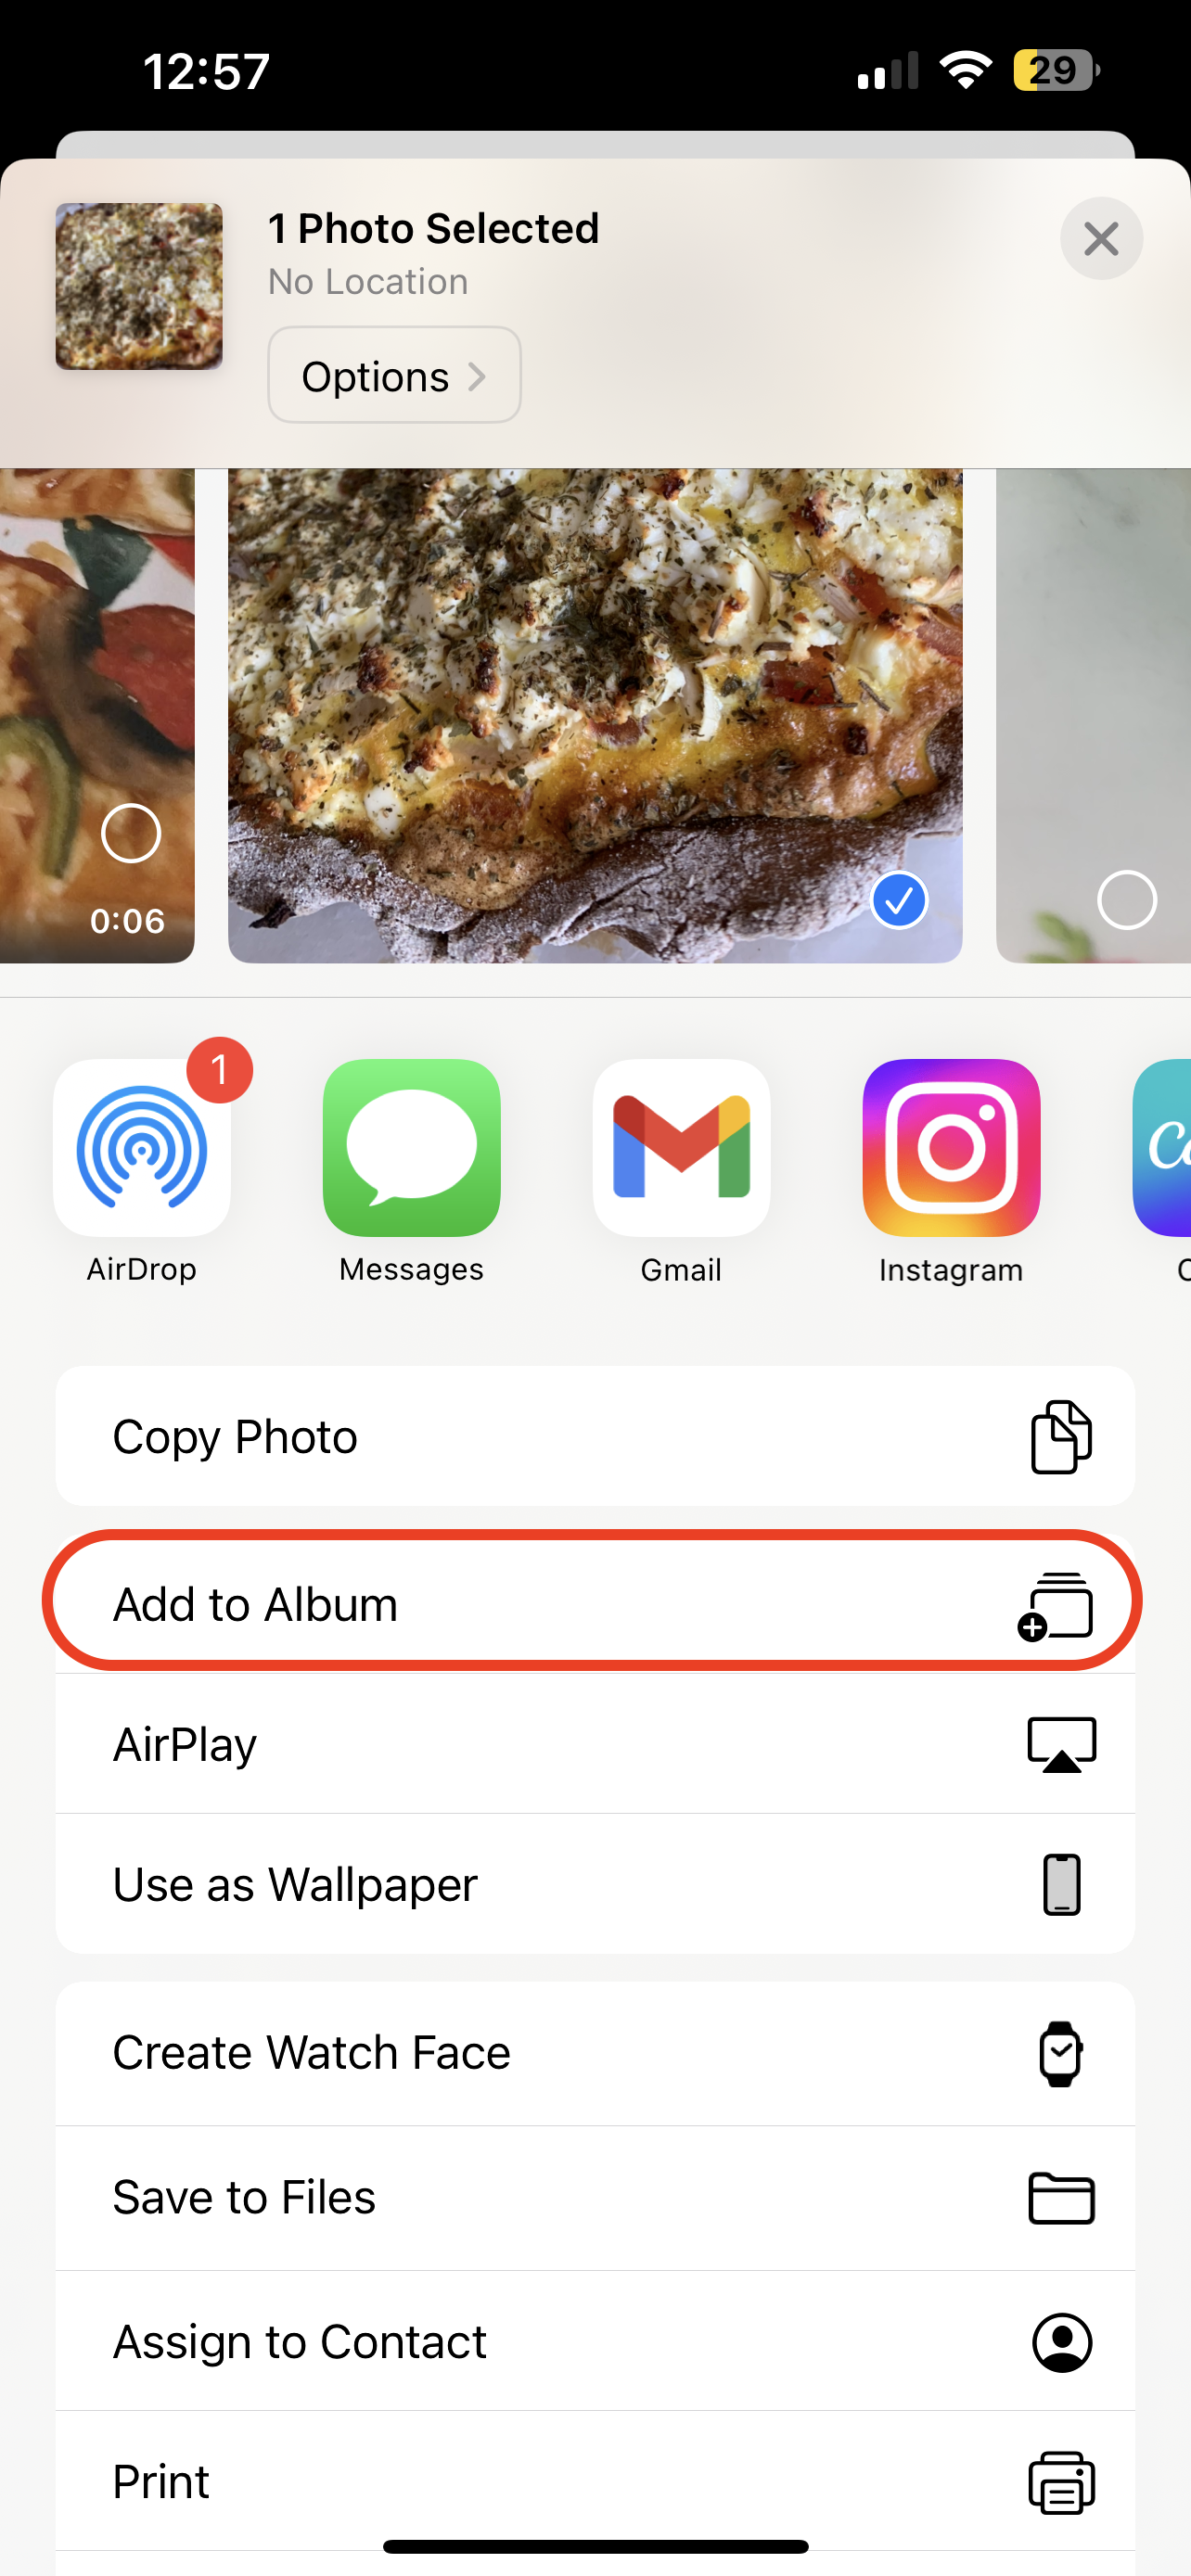
- Select the suitable Folder or Album.
Aside from the search tool, the Photos app also offers a few other ways to categorize your photos. With the help of these options, you can manually go through your Photos app gallery to find any other photos that need to be sorted out and added to your albums.
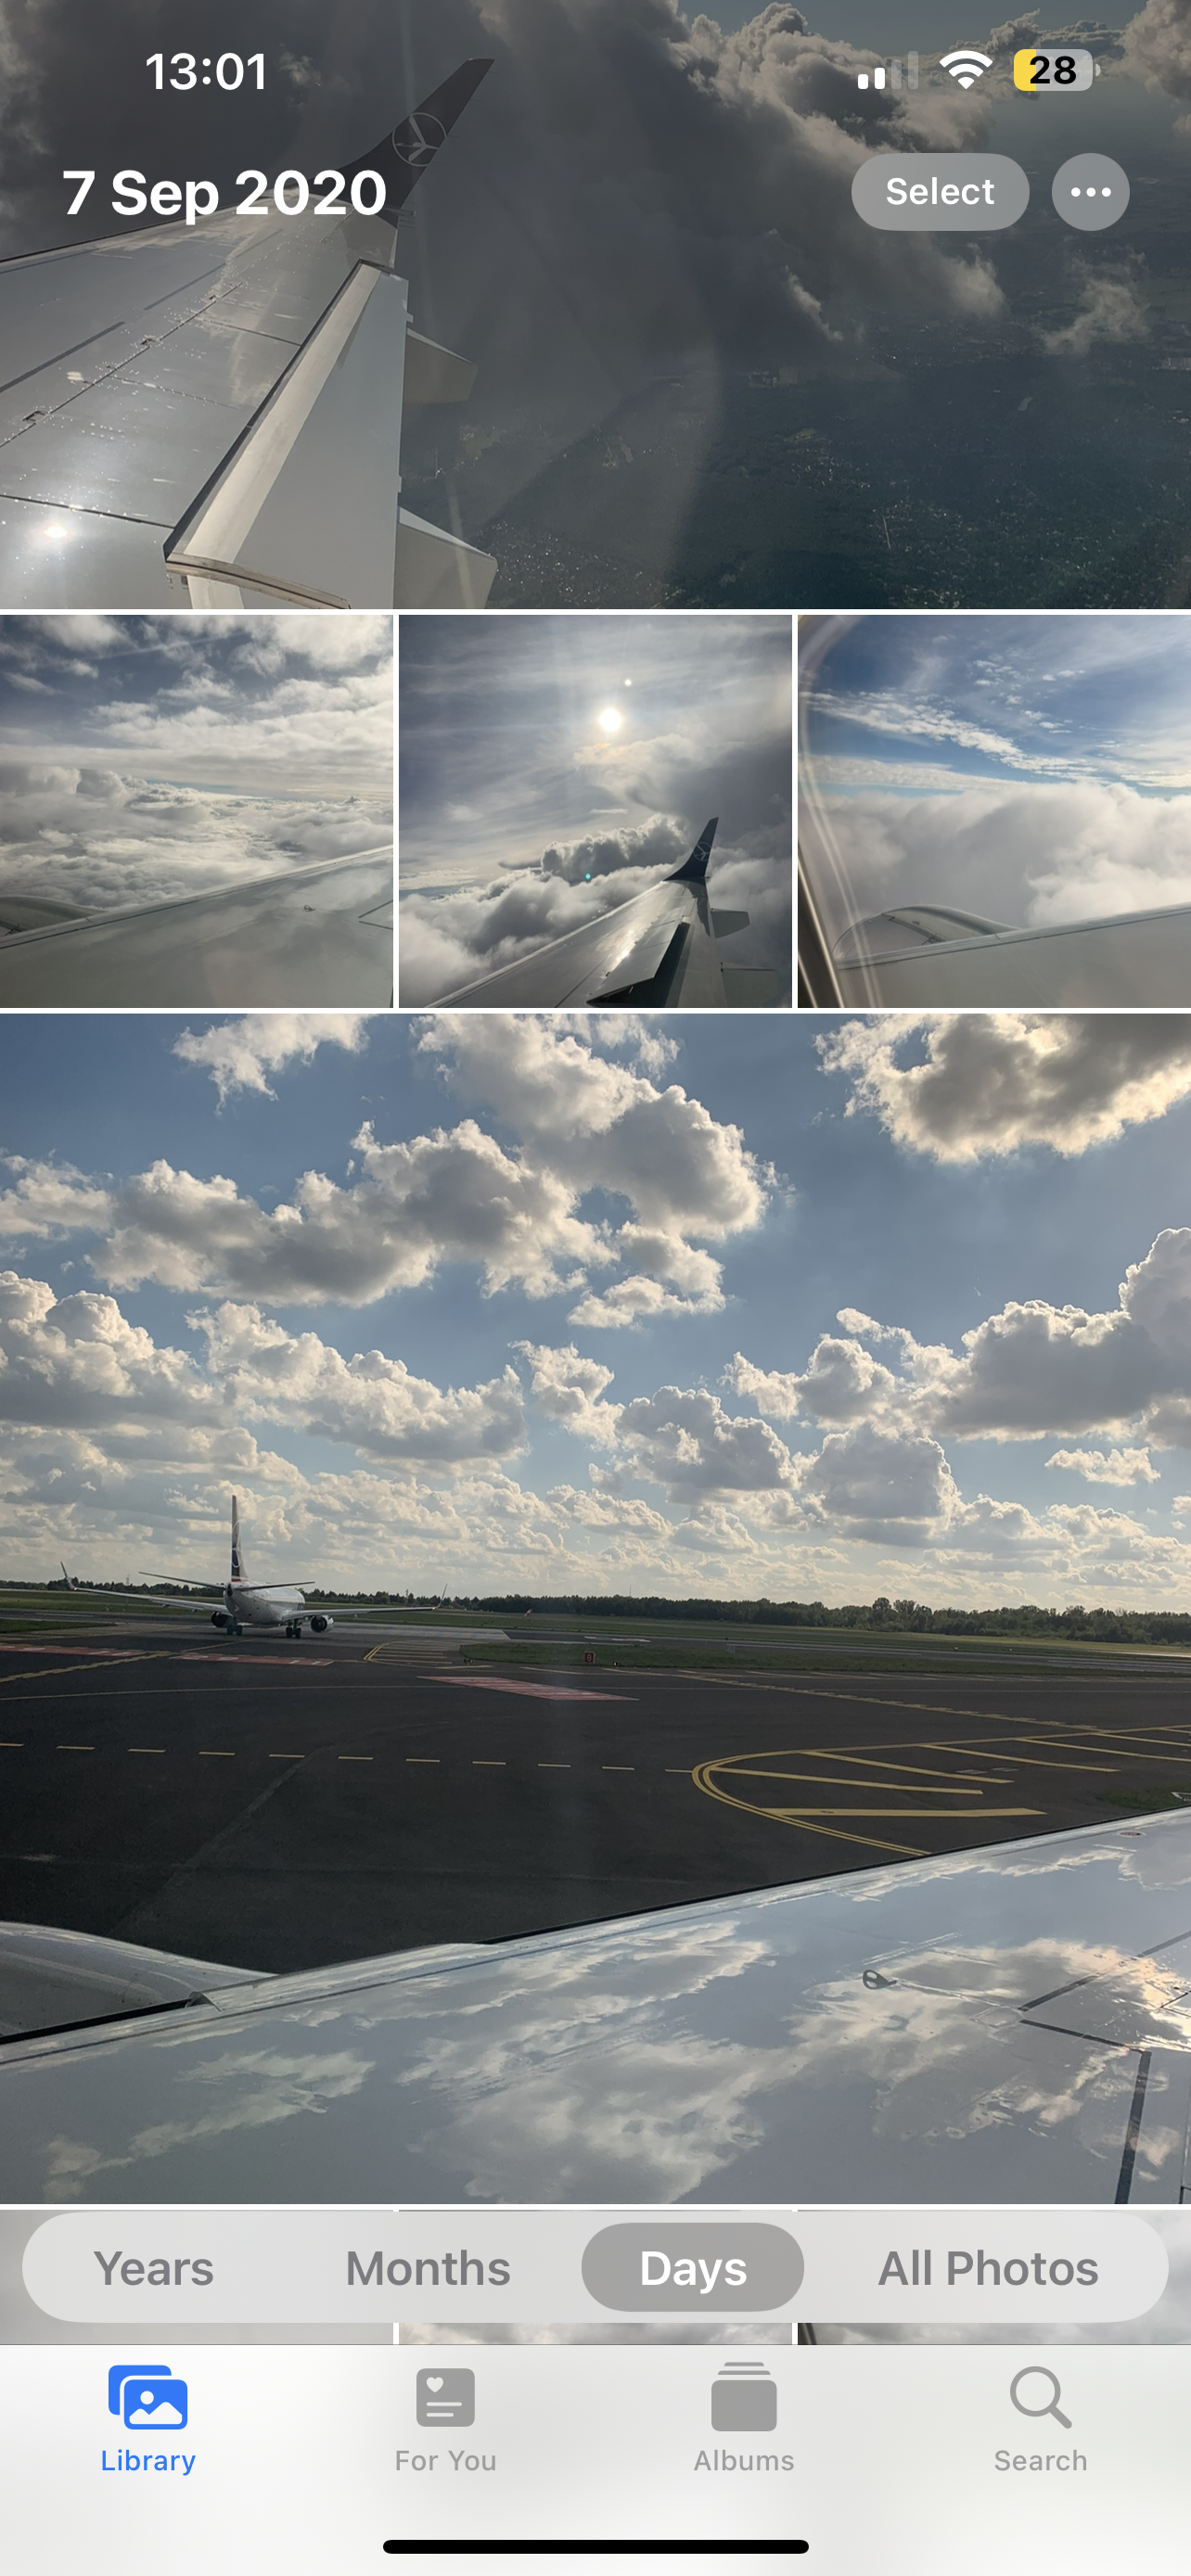
Basically, there are three ways you can categorize the photos on your iPhone:
- By date: go to the Library tab in the Photos app, and depending on how you wish to categorize the photos, choose Years, Months, or Days on the bottom of the screen.
- By people and places: go to Albums and scroll down to the People & Places section to choose the preferred one.
- By type: scroll down the Albums tab to see the available photo category types. You can view your Selfies, Live Photos, Screenshots, Bursts, Panoramas, etc.
Note: If you need more functionality to sort the photos on your iPhone, you can use a specialized photo organizer application. To learn more about this option, check out the section below.
Alternative Ways to Manage Photos on an iPhone
Aside from the native way of organizing the Photos app, there are a couple of alternative ones that can help you manage the photos on your iPhone.
Option A: Create a Shortcut or Try to Find One Online
If you want to have a quick way to add a photo to a specific Album in the Photos app, you can try to find a suitable Shortcut for that action. However, this won’t be an ideal option since you won’t be able to completely automate this process. But at least it can give you a quicker option.
You can either create such a shortcut by yourself if you’re confident you have the skills to do it or try this shortcut to get an overall idea of how it works.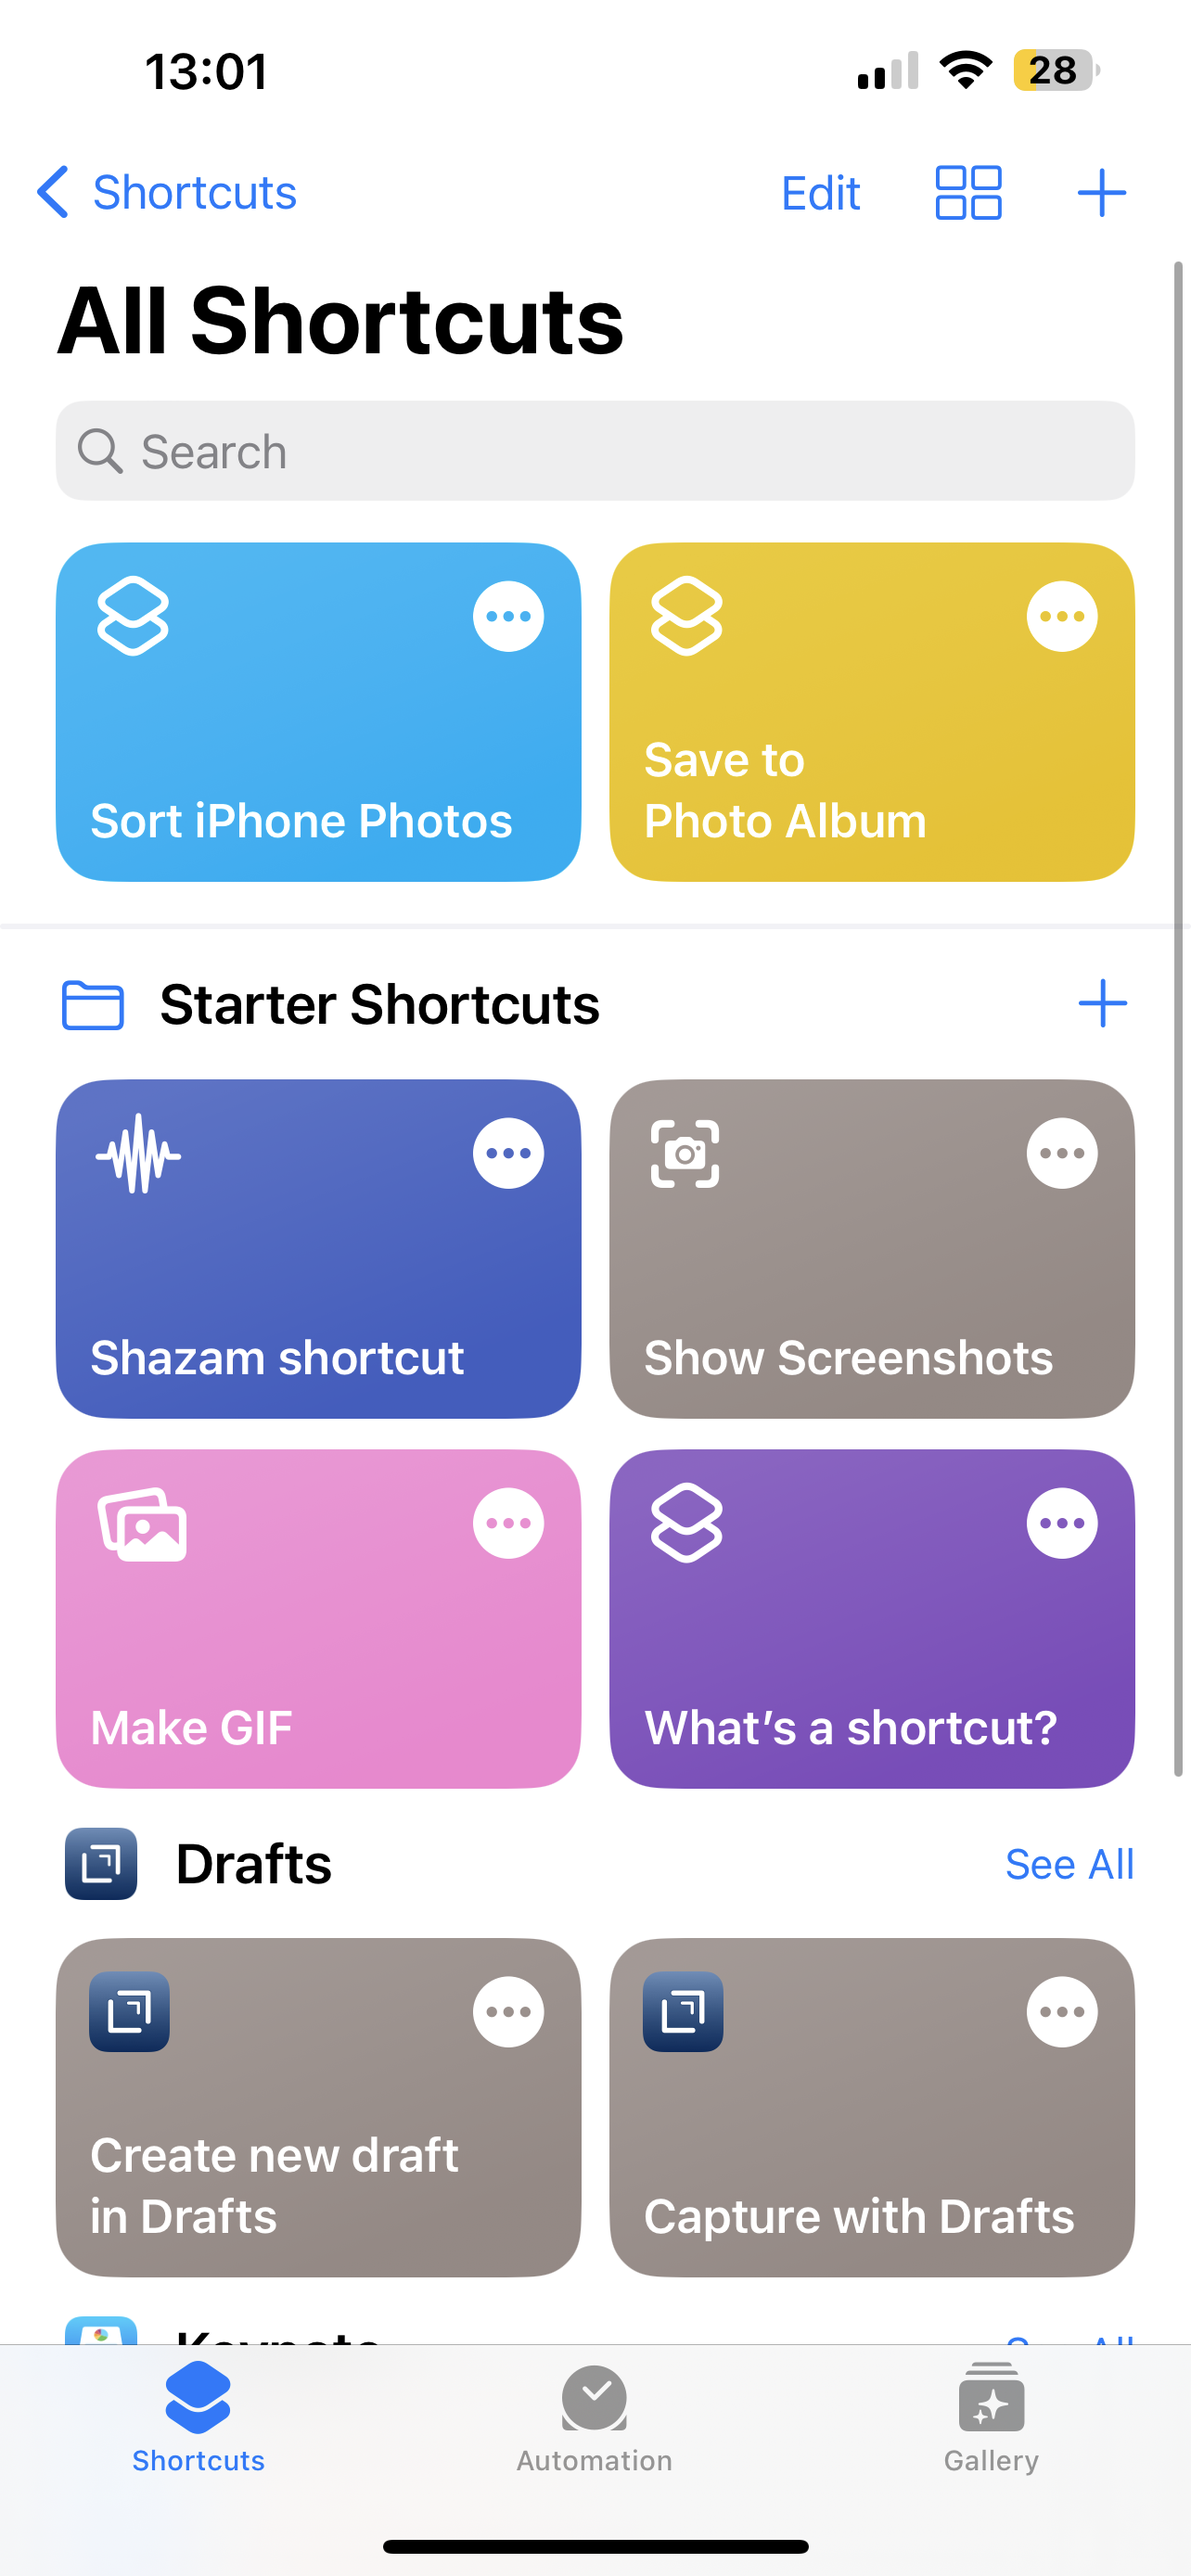
Option B: Use a Photo Organizer App
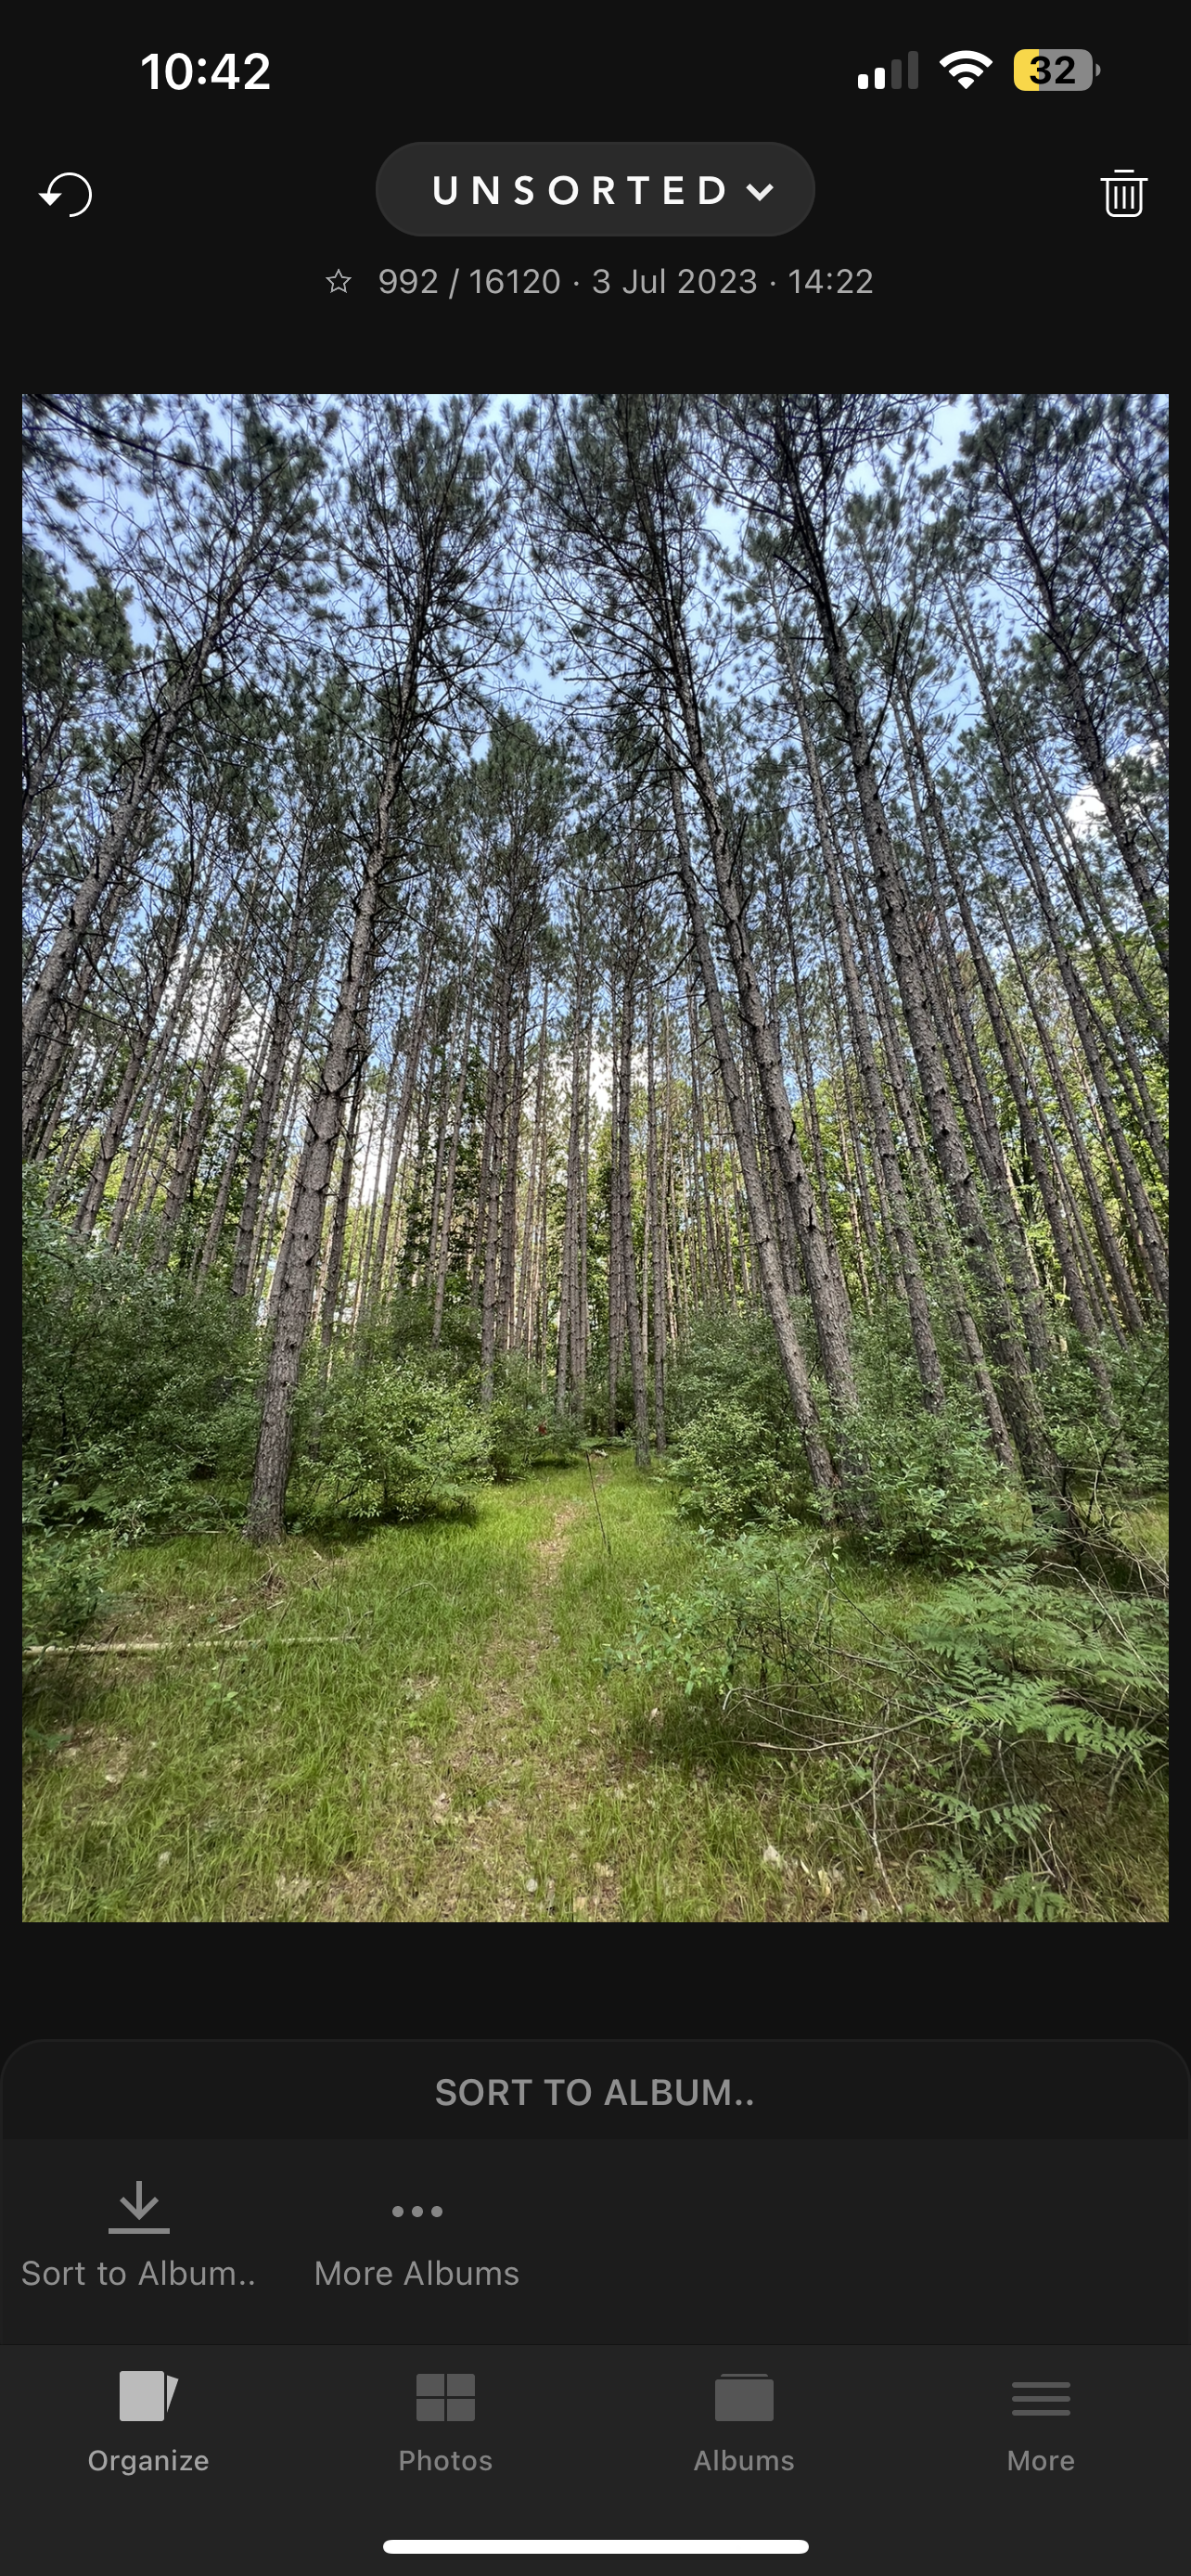
Another option that you have when it comes to organizing the photos in your iPhone is to use a specialized Photo organizer tool. After testing a few out there, we’ve decided that the Slidebox – Photo Manager is the best option there is at the moment. This app lets you handle every photo there is in your gallery from one screen: you’ll be able to delete any photo, sort them, add it to an available album, and even create a new folder or album to add the specific photo to.
To get a better idea of what this tool can offer, here’s a quick guide on how to use it to organize the photos on your iPhone:
- Install the Slidebox app from the App Store on your iPhone.
- Open the application.
- Allow access to all of your photos.
- On the main screen, the app will show you the photos from your gallery one by one. You can choose what you wish to do with each of the photos. If you want to delete it, tap the trash bin icon on the top right.
- To sort it, tap the needed album below the photo or tap More Albums to create a new album or a new folder for the current photo.
FAQ
How can you sort photos on an iPhone?
You can sort the photos on your device with the help of Folders and Albums in the Photos app. Here’s how to create them and start sorting the photos on your iPhone:
- Open the Photos app on your iPhone.
- Tap the + (plus) icon on the top-left.
- Choose New Folder to create your first folder and type in a suitable name for it.
- Tap Save.
- Open the folder and tap Edit.
- Tap the + (plus) icon and choose New Album.
- Give a name for the album and tap Save.
- Tap the photos you wish to add to the specific album and choose Add.
How can you organize iPhone photos by date?
Here’s how to organize the pictures on your iPhone by date:
- Open the Photos app on your iPhone.
- Tap the Library tab at the bottom of the screen.
- Choose to sort your photos either by Years, Months, or Days.
Is there an automatic way to organize iPhone photos into albums?
No, unfortunately, there is no automatic way to organize your iPhone photos into albums. If you create your own albums, you’ll have to either manually put the needed photos in there or use a special app to do it for you (but still, you’ll be the one choosing which album to add a specific photo to).
What is the easiest way to organize iPhone photos?
The easiest way to organize iPhone photos is to use the Apple-native features in the Photos app, such as creating Folders and Albums to sort the photos.
What is the best approach to categorize photos on an iPhone?
It depends on your preferences. You can either use the iOS features available in the Photos application to sort your photos into Folders and Albums or use a special photo organizer application to help you do it.
How can you organize photos on an iPhone without duplicates?
If you’re running iOS 16 or later, you can use the Apple-native Duplicates feature to locate and remove duplicate photos from the Photos app on your iPhone. Another option is to use a special third-party duplicate removal application for this task.
What are some major iPhone photo organization tips?
Here are a few useful iPhone photo organization tips that can help you tidy up your Photos app:
- Locate and remove duplicate photos
- Declutter your gallery from unnecessary photos (similar photos, screenshots, etc.)
- Create Folders and Albums to have an easy way to locate the needed photo
- Use a third-party tool to help you keep the gallery clutter-free
Is it hard to manage photo albums on an iPhone?
Yes and no. Overall, it’s pretty simple to organize the photos into albums on your iPhone. However, since this process is not fully automated yet, it does take some time to manage those albums.
Is it possible to organize iPhone photos on macOS?
Yes, it is possible to organize your iPhone photos on a Mac. To do that, you should connect your iPhone to the computer and then use iTunes to organize the photos on iOS.
Conclusion
Now that you know how the process of managing pictures on an iPhone works, you can start to get that gallery tidied up. With our simple step-by-step algorithm, you shouldn’t have any trouble removing the clutter from your photo gallery and organizing your iPhone photos into Folders and Albums.
This article was written by Romana Levko, a Staff Writer at Handy Recovery Advisor.
Curious about our content creation process? Take a look at our Editor Guidelines.