Are you constantly being bombarded with “iPhone storage is almost full” notifications on your device? It’s one of the most common complaints we hear from iPhone users – and we’ve had plenty of time to dig into every angle of it. Our guide pulls together the smartest fixes, little-known workarounds, and honest advice we’ve tested ourselves, so you can finally put that message to rest for good.
Quick side note. The message you’ll see might be either “Storage Almost Full” or “iPhone Storage Full.” Same issue, different wording. And yes, sometimes people use the term “memory” even though technically it’s “storage”. We’re not here to split hairs. If you already know the basics, click here to jump straight to the methods.
Why Does the ‘iPhone Storage Is Full’ Message Appear?
There’s no single reason why the memory full iPhone message keeps showing up. It’s usually a mix of things.
Here are some of the more common reasons:
- One of the more frequent sources of users mysteriously losing storage space is an excessive amount of app data/cache. When used, web browsers and other iPhone apps store various types of data, like pictures, audio files, temp files, and scripts. When left unchecked, this can eventually eat up a huge chunk of your iPhone storage, which may be why you’re getting the “iPhone storage almost full” messages.
- If you’re a shutterbug who just can’t help constantly snapping photos and videos wherever you go, then there’s a good chance that your photography is taking up a lot of space on your phone. This is especially true if you don’t regularly move the photos and videos to a computer or cloud service.
- There’s a possibility of a software bug that causes the iPhone to misread its available storage space, which results in recurring “iPhone memory is almost full” warnings.
- Also, your iPhone may be trying to download important firmware or app updates on your device but is unable to do so due to the lack of sufficient storage capacity. This would lead to the “iPhone memory full” messages.
How to Identify the Reason for the ‘iPhone Storage Is Almost Full’ Message?
Now that we know why it happens, the next thing to figure out is the specific cause of it occurring on your device. The quickest way to do so is to check the breakdown of your iPhone storage.
Here’s how you can do it:
- To get started, head to Settings > General > iPhone Storage.
- Wait a few seconds for the data to load, and you should see a bar near the top of the screen with different segments of different colors and a legend underneath it.
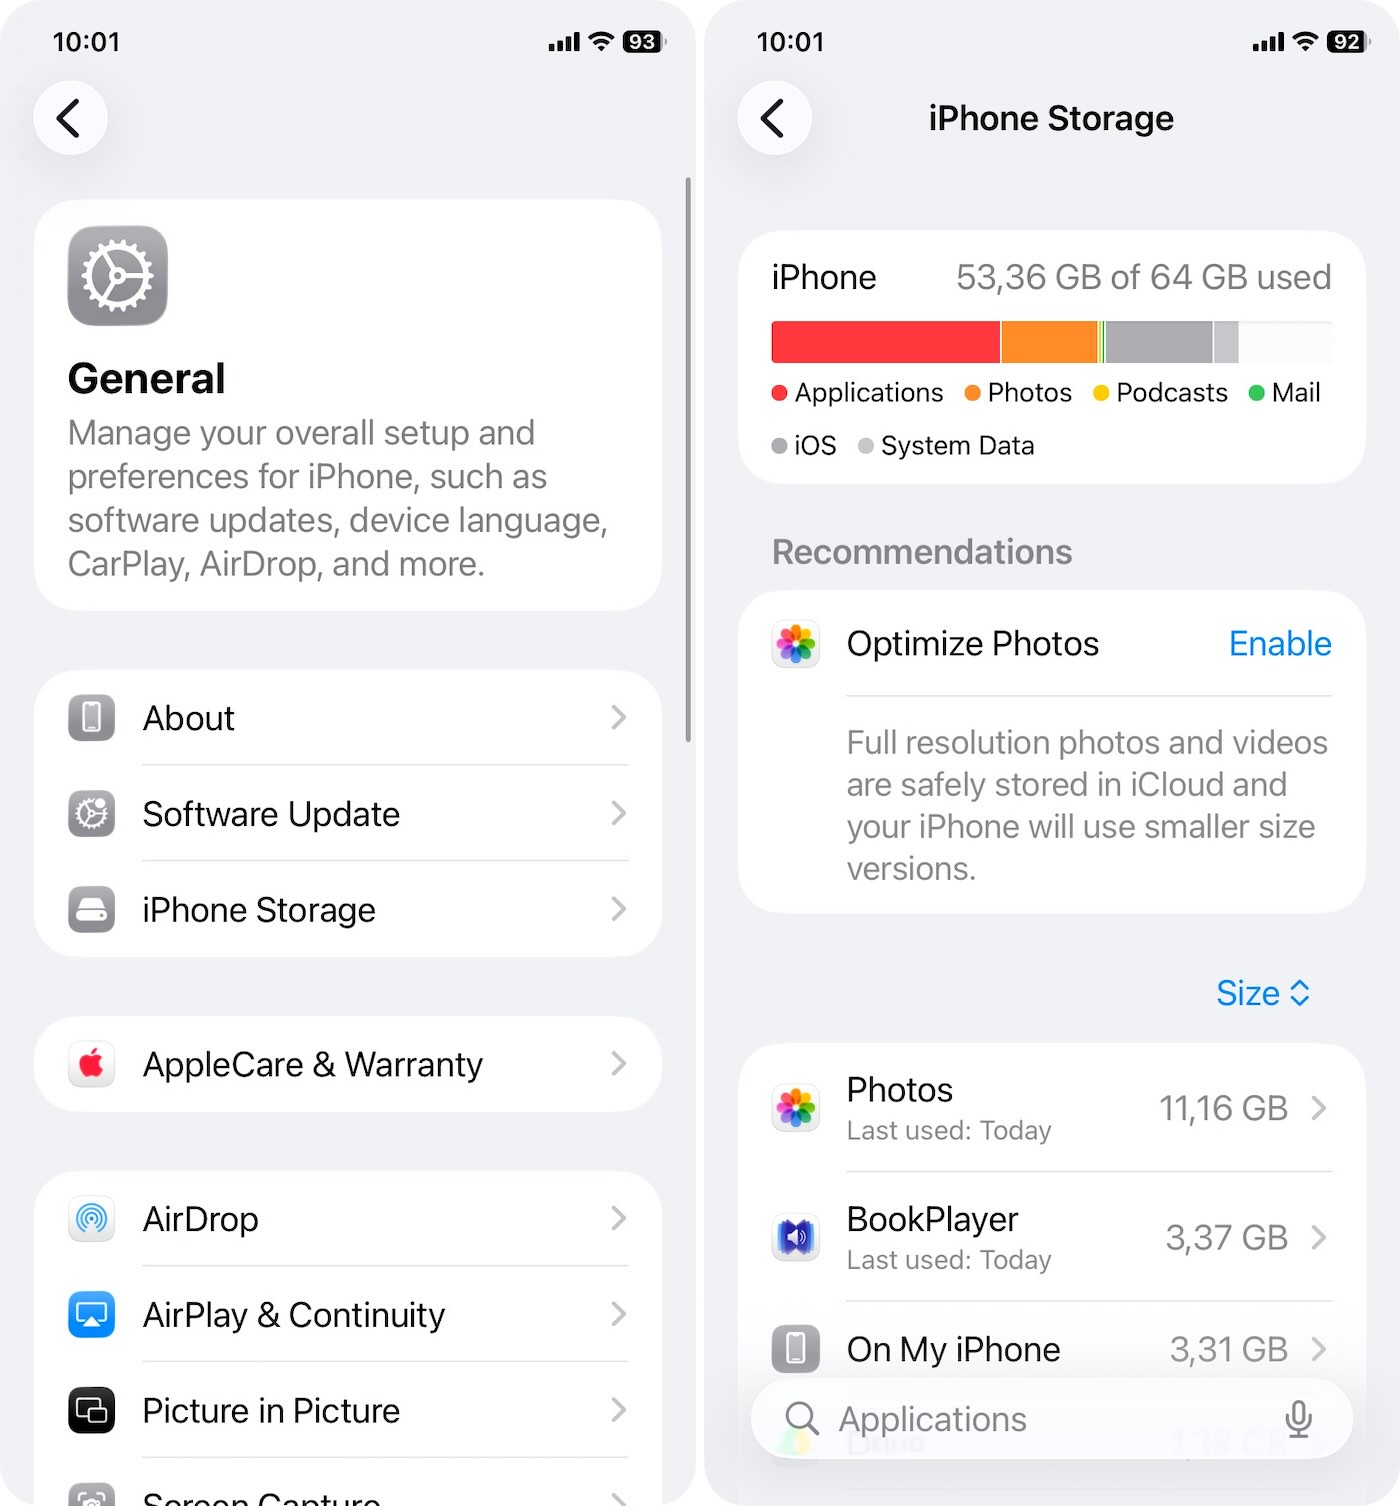
From here, you can tell how much of your storage is being occupied by each category.
We tested all the fixes in this guide on iOS 26. Everything applies across the board – doesn’t matter if you’re using the newest iPhone 17 Pro Max or something older like the iPhone 12. If the “storage full” message is stopping you from updating to the latest iOS, these methods still work. You might notice slight UI differences, but the steps largely remain the same.
How to Get Rid of the ‘iPhone Storage Is Almost Full’ Message
Alright, now let’s walk through the fixes that can help stop those “iPhone storage almost full” alerts from showing up.
We’ve listed them in order from easiest to more hands-on. You don’t need to do every single one – try the first few and then check your iPhone Storage screen to see if that was enough. If the warning’s still there, keep going down the list. Each step clears a different kind of clutter, and sometimes it only takes one or two methods.
Method 1: Restart Your iPhone
As any tech support specialist will recommend, the first thing to try when a device is not functioning properly is to reboot it. In case the “storage full” notifications are being caused by a glitch, this could help return your phone to working order.
Another thing a quick restart can do is free up your iPhone’s resources.
Method 2: Manage Your Photos
Next stop is Photos. Based on what we’ve seen, this is where the real cleanup potential hides for most people.
These are some of the things that you can try in order to make sure that your photos are properly managed:
1️⃣ Optimize Photo Storage
If you don’t mind using iCloud, this one’s worth turning on.
Optimize iPhone Storage is a setting that helps shrink the space your photo library takes up locally. When it’s enabled, your iPhone stores lighter versions of your photos and videos. The full-resolution originals stay safely in iCloud and get pulled down only when you open or edit them. It’s seamless, and if you’ve got a huge photo library, it can make a noticeable dent in your storage.
Here’s how to do it:
- Open “Settings”.
- Scroll down and tap “iCloud”.
- Make sure “Sync this iPhone” is enabled (toggle should be green).
- Select “Optimize iPhone Storage”.
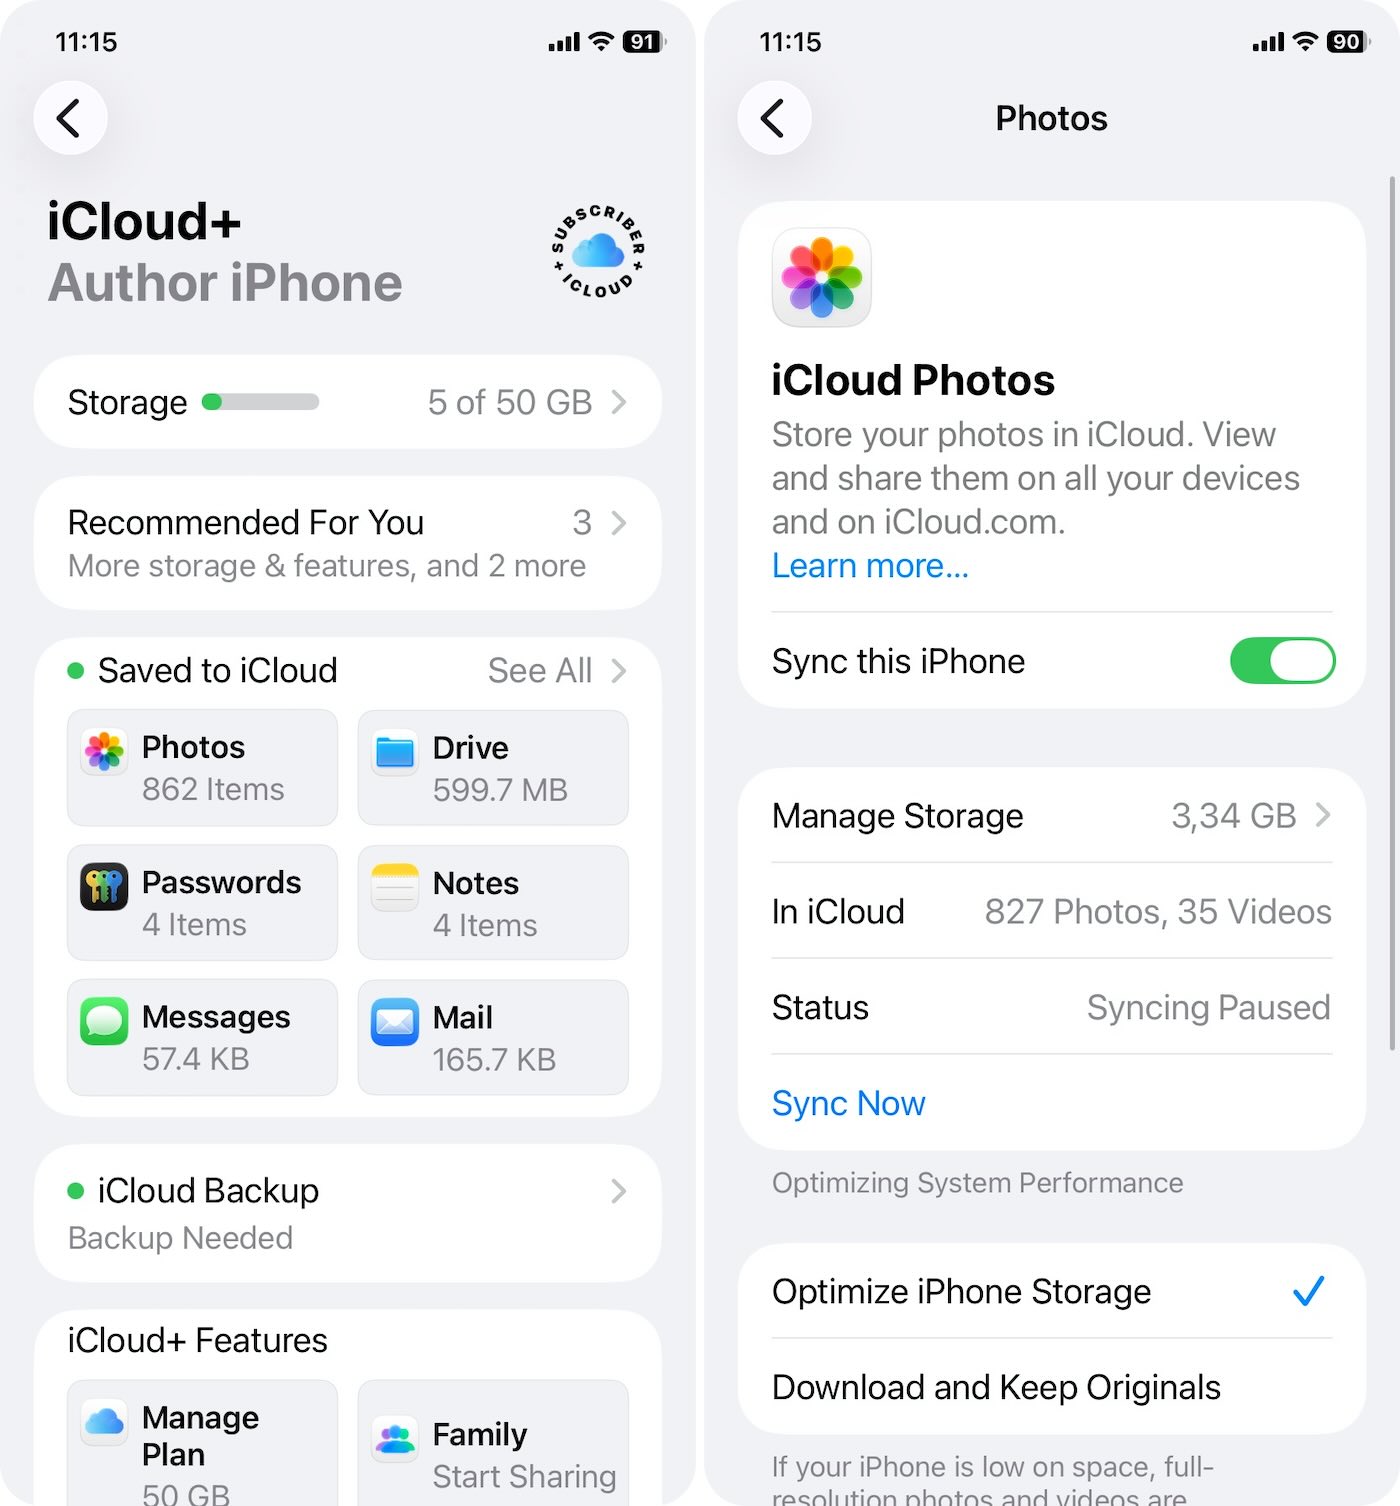
That’s it. From here, your iPhone will gradually start to offload full-res media to iCloud. The more photos and videos you have, the more storage it can save. Just give it time to sync – this isn’t an instant fix.
One tip: make sure you have enough iCloud space to hold your library. If you’re constantly getting “iPhone memory full” messages and iCloud is full too, this option won’t help until you make room or upgrade your plan.
2️⃣ Tidy Up Your Library
If iCloud’s not your thing, that’s fine – there are plenty of ways to get back storage without using iCloud. You can go through your photo library and clear out the junk: duplicated shots, screenshots, massive videos that’ve been sitting there for months.
Or, better option in our opinion, hand the whole thing off to a cleanup app. For example, the free Clever Cleaner app. It recently landed at the top of our iPhone cleaner app ranking – and for good reason. It’s fast, free, and doesn’t lock features.
Here’s how to quickly tidy up your library using Clever Cleaner:
- Use this link to download it from the App Store.
- Open the app and allow access to your library.
- Start with the “Similars”. It scans your camera roll for near-identical shots (stuff that looks almost the same but isn’t close enough for Apple’s built-in duplicate merger tool to catch).
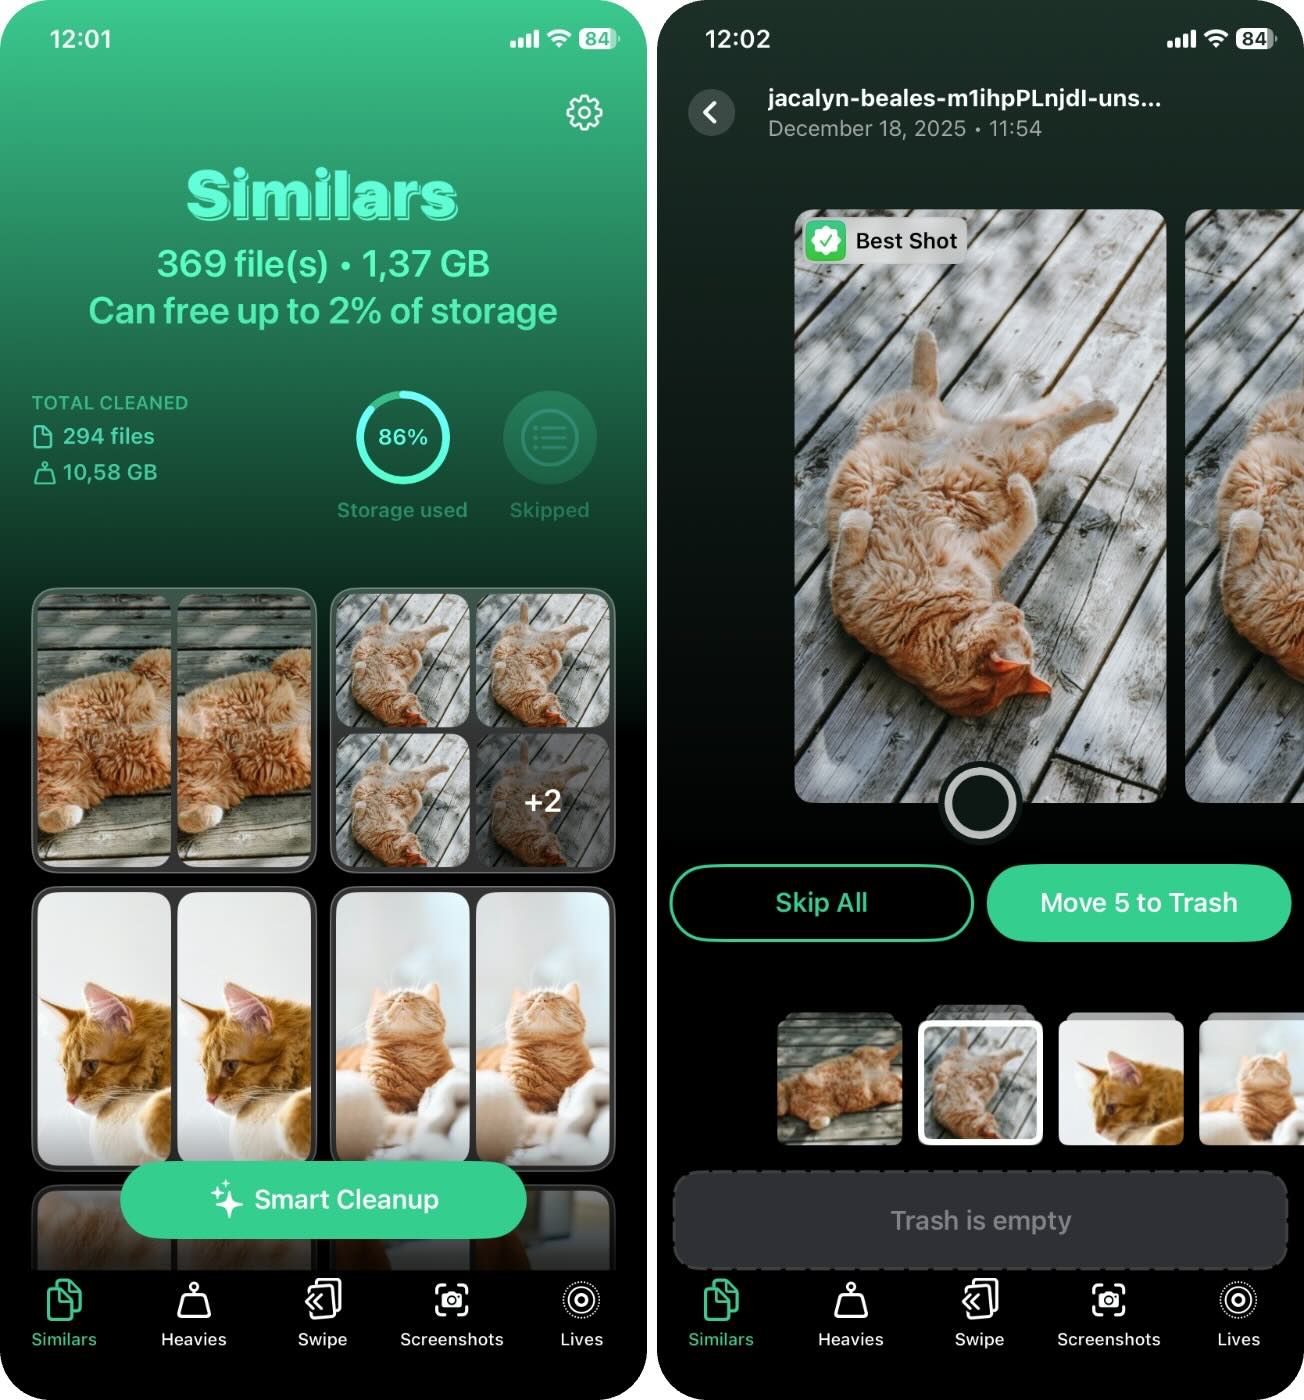
- You can hit “Smart Cleanup” to let the app auto-select the extras and move them to trash. Or you can go through them manually – Clever Cleaner pre-selects the “Best Shot” in each group to save you time.
- All you have to do is tap “Move to Trash.” Anything you delete doesn’t disappear immediately. It goes to the app’s built-in Trash, so you can review or restore anything later if you change your mind.
- Next, head over to the “Heavies” tab. You’ll see a list of your biggest media files, usually videos. There are two main options in this section: “Removal” and “Compression”. Pretty self-explanatory.
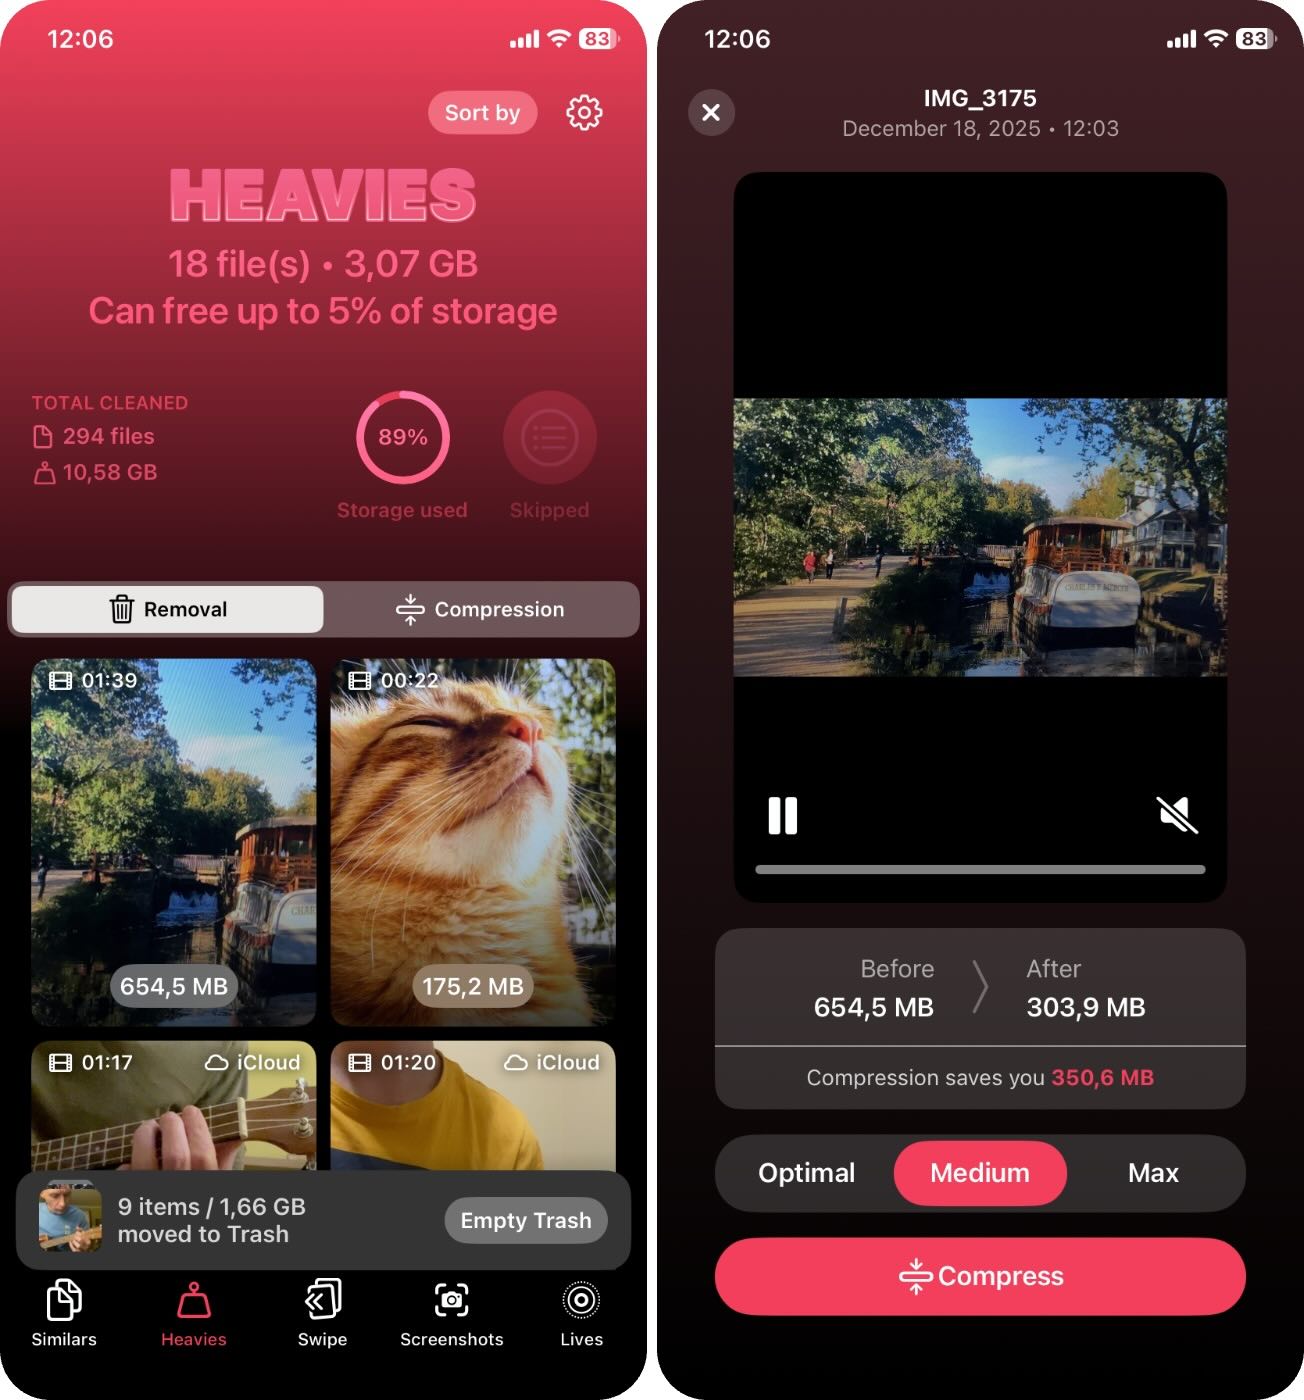
- If you want to delete big files you no longer need, tap into the “Removal” tab and start clearing things out. Like other sections, anything you remove goes to the app’s Trash first.
- But if you want to keep your videos without them eating half your storage, “Compression” is the way to go. This is one of the fastest ways to compress a video on iPhone without needing a Mac. 👀
The app lets you choose between “Optimal,” “Medium,” and “Max” compression levels. Based on our tests, Medium is the sweet spot – it often cuts the file size in half or more without any visible loss in quality.
- Once you’ve gone through your cleanup look at the bottom of the screen and tap “Empty Trash.”
- You’ll see a confirmation slider pop up – just drag it to the right to confirm.

In our experience, the “Similars” and “Heavies” tabs alone are enough for most people to stop seeing the iPhone memory is full pop up. It usually reclaims a huge chunk of space, sometimes over 5-10 GB in a single run.
That said, the other tabs in Clever Cleaner can definitely come in handy depending on what’s in your library.
- “Swipe” gives you manual control – you can swipe left to delete or right to keep. It’s great if you want to clean with your own eyes and not rely on automatic suggestions.
- “Lives” helps you convert Live Photos into regular still images. This can reduce their size by around 2x without actually removing the photo.
- “Screenshots” lets you find and delete all screenshots in one go.
3️⃣ Clear the Recently Deleted Album
And don’t forget to check Recently Deleted.
Everything you clean out, whether you delete it manually from the Photos app or remove it using a duplicate removal app, lands in the Recently Deleted album first. Until you empty that, your iPhone doesn’t actually reclaim the space. So that “iPhone memory full” message might keep showing up even after you’ve deleted a ton of stuff.
Here’s how to clear it:
- Open the Photos app.
- Go to the Collections tab.
- Scroll all the way down to Utilities.
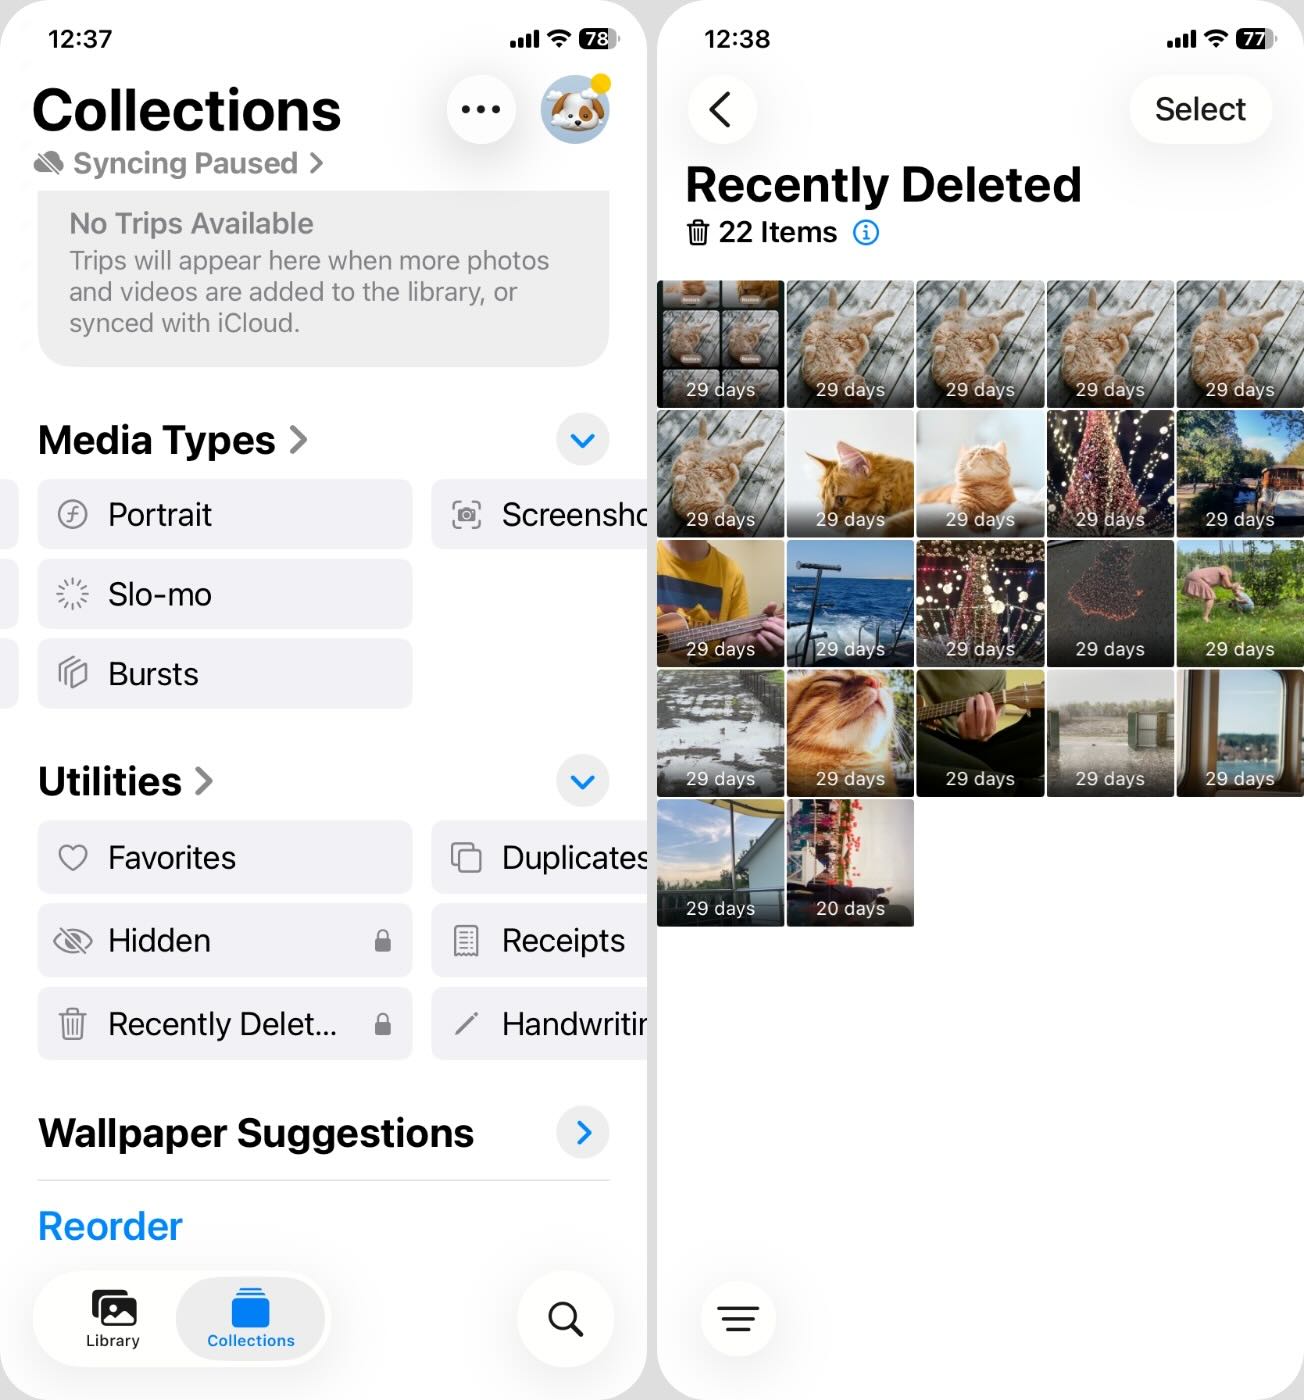
- Tap “Recently Deleted”.⚠️
You may be asked to enter your passcode or use Face ID to confirm.
- Tap “Select” in the top right.
- Then tap “Delete All” (or manually select items you’re sure about), and confirm.

Once that’s done, the deleted photos and videos are actually gone, and your storage space should reflect the changes within a few minutes.
Do this every time you finish a cleanup.
Method 3: Remove Unnecessary Apps
If you have a lot of apps installed on your iPhone, a quick way to get back some precious storage space is to uninstall the ones that are non-essential or haven’t been used in a long time. Despite being unutilized, these apps may still be updating automatically (and consume more and more of your iPhone memory).
👀Keep in mind that aside from straight-up deleting an app, your iOS offers the option to “Offload” it instead. In this case, the app will still be deleted, but its settings and some other files will be retained in case you want to reinstall it in the future. But to be honest, many apps store way more data in their “Documents & Data” than the app itself. So in cases like that, full deletion is often more effective when you’re trying to fix the iPhone memory full message.
Here are the steps on how to delete or “offload” an app:
- To get started, go to Settings > General > iPhone Storage.
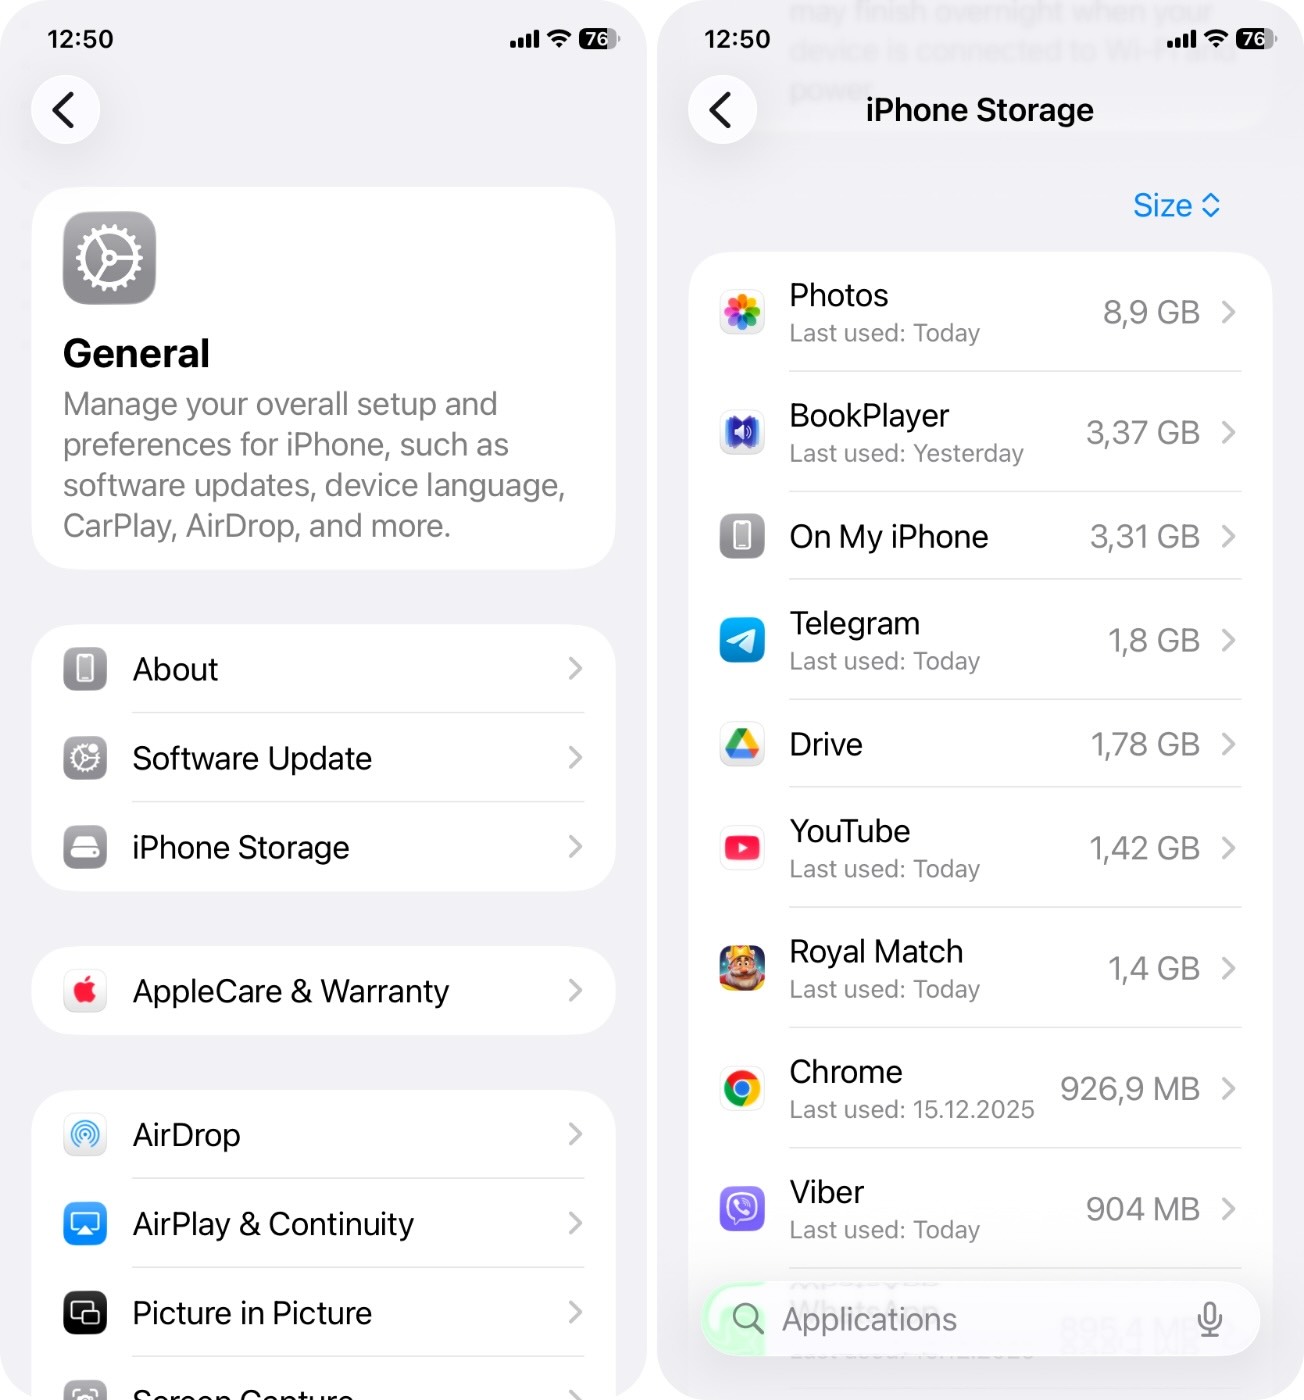
- Then scroll down and select the app you want to delete.
- Tap “Offload App” or “Delete App,” depending on which option you want to go with.
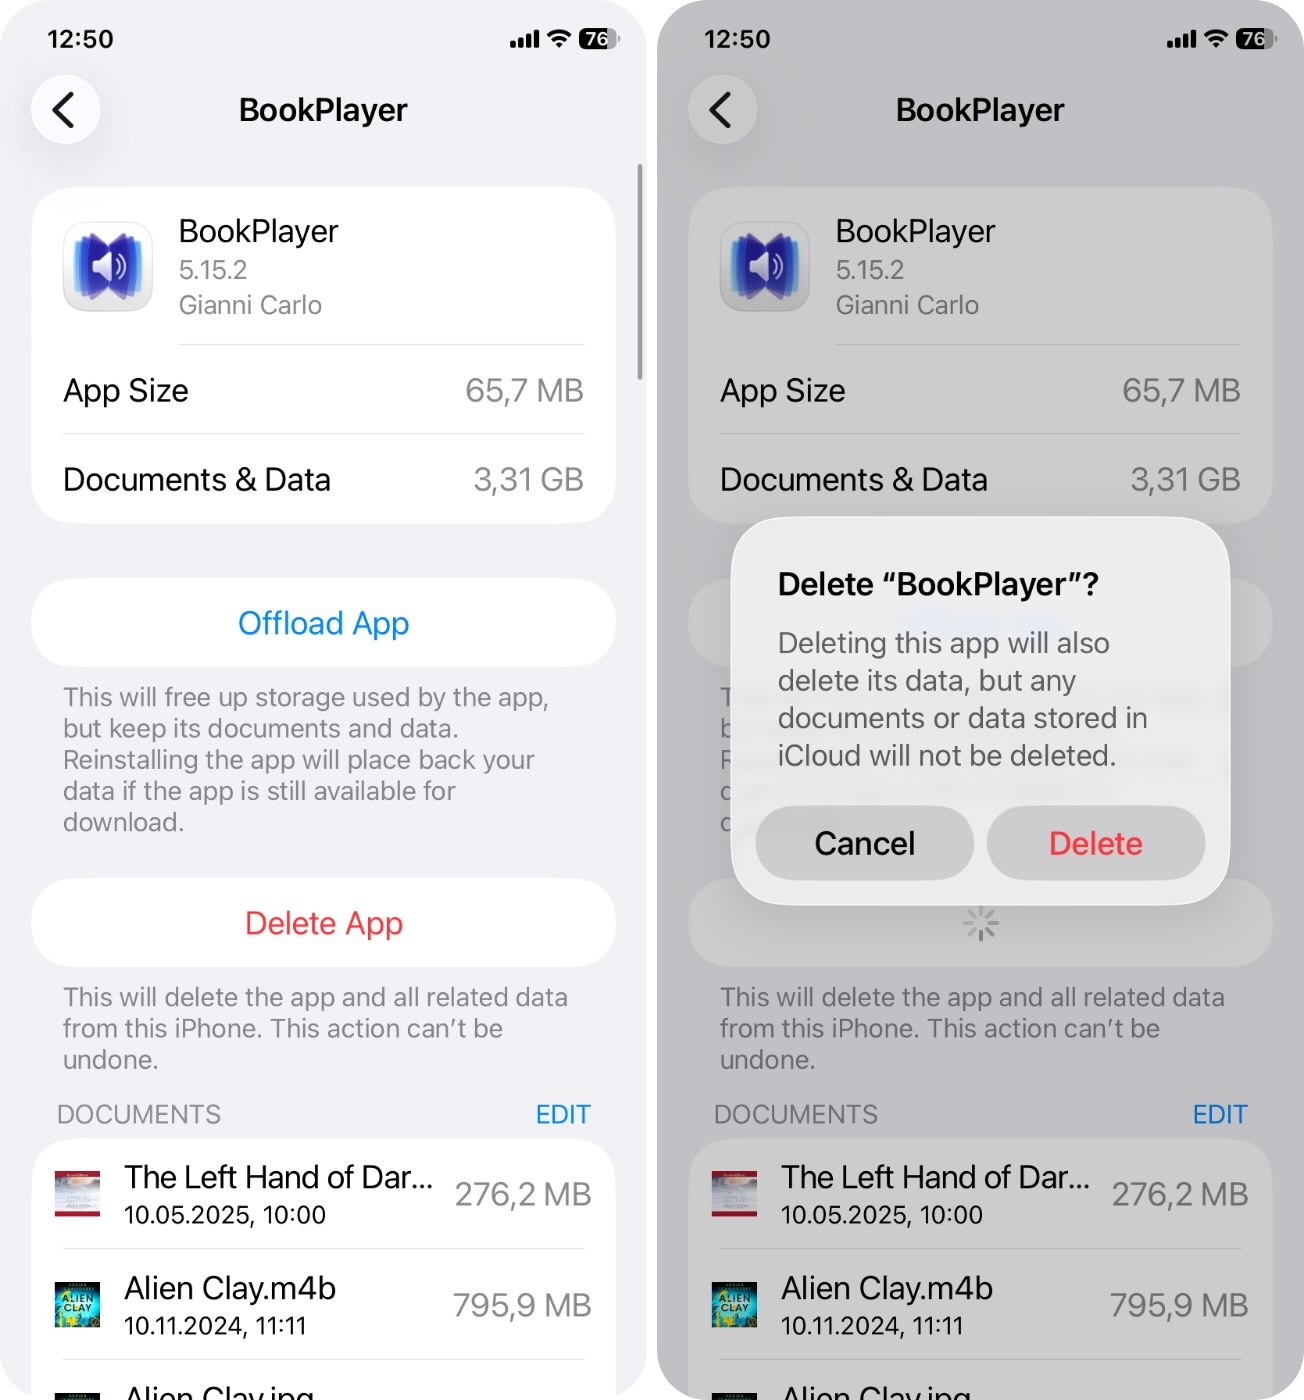
- Finally, confirm your choice to finalize the deletion.
By the way, you can also choose to offload unused apps automatically. In iPhone Storage, you’ll usually see a system suggestion near the top called “Offload Unused Apps.” If you enable it here, your iPhone will handle the offloading for you.
While you’re in there, take a second to check the other suggestions too – you might see helpful ones like “Review Large Attachments” (great for clearing out huge files stuck in Messages) or “Review Personal Videos.”
Method 4: Clear Your Cache
Certain apps utilize a cache that’s made up of various saved files that are stored for later use. This data includes media files, scripts, icons, etc., and can be safely deleted without issue. In fact, if left unchecked for too long, cache can take up a lot of space on your phone.
Apps that tend to stack up large caches include:
- Social media apps like Instagram, TikTok, and Facebook.
- Messaging apps like WhatsApp, Telegram, and Messenger.
- Web browsers like Safari and Chrome.
Cache on iPhone is one of those topics that comes up a lot – even in our own community forum, where people often ask how to clear it in a way that actually works. And that’s exactly what we’ll show you next.
Clear Browser Cache
Since Safari is still the most-used browser on iPhone, for the purposes of this guide, we went with it.
Here’s how you can clear Safari’s cache:
- In “Settings”, open “Apps”.
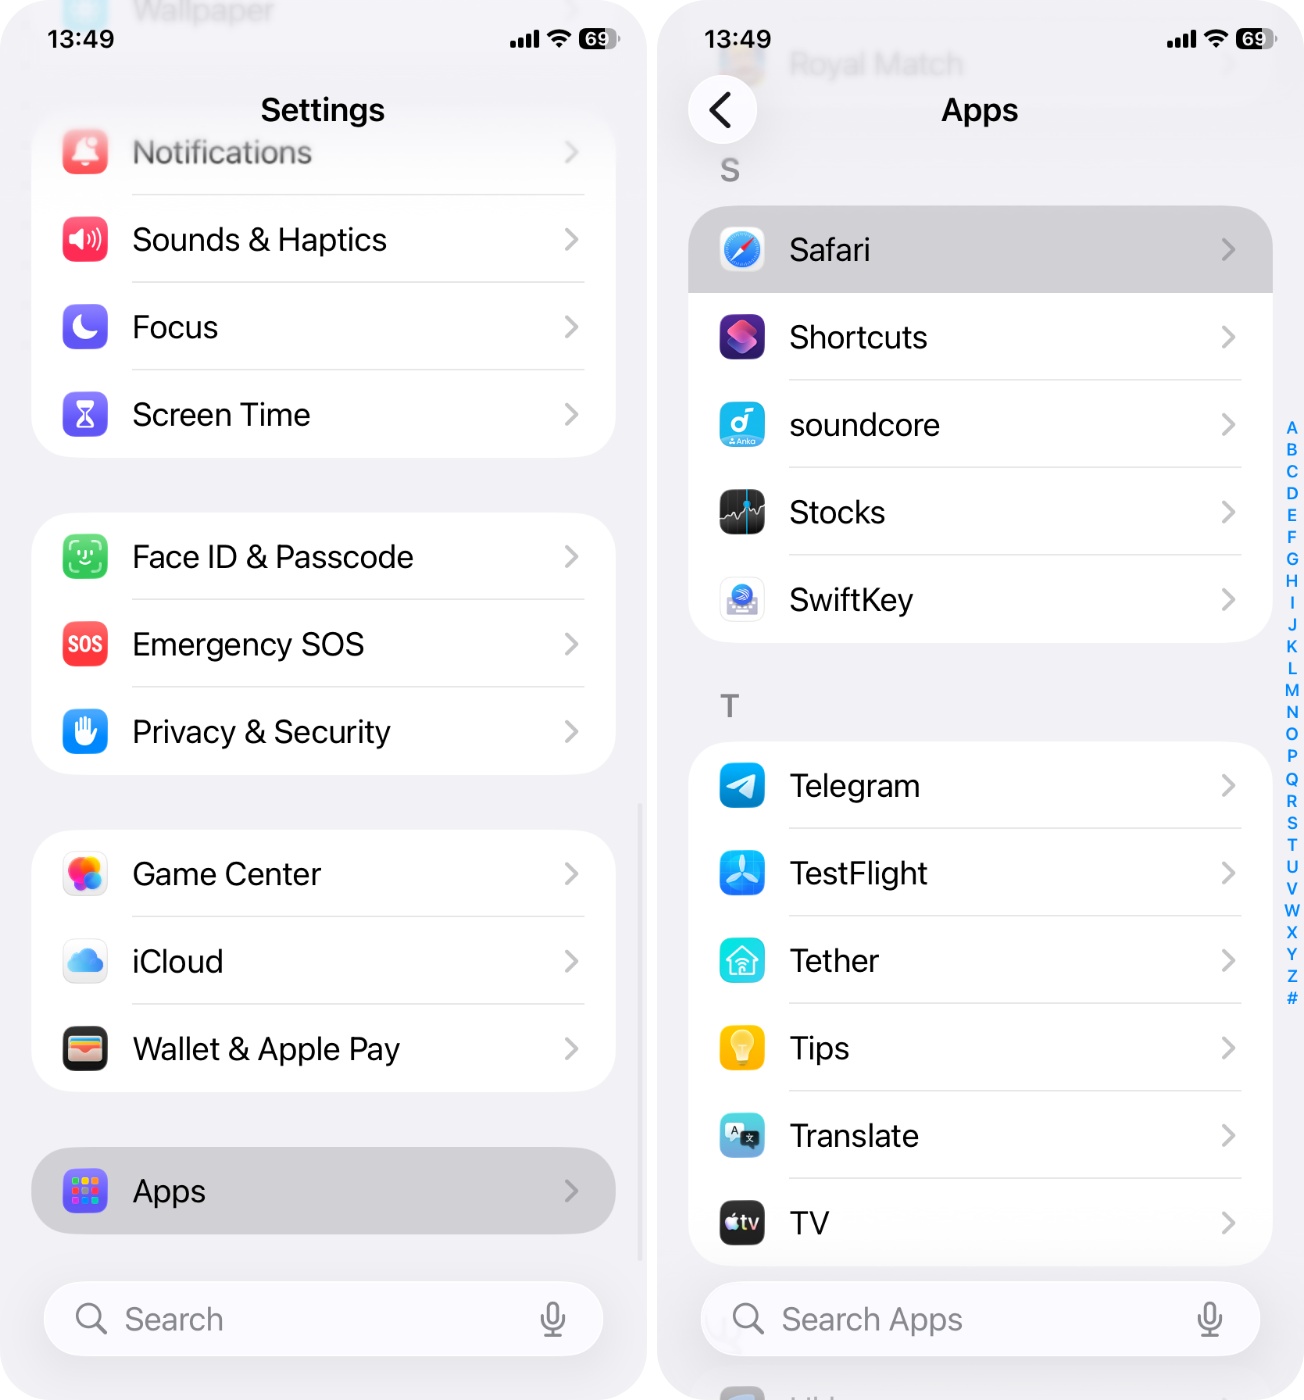
- Scroll down and tap “Safari”.
- Scroll again and tap “Clear History and Website Data”.
- Tap “Clear History and Data” to confirm.
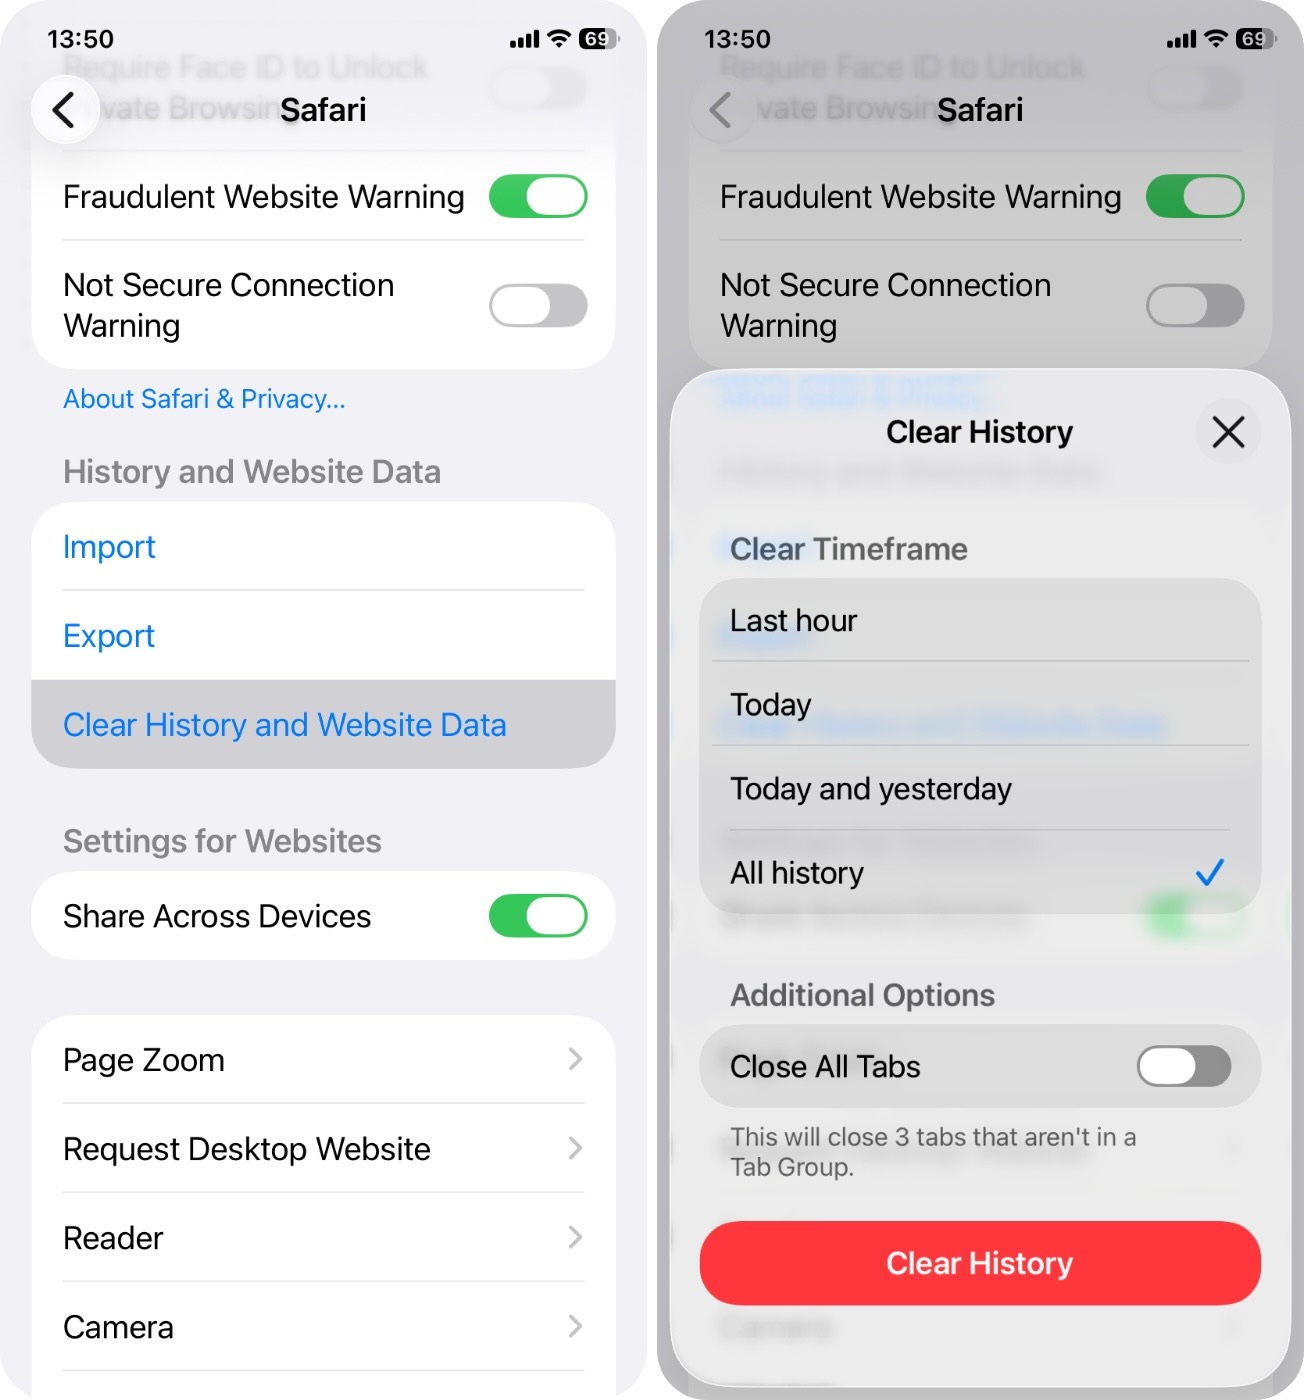
If you clear History and Website Data in Safari, it will log you out of most sites and remove cache, but it won’t touch your bookmarks, reading list, saved passwords (if stored in Keychain), or autofill settings.
Clear App Cache
App cache is a different story. Some apps include a built-in option in their own settings to clear cache. Others don’t give you that control at all.
You’ll have to check manually. Telegram, for example, makes it easy. Here’s how it looks:
- Open the app.
- Go to “Settings”
- Tap “Data and Storage”
- Then tap “Storage Usage”
- From there, you’ll find a “Clear Entire Cache” button. Tap it, and Telegram will immediately free up space.

It’s one of the more user-friendly examples. But if you don’t find a dedicated “Clear Cache” option in the app you’re trying to clean up, you still have another move.
You can clear cache on iPhone for apps by simply deleting the app and reinstalling it. When you remove the app, iOS wipes all its locally stored data. Then when you reinstall it, you start fresh, without the bloat.
You’ll need to sign back in and possibly adjust a few settings again, but this trick works well for apps that build up gigabytes of invisible junk with no built-in way to clear it.
Method 5: Clean Out the Downloads and Other Folders in the Files App
Most people forget about the Files app, but if you’re getting the “iPhone storage full” message, it’s worth checking. This app can quietly hang onto app exports, audio files, and other random downloads from Safari or Mail that you might have opened once and never touched again.
Here’s how to clear them out:
- Open the “Files” app.
- Tap “Browse” at the bottom.
- Tap “On My iPhone”.
- Open the “Downloads” folder (or any other folders you see there).
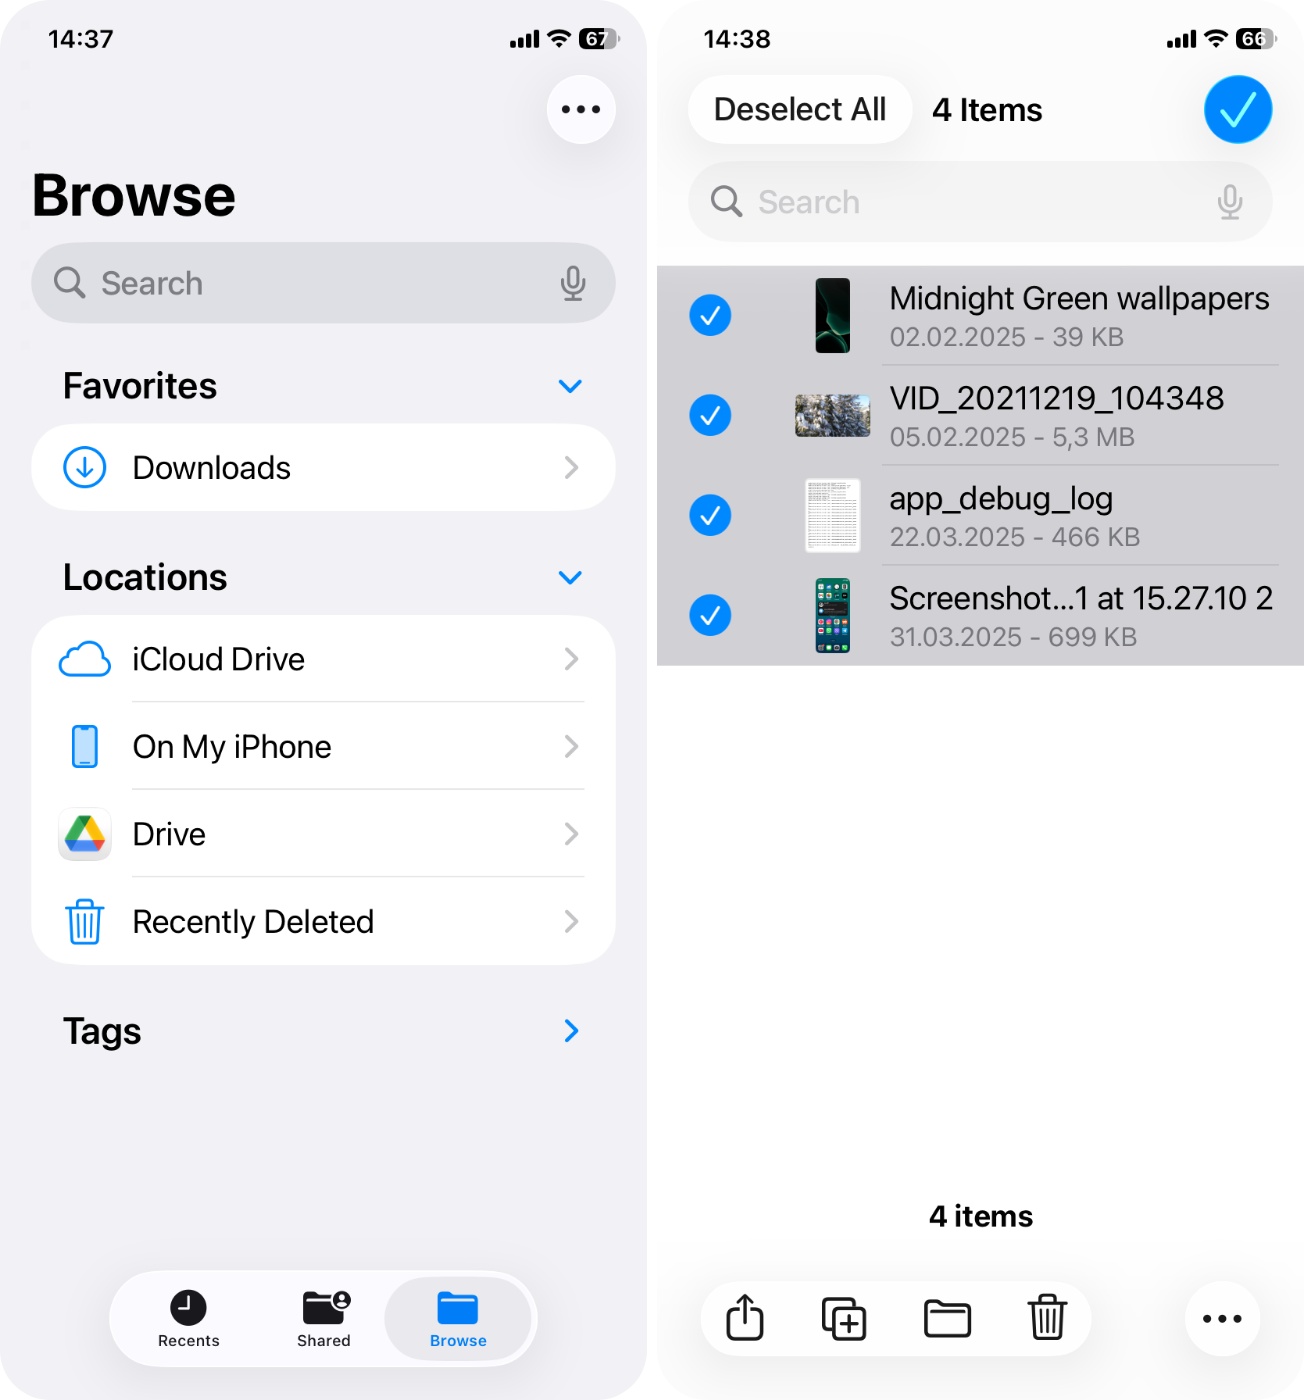
- Look for large files you don’t need.👀
Tap the 3-dot menu in the upper right to switch to list view. This makes it easier to spot the heavy stuff.
- Press and hold a file, tap “Delete”, or tap “Select” to batch delete.
- Once you’re done, go to the “Recently Deleted” folder and tap “Delete All”
You can also check inside app-specific folders (like LumaFusion, GarageBand, VLC, etc.) if you’ve used any creative tools or downloaded media there.
This is one of those simple cleanups that often gets overlooked.
Method 6: Disable Automatic Updates
System updates can end up occupying a whole lot of space on your phone, and they’re usually set to update automatically from the get-go.
If your iPhone’s already running low, that extra gig or two from a pending update can be enough to trigger the “storage full” message.
We’re not saying this is something everyone needs to do. In general, it’s better to keep your iPhone updated. But if you’re actively trying to clear space and that “iPhone memory full” message keeps getting in the way, disabling auto-updates can help take the pressure off while you clean.
How to turn off ios automatic updates:
- Open “Settings”.
- Tap “General”.
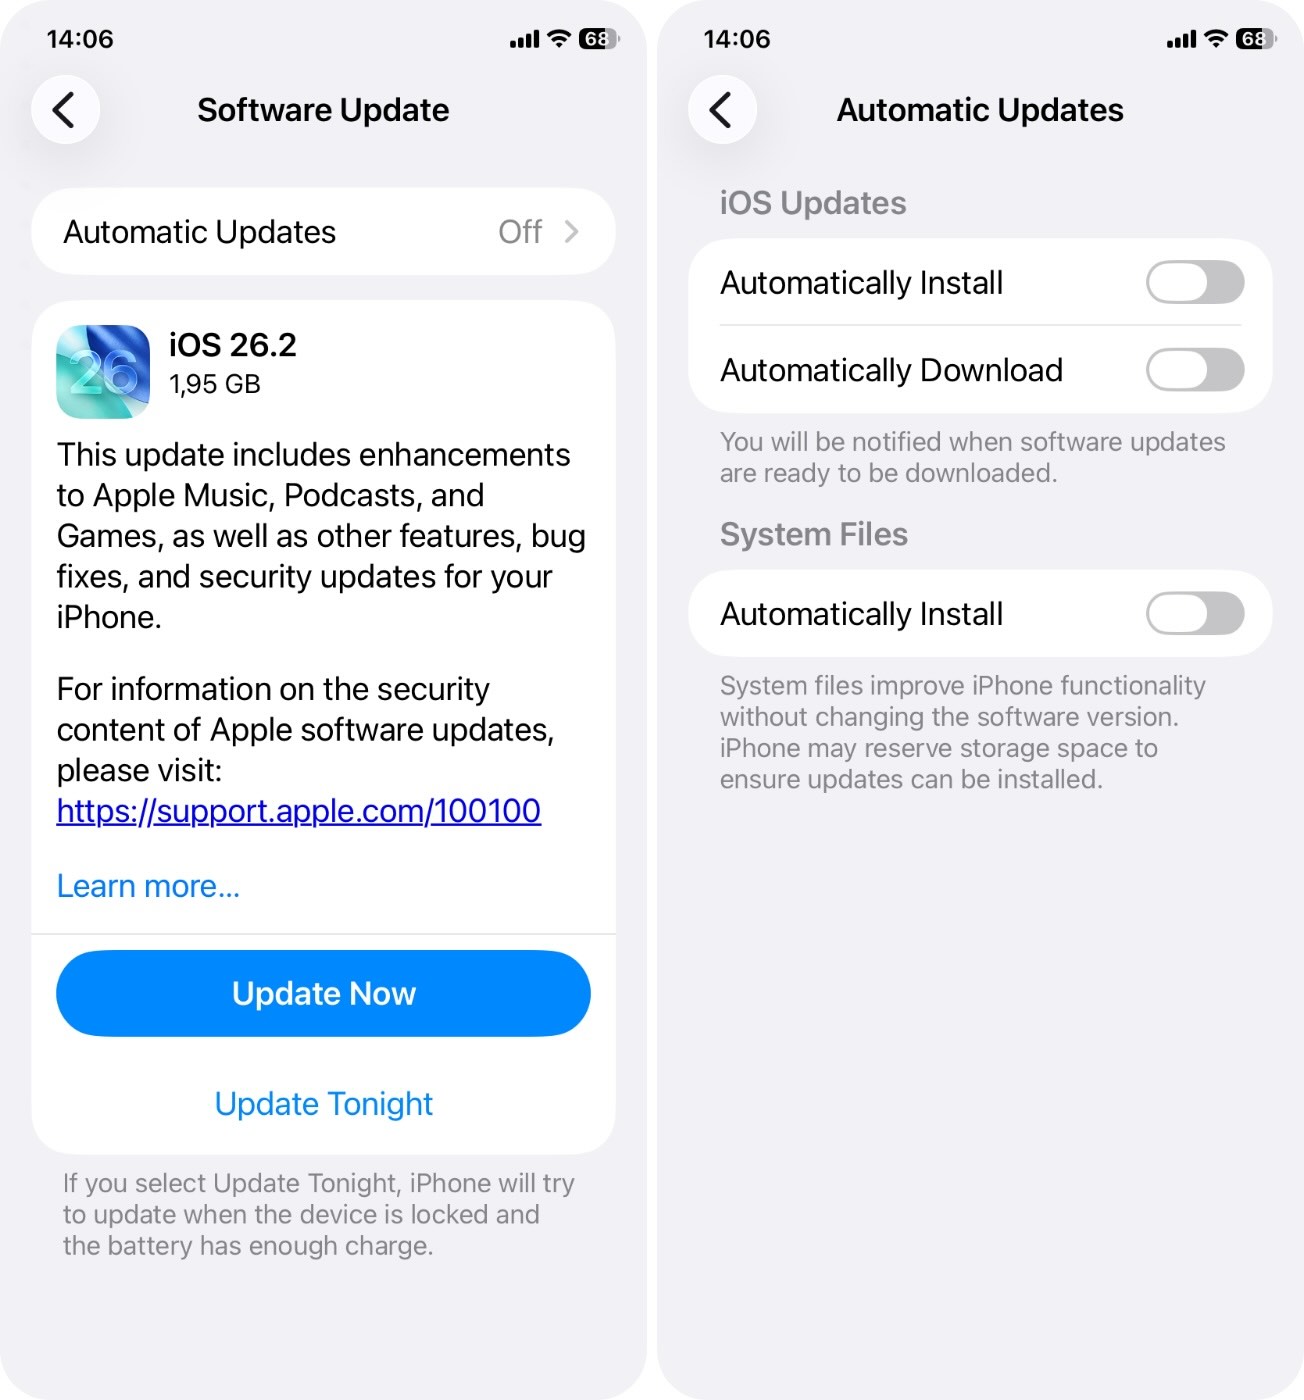
- Tap “Software Update”
- Tap “Automatic Updates”.
- Turn off “Automaticcally Download” (and “Automaticcally Install”).
Method 7: Transfer Large Files to External Devices
You probably already know about cloud storage options like iCloud, Google Drive, or Dropbox. But what a lot of people don’t realize is that you can also move files off your iPhone using external storage devices. Yes, like an actual flash drive.
If your iPhone has a Lightning or USB-C port, there are drives built specifically to plug right in. They work with the Files app and can give you a way to stash files outside of your device.
This is especially useful if:
- You don’t want to pay for cloud storage.
- Your internet is slow and uploading to iCloud or Drive takes forever.
- You need to offload raw footage, drone clips, or long screen recordings that don’t need to live on your phone.
Most modern iPhones support USB-C flash drives, or Lightning drives for older models. Just plug it in, open the Files app, and start copying over the stuff you don’t need to carry around 24/7. From there, you can delete the local copies off your phone.
To make sure your external storage device works smoothly with your iPhone, you’ll need to follow Apple’s formatting rules:
An external drive must have only one data partition, and it needs to be formatted as APFS, APFS (Encrypted), macOS Extended (HFS+), exFAT (FAT64), FAT32, or FAT.
If your drive isn’t showing up, this is probably why.
Why Does My iPhone Say Storage Is Full When It’s Not?
We’ve already walked through the cases where your iPhone really is low on space. But what if everything looks clean, and that full storage warning still pops up?
This bug crops up now and then, and there’s a long trail of victims. Some people have plenty of free space (both locally and on iCloud) but still can’t take new photos because the phone keeps saying: “iPhone Storage Full. You do not have enough storage to take more photos.”
So what’s happening here?
In some cases, it’s an iCloud Photo sync hiccup. During upload, iOS might temporarily inflate the storage used by categorizing in-progress uploads and cached items as Other. This can cause your device to think it’s packed, even when it’s not.
You might also see the message vanish after a restart or toggling iCloud Photos off and back on.
If you’ve tried everything else and that “iPhone Storage Full” warning still won’t go away (despite having space) the most reliable fix in these stubborn cases is to fully back up your device and perform a full reset.
Here’s how to do it safely:
- Before resetting anything, create a full backup. Go to Settings > [Your Name] > iCloud > iCloud Backup.
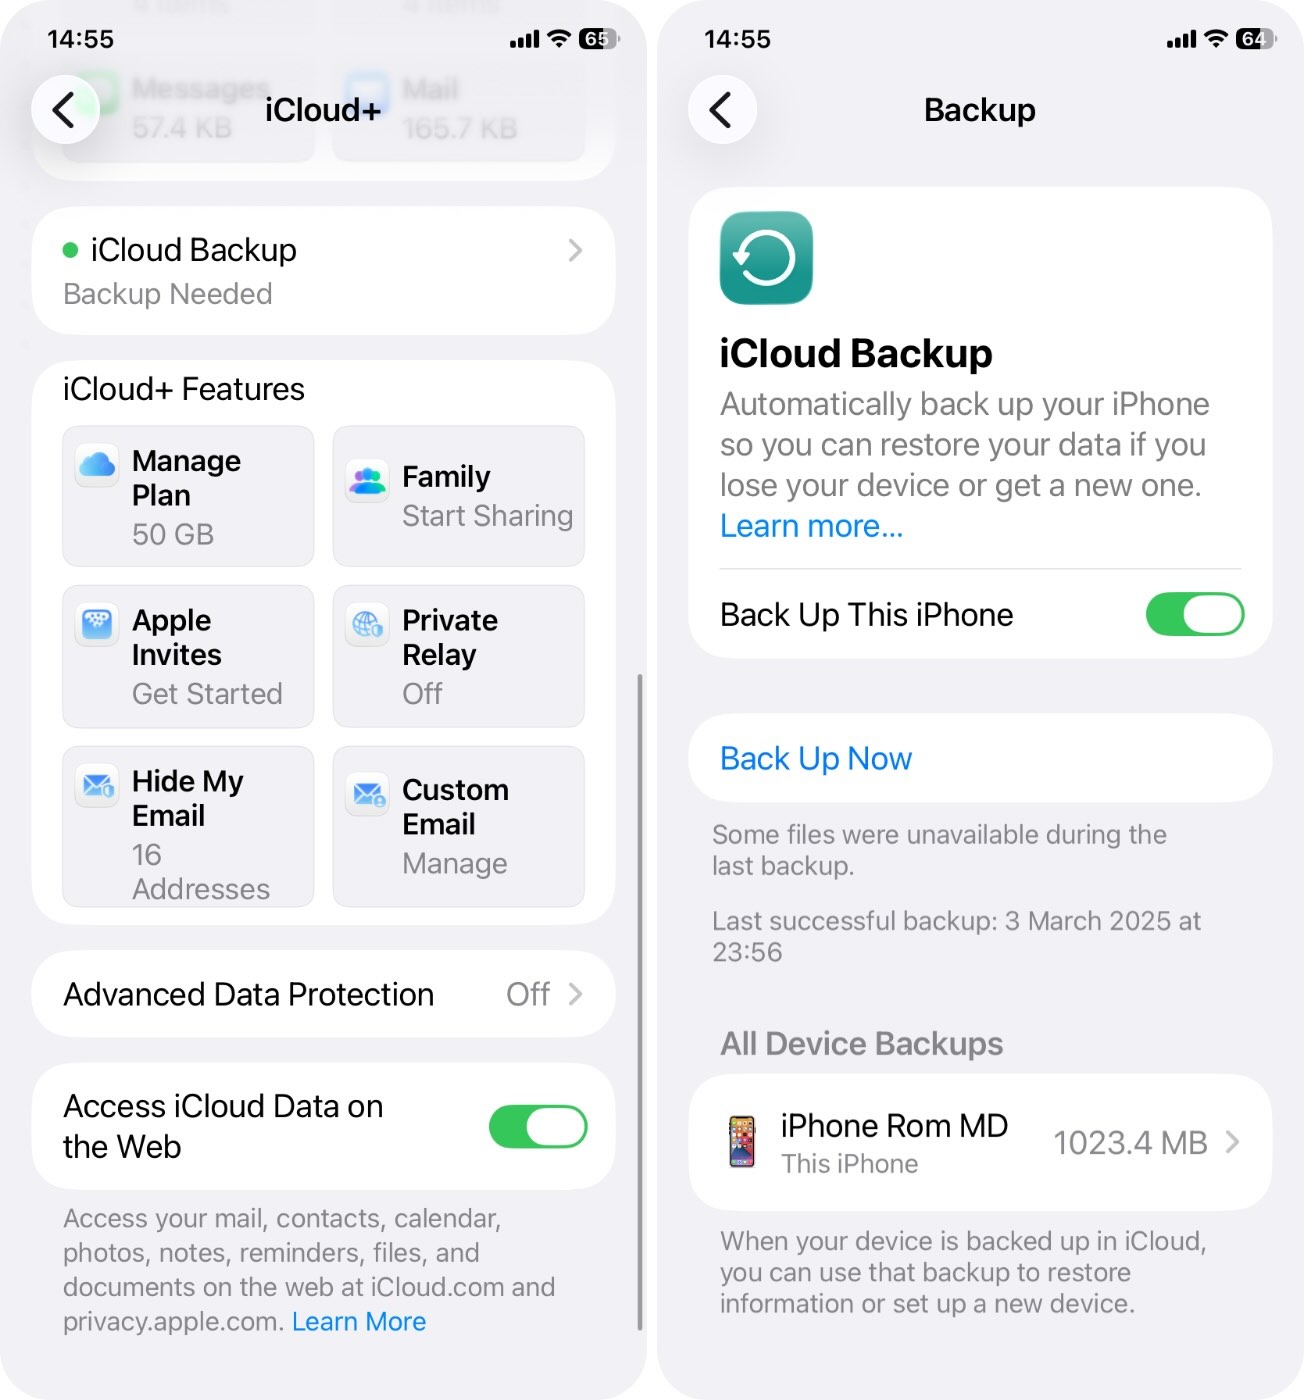
- Tap Back Up Now. 🗨️
Or do it on your Mac: Plug your iPhone in, open Finder (on Mac) or iTunes (on Windows), and choose Back Up Now. If you want a full backup including app data and passwords, choose Encrypt Local Backup.
- Once you’ve backed everything up g o to Settings > General > Transfer or Reset iPhone.
- Tap Erase All Content and Settings.
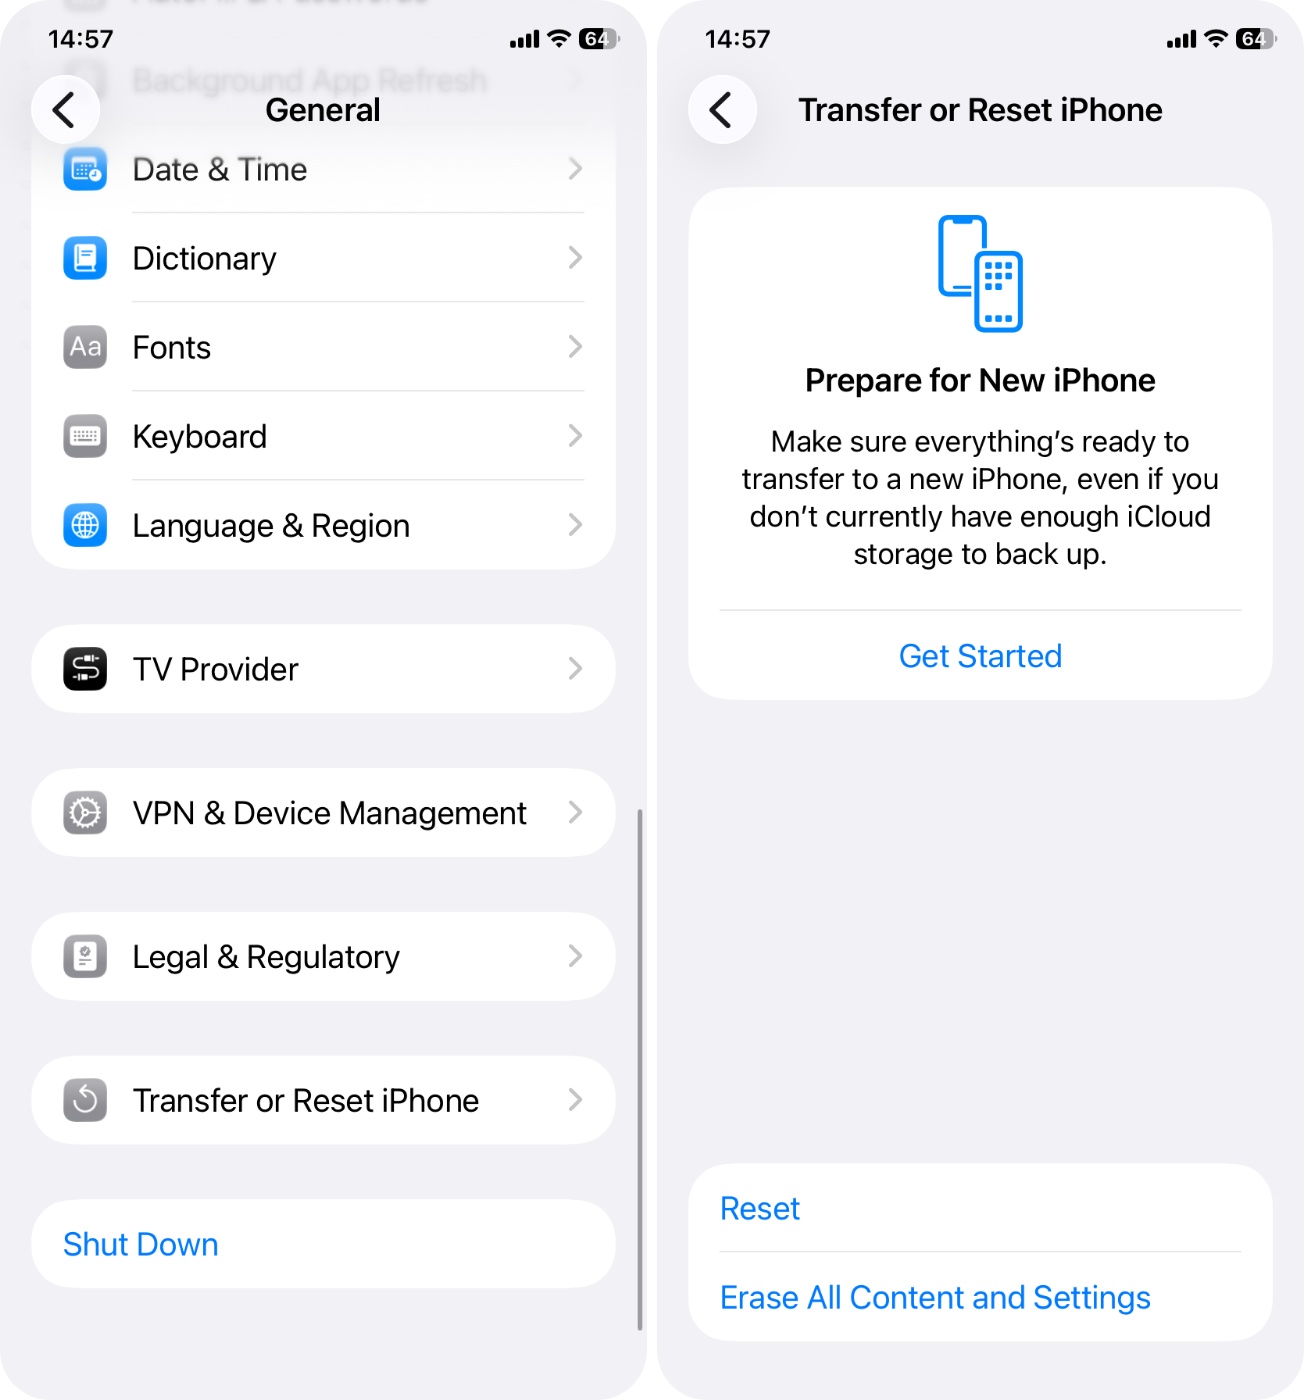
- Follow the prompts and confirm your passcode.
This will completely wipe your iPhone and reinstall the latest iOS version. On the Hello screen, you’ll need to go through the setup process and select the backup you made earlier, and your apps, photos, messages, and settings will begin restoring.
It’s a bit of a nuisance, but it should do the trick.
Conclusion
We went over the article and realized there’s quite a bit of information packed in. So if you need a quick summary or if you’re one of those people who skips to the end (no judgment), we put this checklist together to help you cut straight to the point:
While we prepped this guide and tried different methods, the best way to get rid of the iPhone Memory Full message was using Clever Cleaner. Not a surprise – in our case, the photo library took up most of the space, so that’s where the biggest gains came from. If you’re in the same boat, odds are you’ll get similar results.
And as an extra move, if you’re one of those users who really does have a ton of stuff and still needs every bit of it, consider shifting some of that load to iCloud or even external storage. Cloud sync can offload photos, videos, and files without deleting anything. And thanks to iOS improvements, external drives now work well too (just make sure they’re properly formatted). Either way, you’ll keep access to everything without choking your iPhone’s local storage.
FAQ
Does the iPhone stop working when storage is full?
No, but performance will suffer, and some features may stop functioning properly. You’ll feel the impact right away. The system starts to run out of room for temporary files, updates, and new data, which causes all sorts of weird behavior. Apps might freeze, crash, or refuse to open. You might not be able to take photos or videos. Even basic actions like opening Settings or typing in Messages can lag.
How do I force my iPhone to restart when storage is full?
If your iPhone storage is full and it becomes unresponsive, here’s how to force restart it.
-
On iPhones with Face ID (and iPhone 8 or later):
- Quickly press and release the Volume Up button.
- Quickly press and release the Volume Down button.
- Press and hold the Side button until the Apple logo appears, then release it.
- On iPhone 7 / 7 Plus: Press and hold both the Volume Down and the Side (Power) button at the same time. Let go when you see the Apple logo.
- On iPhone 6s, SE (1st gen), or older: Hold down the Home button and the Power button together until the Apple logo shows up.
This won’t delete anything, it just forces a reboot. Once the phone restarts, go back and try to clear up space using one of the methods we covered earlier.
Why is my iPhone memory suddenly full?
An iPhone’s storage often becomes full because of the following:
- Excessive browser or app cache
- Too many photos and/or videos
- Too many unnecessary apps
- Automatic system or app updates
- A glitch in the iOS that’s making the device’s storage capacity appear erroneously
How to stop the iPhone memory full message spam?
First check Settings > General > iPhone Storage. That screen usually points straight to the culprit. Clear some space there first, and make sure you empty Recently Deleted in Photos so the space actually frees up.
If you’ve already done all that and the message still won’t go away (even though you clearly have free space), your iPhone may be stuck on a storage calculation glitch. In that case, back up your device and do a full reset. It usually clears the bug and stops the warnings for good.
Can I fix the ‘iPhone storage is almost full’ problem using iCloud?
iCloud can help, but it doesn’t solve the entire problem. Here’s what it can do:
- Free up local storage with iCloud Photos enabled – your full-resolution photos and videos are moved to iCloud, and smaller versions stay on the iPhone.
- Offload app data by backing up apps and data to iCloud, but this doesn’t reduce app size on your device unless you delete or offload the app itself.
- Store files in iCloud Drive to move documents off your iPhone.
Though you may still see the “Storage Almost Full” alert if local files (like cached media, downloads, etc.) are taking space. Use Settings > General > iPhone Storage to check what’s really eating up space.
Why is my iPhone memory full when I have no apps?
Aside from apps, your iPhone storage may be full due to an excessive number of media files, a large app/browser cache, and/or pending updates. You could also be encountering a glitch that makes your iPhone storage appear full when it really isn’t, or you may need to clear out your system storage.
This article was written by Princess Lescan, a Staff Writer at Handy Recovery Advisor. It was recently updated by Roman Demian.
Curious about our content creation process? Take a look at our Editor Guidelines.