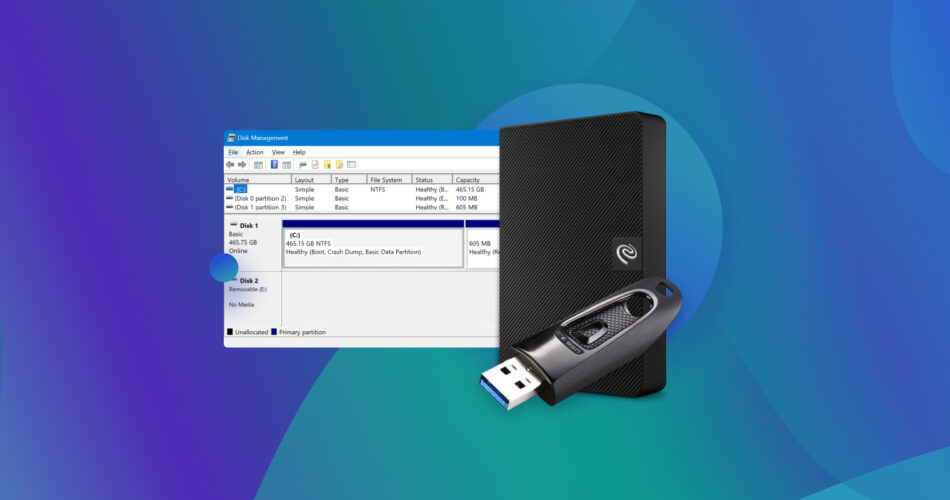
The error message “Removable disk/USB no media” appears when your computer is unable to access the attached storage device, therefore displaying it as empty. In such cases, you will be prevented from accessing any data on the USB until it is resolved.
There are a few reasons why this error message can suddenly appear. In this article, we’re going to explore some tried and true methods for getting it fixed.
Why Do You Get “USB No Media” Error?
One of several problems could arise that will result in this message appearing when you try to access your USB drive. It stems from a logical or physical issue that has inflicted damage to your storage device, causing it to act erratically. The message serves as a general alert that something isn’t quite working as intended.
Here are some common reasons why the “USB No Media” error message can appear:
- 💥 Physically damaged USB device – When a USB drive becomes physically damaged, the pin connectors may not function properly, causing an unstable connection between the USB drive and your computer.
- ❌ Damaged USB port – If a USB port is damaged, it will struggle to read any device that you connect. This can also occur if the USB port is blocked by a substance like dust or lint.
- ⚡ Insufficient power to USB port – Battery-powered devices like laptops include power-saving features to conserve battery life. If your USB port is not receiving enough power, or it has been automatically disabled by your system, it won’t be able to read the connected USB drive.
- 🔧 Driver issues – Corrupted or outdated drivers can lead to a breakdown in communication between your USB storage device and operating system. As a result, this message can appear.
- 🦠 Virus attacks– Certain viruses can infect your computer and influence how the system identifies externally connected devices, which can sometimes lead to the “USB No Media” error appearing.
We’ve included solutions to all of these problems in this article. Refer to the table below to jump straight to the solutions that fit your situation:
The case |
Suggested step/method |
Everything was OK, but now the disk management shows an error. |
|
My computer/USB drive was recently infected with malware. |
|
I get a “USB device not recognized” error. |
|
I accidentally interrupted the data transfer or formatting process. |
|
My USB drive has been exposed to moisture or mechanical damage. |
Recommended Steps to Fix USB No Media Error
There are a few solutions floating around the internet that claim to be effective in resolving the “removable disk no media” error. Still, not all of them are as reliable as you might think. After troubleshooting the problem, we’ve concluded that the solution below is the best way to combat this error message and perform flash drive repair.
Step 1: Mount Your Device to Different USB ports
If Windows is saying there’s no media in the device, it may be due to a faulty USB port. A faulty USB port can cause a myriad of problems as connected devices can either connect intermittently or not at all.
If you’re using a desktop computer, make sure you’re connecting the USB directly to a port on the motherboard (typically at the back of your machine), as the USB ports on your computer case may have a fault in the cable that connects them to your motherboard internally.
Step 2: Check the USB Ports Power Supply
Make sure your USB ports are receiving sufficient power. You can check this using Device Manager. Follow the below steps:
- Right-click Start and click Device Manager.
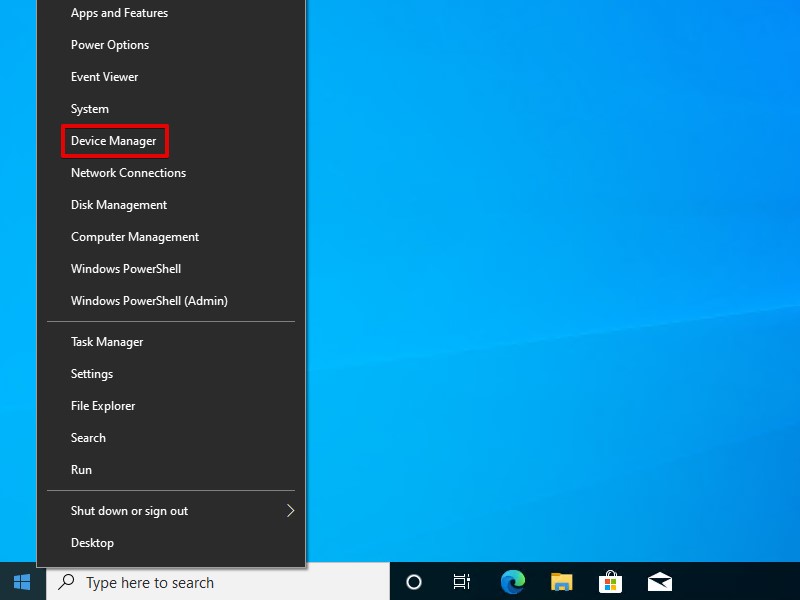
- Expand Universal Serious Bus controllers. Right-click either USB Root Hub or Generis USB Hub and select Properties.

- Go to the Details tab, then change the Property dropdown to Power data.
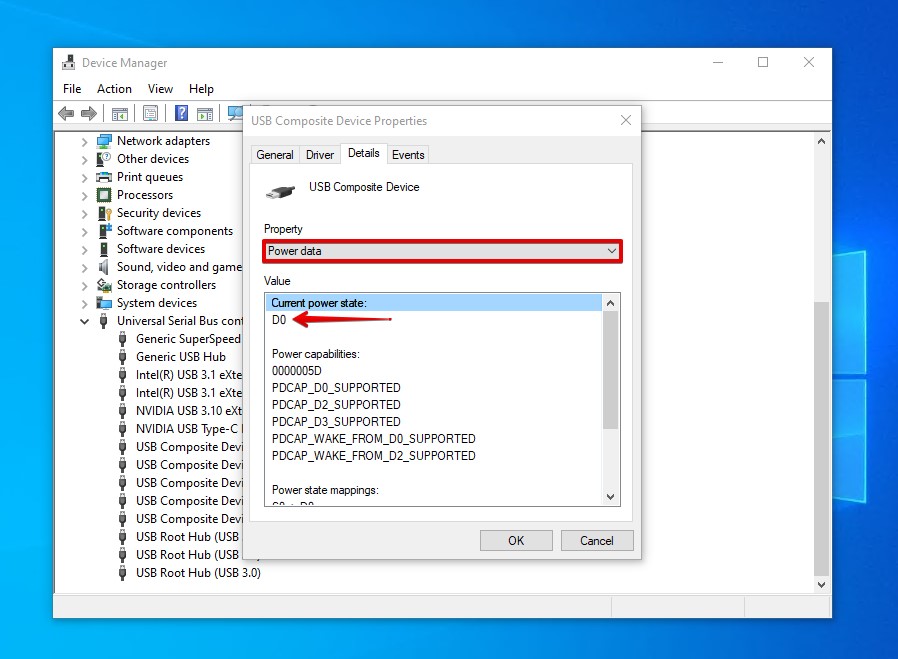
Look at the current power state. It should have a value between D0 and D3. D0 means maximum power output, while D3 means the lowest power output.
If you’re using a USB hub, make sure the USB hub is connected properly and powered if required. Moreover, if you’re not using a powered USB hub, try removing other devices connected to the USB hub to ensure your USB receives enough power.
Step 3: Scan Your System With Antivirus Software
Malware can be designed to do a number of harmful things to your computer. If a virus has infected your computer, it may be inhibiting your computer’s ability to properly read the connected USB drive.
Microsoft Defender is a full antivirus program that comes preinstalled with Windows in versions Windows 8 and above. You can use it to do a full scan of your computer and remove any unwanted malicious software. Here’s how you can do so:
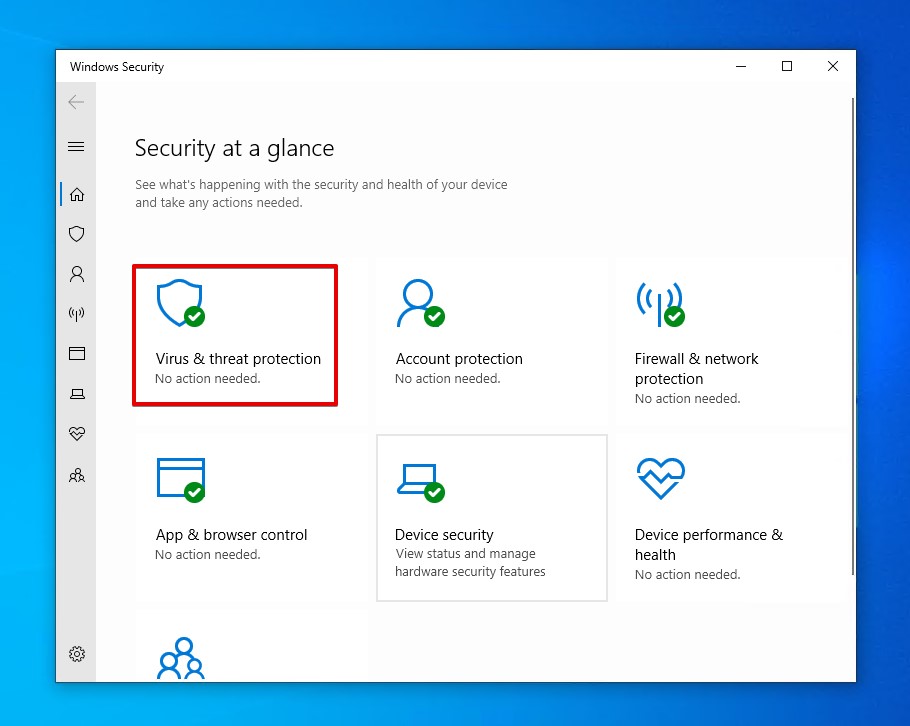
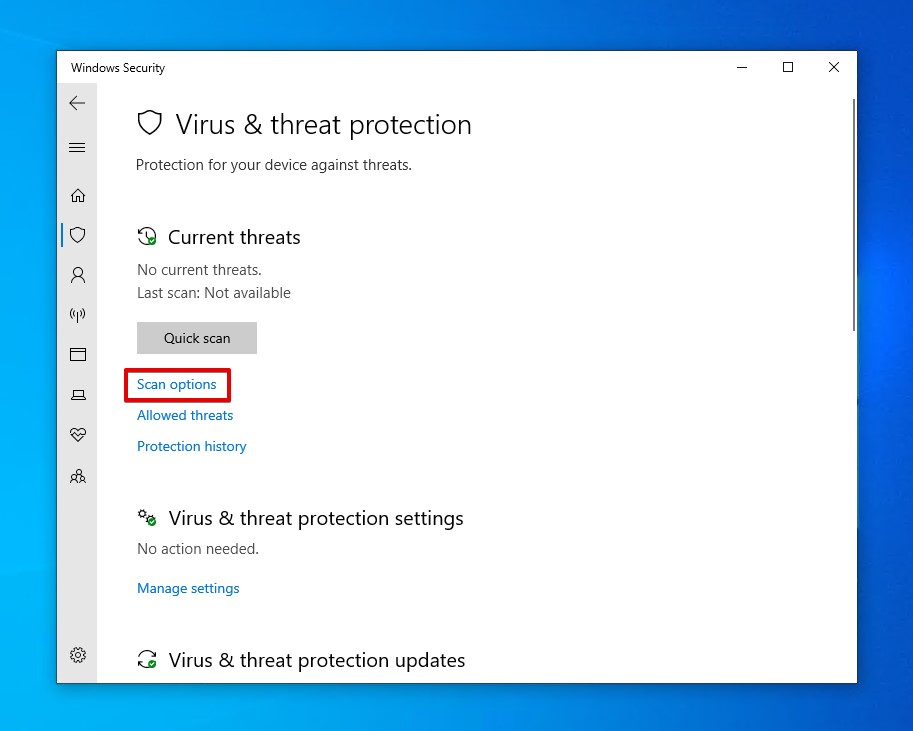
- Press Windows Key + S and search “Windows Security”. Open the first result.

- Click Virus & threat protection.
- Click Scan options.
- Select Full scan, then click Scan now.
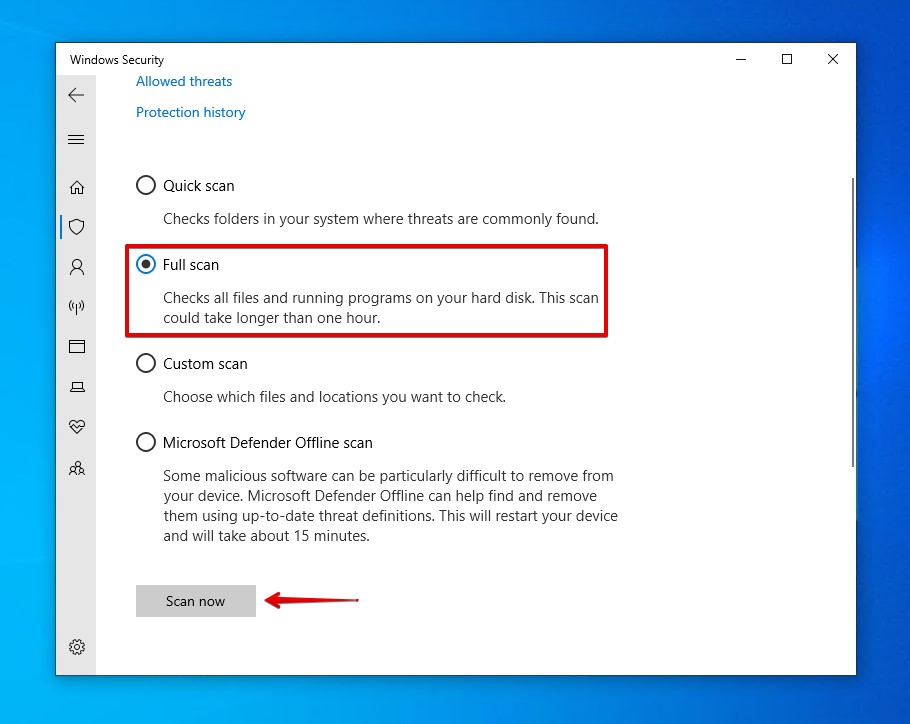
Microsoft Defender will alert you to any viruses and take care of them for you. Following the scan and any successful virus removals, try accessing the USB again to see if it is working.
If the Full scan was unable to produce the results you wanted, you can also try Microsoft Defender Offline scan as it’s a powerful scanning method that operates outside the normal Windows kernel to target malware that attempts to bypass the Windows shell.
Step 4: Update/Reinstall USB drivers in Device Manager
Outdated or corrupted USB drivers are the number one problem for a lot of USB-related issues. Device drivers are responsible for handling the communication between your storage device and your computer’s hardware. Without them, Windows will not be able to detect the USB at all.
Follow these steps to either update your USB drivers or reinstall them if they’re corrupted or damaged:
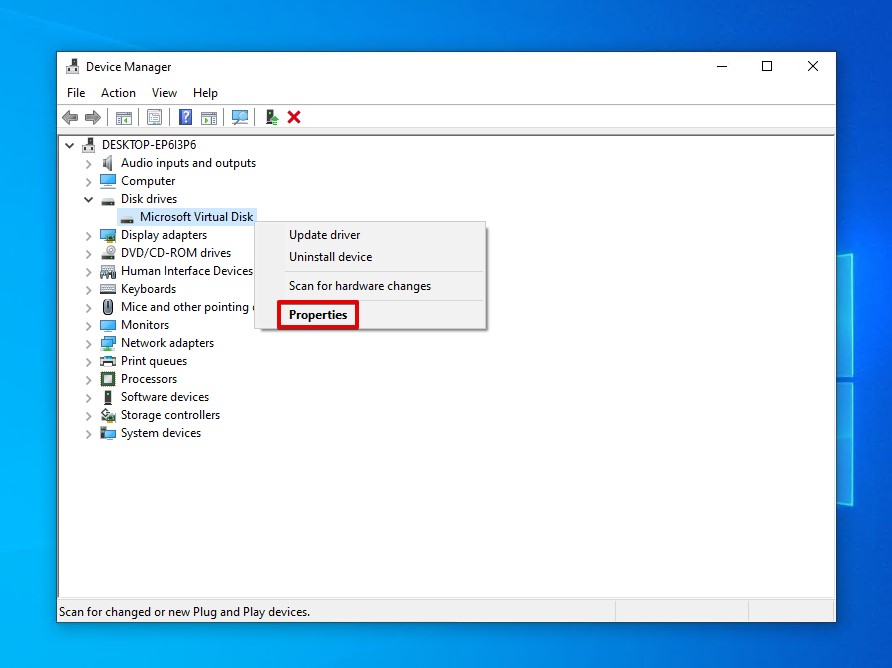
- Right-click Start and click Device Manager.
- Expand Disk drives, right-click your USB drive (the name will vary based on the model), and click Properties.
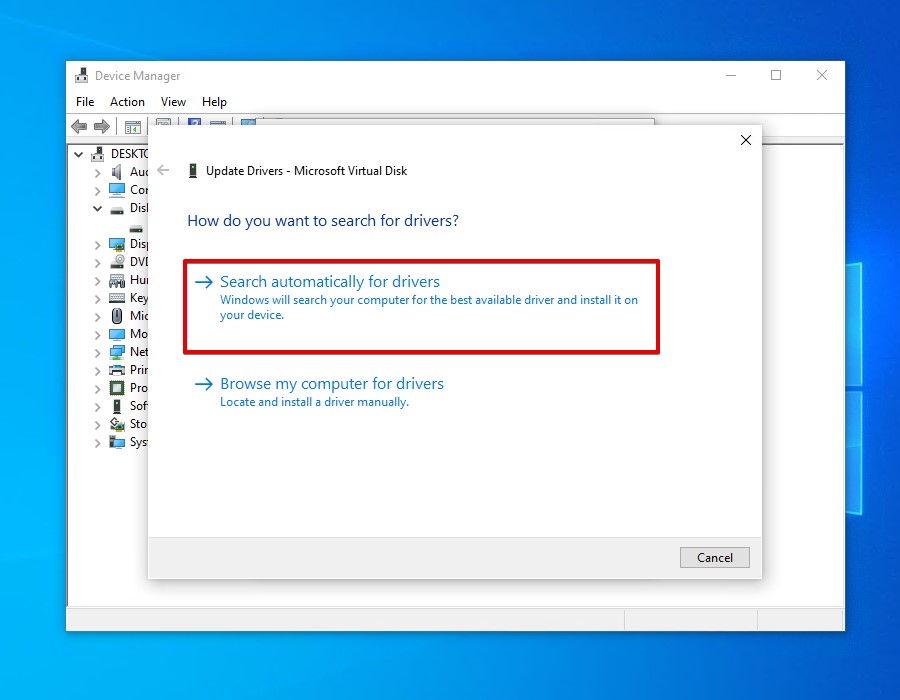
- Go to the Driver tab and click Update Driver.
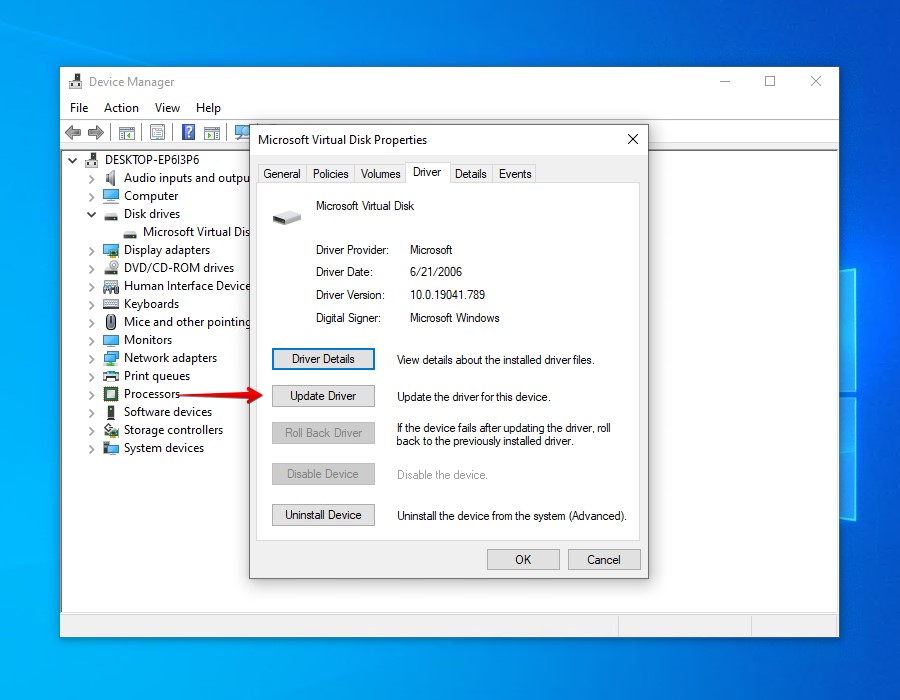
- Click Search automatically for drivers. If the option appears to update, install the updated drivers. If not, proceed to the next step.
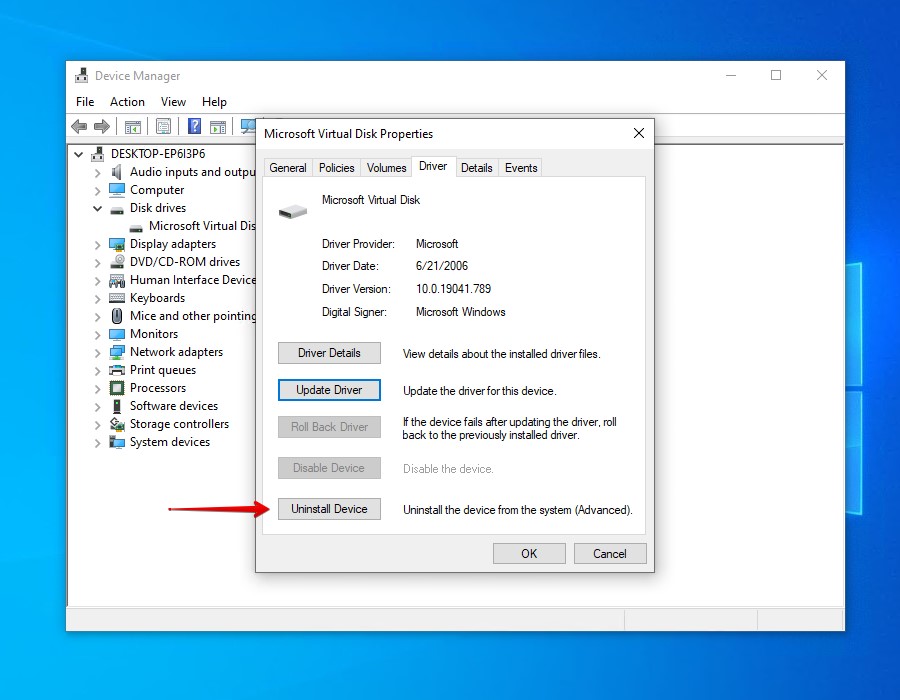
- Click Uninstall Device.
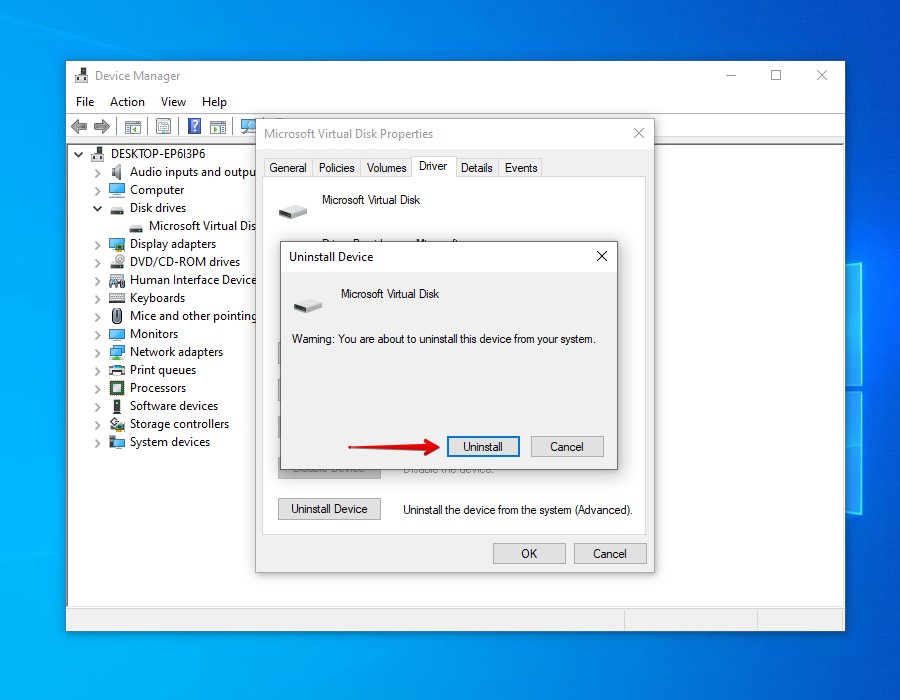
- Click Uninstall to confirm.
- Remove the USB then reconnect it to force the drivers to reinstall.
Once this 0 bytes fix has been implemented, see if normal functionality has returned to the USB drive.
Recover Data From “USB No Media” Device
Once your USB drive is back up and running, it’s imperative that you recover any data that you can to ensure no further problems occur due to your USB drive’s instability. If you don’t, another problem may not present you with the opportunity to recover your data.
For the recovery of your data, we recommend Disk Drill. Drill Drill is a data recovery program specifically designed for recovery cases where your data has been lost, damaged, or deleted. As a highly reviewed and trusted recovery tool, it’s a popular choice when you need to recover data that you cannot afford to lose, even in cases where it seems like it’s gone forever.
- Download and install Disk Drill.
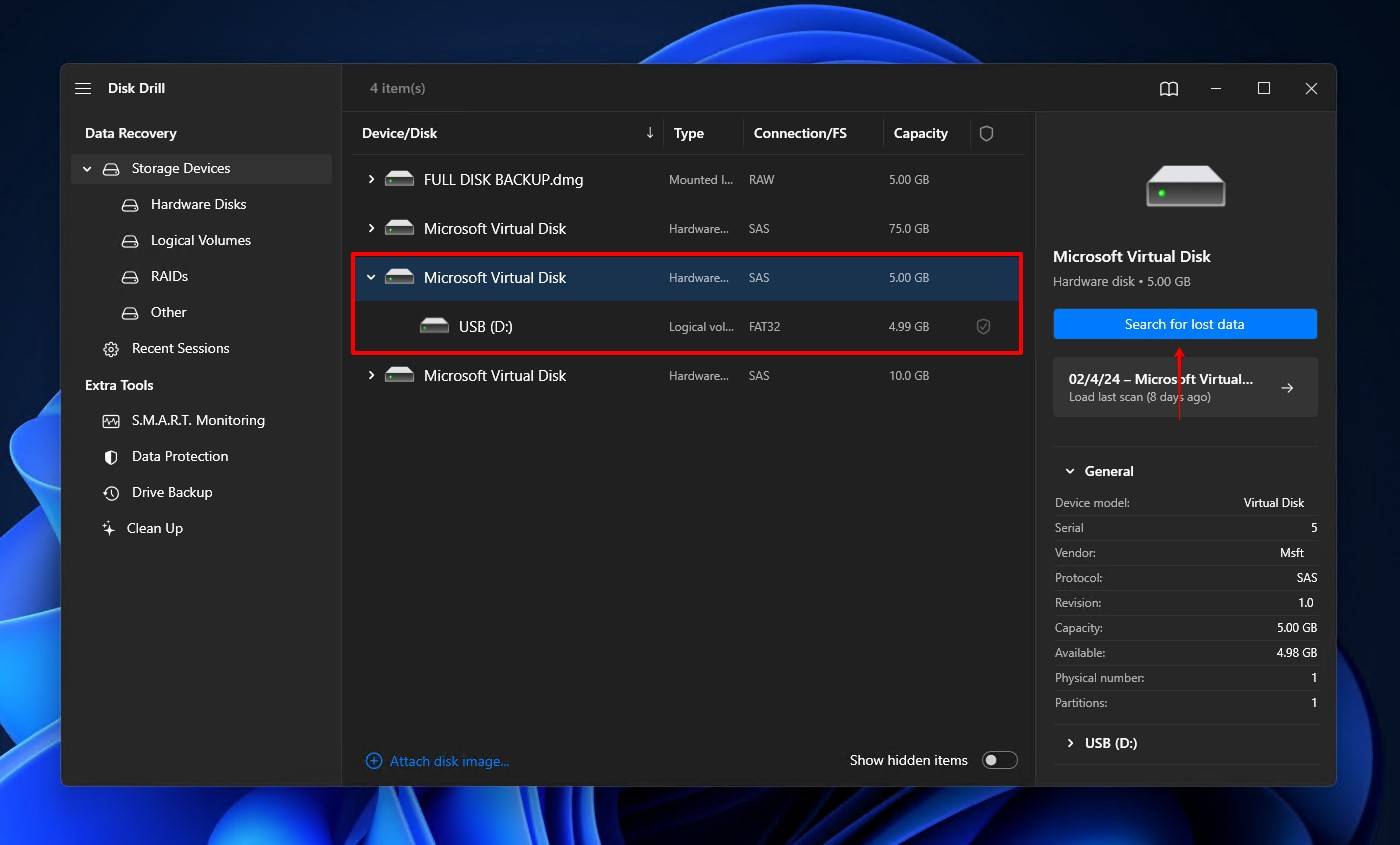
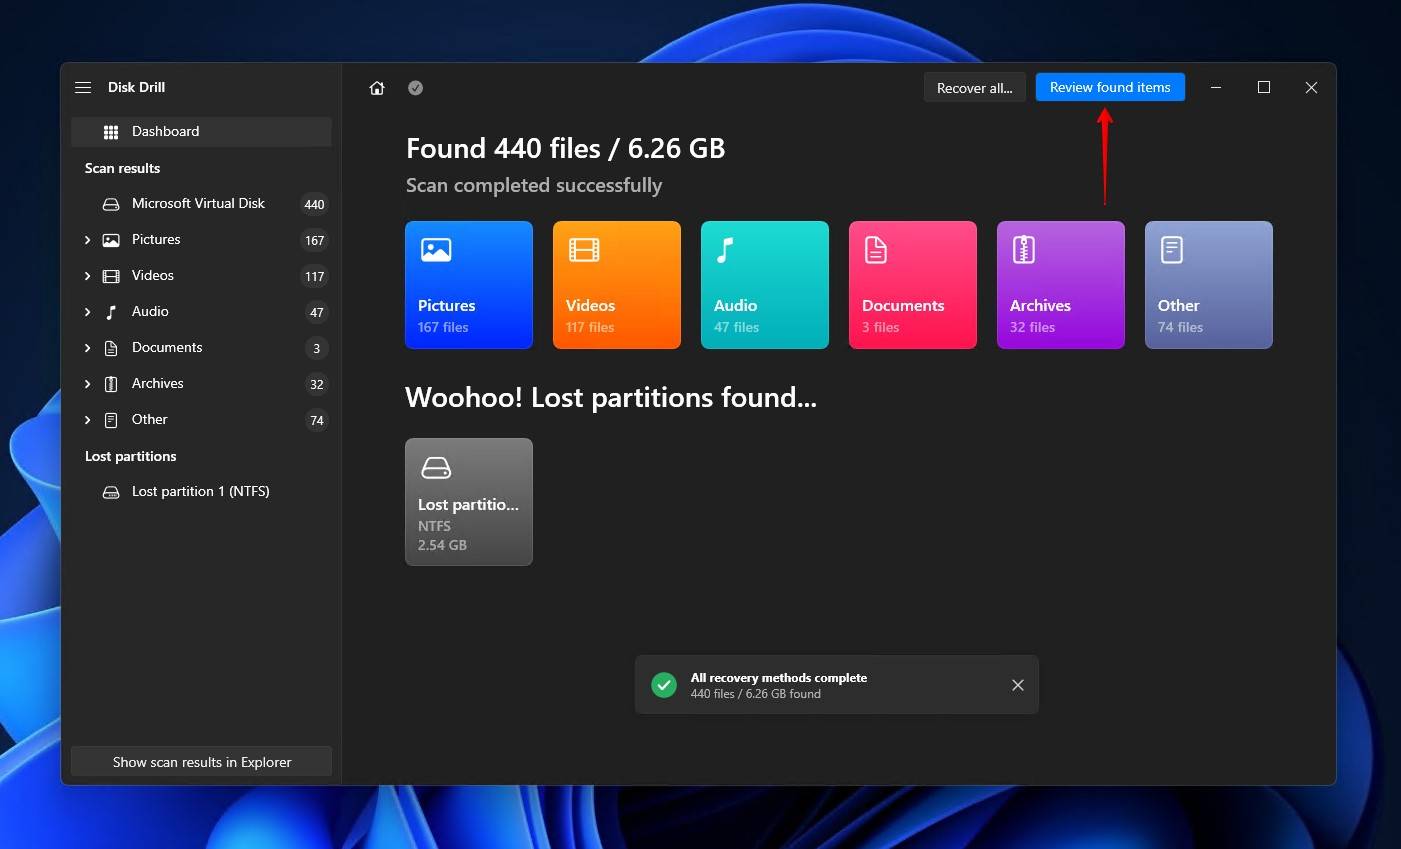
- Select the problematic USB drive and click Search for lost data.
- When the scan is complete, click Review found items. If there’s a particular type of file you’re trying to recover, click on one of the colored file type icons. Or, click Recover all to recover everything immediately.
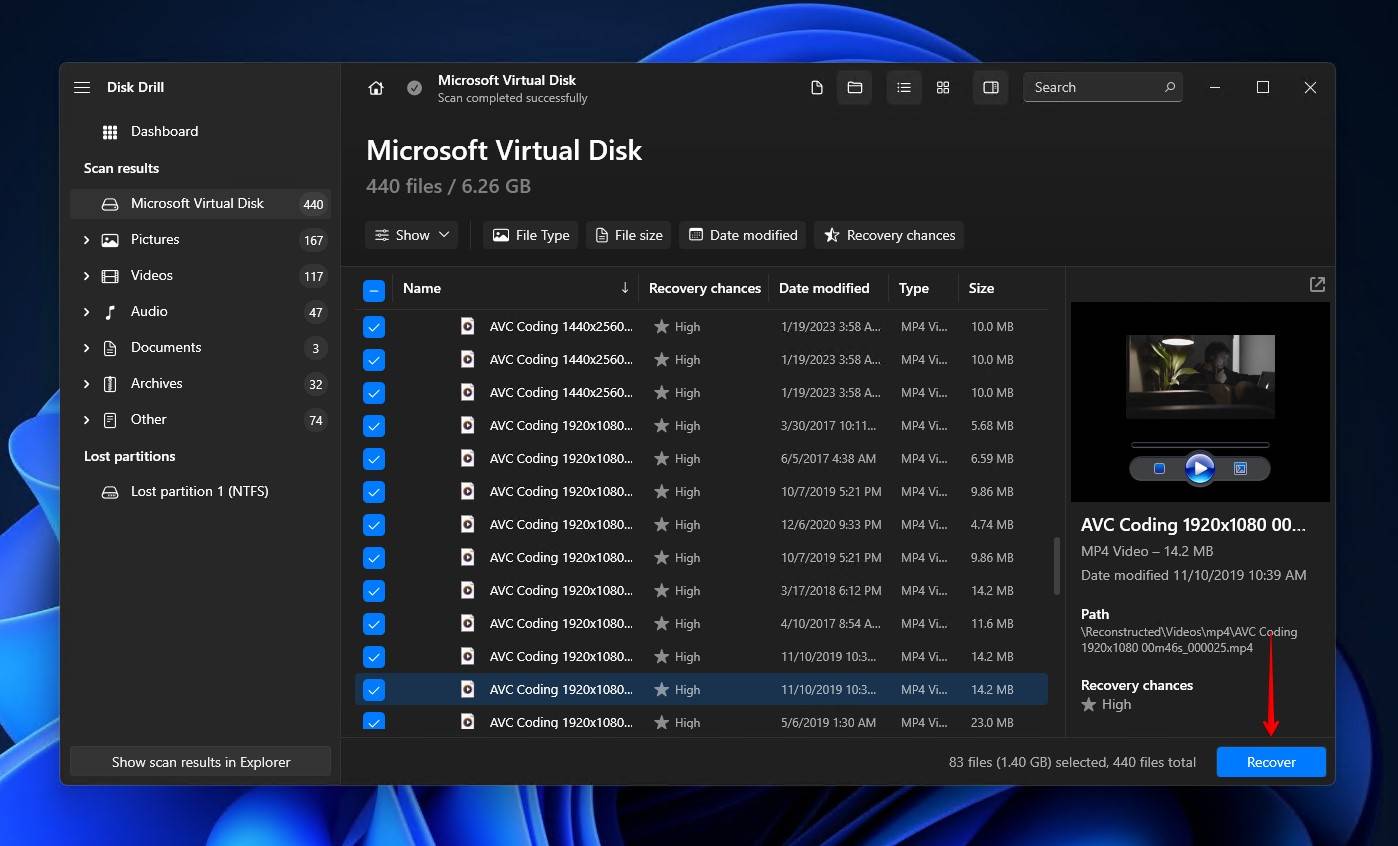
- Mark the items you want to recover. The Recovery chances column gives you a hint of which data has the best chance of recovery, but it’s best to preview your data beforehand to ensure it’s intact. Click Recover when you’re ready to proceed.
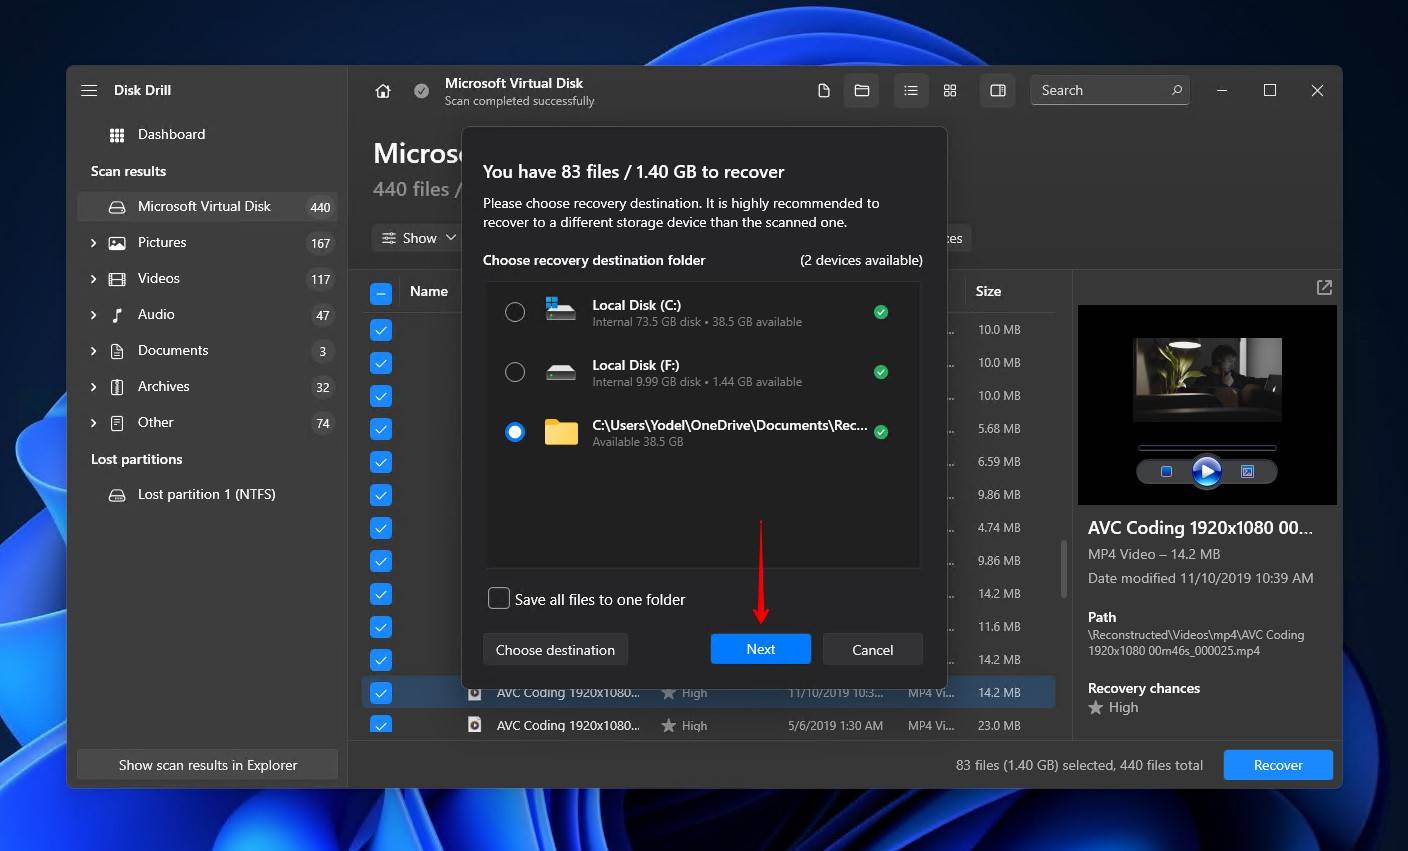
- Specify an output location. Make sure you’re not restoring the data to the same USB you’re recovering from, as this can cause corruption. When you’re ready to complete the process, click Next.
Just like that, your data is restored and accessible. To protect yourself further, consider implementing a backup solution. Unfortunately, Windows’ native backup options like File History and Backup and Restore aren’t great for removable devices. In Windows 10 and earlier they only work with removable devices that use the NTFS file system. In Windows 11 they don’t allow backing up external devices at all.
The fact of the matter is that USB drives aren’t a reliable means of long-term data storage. Rather, they only serve as a temporary means of holding data. Therefore, you should be regularly copying the data from your USB drive to a more permanent storage medium, such as an external hard drive. From there, you can set up a backup schedule with Backup and Restore, or opt for a more premium solution like Macrium Reflect.
Let’s Check Additional Methods to Fix “Removable Disk/USB No Media” Error
As we mentioned earlier, many solutions available online merely pose as a “USB no media” fix. Our testing shows that the below solutions, while perfectly viable as fixes for many other related issues, are not specifically appropriate for the “Removable disk/USB no media” error. That being said, we’ve outlined each solution and included reasons why they will not work.
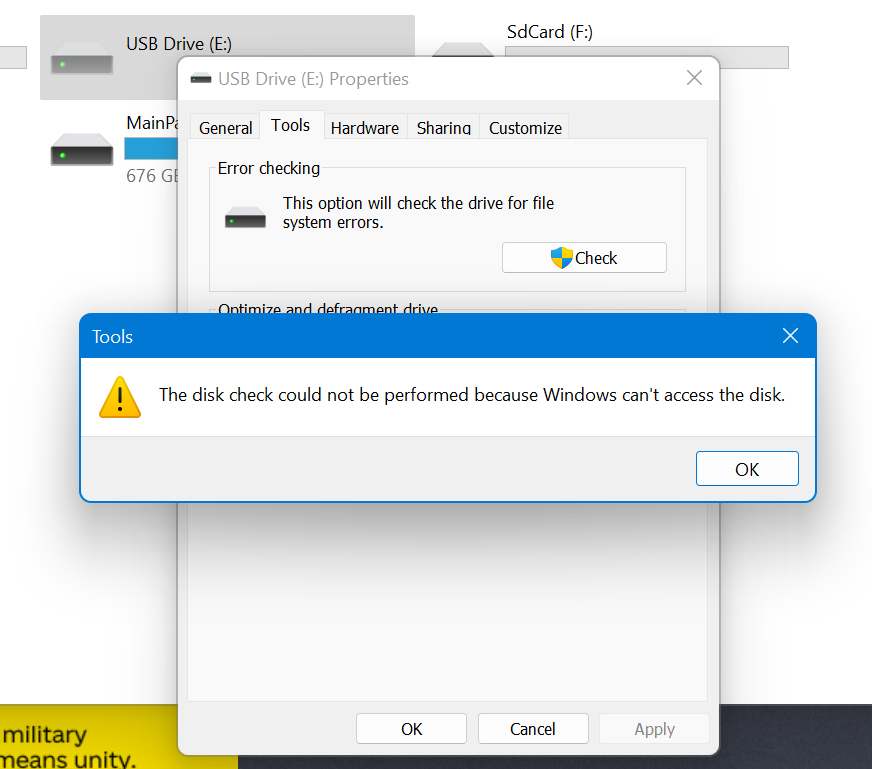
Method 1: Check Your Device With Built-in Windows Error Checking Tool
The Error-checking function is a diagnostic tool included with Windows that can be performed on compatible devices. In essence, it’s simply CheckDisk with a graphical user interface. Its function is to scan your storage device for any possible errors and attempt to fix them.
Here’s how it would usually work:
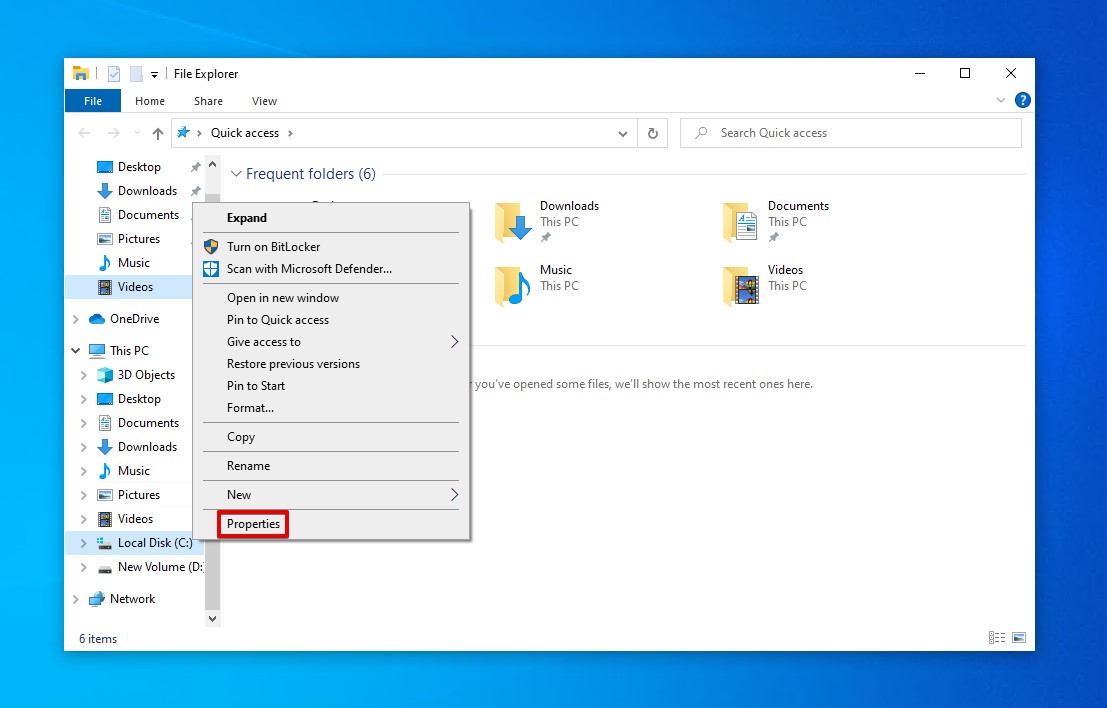
- Open File Explorer, then right-click your drive and click Properties.
- In the Tools tab, click Check.
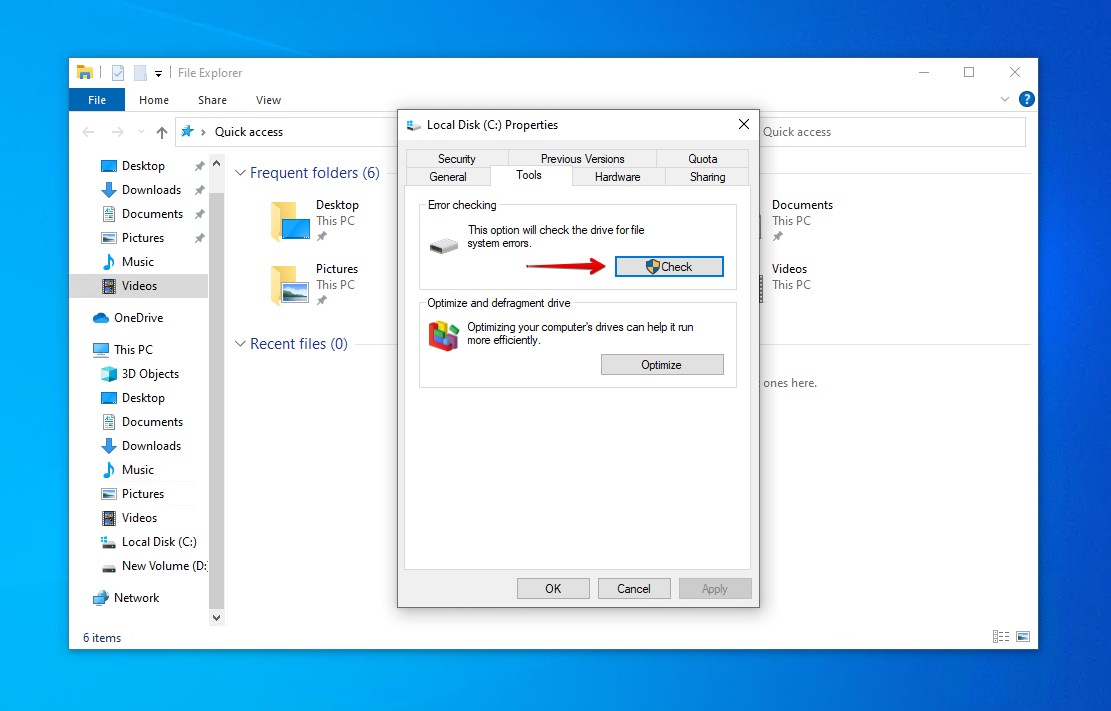
- Click Scan drive.
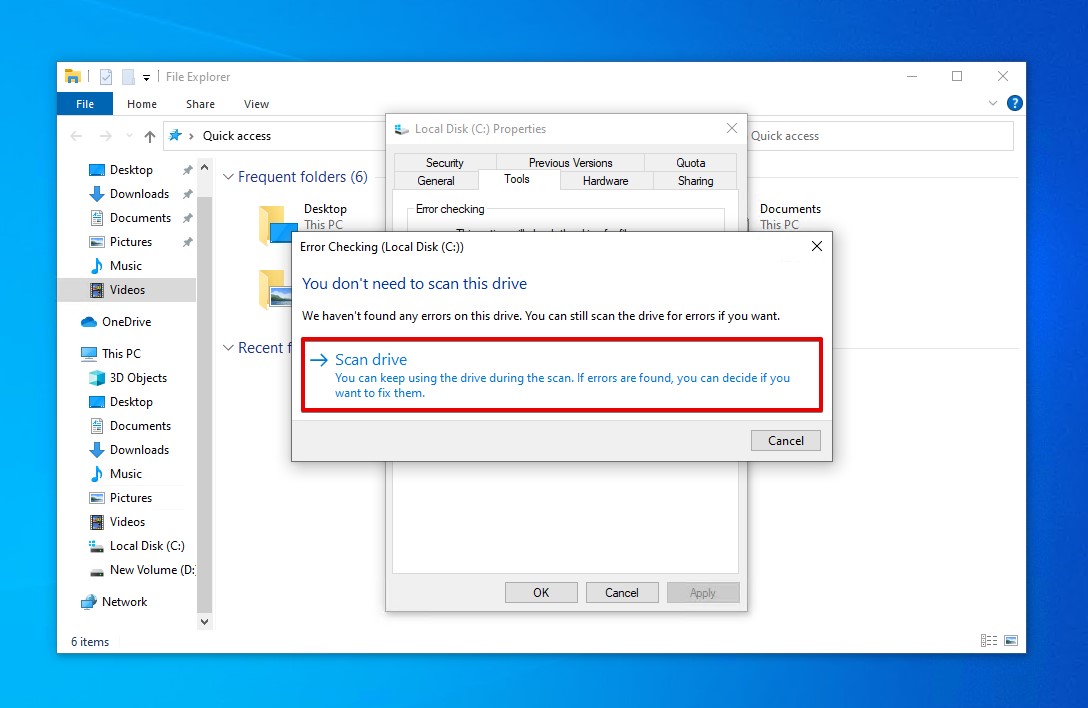
While this does sound like it could help, the utility that’s used (CHKDSK) relies on the file system and file system metadata of the connected drive to find issues and repair them. Since the USB drive isn’t being recognized completely by Windows, a file system cannot be accessed, therefore rendering the solution unusable.
Method 2: Change the Drive Letter
Changing the drive letter allows the system to analyze the disk again, allowing it to scan for any potential glitches or malfunctions as it does so. Changing the drive letter can be done through Disk Management, like so:
- Right-click Start and select Disk Management.
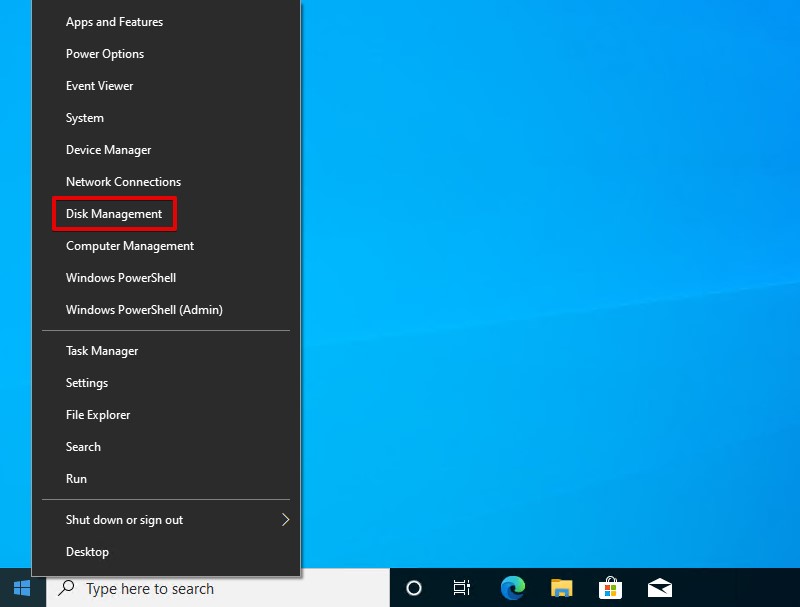
- Right-click the volume on your USB and select Change Drive Letter and Paths.
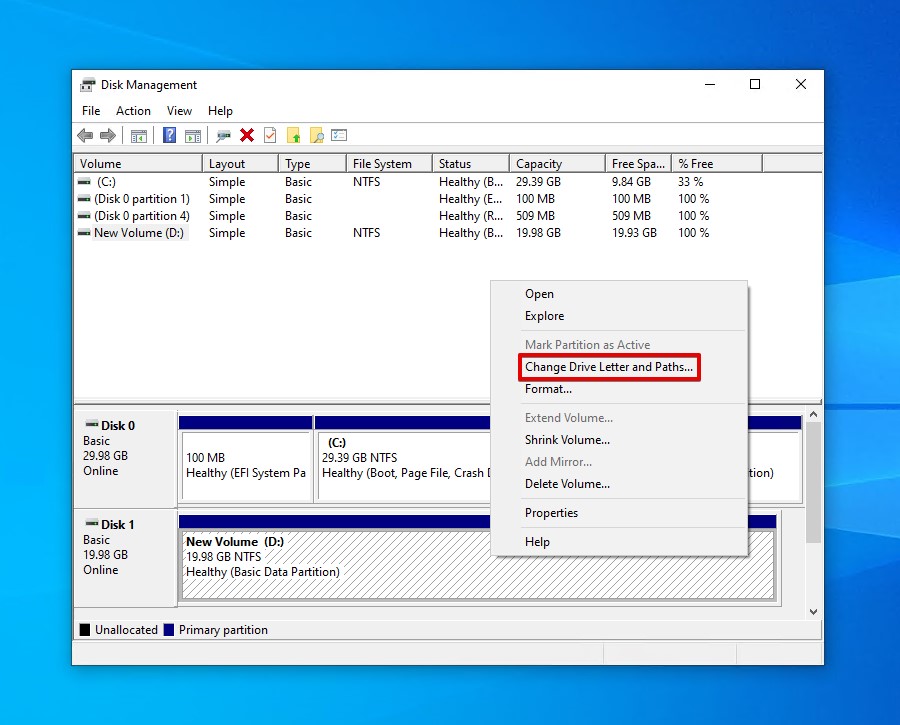
- Click Change.
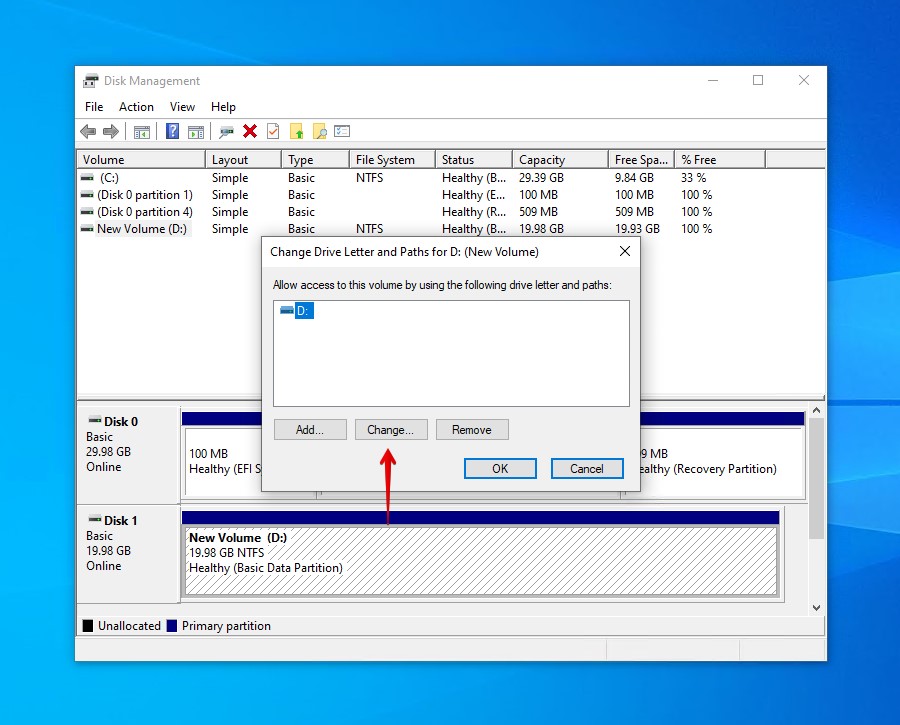
- Select a new drive letter from the dropdown and click OK.
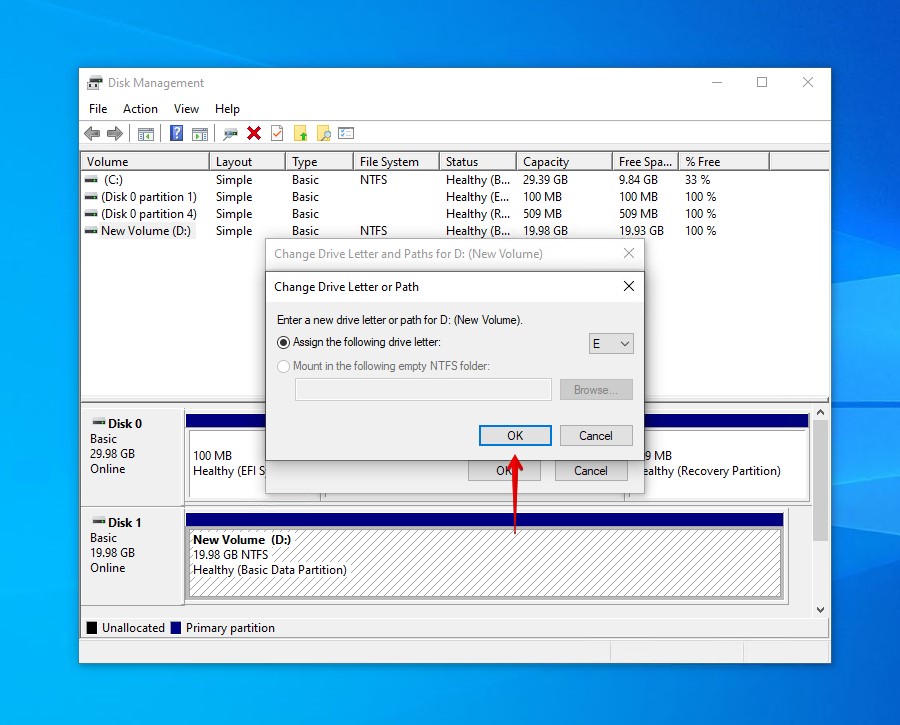
- Click OK again.
The problem here is that, since your USB is showing empty, there’s no way to change the drive letter attached to it so it won’t solve the issue.
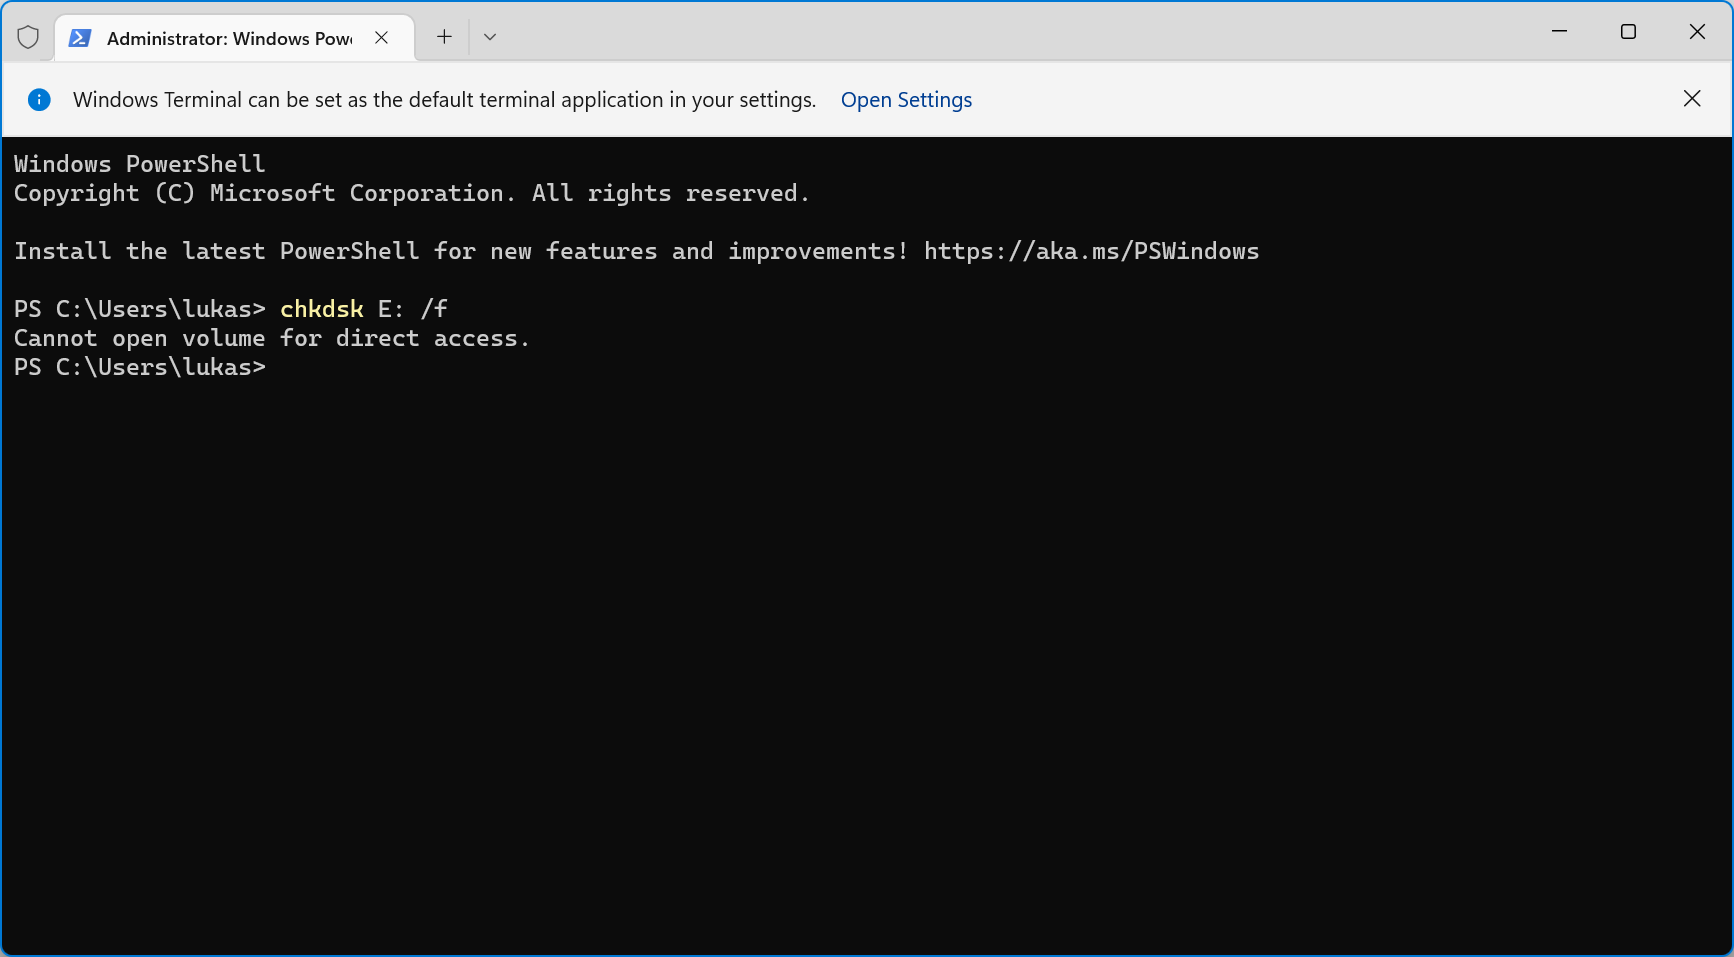
Method 3: Check for Errors with CHKDSK
CHKDSK is a command-line utility that can scan your drive for errors and report them to you. With additional parameters, CHKDSK can even attempt to fix the problems for you. This is how you use CHKDSK to typically fix errors:
- Right-click Start and select Windows PowerShell (Admin).

- Type chkdsk *: /r. Replace * with your drive letter. Press Enter.
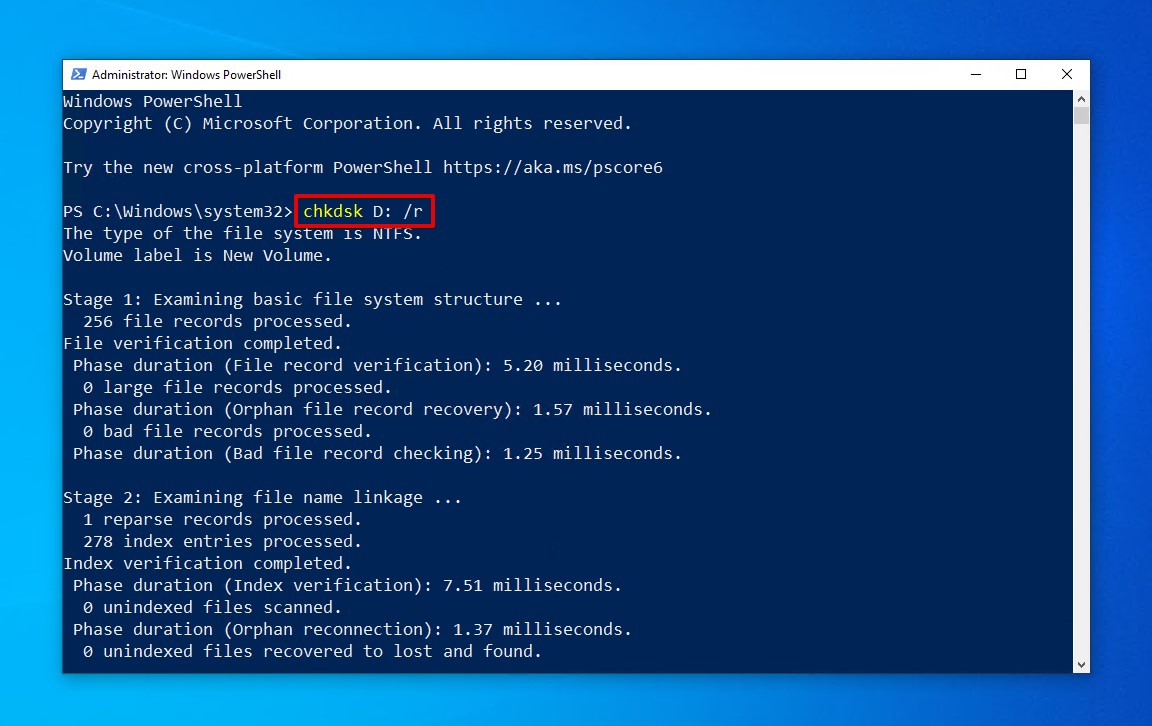
The reason why you can’t fix it with CMD is that it relies on the file system of your USB drive. Since your computer cannot correctly communicate with the USB drive, CHKDSK will return an error message stating that it cannot open the volume for direct access.
Method 4: Format Your USB drive
Performing a format on your USB is the equivalent of restoring it to factory settings. Essentially, you’re wiping the drive clean, including any errors as well as data, so you can start fresh. Here’s how a typical format goes:
- Open File Explorer.
- Right-click your device and click Format.
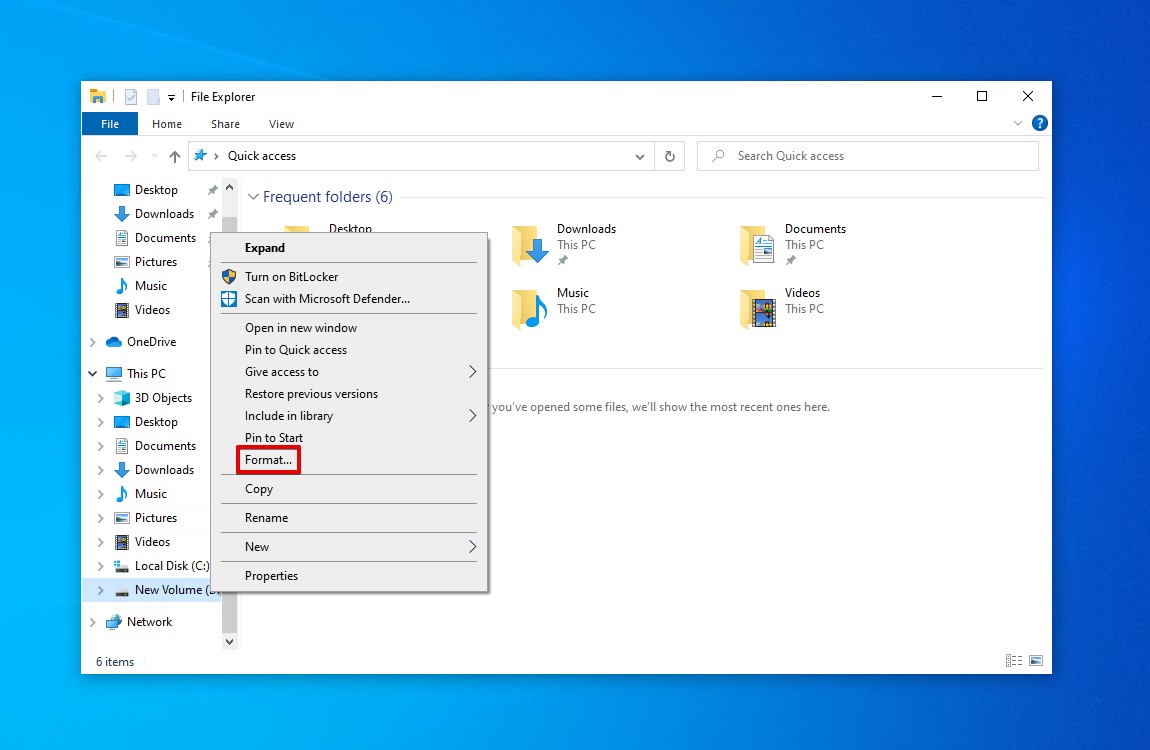
- Fill out the format parameters (ensure Quick Format is selected, as it gives you a chance to recover your data later) and click Start.
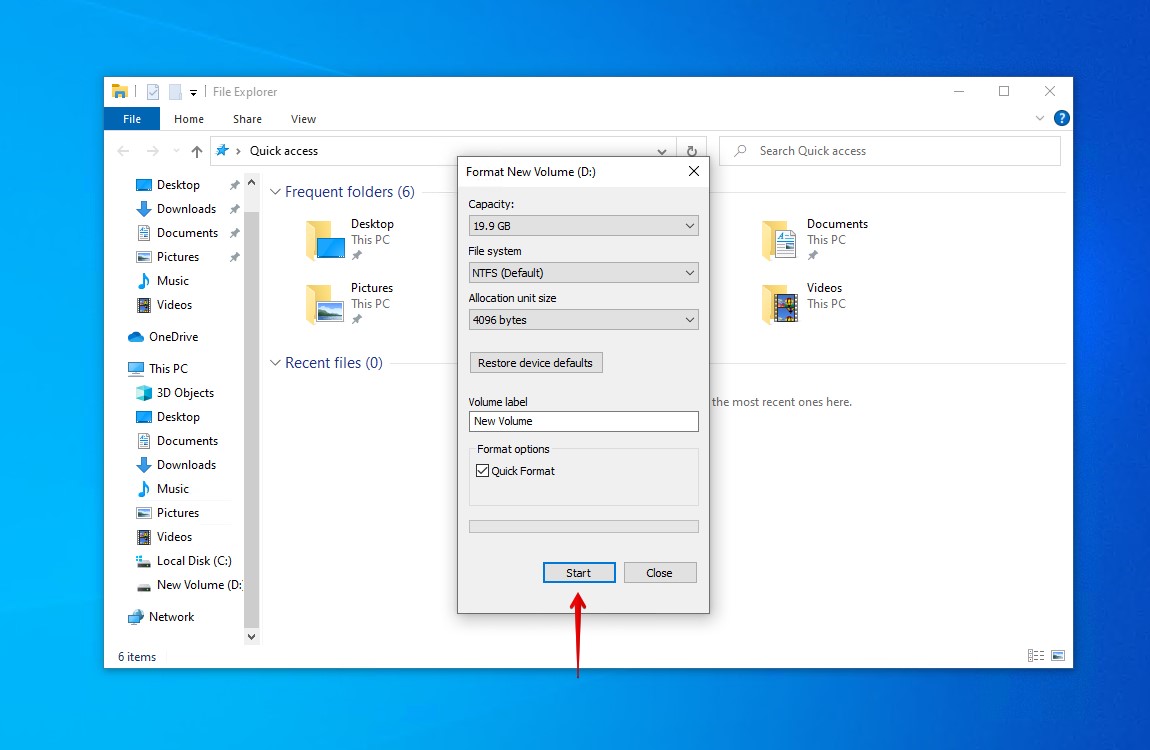
Once formatted, you can recover data from a formatted USB drive if you didn’t do so beforehand. Unfortunately, while formatting is a great solution to fix many general errors, it doesn’t work quite as well here because Windows still thinks there’s no drive connected. When you attempt to format the USB, it will display an error stating that there is no disk connected and that you should connect a disk and try again. Even DiskPart says no media.

Still no Luck? Contact a Data Recovery Service
There isn’t a 100% guarantee that the fix will work. In cases where the damage is extreme, your best chance of recovering the data on the drive is to rely on the services of a professional as it gives you the best chance of getting your data back in one piece. Check out our list of the best data recovery services to get started.
FAQ
What does no media mean?
“No media” means that your operating system cannot read the storage device properly. Any data residing on the storage device will be inaccessible until the problem is resolved.
How do you fix “There is no media in the device”?
If you receive a message along the lines of “USB drive no media”, there are four simple steps you must follow to resolve the issue:
- Connect the USB to another port.
- Ensure the USB port is powered.
- Scan for and remove any viruses in your system.
- Update drivers to the latest version or reinstall if they are damaged.
Why is nothing showing up on my USB?
If your flash drive says “no media”, it could be because something is blocking the connection between your system and the USB. Try connecting it to another port that you know is working. Alternatively, it could be that your USB is formatted with an incompatible file system, therefore leading it to show as empty.
How do I format a flash drive in Windows 10?
You can format a flash drive in Windows 10 using File Explorer, Disk Management, or DiskPart. The below instructions will show you how to do it using File Explorer in just a few clicks:
- Open File Explorer.
- Right-click your drive in the left navigation pane and click Format.
- Define the format parameters and click Start.
Of course, bear in mind that formatting the USB will delete everything on it. If the USB contains data you need to keep, look at ways to format the USB without losing data.
How do I fix a USB device not recognized Windows 10?
Another USB-related issue is the “USB device not recognized” error. Just like the “Removable disk/USB no media” error, you can resolve it by checking that your USB ports are working correctly and that the drive is virus-free and running updated (and working) drivers. Check out how to fix the USB device not recognized error for more information.
Why is my USB not showing up on my computer?
There are lots of reasons why a USB may not be showing up on your computer. Perhaps it’s running an incompatible file system, or perhaps it has encountered some form of logical or physical damage that prevents it from being read. Either way, you should perform broken flash drive recovery as soon as possible to ensure the safety of your data.
Can a flash drive be repaired?
Yes, a flash drive can be repaired, but its chances depend largely on the type of damage it has sustained. Logical damage can often be fixed relatively quickly and easily, but physical damage may require inspection by an expert.
If you’re trying to repair it yourself, check out our list of the best USB repair tools.
Conclusion
The pesky “Removable disk/USB no media” error on Windows can appear at any moment with your USB or external hard drive. Thankfully, this error can easily be rectified by connecting the USB to a working port, ensuring your computer is virus-free, and updating to the latest drivers.
This article was written by Jordan Jamieson-Mane, a Staff Writer at Handy Recovery Advisor. It was also verified for technical accuracy by Andrey Vasilyev, our editorial advisor.
Curious about our content creation process? Take a look at our Editor Guidelines.