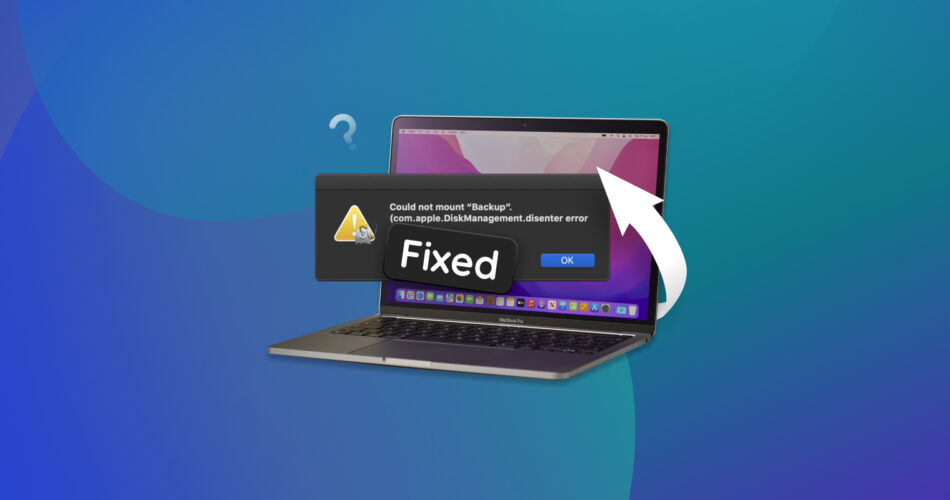
Did you experience a com.apple.diskmanagement.disenter error when connecting an external hard drive to your Mac? You’re not alone.
Apple developed the HFS+ file system over two decades ago. In 2017, it released an updated format called APFS with more encryption and space allocation. The APFS file format brought improvements, but many users have run into expected errors, including com.apple.diskmanagement.disenter. We’ll explain what this error entails and how to fix it.
What Causes the com.apple.DiskManagement.disenter Error?
It occurs when you select the Mount option in your Mac’s Disk Utility tool. This error means there are issues with the hard drive preventing you from accessing the files. It occurs due to issues with disk management, such as formatting, mounting, or partitioning.
You can do several things to fix this error, but if they don’t work, the last resort is to reformat the drive. Reformatting erases all the data, so it’s advisable to first recover all the files from the drive using a data recovery tool.
The most common DiskManagement Disenter errors are shown in the table below.
List of common errors |
Description |
com.apple.diskmanagement.disenter error 0 |
The file system of the hard drive is corrupted |
com.apple.diskmanagement.disenter error 49153 |
An incompatible file system due to bugs, issues, malware, etc |
com.apple.diskmanagement.disenter error 49221 |
Caused by a bug in Apple’s security updates 2021-003 and 2022-003 |
com.apple.diskmanagement.disenter error -119930872 |
This error occurs when the File System Consistency Check (FSCK) tool is stuck in the checking process. |
com.apple.diskmanagement.disenter error 49223 |
This happens if an exFAT drive was improperly formatted on a Windows PC and connected to a Mac. |
com.apple.diskmanagement.disenter error 53249 |
This may occur if the hard drive wasn’t ejected properly the last time it was connected. |
com.apple.diskmanagement.disenter error 49218 |
This also occurs if you remove an external hard drive without proper ejection on macOS Monterey. It can also happen due to bugs with macOS Monterey itself. |
How to Retrieve Data from a Drive That Triggers the DiskManagement Disenter Error
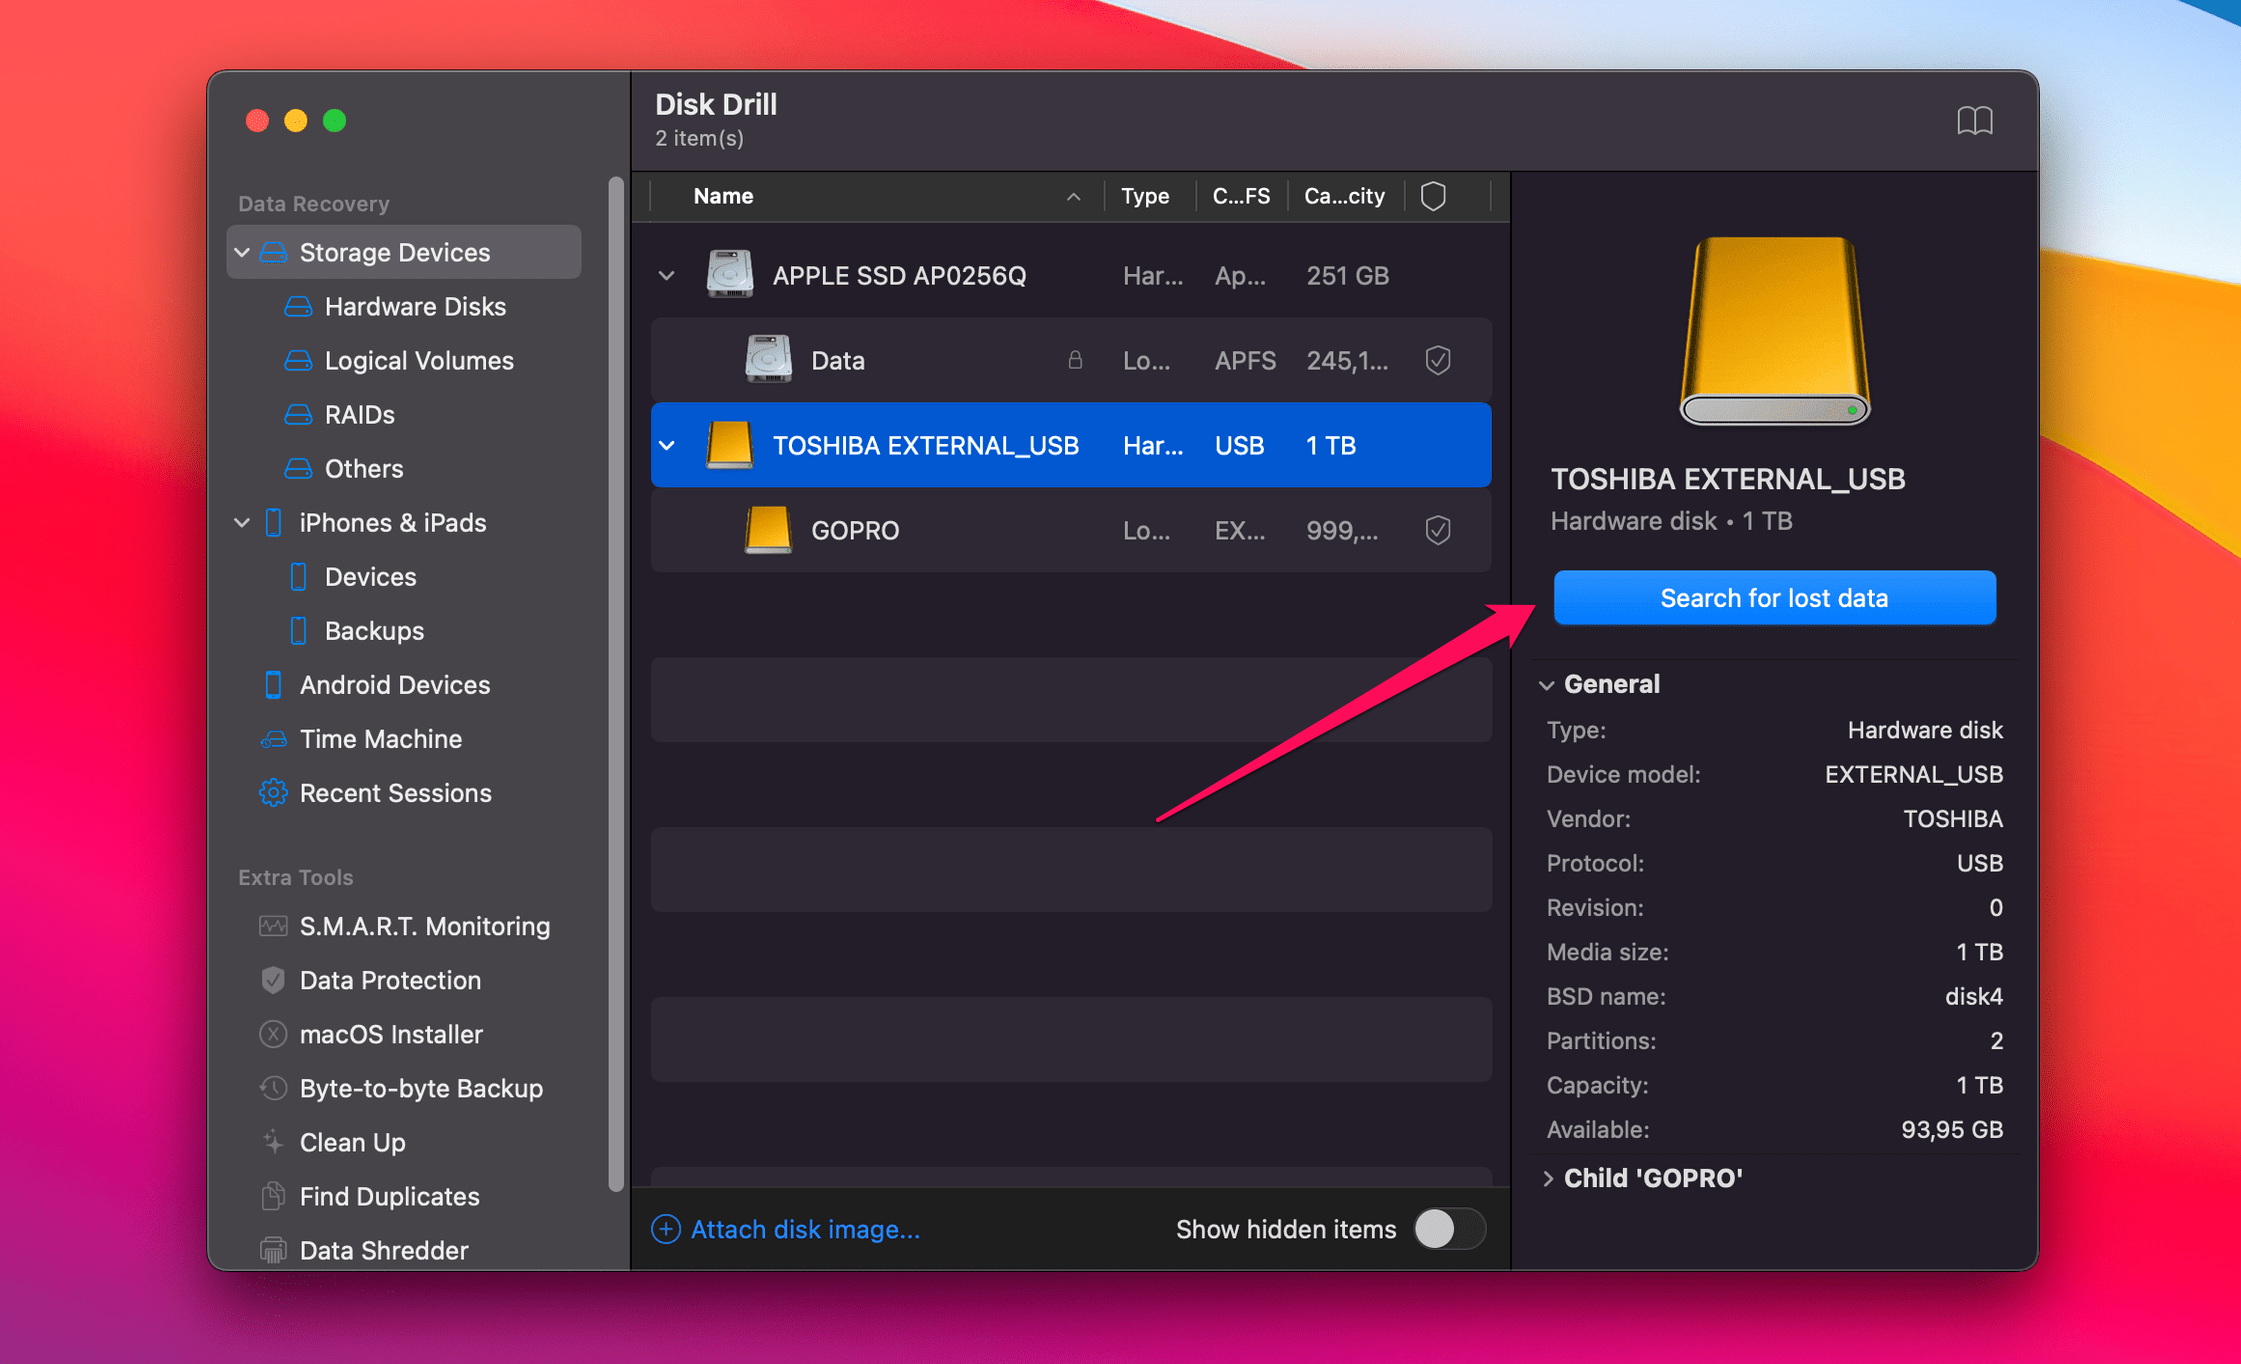
The safest way to do this is through dedicated data recovery software. In this case, we’d recommend Disk Drill because it effectively scans your device to recover all lost files. If your Mac’s Disk Utility tool shows the correct size of the hard drive refusing to mount, then you can recover files from it via Disk Drill.
Disk Drill can recover any files as long as they’re stored with these file systems: FAT16/FAT32/exFAT, NTFS, NTFS5, HFS, HFS+, APFS, EXT2/EXT3/EXT4, and RAW.
- Download and install Disk Drill on your Mac.
- Launch the app (head to Finder > Application > Disk Drill).
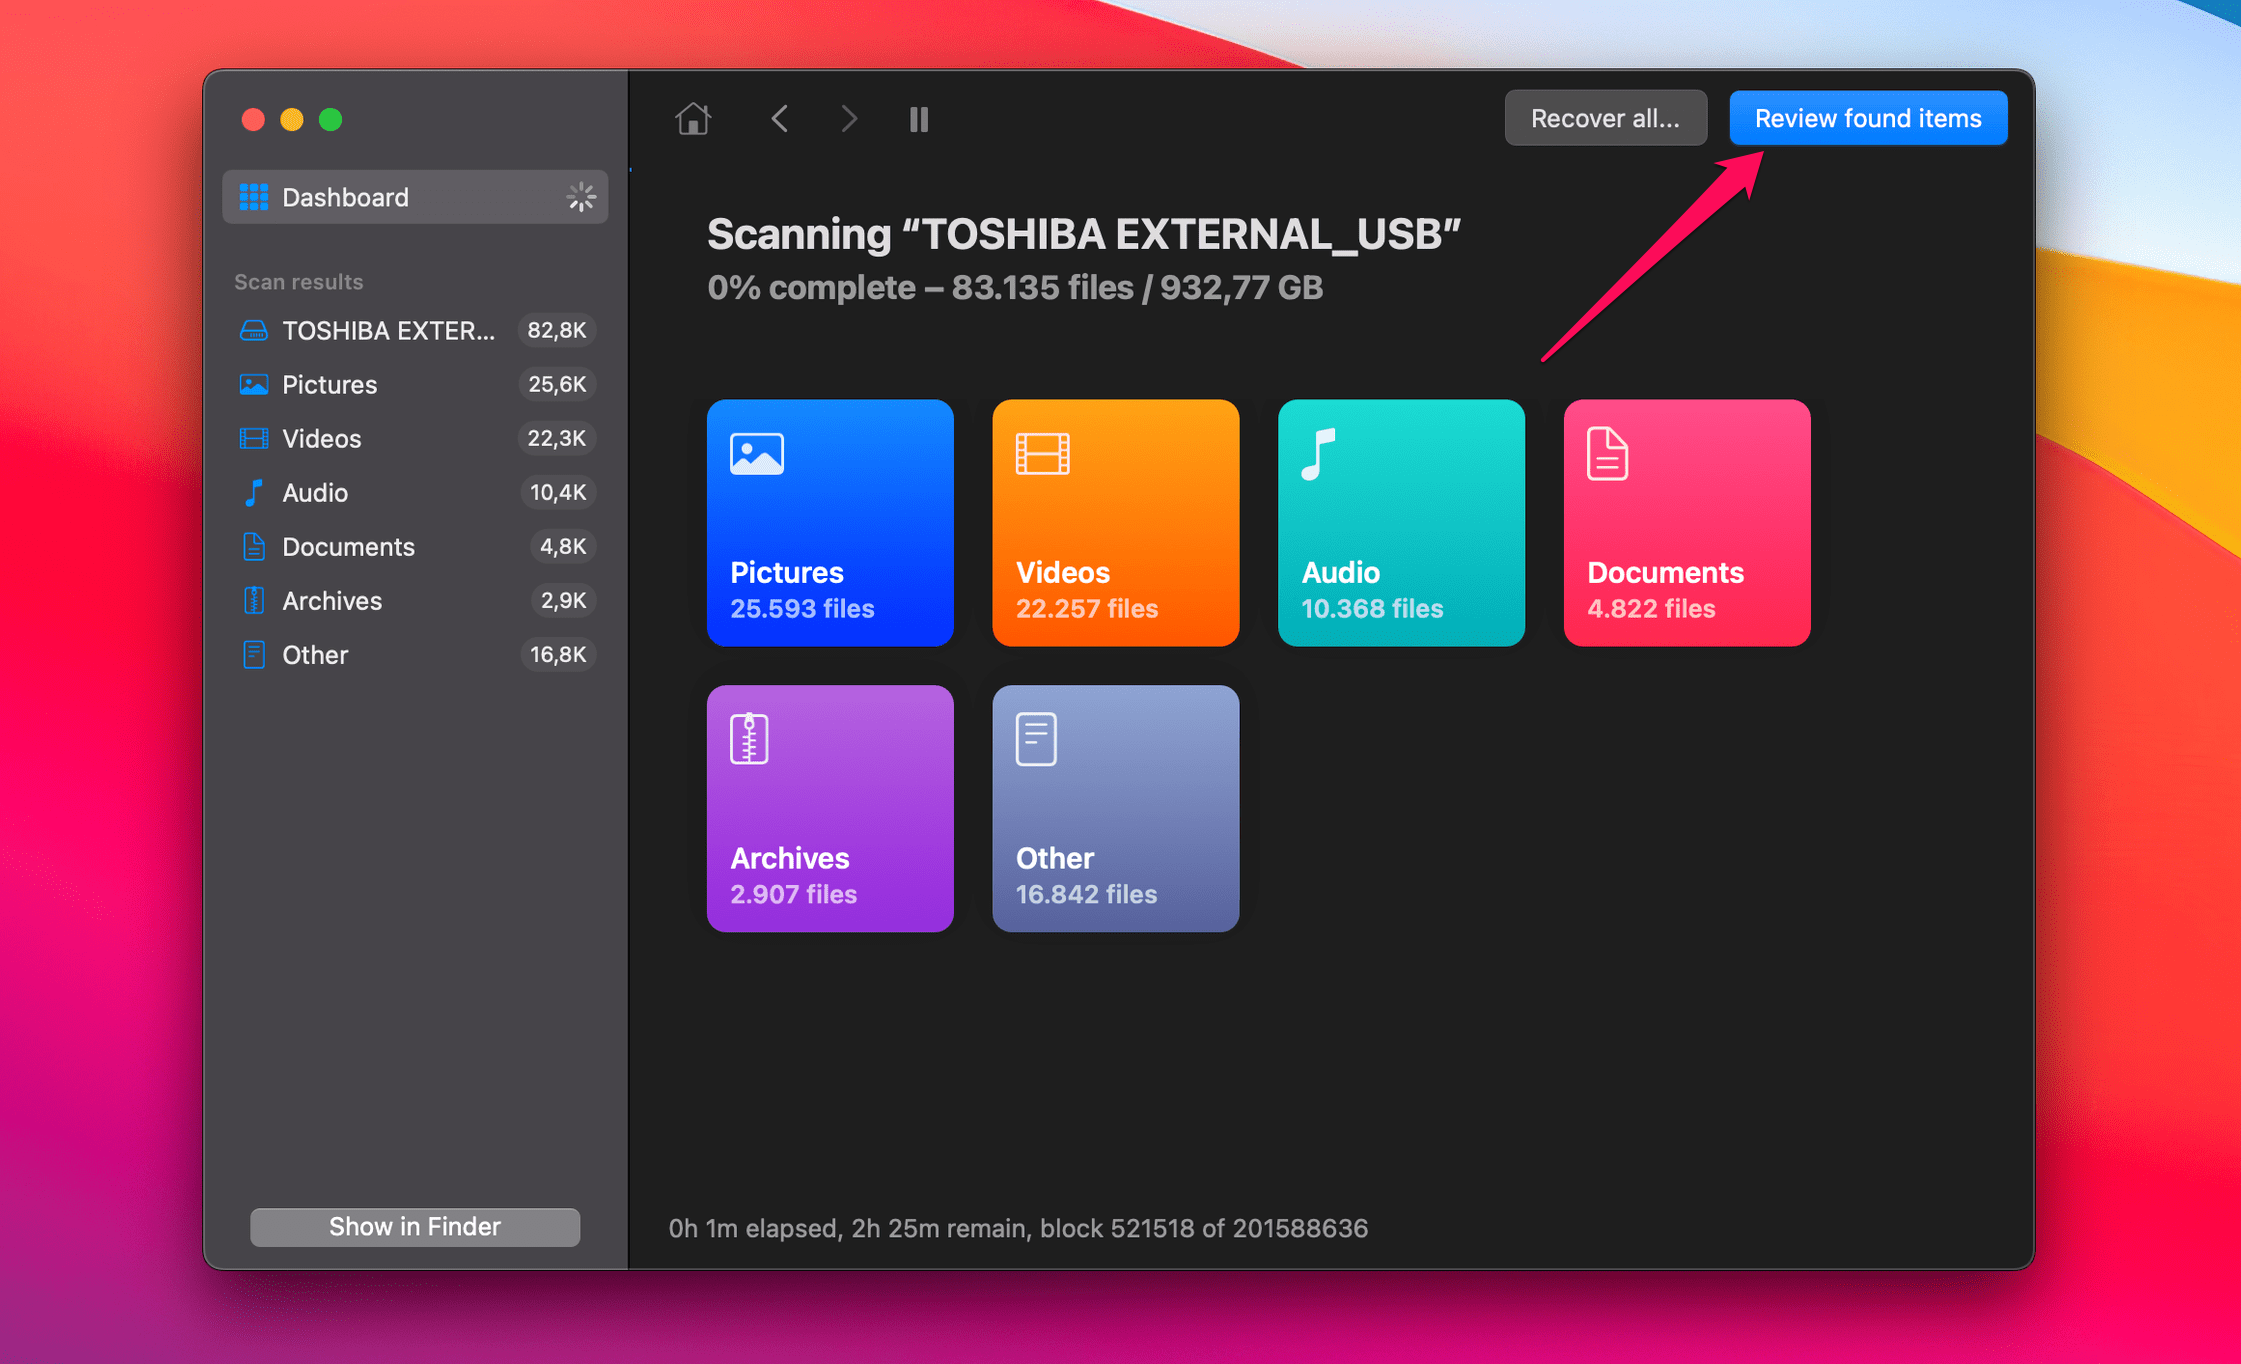
- Select the external drive that shows diskmanagement error and click the Search for lost data option: this will trigger a scan.
- Wait for the scan to complete and click Review found items.
- Use the search bar or sidebar to filter the results of the recovered files. You can hover your mouse beside any file for a preview.
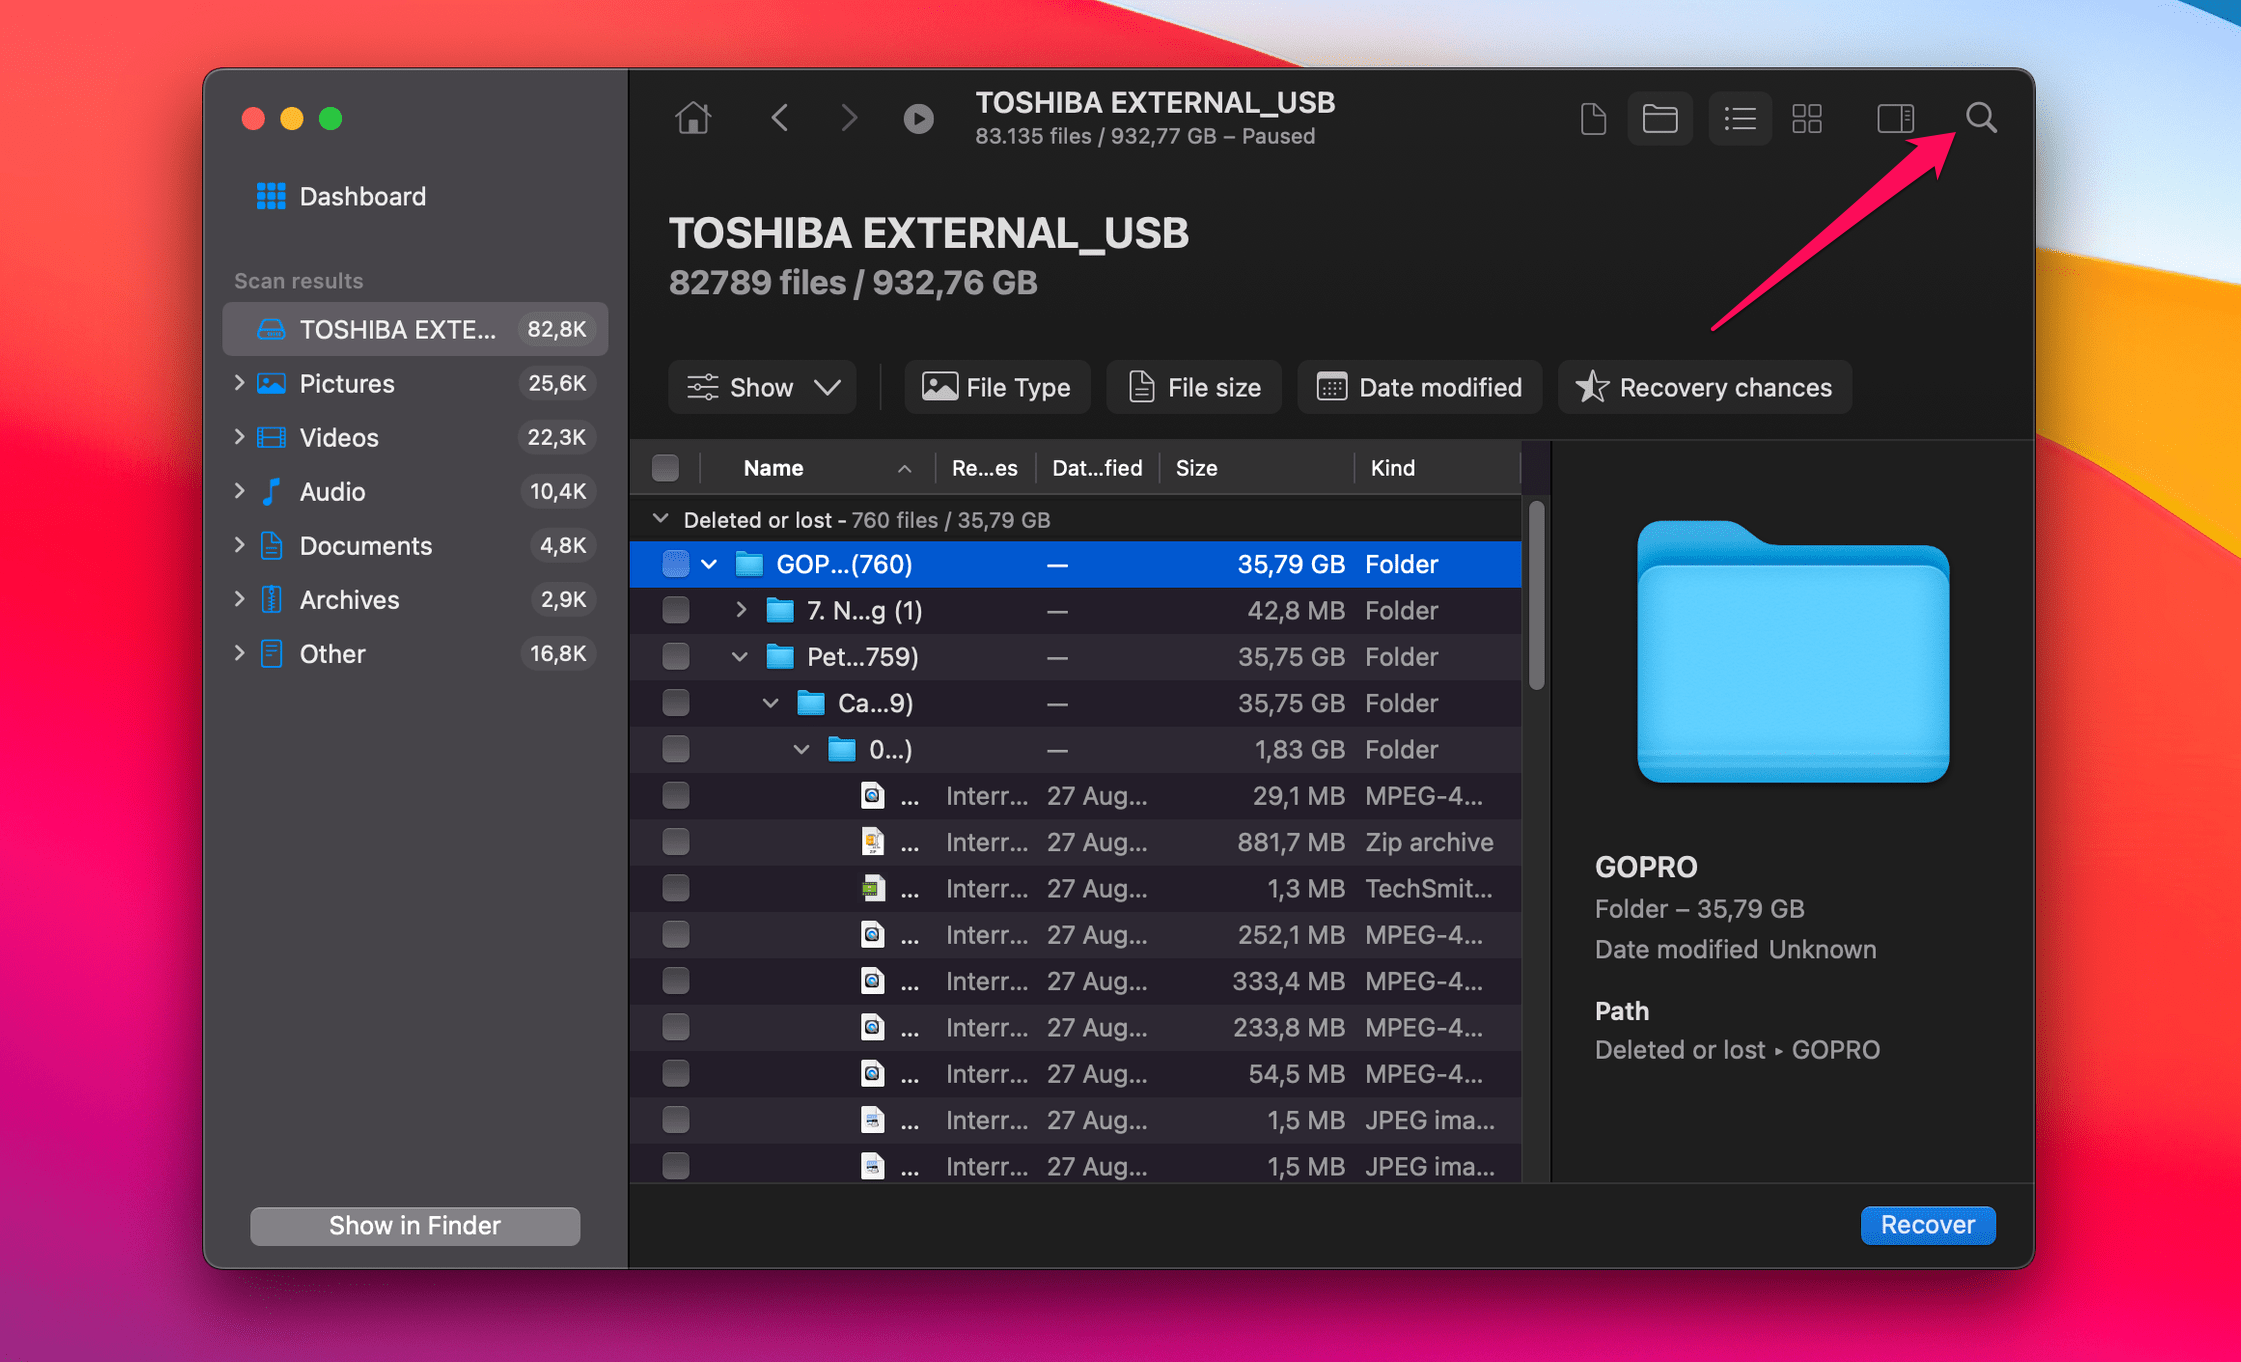
- Use the checkmark boxes beside the files to select the ones you wish to recover.

- Click Recover and choose a location for your hard drive to save the recovered files.
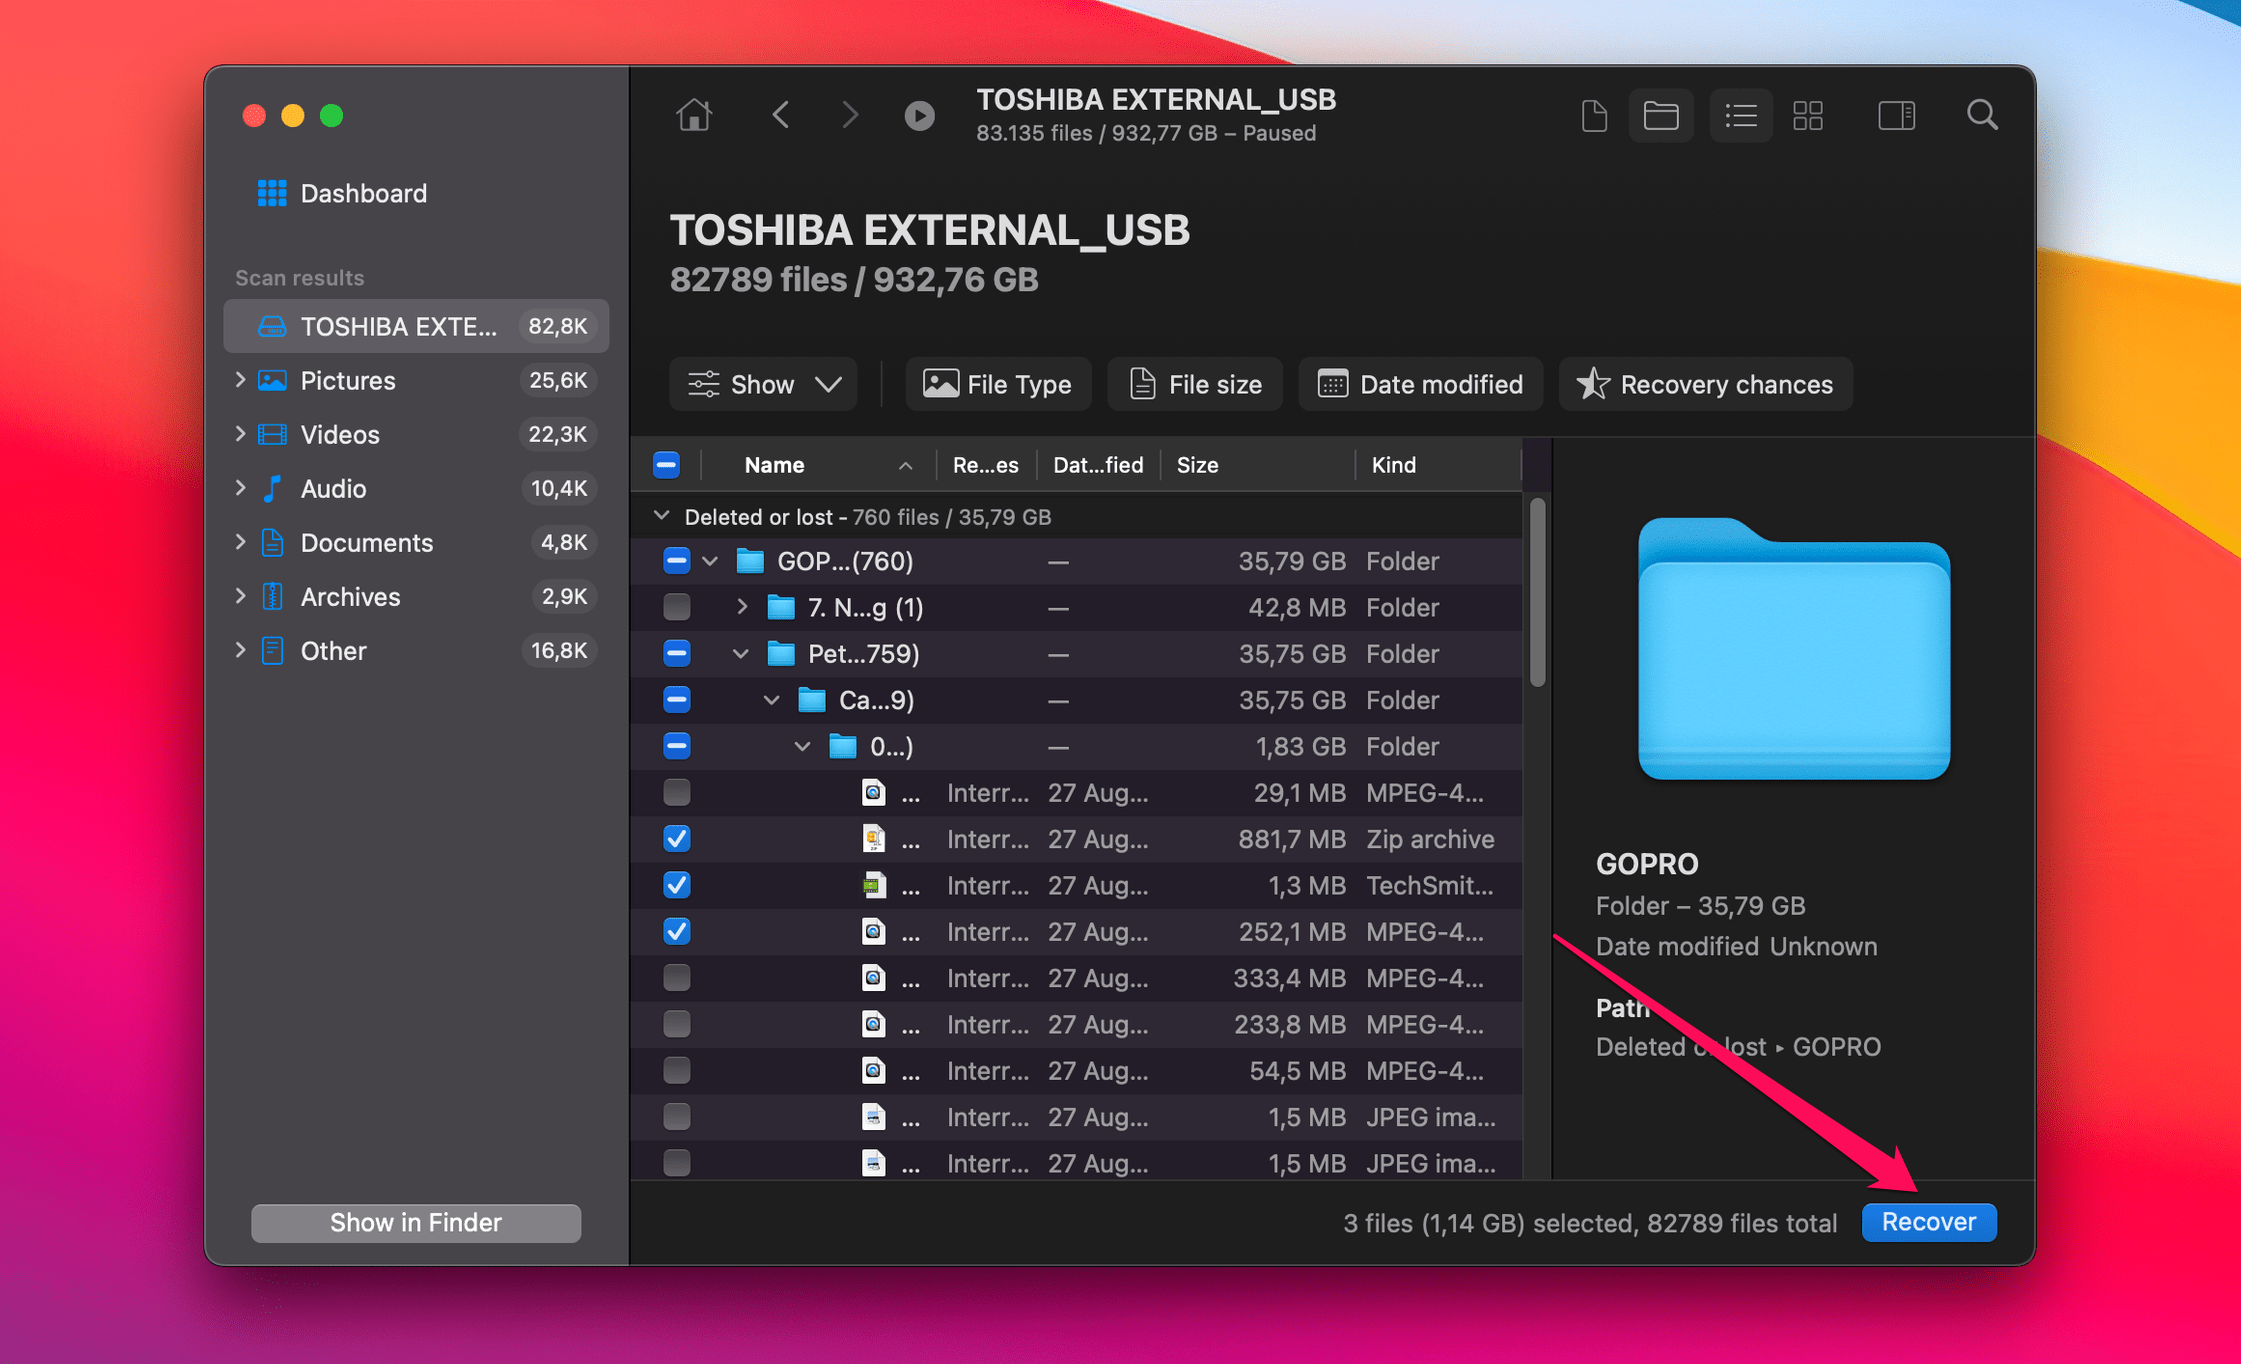
- Click OK, and the recovery is complete. This recovery lets you retain your files even though you format the drive to fix the com.apple.diskmanagement.disenter error.
7 Methods to Fix the com.apple.DiskManagement.disenter Error on a Mac
Method 1: Connect the External Hard Drive to Another Mac
Whenever you encounter a disk utility error, the source is either from the drive or from the Mac. To determine the exact source, you should first connect the drive to another Mac or a PC. If the drive, e.g., a Seagate Portable 1 TB, does not work on other computers, then the source of the error is likely the drive.
On the other hand, if the drive works on other Macs or PCs, then your Mac is likely the issue. This step lets you identify the source of the issue, which is the first action toward solving it.
Method 2: Re-Mount the External Hard Drive
Mounting an external hard drive, e.g., Seagate, Lacie, or WD, triggers communication between your Mac’s operating system and the drive’s file system via the USB port. The connectivity could be the issue. Maybe the USB port isn’t working, or there’s something wrong with your cable.
You should eject the hard drive, unplug it, and then connect it to another USB port on your Mac. Alternatively, you can use a new cable for the connection. This will fix the issue in some cases, but if it doesn’t, the next step is using the First Aid feature in the Disk Utility app.
Method 3: Use the First Aid Utility to Repair Disk Errors
First Aid is a useful tool for identifying and fixing disk errors on Macs. It scans your drive and its partitions for any issues related to its formatting and directory structure. If it identifies any file system error caused by incorrect ejection, a sudden power shutdown, wrong formatting, etc., it will try to fix it to get your hard drive working again.
- Head to Finder > Applications > Utilities and launch the Disk Utility app.
- Choose your drive from the left sidebar of the menu that pops up. You should see the name of your drive’s brand manufacturer, e.g., WD, Toshiba.
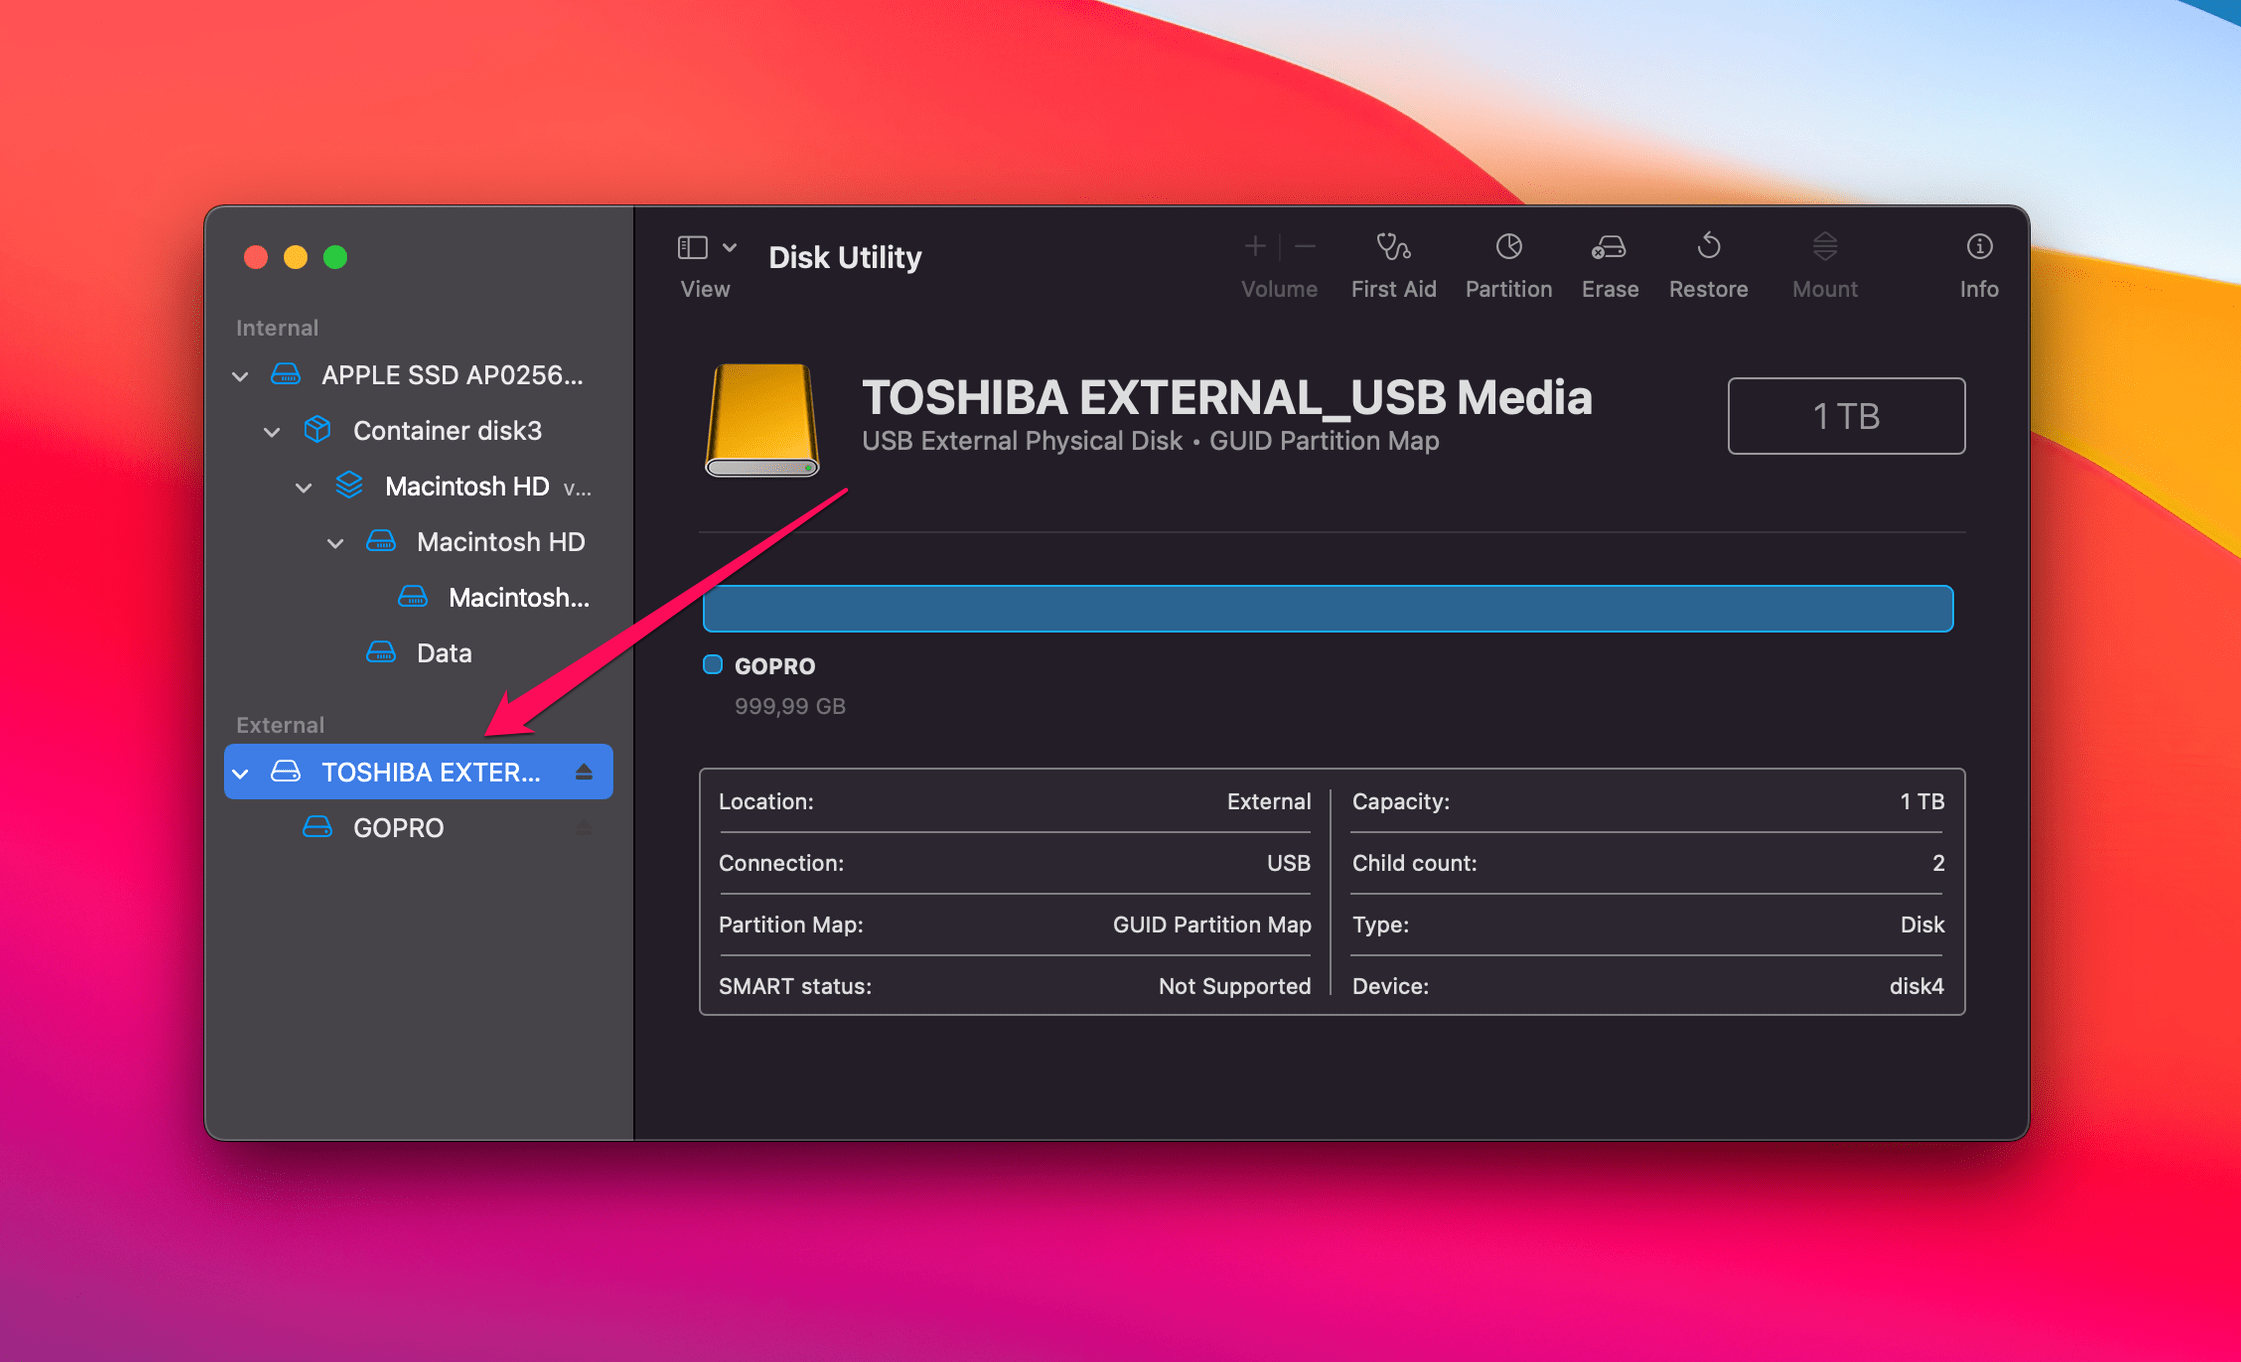
- Select the First Aid option from the top of the Disk Utility app.

- A dialogue box will appear telling you what First Aid will do on your drive. Click Run.
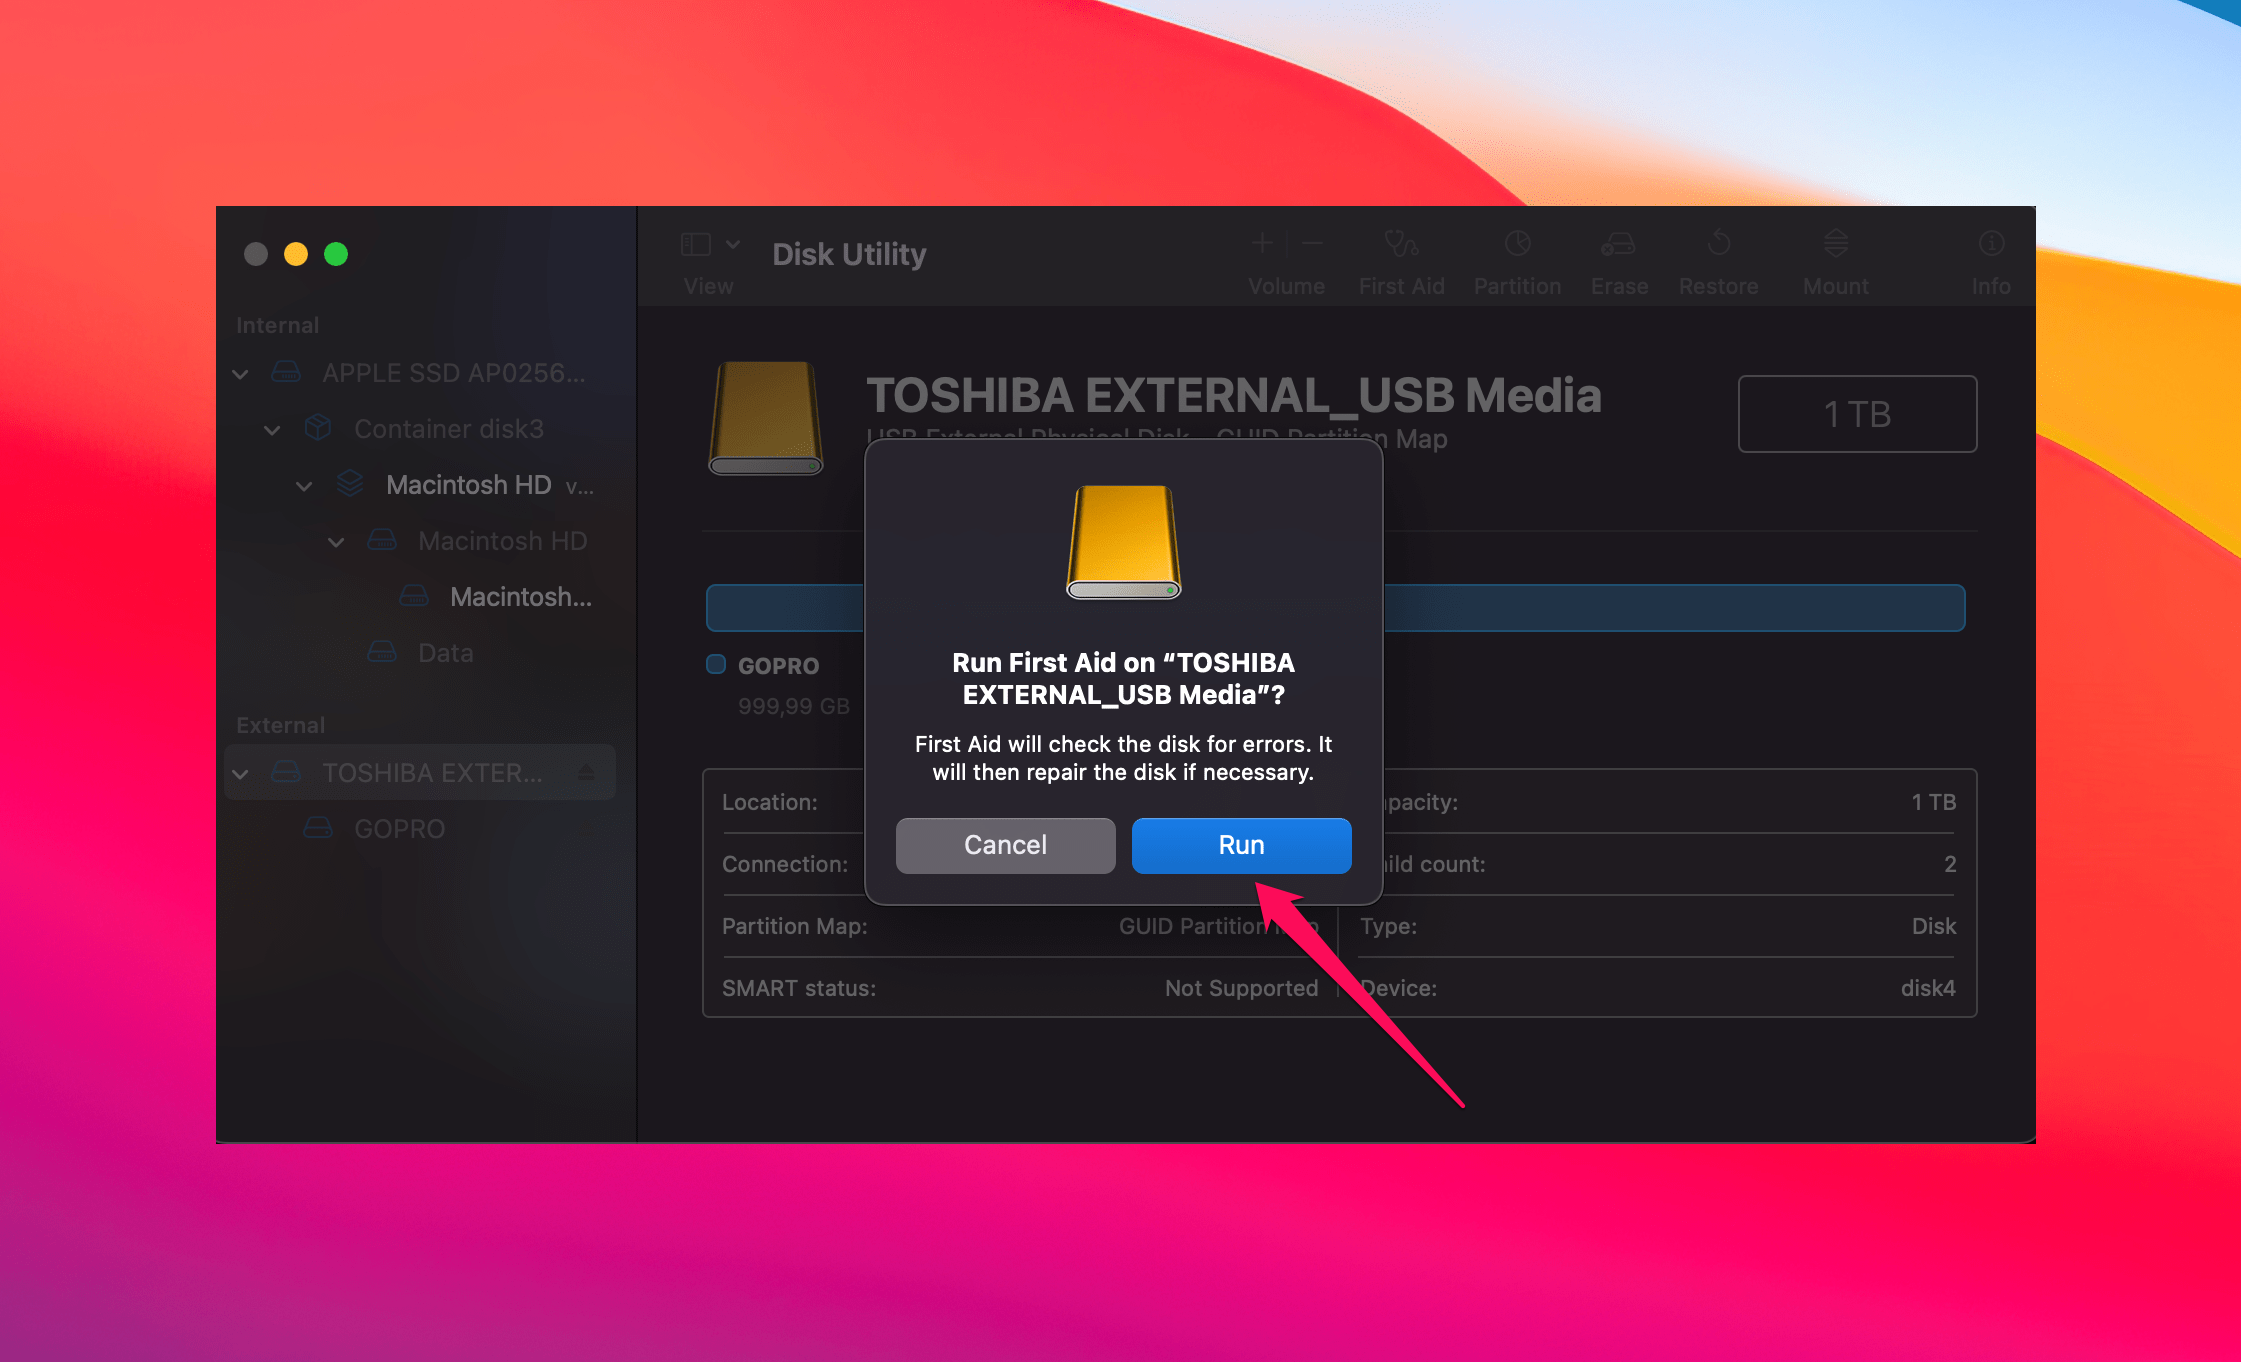
- Wait for the scan to complete.
- Re-mount the hard drive to your Mac. In some cases, the First Aid scan would have fixed the issue.
Method 4: Stop the FSCK Process
FSCK stands for File System Consistency Check. It is a command line tool people often use to fix file system issues on macOS Big Sur, Catalina, Ventura, or Sierra. However, the FSCK tool could be stuck in the checking process and cause errors when connecting your drive. You should disable it by following these steps;
- Open your Activity Monitor app.
- Under the Process Name list, look for FSCK and select it.
- Click the stop button on the upper-left-hand side of the window. Alternatively, you can use the Touch Bar.
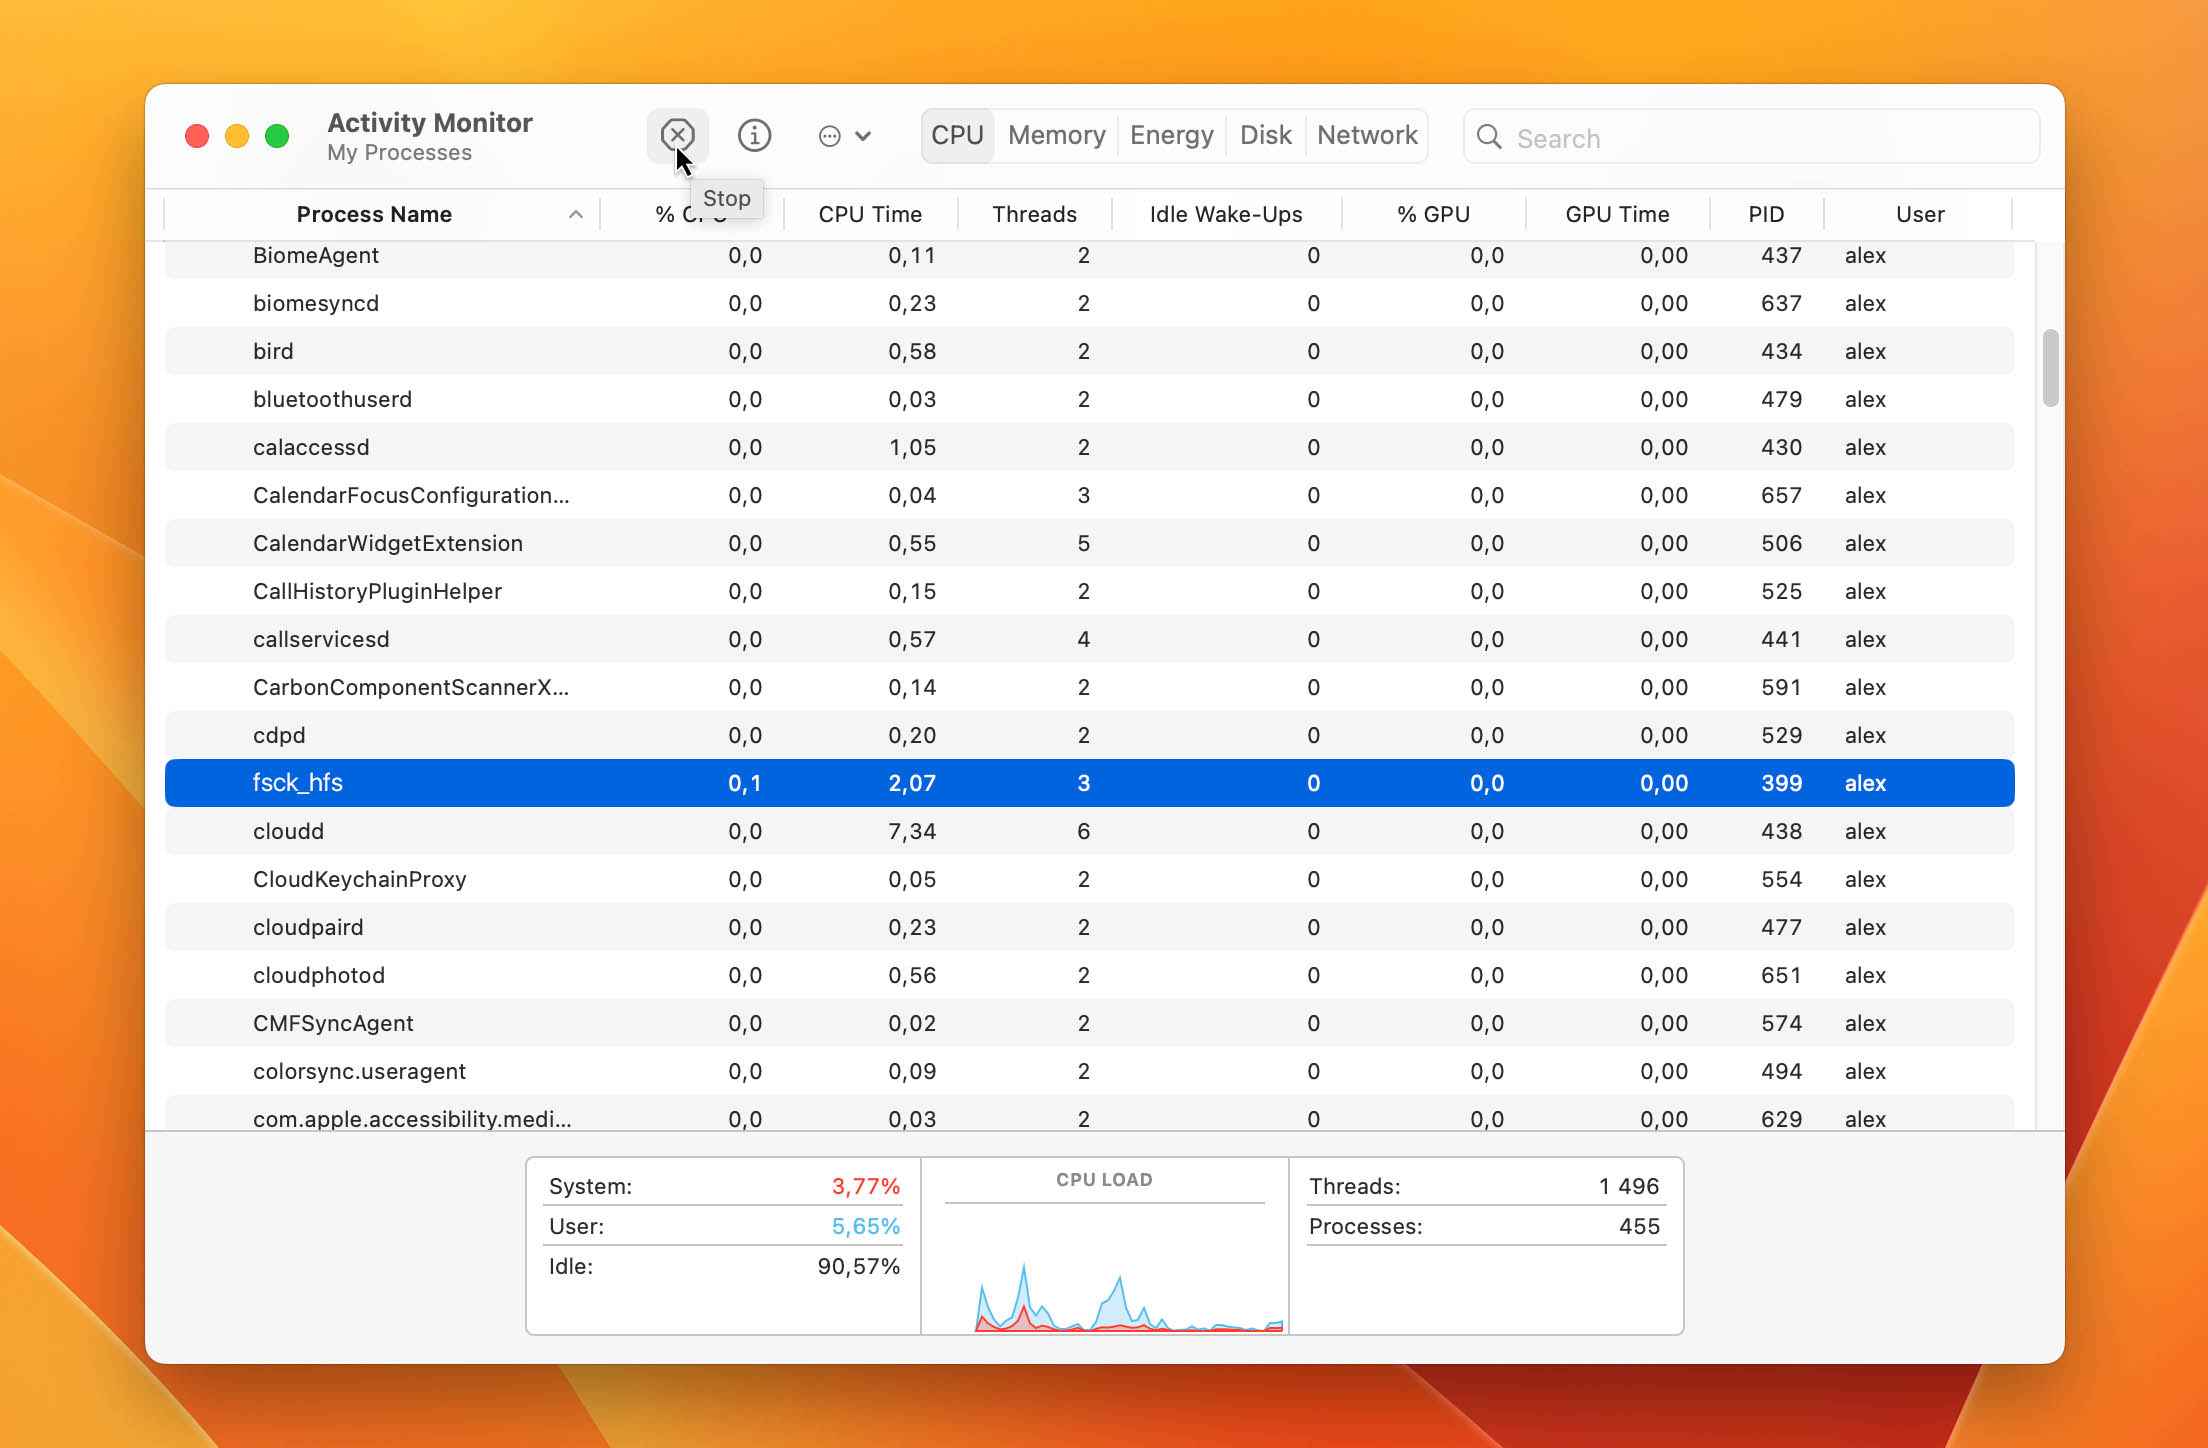
- Choose Quit for Force Quit. The former quits when it’s safe to do so, while the latter quits the process immediately. Force Quit means you may lose data if the FSCK process has files currently open.
Method 5: Fix Mac Errors With Terminal’s Repair Commands
Your Mac has a Terminal app giving you root-level access. It lets you fix errors by inputting commands on the Command Line. There are two main ways to use the Terminal to fix disk errors.
Run Error Checking In Single User Mode
- Restart your Mac. As soon as it begins rebooting, press and hold down the Power button and CMD + S keys simultaneously.
- The buttons will load you into Single User mode, which you’ll confirm when you see a window resembling the Terminal app.
- Once white texts on the window stop appearing, type /sbin/fsck -fy and hit the Return button. This command triggers a manual File System Consistency Check process.
- Once the check is complete, type reboot and hit the Return button. This command instructs your Mac to restart.
Manual Termination of the FSCK Process
Sometimes the FSCK process can be using the drive in stealth mode, which causes the drive to fail to mount and give you an error. The following steps may help;.
- Attach the external hard drive to your Mac.
- Type the sudo pkill -f fsck command in the Terminal and hit the Return button.
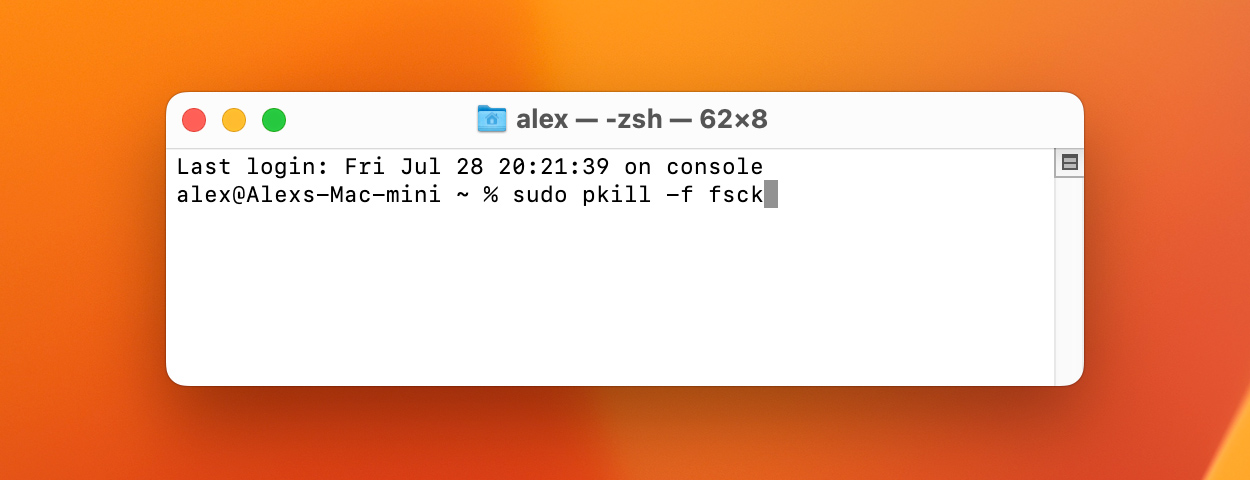
Executing this command will force the FSCK process to stop and free up disk access for you.
Method 6: Try to Mount the External Hard Drive Manually
You can mount a hard drive manually via the Terminal app.
- Connect the drive to your Mac.
- Type the command diskutil mount /dev/(disc identifier). You can run the diskutil list command on the Terminal to find the unique identifier for your disk. Here, it is the partition being mounted, so the identifier must be for the specific partition, e.g., disk2s1.
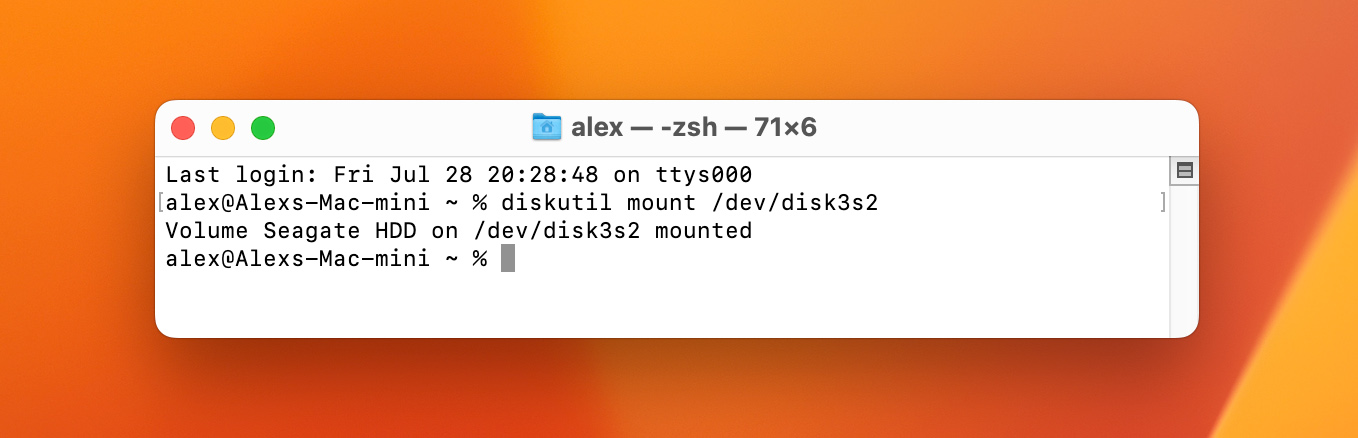
The above command is for manually mounting or dismounting a device, which can fix the hard drive connection issue.
Method 7: Format the External Hard Drive as a Last Resort
If all the aforementioned methods fail to resolve the errors, the last option is to format your hard drive. This process will wipe the disk, including all files and associated errors. However, you can first recover the files by following the steps mentioned in the retrieving data section. Then, you’ll be sure not to lose important data.
Type diskutil eraseDisk format name /dev/identifier in the Terminal. Refer to the above section for how to find the identifier.
Replace “format” with the required file system format, replace “name” with the volume name, and replace “identifier” with the disk identifier.
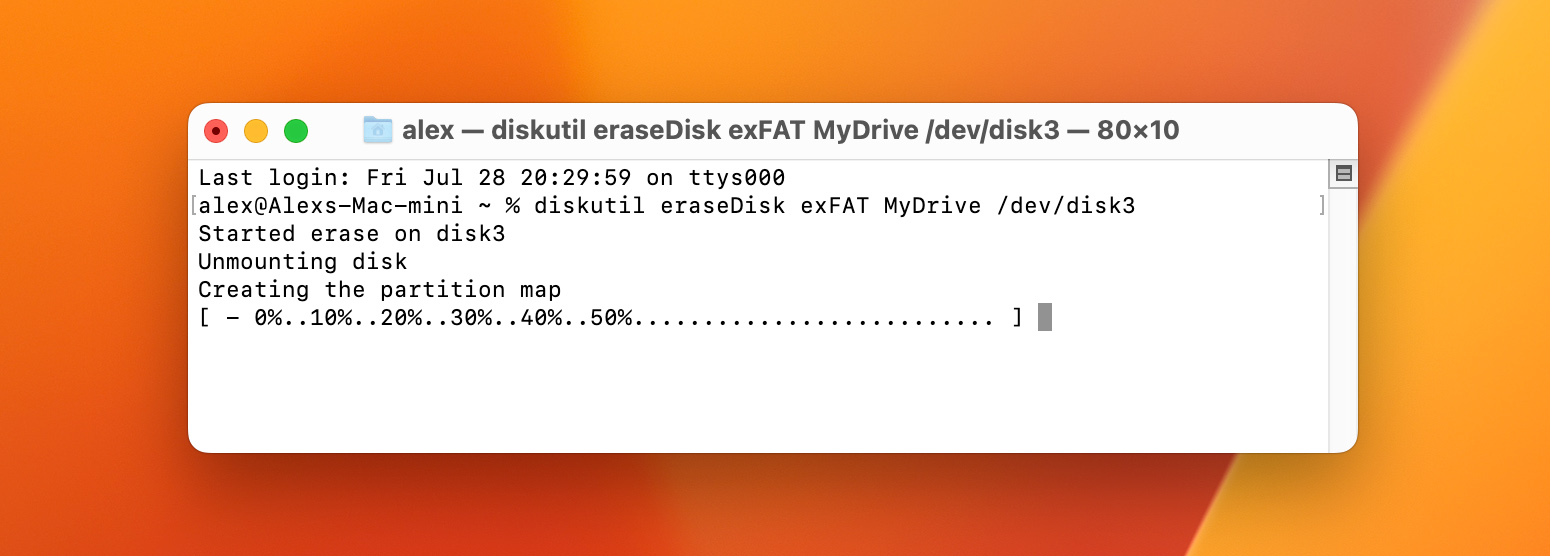
The above command formats your disk.
How to Prevent com.apple.DiskManagement.disenter Errors: Tips and Tricks
Use Only File Systems that Mac Supports
Using a hard drive with unsupported file systems can cause errors on your Mac.
Disk Utility supports these file systems:
- Apple File System (APFS) on macOS 10.13 or later
- HFS+ on macOS 10.12 or earlier
- MS-DOS (FAT) and ExFAT for Windows-compatible files
Format External Hard Drive Properly
You must format your hard drive properly before plugging it into your Mac; ensure to delete all the file partitions and volumes. Otherwise, you may have some remaining partitions containing corrupted files that prevent your external hard drive from opening.
Use Trusted Software
An external drive mounter software can cause conflicts with your Mac’s operating system and prevent the drive from working as it should. Ensure that any external mounter you download is from a trusted and verified source. If the mounter is causing problems, you can uninstall and reinstall it to resolve the issue.
Conclusion
The DiskManagement Disenter error is one of the most common problems Mac users encounter, yet can’t often find a fix. We have explained this error, its types, and the steps to resolve it. Your com.apple.diskmanagement.disenter error could be caused by many things. However, if you follow the seven steps we outlined, you’ll likely solve the issue.
Remember that reformatting your hard drive should be the last resort and not the first. Even at that, you should first recover the files before the formatting to prevent data loss; see how to recover HFS files and APFS files on different types of hard drives.
FAQ
How do I fix my external hard drive not mounting Mac?
Try any of the following:
- Connect the drive to another Mac to identify if the drive or your Mac is the cause of the hard drive refusing to mount.
- Re-mount it to another USB port or with a new cable.
- Use the First Aid tool to identify and repair errors.
- Stop the FSCK process from running in the background.
- Fix the errors using Terminal commands Mount the hard drive manually from the terminal.
- Reformat the drive if all the above steps don’t work. The reformatting process is usually the same for different types of hard drive, such as WD, Seagate, and Lacie.
How do I force my Mac to mount a hard drive?
You can manually mount it via the Terminal app by following these steps:
- Attach the external hard drive to your USB port.
- Open the Terminal, type sudo pkill -f fsck in the command line and hit the Return button.
What is Apple disk mount error 49223?
This error usually occurs if a hard drive was formatted on Windows and then connected to a macOS computer; macOS Big Sur, Catalina, Ventura, or Sierra does not support all the file storage block sizes that Windows does, so this causes it not to recognize the hard drive. You can use the First Aid tool to resolve this issue or reformat the drive if the problem persists.
This article was written by Stefan Ionescu, a Contributing Writer at Handy Recovery Advisor. It was also verified for technical accuracy by Andrey Vasilyev, our editorial advisor.
Curious about our content creation process? Take a look at our Editor Guidelines.