
If your photo library’s full or full of duplicates and you want to quickly get things back in order, give this text five minutes. You’ll walk out with the best way to merge duplicate photos on your iPhone – and not just duplicates. You’ll see. Let’s get into it.
Everything in here was tested on the iPhone 15 running iOS 26, but you don’t need the newest setup to follow along. If you’re still on iOS 18 or even a model or two back, you’ll be fine.
How to Merge Photos on iPhone (Exact Copies and Similar Images)
Basically there are two approaches when it comes to merging duplicate photos on an iPhone: you can either use the native feature in the Photos app or do it with the help of a third-party tool. We’ll demonstrate both. For the app method, we’re using Clever Cleaner: AI Cleanup App – a free app that finds both exact duplicates and visually similar images that your iPhone’s native feature won’t notice.
Here’s a quick side-by-side comparison of these methods to help you see which one might make more sense for your case:
Photos App (Built-in) |
Third-Party Apps |
Already on your iPhone |
Quick setup from App Store |
Only finds exact duplicates |
Can find duplicates AND similar photos |
Merge is simple (one tap per pair or bulk select) |
More flexible – lets you auto-select best versions and do everything automatically |
Can take hours (or days) to finish indexing, so duplicates might not show up at all |
Many apps show side-by-side views, metadata, file sizes before merging |
Requires iOS 16 or newer |
Most apps support iOS 16+ (some iOS 15) |
~ |
Often includes other cleanup tools (image compression, video compression, swipe-to-delete) |
So, are you ready to get rid of those duplicates and clear more space on your iPhone? Let’s start with the built-in method.
Method 1: Merge Duplicate Photos Using the iOS Native Feature
The iPhone native photo duplicate feature gives you two options for merging your duplicate photos: either merge all duplicate photos at once or merge only specific sets of duplicates. If you let the feature handle this process by itself, it will automatically detect the highest-quality duplicate and leave it on your device, the rest of the duplicate set will be moved to the Recently Deleted folder.
If your goal is to get more storage on your iPhone for Photos, then make sure that after you’ve removed all duplicates, you open the Recently Deleted folder and erase the files from there.
Read on for step-by-step instructions for both options.
Option A: Merge All Duplicate Photos
Here’s how to merge all duplicate photos on iPhone using the iOS native duplicate feature:
- Launch the Photos application on your iPhone.
- Go to the Collections tab.
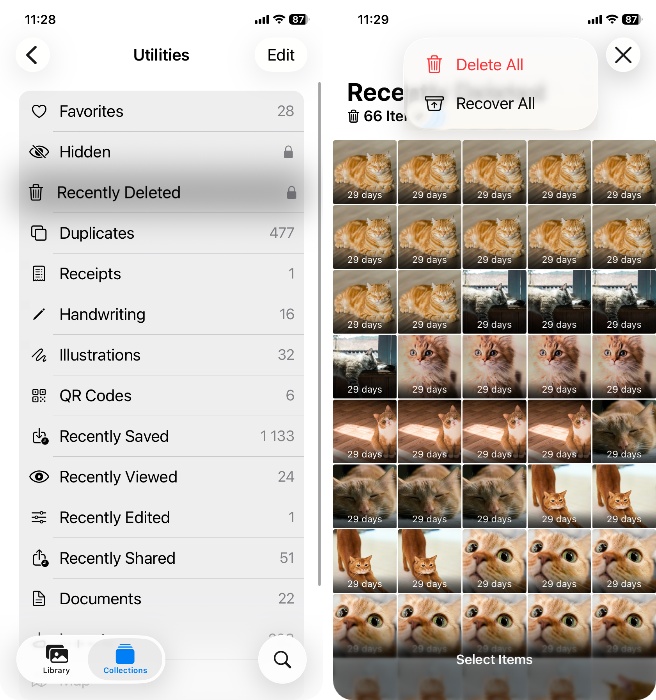
- Scroll down to find a section called Duplicates (under the Utilities).
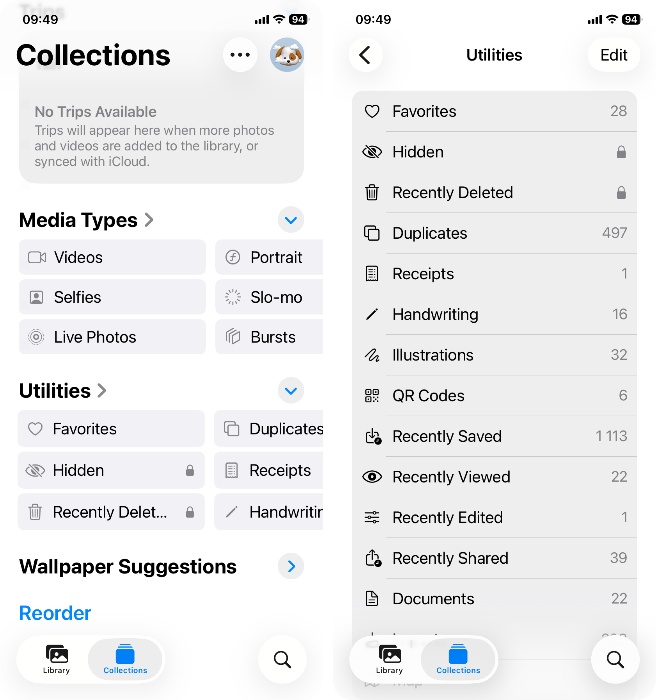
- Tap Select in the top-right corner.
- Tap Select All to choose all of the duplicate pairs.
- When ready, tap Merge (number) at the bottom of your screen.
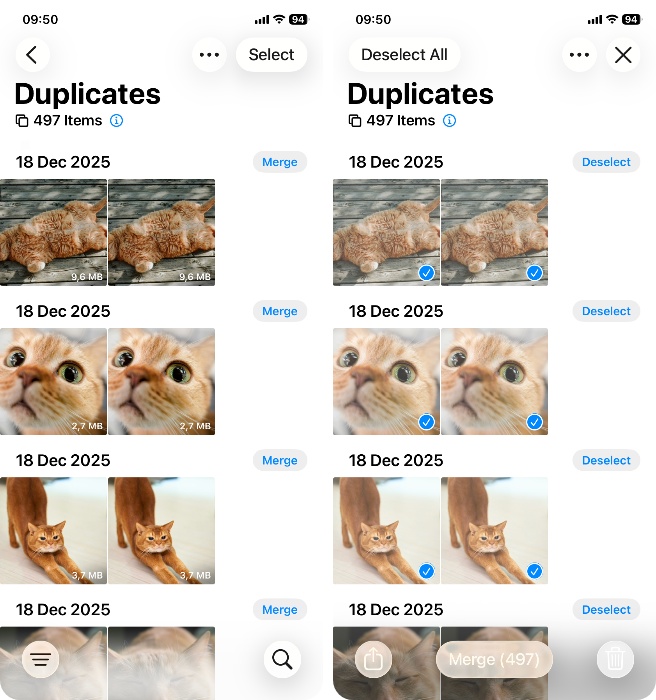
- Choose Merge (number) Exact Copies Only or Merge (number) Items and wait for the process to finish.👀
“Merge Exact Copies Only” skips anything with slight differences, like resolution, file format, or missing metadata. “Merge All” includes all versions. Still the same image, just not technically identical.
- Once the merging is complete, the duplicates will be moved to the Recently Deleted folder.
Option B: Merge a Specific Set of Duplicates
If you only want to merge a specific set of duplicates on your iPhone, it’s even simpler than the bulk-merge steps:
- Tap the Collections tab in the Photos app.
- Scroll down to the Utilities and find Duplicates.
- Locate the set of duplicate photos that you want to merge and tap Merge near it.

- Tap Merge to confirm your choice (your phone will automatically choose to store the highest quality and most relevant photo, and the rest of the duplicates will move to the Recently Deleted folder).
Method 2: Merge Duplicate Pictures on an iPhone Using a Third-party Tool
Now let’s get into the app method. This one’s way more versatile, and like we mentioned earlier, it doesn’t stop at exact duplicates. It goes after photos that look identical to you but would never get flagged by your iPhone’s built-in feature.
We’ve tested a bunch of duplicate cleaner apps over the past year (both free and paid). For this walkthrough, we’re using one that, in our opinion, has one of the strongest visual comparison algorithms out there – Clever Cleaner. It nails similar photo detection, and most of the time, you can literally press one button and be done with duplicates.
Here’s how to use Clever Cleaner to merge and clean up your library:
- You can download the app from the App Store using this link. It’s 100% free and doesn’t lock features behind a paywall. Plus, the developer says early adopters will get to keep it free permanently.
- Open the app and grant access to your photo library.
- Tap Smart Cleanup. This kicks off the AI pass.
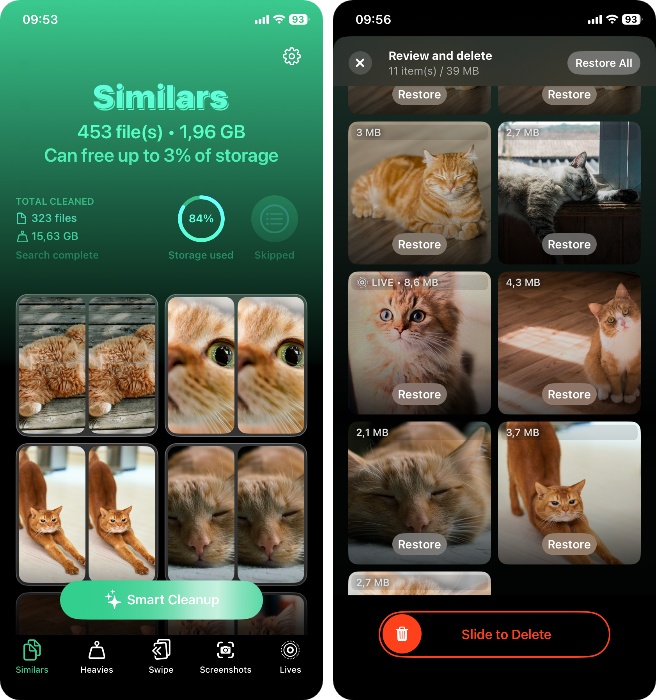 The app will compare everything, and pre-select photos that can go. No need to tap through every pair manually (unless you want to).
 - Review what it picked. If you want to keep something, just tap Restore.
- If everything looks good, slide the red button to clean up and confirm.
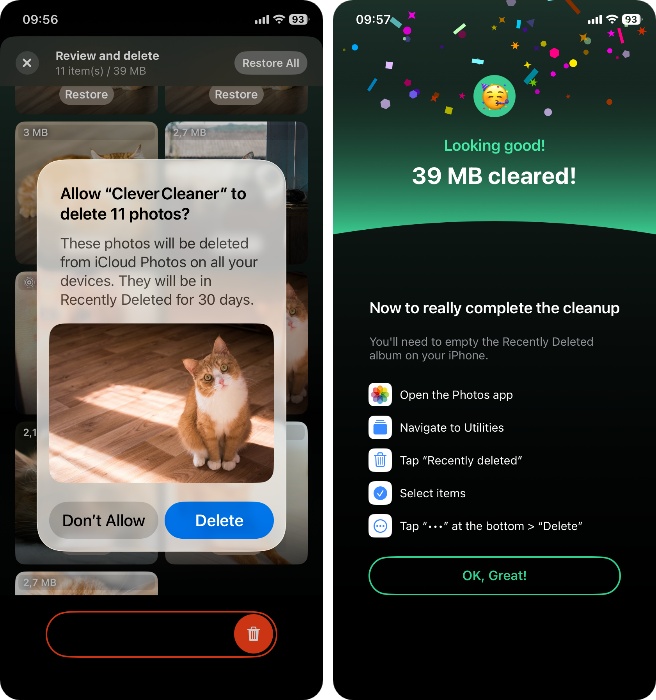 It won’t erase things permanently – they go to Recently Deleted, just like the built-in Photos app. So you’ve still got a 30-day safety net.
If you want a more hands-on cleanup you can go straight into a set of similar photos and make the calls yourself.
Tap through any group and you’ll see a clean layout with every version lined up. Use Move to Trash on the ones you want to delete, or Skip All if you want to leave the group untouched. As soon as you’re done with one batch, the app slides the next one into view.

You’ll notice Clever Cleaner highlights the one it thinks is best with a “Best Shot” tag. That’s its AI guess based on sharpness, resolution, framing, whatever gives it an edge. But nothing’s locked in – you can uncheck that one and keep a different version if you prefer.
As we already mentioned up top, one of the things that gives this method a clear edge over the built-in Photos tool is everything else it packs in – it’s more like a full-on cleanup toolbox.
You can also use these:
- Heavies – shows your largest videos and photos. Great for clearing space fast without guessing what’s taking up the most room. If you don’t want to delete a video, you’ve got an alternative: use the built-in Compression option to shrink the video size without losing the video itself.
- Swipe – a manual review mode where you swipe left to delete or right to keep, one photo at a time. Screenshots – detects and lets you delete all your screenshots in just a tap.
- Lives – shows all your Live Photos and lets you convert them into stills to save space.
All of this works on-device and takes a couple taps. So even after duplicates are gone, you can keep cleaning.
Don’t Forget to Empty Recently Deleted
Before you wrap up, don’t forget this last step: Clear out your Recently Deleted folder.
No matter which method you used – the Photos app or a third-party tool – deleted duplicates still hang out in that folder for 30 days (they are still taking up space for the whole time). If you’re cleaning up to save storage, that leftover junk won’t help until it’s gone for good.
Go to Photos > Albums > Recently Deleted, tap Select, then Delete All if you’re sure. That’s when you’ll see the real space savings.
FAQ
Can I merge photos on an iPhone that are not exact copies without any apps?
As of iOS 26, no, the built-in Photos app can’t merge or flag photos that aren’t exact duplicates. If two shots look almost identical to you but have slight differences (like edits, filters, crops), the native Duplicates feature won’t pick them up.
To handle those, you’ll need a third-party app that supports visual similarity detection.
I need to merge new duplicate photos I took, but they don’t show up in Duplicates. How long do I need to wait?
Your iPhone doesn’t detect duplicates instantly. According to Apple, the Photos app automatically scans for duplicates and puts them in the Duplicates album under Collections > Utilities. But that scan only runs while your iPhone is locked and charging. So unless it’s plugged in and left alone, nothing happens.
Depending on how many photos you have and what else the system’s doing in the background, it might take a few hours (or days) to finish.
If you want to check whether it’s still working, open Photos, tap Library, and scroll to the bottom. If you see a message that says “Indexing,” your phone’s still scanning.
How to merge all duplicates in Photos automatically?
The easiest way is to use a third-party app like the one we covered above. Most of them automatically find both duplicates and lookalikes, pick the best version, and clear out the rest. No settings to mess with.
You can also merge exact duplicates using the built-in Photos app, but:
- It’s not really a one-tap method.
- It won’t catch similar photos that look the same but aren’t exact matches.
Does the 'Merge All' feature truly combine all duplicate photos on my iPhone?
Yes and no. The Merge All feature found on iPhones running iOS 16 or later does locate your duplicate photos, but it doesn’t actually combine the duplicate sets. The feature selects one photo from the duplicate set that is of the highest quality and most relevant and keeps it in your gallery. The rest of the duplicates get moved to the Recently Deleted folder and then erased from there.
Also, this feature locates only exact duplicates in the Photos app. So if you want to find and remove similar photos on your iPhone, this feature won’t help you with that.
Are there any risks or potential data loss when merging duplicate photos on my iPhone?
In general, it is safe to merge duplicate photos on your iPhone. The system usually chooses the best quality and most relevant photo from the duplicate set to keep, so in most cases, you should be happy with the selection. And even if you don’t like the choice or if you want to bring back any photo from the duplicate set, you can always go to the Recently Deleted folder right after the merging and recover the photo that you need.
Conclusion
Here’s the quick version for anyone who jumped straight to the end.
What to do (the fast checklist):
If your main goal wasn’t just tidying up the library but actually freeing up real storage space, there’s more you can do after merging duplicates:
- Use Clever Cleaner’s Heavies tab to find massive videos and oversized photos.
- Compress large videos instead of deleting them.
- Check out Screenshots and Live Photos.
- Use Swipe mode for a manual pass-through.
Usually, there’s a lot more junk in your photo library than you think. Not just duplicates. It all depends on how you use your phone, but if you’re like most people, you’re sitting on a ton of space you could clear.
This article was written by Romana Levko, a Staff Writer at Handy Recovery Advisor. It was recently updated by Roman Demian.
Curious about our content creation process? Take a look at our Editor Guidelines.