Have you recorded a crisp 4K video on your iPhone and now can’t seem to send it over email or upload it anywhere? It’s a common issue. Apple forums are full of people asking how to compress a video on an iPhone without losing anything. So we figured it was time to put together a proper guide. Our team tested every method we could find and narrowed it down to the ones that worked best.
6 Best Methods to Reduce Video File Size on iPhone
We ended up with six methods that use tools you already have on your iPhone right now, plus a few third-party apps that are actually worth downloading. For each one, we’ll point out the pros and cons, so you can scan quickly and land on the method that fits your goal.
Let’s start with the basic one: trimming your video in the Photos app.
Method 1: Trim Video in Photos to Make iPhone Video Smaller
Pros:
- Already built into every iPhone
- Quick and beginner-friendly
- Keeps full video quality intact
- Works well for cutting out unnecessary footage before sharing
- Doesn’t require internet
Cons:
- Doesn’t reduce resolution or compress the video format
- Won’t help if the video is already short but still large
- No control over file size or format
- Doesn’t batch process or handle multiple videos at once
This one might already be familiar to you – if you’ve ever edited a clip on iPhone. But full disclosure: this isn’t true compression. You’re not lowering the resolution or changing the file format. Everything stays the same. The file just gets shorter.
Still, if you only need to share a specific part of a clip (or if there’s extra footage at the beginning or end), it’s a super quick fix.
Here’s how to do it:
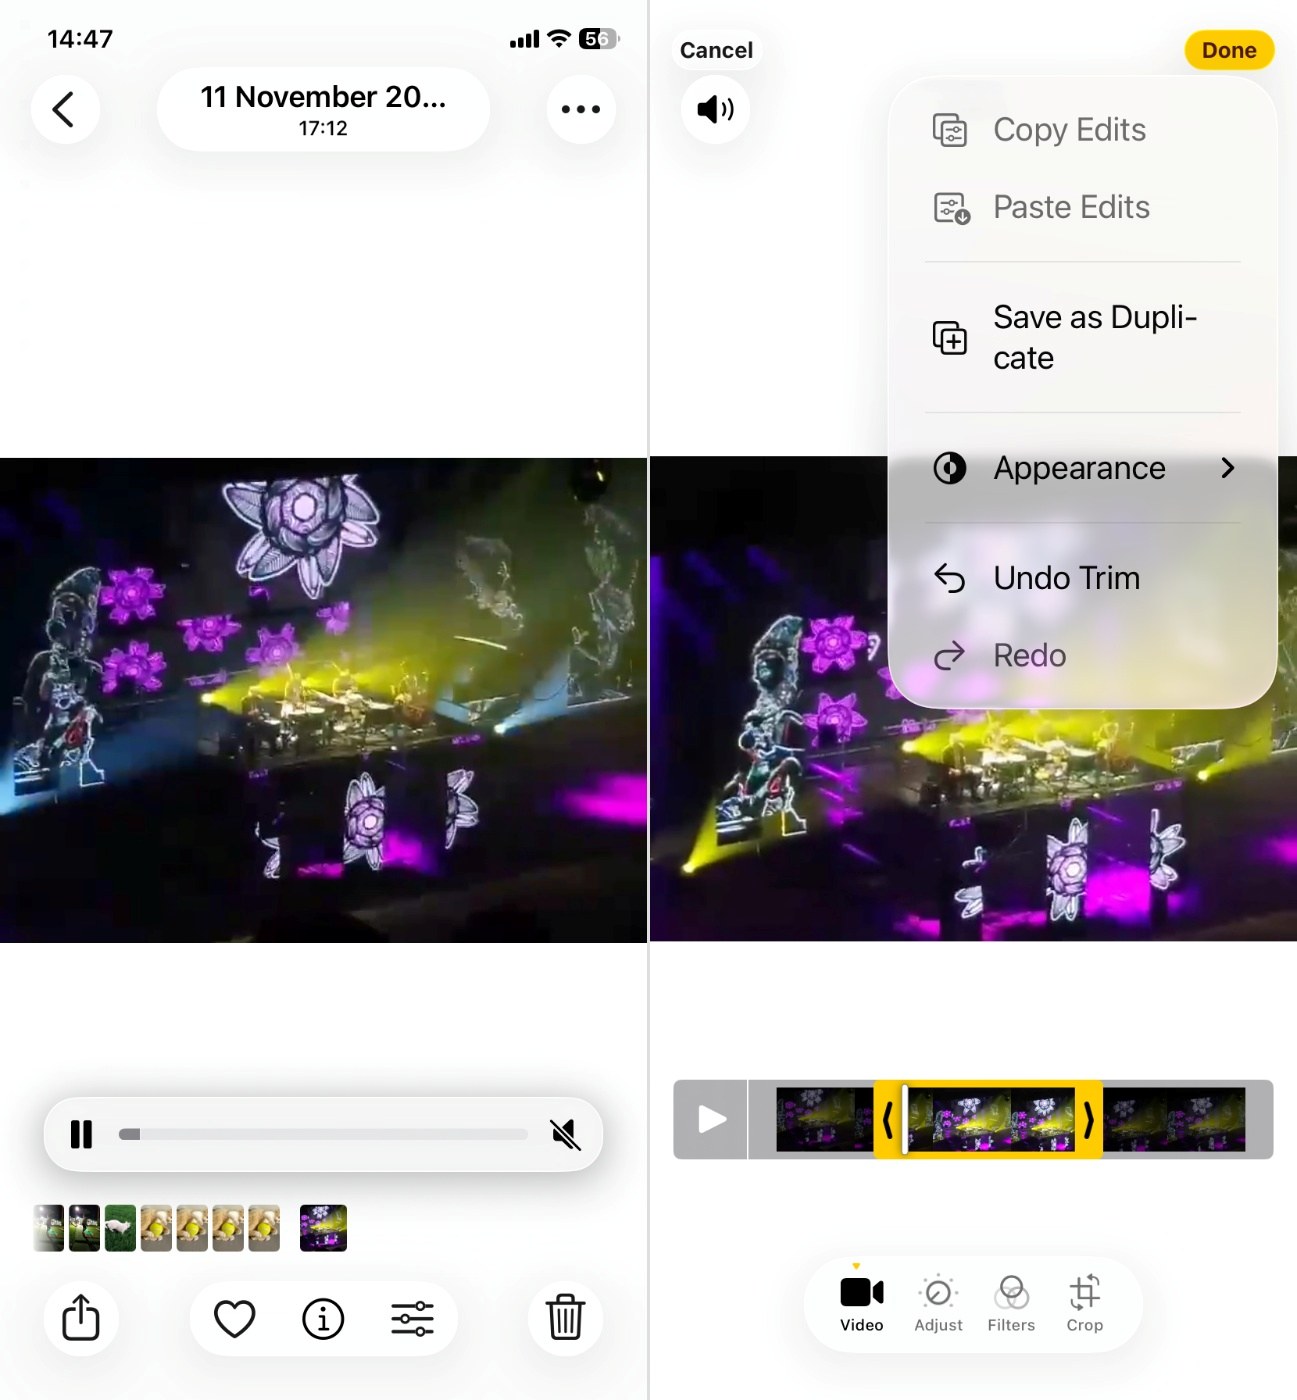
- Open the Photos app and tap the video you want to trim.
- Tap Edit, then use the sliders to cut the beginning or end.
- Tap Done, then choose Save as Duplicate so you don’t overwrite the original.
You’ll get a shorter video with the same quality, which might make it small enough to text or email.
If you searched for an iPhone video compression guide because your video won’t send due to a size limit, say, over email, you might not need to compress it at all. Some people suggest uploading the video to the Files app using iCloud Drive, Google Drive, Dropbox, OneDrive, or any cloud service you already use.
Once uploaded, copy the share link and send that instead. The recipient can stream or download the full-quality version, and you avoid any quality loss from re-encoding. It’s not compression – but it gets the job done when sharing is the only goal.
Method 2: Use Third-Party Apps to Reduce Video File Size on iPhone
Pros:
- User-friendly interface
- Smart compression modes to choose from
- Shows estimated file size before compression
- Supports a wide range of formats
- Option to delete or keep original after compression
Cons:
- No batch processing
- Limited advanced control
This one, unlike the previous method, is true compression. You can actually shrink the file by lowering the resolution, bitrate, or frame rate. You end up with a smaller video file, saved right to your iPhone.
And probably the easiest way to do it is with an app from the App Store. We’ve tested plenty of popular compressors like Video Compress and Panda Video Compressor. There are also multi-purpose apps that include video compression as one of their tools, like Clever Cleaner, which is primarily a phone cleaner but comes with a built-in video compressor, and that’s the one we’ll use for this walkthrough since its compression is one of the best we’ve seen (plus, it’s a 100% free app with no ads, unlike the two previously mentioned apps).
Here’s how you can use Clever Cleaner to reduce video file size on your iPhone:
- Download the app from the App Store.
- Open it and allow access to your Photos so it can read your video library.
- Tap the Heavies tab at the bottom, then switch to the Compression tab – this is where your videos are listed from largest to smallest.
- Tap on any video and choose one of the three compression modes.
- Hit Compress and let the app do its thing.
- Once it’s done, you’ll get the option to either Delete the original or Keep original. If you’re sure you won’t need the original, go ahead and delete it to save space.
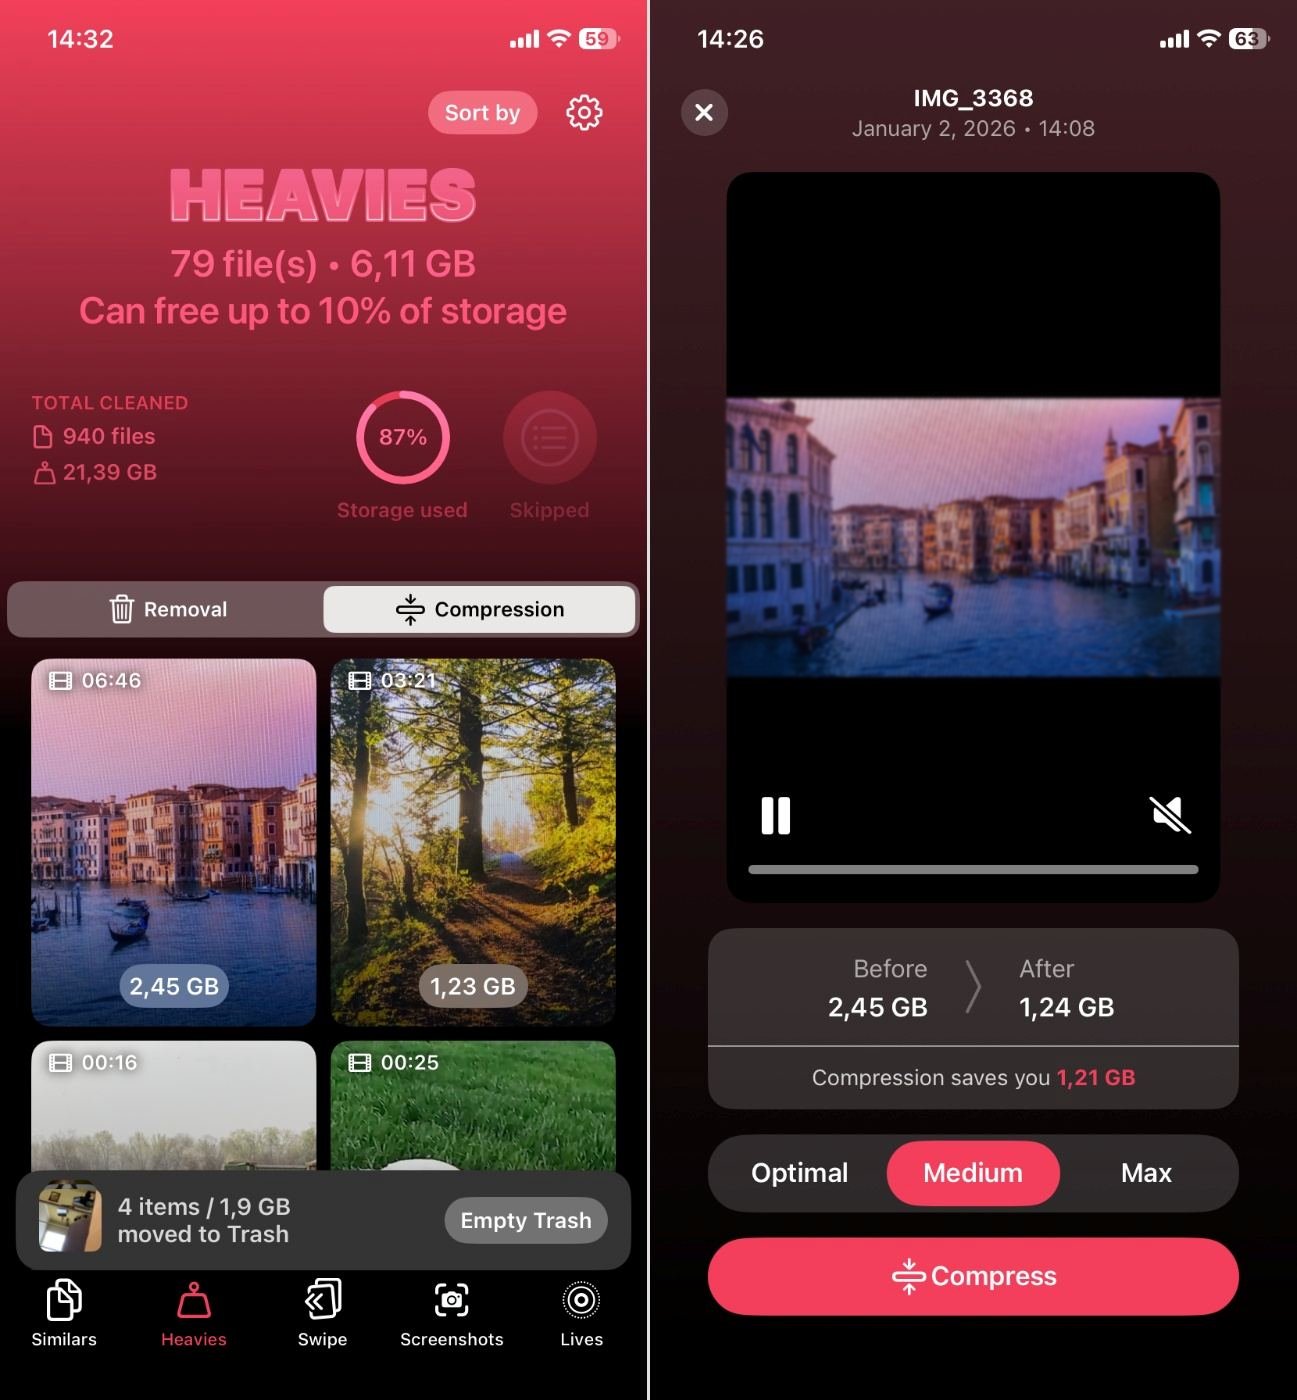
Out of the three options (Optimal, Medium, and Max compression) we’d recommend sticking with the default one: Medium. In our tests, it consistently cut file size by nearly half. For example, a 2.45 GB 4K video shrank down to 1.24 GB, and to the naked eye, the quality looked pretty much the same.
For 99% of people reading this, there’s really no need to tweak anything. But if you feel like experimenting, Optimal keeps a bit more detail (useful for scenic shots or videos with lots of motion), and Max gives you the smallest file (could be handy for email attachments or uploads with strict size limits).
Method 3: Compress a Video on iPhone with iMovie
Pros:
- Free and officially made by Apple
- Already optimized for iOS devices
- Easy step-by-step workflow
- Lets you pick from multiple export resolutions (360p, 540p, 720p, 1080p, 4K)
- Compressed video saves directly to Photos app
- Works offline
- Maintains good quality at 720p/1080p for mobile use
Cons:
- No manual bitrate control or ability to set exact file size
- Limited to the preset resolutions Apple offers
- Trial and error may be needed to hit the size you want
- Re-exporting large clips can take time and use temporary storage
- Quality drop is noticeable if you go too low (360p looks poor on most screens)
- Metadata (like original creation date) may not always transfer cleanly
You might know iMovie as a Mac app, but there’s also a free iPhone version you can grab from the App Store. You can use it to re-export a video at a lower resolution and end up with a smaller file.
How to compress videos using iMovie on iPhone:
- Install and open iMovie. Tap Movie.
- Import your video into the timeline.
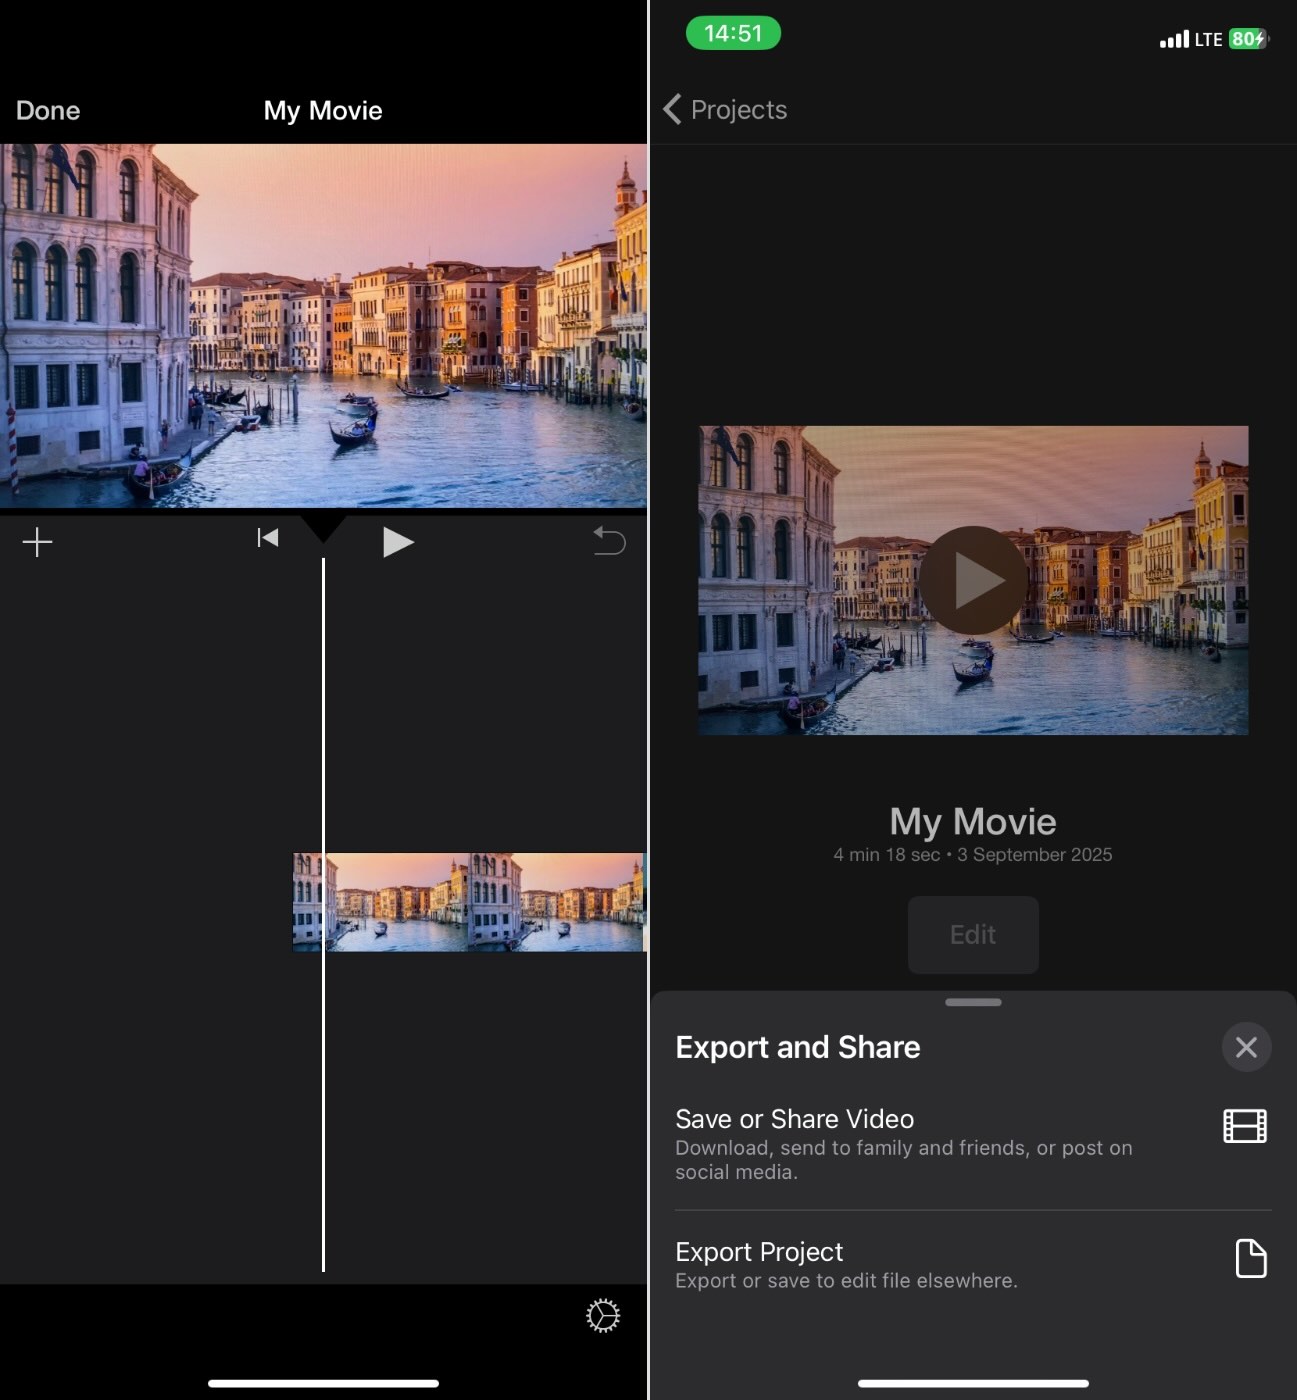
- Without making any edits, tap Done, then tap the Share button (square with an arrow).
- Select Save Video.
- At the top of the share sheet, tap Options and pick a lower resolution. If your video is 4K, switch to 1080p. If it’s 1080p, try 720p. On iPhone, you’ll typically see export choices like 360p, 540p, 720p, or 1080p.
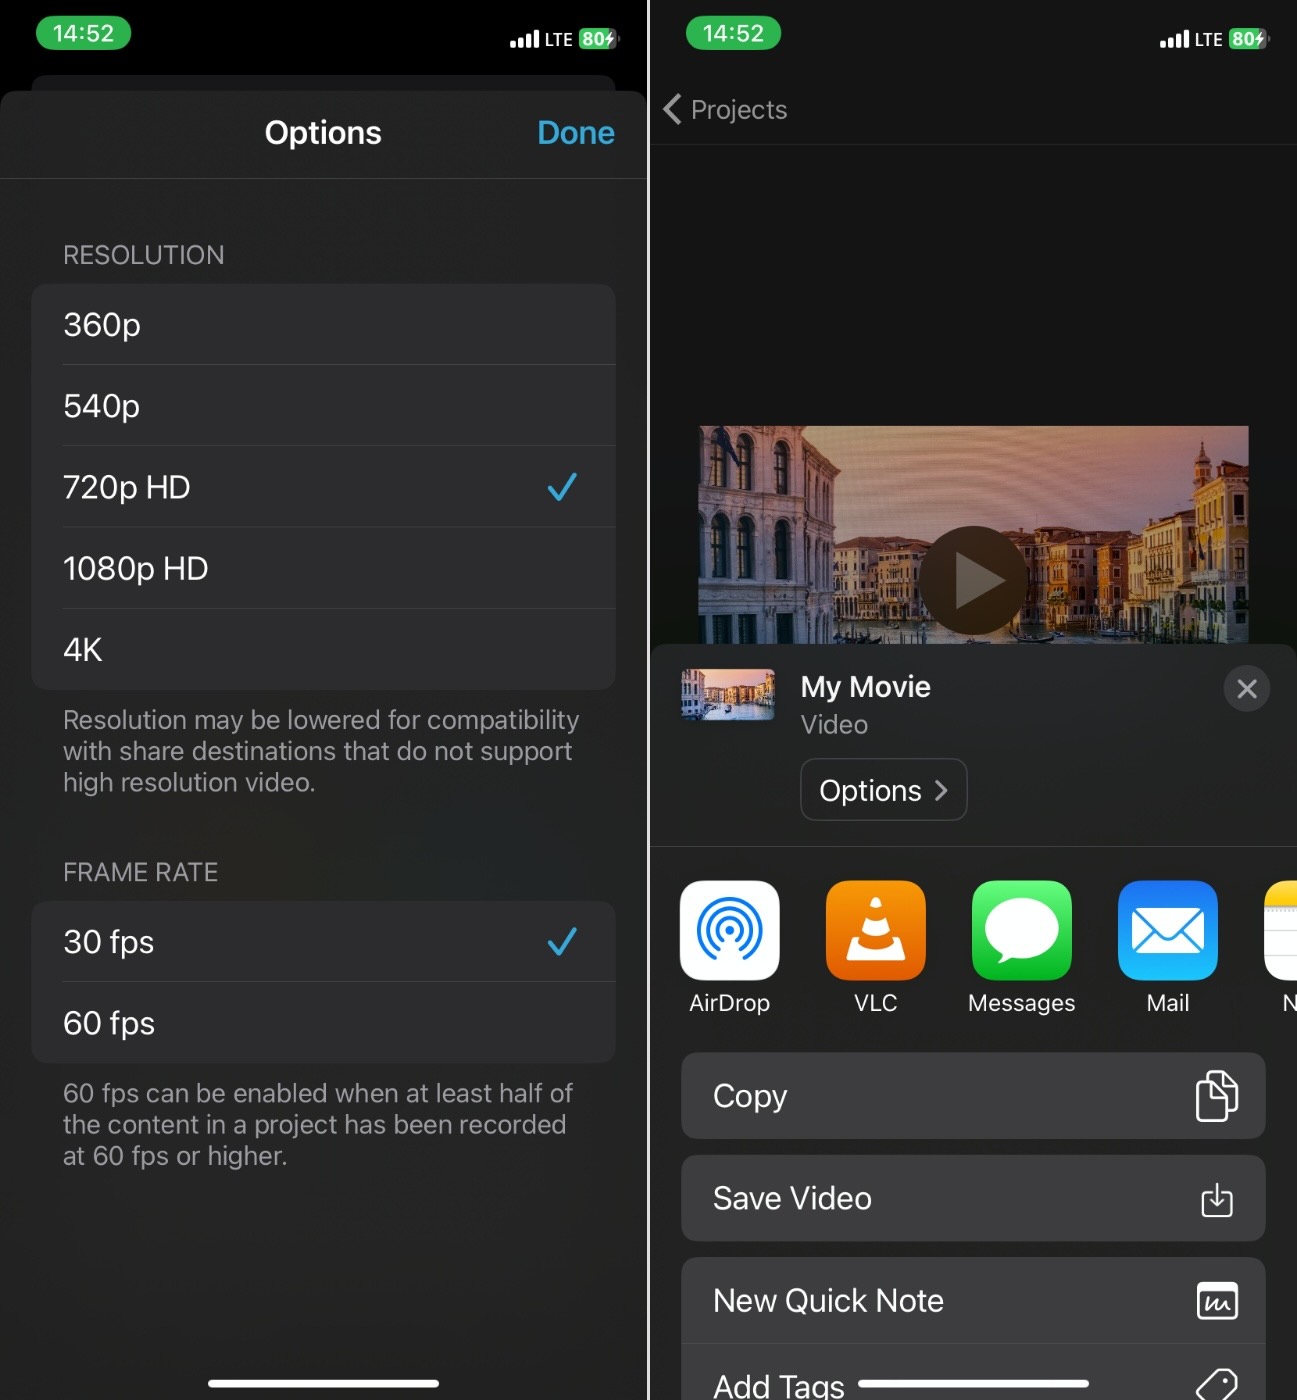
- Tap Done, then Save Video. iMovie will export the compressed version to your Photos library right alongside the original.
Tip: If you want to share directly via Messages or Mail, you can pick the smaller export option right from the share menu. And if the video is too large, iMovie will automatically prompt you to choose a smaller resolution before sending.
Lower resolution and/or bitrate can dramatically reduce the size of your video file. For example, a one-minute 4K clip that weighs hundreds of megabytes can fall to a few dozen megabytes when saved at 720p. Apple themselves recommend choosing smaller resolutions, like 720p, because they “produce smaller files that upload to the web faster.”
On a phone screen or social feed, the difference often isn’t noticeable. On a big TV, though, you might see the drop in detail.
Keep in mind: iMovie doesn’t give you fine control over bitrate or an exact file size. You pick a resolution, and the app handles the rest. That means it can take a little trial and error – if 1080p still feels too heavy, try 720p. On Mac, iMovie offers “Low, Medium, High, Best” quality settings for each resolution, but on iPhone, you mainly adjust resolution.
Method 4: Use Shortcuts App to Compress Videos on iPhone Automatically
Pros:
- Already built into iOS (except on older versions)
- Runs entirely on-device
- Flexible
- Integrates directly with the Share Sheet for quick access
- Supports batch compression
Cons:
- Requires initial setup
- Fewer presets compared to dedicated third-party apps
- No precise control over target file size (only resolution/quality choices)
- Compression speed depends on your iPhone model
If you like built-in solutions but want more control than Photos or iMovie, the Shortcuts app is a smart middle ground. It’s already installed on most iPhones (iOS 13 and up), and it can handle video compression through automation. Instead of opening a separate app every time, you create a shortcut that compresses your videos with a single tap.
How to set it up for video compression on iPhone:
- Open Shortcuts and tap the + to create a new shortcut.
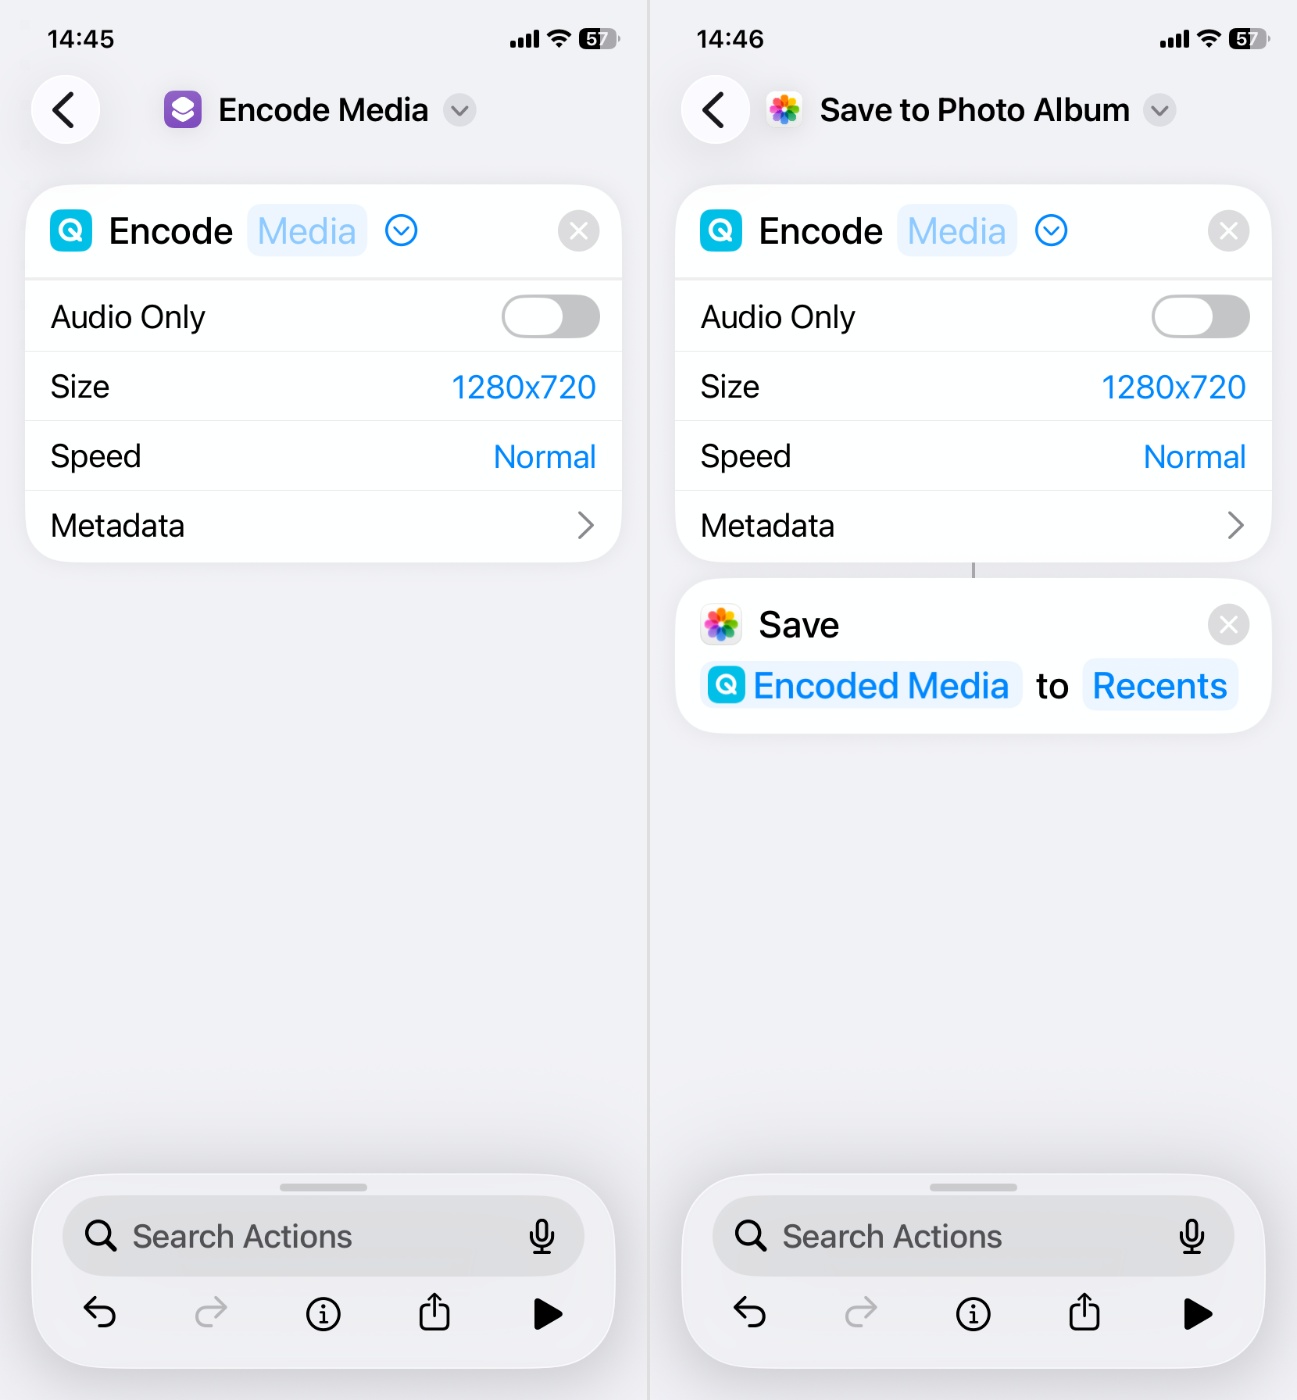
- Add the action Encode Media (this tells your iPhone to re-encode the video).
- Adjust the settings: set Size to 1280×720, or ask each time.
- Add a second action like Save to Photo Album or Share so the compressed file goes straight to your library or into the share sheet.
- In the shortcut settings, enable Show in Share Sheet and allow it to accept video files.
Now, when you open a video in Photos and hit Share, your shortcut shows up alongside AirDrop and Messages. Tap it, pick the quality or resolution, and Shortcuts compresses the file automatically.
The nice thing is flexibility – you can build shortcuts that target specific needs. For example:
- A “720p Quick Compress” shortcut for downsizing clips before posting to Instagram.
- A “Compress for Email” shortcut that makes sure the file drops under common attachment limits.
- Or even a batch shortcut that lets you select multiple videos at once.
Shortcuts might need a bit of initial setup, and many people run into issues getting them to appear in the Share Sheet the first time. But once you configure it correctly, it turns into a one-tap compression tool that works system-wide.
Method 5: Use Online Services to Compress Videos on iPhone
Pros:
- Works directly in Safari or any browser
- Supports modern codecs like H.265 (HEVC) for better compression
- Offers manual control over output size
Cons:
- Requires internet (upload/download times can be long for large files)
- Uploading personal videos to a third-party server may raise privacy concerns
- Free plan has limits (max file size, daily usage caps, slower speeds)
- Browser-based tools may not handle batch compression as smoothly as native apps
- Occasional hiccups with large uploads or slow networks
If you don’t want to install an app, you can use an online video compressor right from Safari (or any other browser you use) to condense a video on your iPhone. Sites like FreeConvert or Online Converter let you upload a video, pick a smaller size or resolution, and then download the compressed copy back to your phone.
Here’s how to compress a video on iPhone using FreeConvert as a step-by-step example:
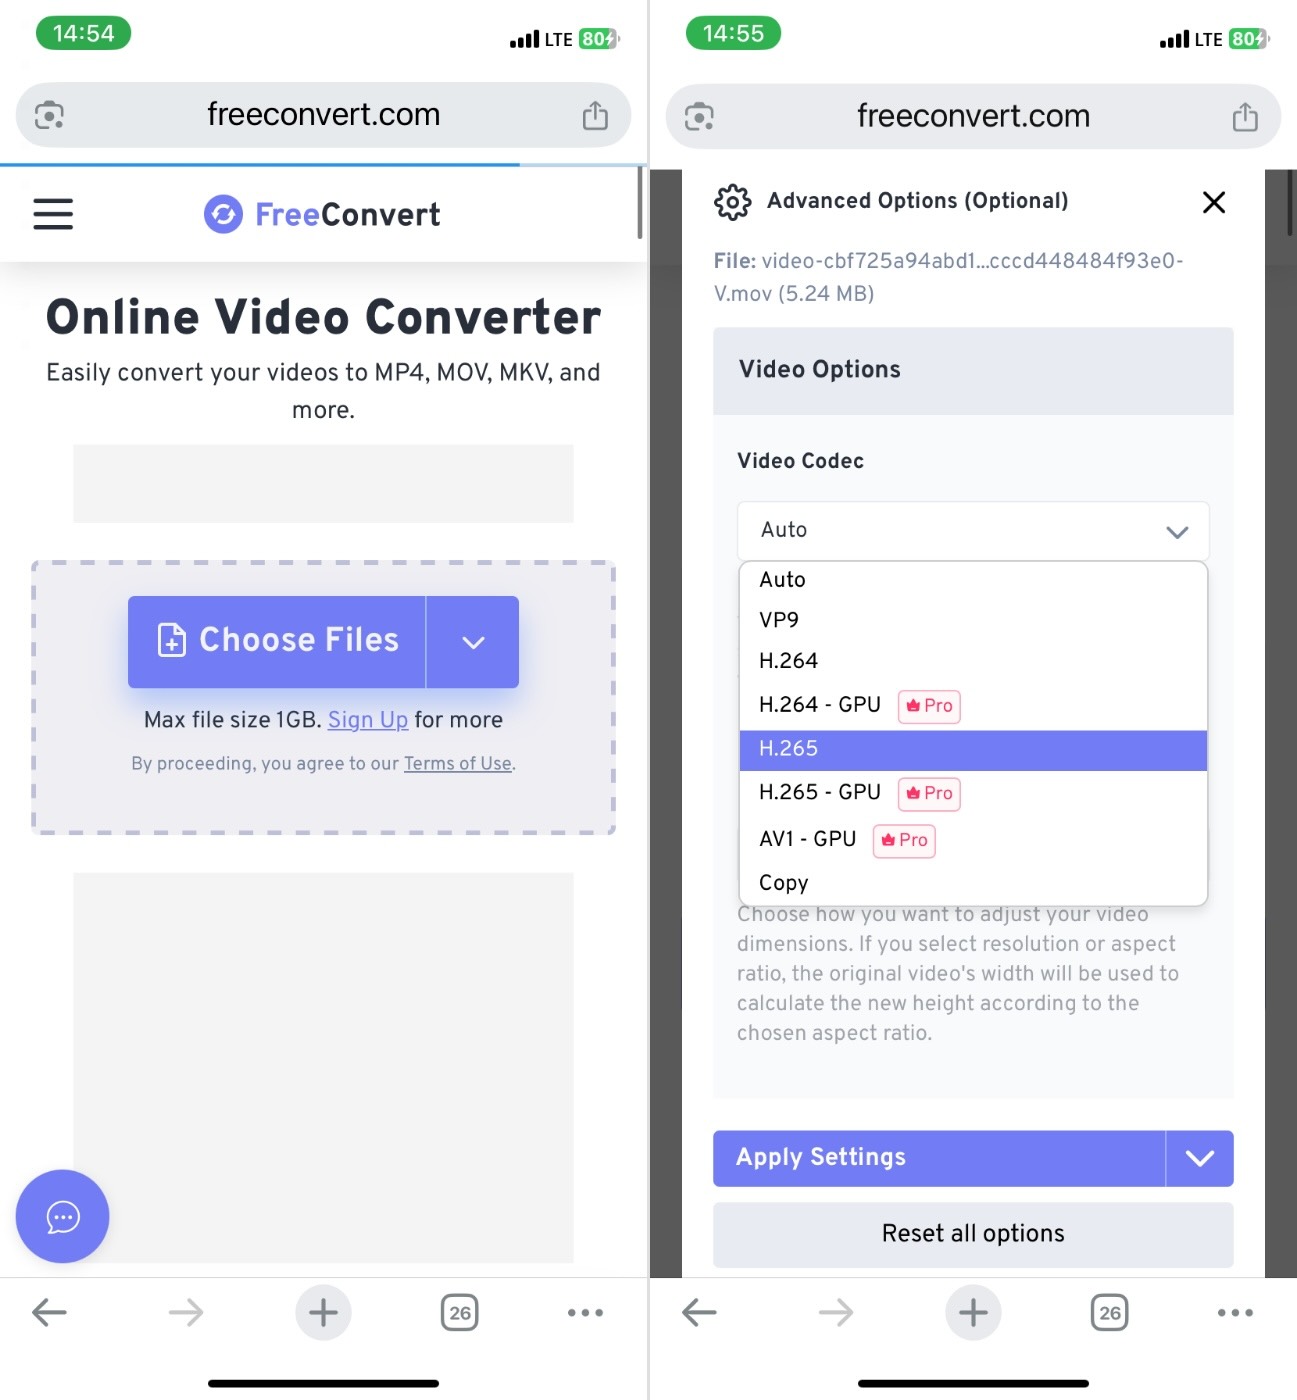
- Open Safari and go to freeconvert.com.
- Tap Choose Files and upload your video from Photos or Files (you may need to tap “Browse” if it doesn’t appear right away).
- Under Advanced Settings, select your Video Codec. H.264 is default, but H.265 (HEVC) offers better compression with similar quality.
- Choose a Compression Method. You can either target a specific output size or set a percentage (e.g., shrink to 60% of original size).
- Use the slider under “Select Target Size (%)” to control how much you want to compress.
- Tap Compress and wait for processing. Once done, tap Download to save the compressed version back to your iPhone.
For example, if you upload a 100MB video and select 60%, the final file will be around 40MB. If you go lower (like 25%), expect more visible quality loss – but it’s a fast way to downsize a video on iPhone without installing anything.
Method 6: Use Messaging Apps to Compress iPhone Video for Quick Sharing
Pros:
- Works quickly if you already use WhatsApp, Telegram, or iMessage
- Can shrink huge files into much smaller versions automatically
- Great for casual sharing (social media, quick updates)
- Easy to save the compressed copy back into Photos
Cons:
- No control over resolution, bitrate, or final size
- Quality drops noticeably
- Large videos may be rejected or turned into cloud links
- Not suitable for anything that needs high quality
This one is more of a trick you can use to get a smaller video quickly, rather than a method you control. Messaging apps like WhatsApp, Telegram, and Messages often shrink large videos automatically before sending them, which you can then save back to your iPhone.
It’s not something we’d recommend as your main approach, but it’s a viable workaround if you need a fast solution and don’t care too much about keeping full quality.
How to compress iPhone video with WhatsApp:
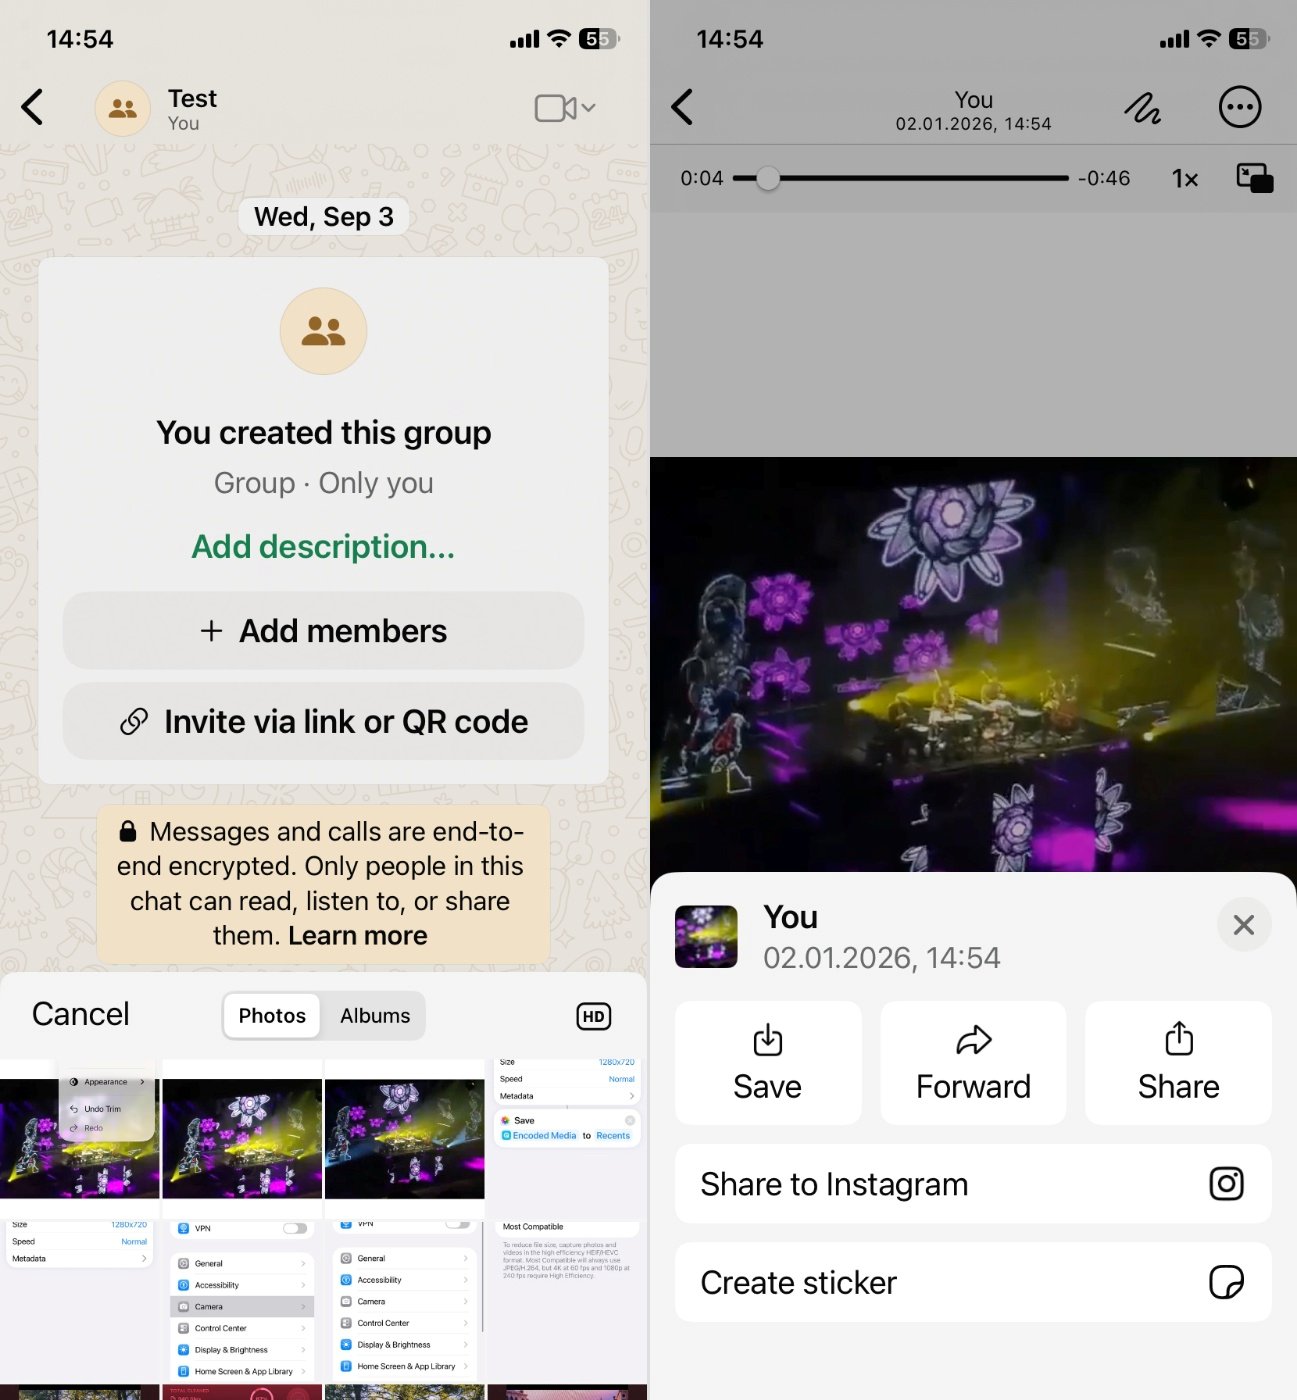
- Open WhatsApp. If you don’t want to bother anyone, create a private group with yourself as the only member.
- Send the video you want to shrink into that chat. WhatsApp automatically compresses it to fit its limit.
- Once it appears, tap the video and Save it to your Camera Roll.
Check the new file size. For example, one Reddit user reported shrinking a 187 MB clip down to 17 MB – might be enough for casual use.
Keep in mind: WhatsApp usually lowers the resolution to 480p/720p and cuts the bitrate aggressively. This is fine for quick clips or posting to Reddit, but not ideal if you need high quality on a large screen.
Extra Tips for Smart Compression (Quality vs. Size)
Quick takeaway: Use 1080p or 720p for sharing and saving space. Save 4K for when it actually matters.
First is resolution. This is one of the easiest ways to shrink a video without making it unwatchable. If the person you’re sending the video to is going to watch it on their phone – or you’re posting it to Instagram or WhatsApp – then 4K is overkill. Even full 1080p might be more than you need.
For most everyday clips, 720p looks totally fine on a phone screen and cuts the file size down by a lot. You’re not going to see the extra detail of 4K on a 6-inch display, and chances are, the app you’re using to share it is going to compress it again anyway.
On the other hand, if you plan to view the video on a larger screen (like a TV or desktop), or you’re uploading it to YouTube in full quality, then yes – higher resolution still makes sense.
Use the HEVC Format (a.k.a. H.265)
Quick takeaway: Enable High Efficiency in your Camera settings going forward, and use HEVC whenever you re-encode.
Next is format. If your iPhone is set to High Efficiency mode, it records using the HEVC (H.265) codec instead of the older H.264. And that’s a good thing. HEVC can cut file size by up to 50% without changing how the video looks.
You can check this here:
Settings > Camera > Formats > High Efficiency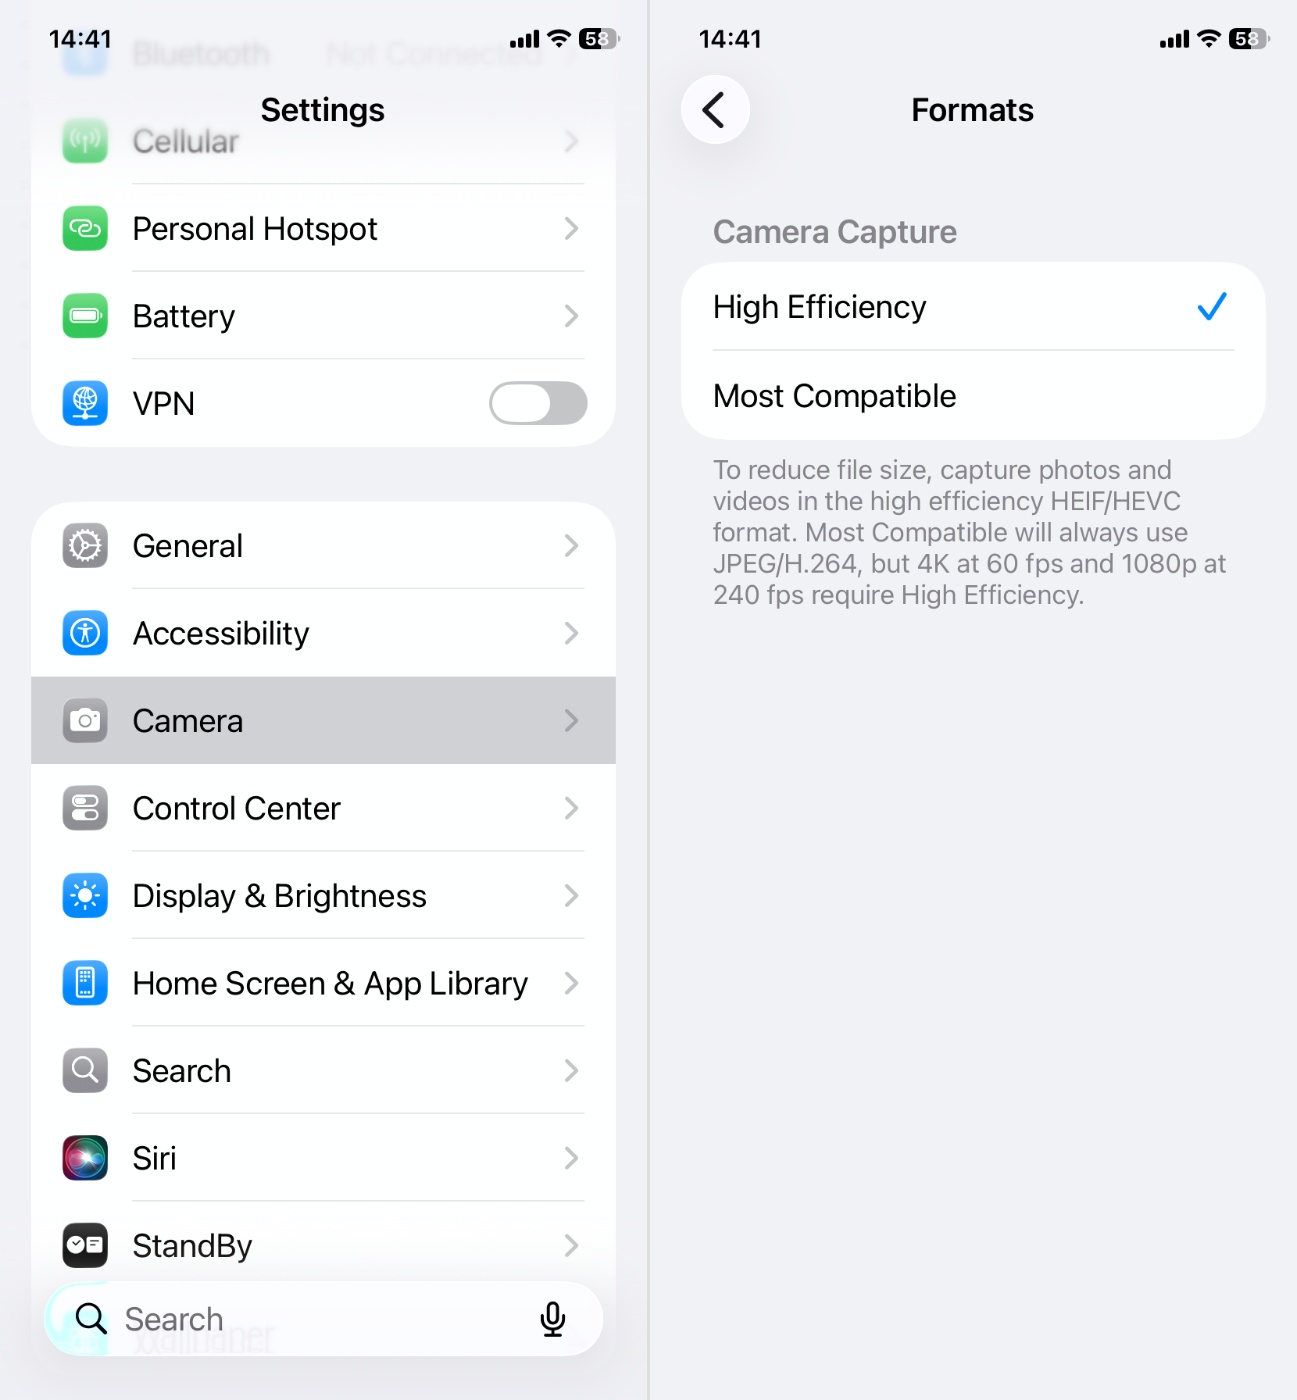
If it’s set to “Most Compatible,” your phone is using H.264, which takes up more space. The nice thing is, many compression tools can convert your older H.264 clips into HEVC as part of the compression process. Even if you keep the resolution the same, just switching to HEVC can drop the file size significantly.
Most modern devices can play HEVC with no problem. If you’re sending video to someone with a very old phone or PC, they may need to install a codec to view it, but that’s rare now.
Lower the Frame Rate (If You Don’t Need It)
Quick takeaway: Lowering frame rate is one of the most effective ways to shrink a video without hurting visual quality too much. Stick with 30fps unless you need something more specialized.
Frame rate refers to how many images your iPhone captures per second when recording video. A lot of iPhones default to 60 frames per second (fps), which looks smooth, but it also creates much larger files.
Unless you’re filming fast action or slow-motion clips, 30fps or 24fps is usually enough. You’ll barely notice the difference in everyday footage, especially when watching on a phone screen. And dropping the frame rate can easily cut your file size in half.
Most compression apps let you change frame rate during export. Some show it directly as a number, while others fold it into a general “quality” setting. If you have the option, go for 30fps when you don’t need the extra frames.
Just don’t go below 24fps. That’s where things start looking choppy (even if the resolution is high).
Adjust Bitrate or Quality Setting (When Available)
Quick takeaway: Medium quality works for most situations. When possible, aim for the lowest bitrate that still looks clean during playback.
Bitrate is one of the biggest factors that determines how large a video file will be. It controls how much data is used to store each second of footage. Higher bitrate means sharper detail – but also a much bigger file.
Lower it too much, and you start to see blocky textures, blur, or color smearing.
Most video compression apps don’t show the actual bitrate in numbers. Instead, they use sliders labeled Low, Medium, or High.
If your app does offer manual control, here’s a rough guide:
- For 1080p, a bitrate around 4-6 Mbps looks good for most content.
- For 720p, 2-3 Mbps usually works well.
- Avoid going below 1.5 Mbps unless you’re okay with visibly lower quality.
The key is to not overdo it. Try compressing a short clip first and preview the result. If the quality holds up and you’re happy with the size, apply the same settings to the rest.
Be Aware of Metadata Loss
Quick takeaway: Always assume metadata will be altered or lost during compression, and take action if it’s important to your workflow.
When you compress a video – especially using third-party apps or online tools – there’s a high chance the metadata will be stripped or changed. That includes:
- Creation date (it may now show today’s date)
- Original location (geotags might be wiped)
- Camera model and settings
- EXIF and file history
This might not sound like a big deal, but if you rely on date-based sorting (like in the Photos app or Google Photos), it can get confusing. Some people have noticed that after compressing their videos, the creation date gets replaced with the current date, not the original time the video was shot. This can mess with how your media is sorted.
Also, losing location data might matter if you’re organizing memories by trip or need geotags for social uploads. Most compression tools don’t give you an option to preserve this info unless explicitly stated.
After compression, you can manually adjust the date in the Photos app:
- Open the video in Photos
- Tap the three-dot menu
- Choose Adjust Date & Time
- Set it back to the original shooting time
For geolocation, unless you’re using a tool that retains metadata, there’s no easy fix.
Final Thoughts
The methods and tools we covered above should give you everything you need to shrink video files on your iPhone without wrecking the quality.
But fair warning: don’t be too quick to delete the original video after compression. Make absolutely sure the smaller version still looks and sounds good, and that it works where you plan to use it. While there are ways to recover deleted videos on iPhone, the process can be hit-or-miss, with a lot of variables. So it’s much safer to keep the original around until you’re 100% confident the compressed copy holds up.
We hope the tips and tricks in this guide were helpful. If you still have questions, scroll down to check the FAQ section below. And if you’re dealing with a weird case, consider posting in our community forum – chances are someone else has run into the same issue and already found a workaround.
And if not, start a new discussion – we’ll be glad to help however we can.
FAQ
Is it possible to make a video file smaller on iPhone without losing any quality?
In most cases, no, at least not entirely.
To make a video file smaller on iPhone, something usually has to give – either the resolution, bitrate, frame rate. All of these impact the quality in one way or another. That said, some compression tools are smart about how they reduce file size and can shrink videos with minimal visible loss, especially for casual use or social media.
However, there are situations where you might:
- Trim the video (shorten the duration) without touching visual quality.
- Convert to a more efficient codec like HEVC (H.265), which offers smaller files at similar quality compared to H.264.
So while true lossless compression is rare for videos, you can often get the file much smaller with almost no noticeable difference to the average viewer (especially on small screens).
Does compressing a video always remove metadata on iPhone?
Not always, no. It depends on the tool you’re using.
Some iPhone apps and online compressors strip out metadata by default – things like the original date, location, or camera info. That’s because most tools re-encode the video into a new file, and unless the app specifically preserves metadata, those details are lost in the process.
However, some apps do retain metadata, especially if they’re designed with that in mind. In iOS, it’s also possible to manually edit and restore the date and time inside the Photos app (use “Adjust Date & Time” under the three-dot menu).
Can I compress a video on iPhone right after recording automatically?
Not fully automatically, but you can get close.
The iPhone doesn’t currently offer a built-in setting to auto-compress videos after recording, but there are a couple of workarounds:
- Use High Efficiency format (HEVC/H.265). Go to Settings > Camera > Formats and select High Efficiency. This makes sure all your future recordings will use the more compact HEVC codec, which saves space without a noticeable quality drop.
- You can create or download an iOS Shortcut that compresses the latest recorded video with a single tap. Some Shortcuts even allow you to reduce resolution or trim length right away.
- Use apps with automation features. A few video compression apps let you compress multiple videos quickly or even batch compress entire albums, which saves time (though not truly “automatic”).
What’s the best video format to export in?
For iPhone and most modern devices, the best format to export in is MP4 (H.264 or H.265 codec).
Here’s why:
- MP4 (H.264) is the most widely supported video format across platforms, apps, and devices. It balances good quality and file size – ideal for sharing or uploading online.
- MP4 (H.265 / HEVC) offers better compression than H.264 – up to 50% smaller files for the same quality. It’s especially useful if you’re short on storage, but make sure your recipient’s device can play HEVC (many phones and computers can).
Can I zip a video on iPhone just like on my computer?
You can’t directly archive or compress a video file from the Photos app itself. You can’t just tap a video in Photos and create a ZIP file like you would on a computer.
To compress or archive a video on iPhone, you first need to:
- Export or share the video to the Files app (tap Share > Save to Files).
- Then open the Files app, locate the video, and tap Compress.
It’s a bit of a workaround, and not exactly seamless. It’s not something we’d recommend as your go-to solution for shrinking video size. You’re better off using one of the compression methods we covered above.
This article was written by Roman Demian, a Content Editor and QA Specialist at Handy Recovery Advisor.
Curious about our content creation process? Take a look at our Editor Guidelines.