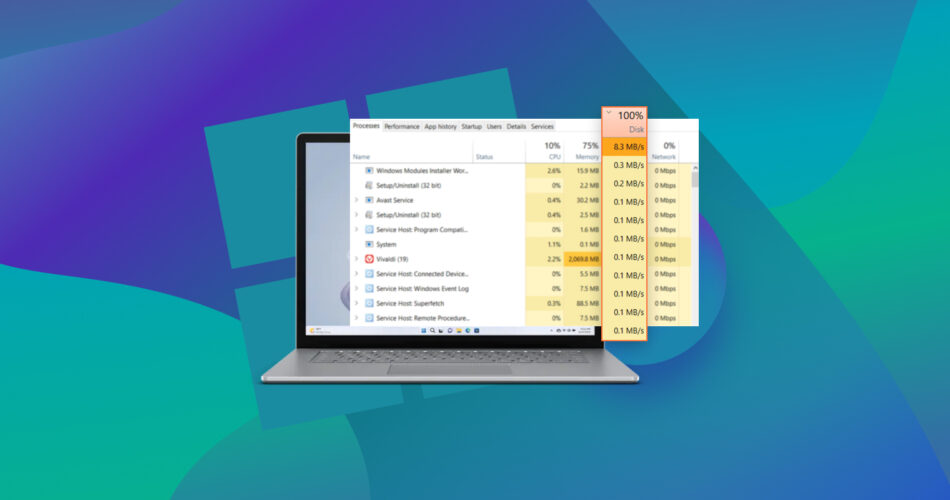
Your OS is stuttering, and your PC is practically crawling. Your apps are starting to misbehave or outright fail. All because your storage is in overdrive with a reported 100% disk usage.
How can something like that happen? And more importantly, what are the potential causes, and how can you eliminate such issues? Read on to find out.
Why Is My Disk Always at 100% Of Usage?
When you find your HDD usage is at 100%, there are only two potential culprits: software or hardware issues.
Software issues are a favorable scenario. Although they can lead to 100% disk usage on Windows 10, they are usually easily solvable. In the case of software, you might have a backup solution or a torrent client running in the background.
Unfortunately, that is not always the case when talking about hardware issues. More often than not, those are signs of a problematic hard drive that you will probably have to replace soon.
Microsoft’s latest version of Windows is almost identical to Windows 10. Most (if not all) solutions we will see should also work for dealing with 100% disk usage on Windows 11.
Methods to Fix 100% Disk Usage on Windows 10
The following methods can help to decrease disk usage when you see your disk at 100% on the latest versions of Windows.
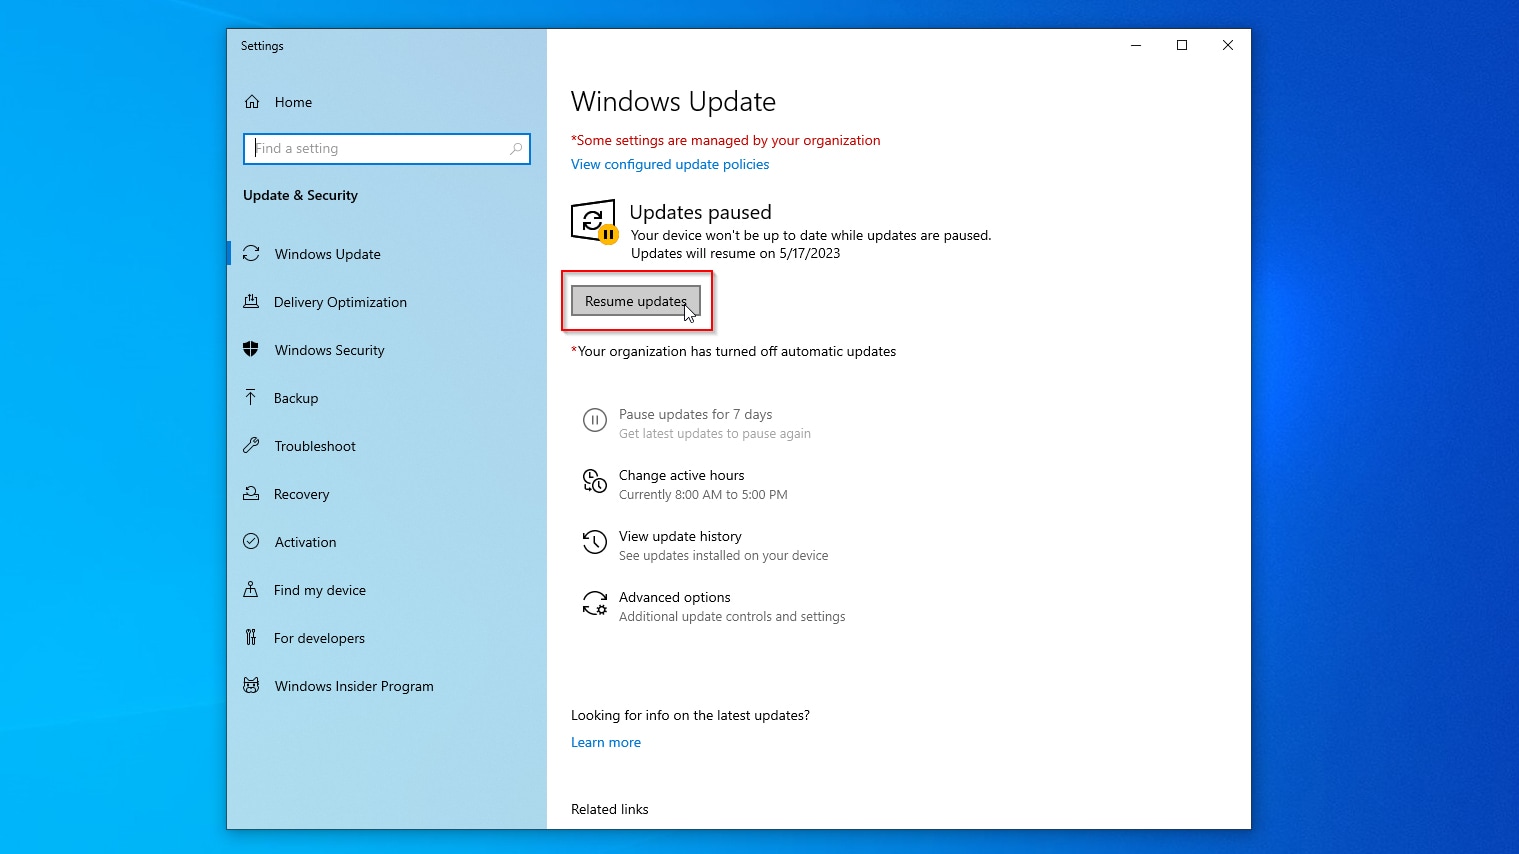
Method 1: Check and Install Windows Updates
The Windows Update process can still be a hog despite Microsoft’s constant optimizations. And yet, a simple trick can reduce their impact: if you download all available updates manually, Windows Update will not have anything to do anymore, pushing your disk at 100%.
To manually download and install Windows Updates:
- Use the Start menu or Search to seek “updates”, locate, and launch the Check for updates entry.
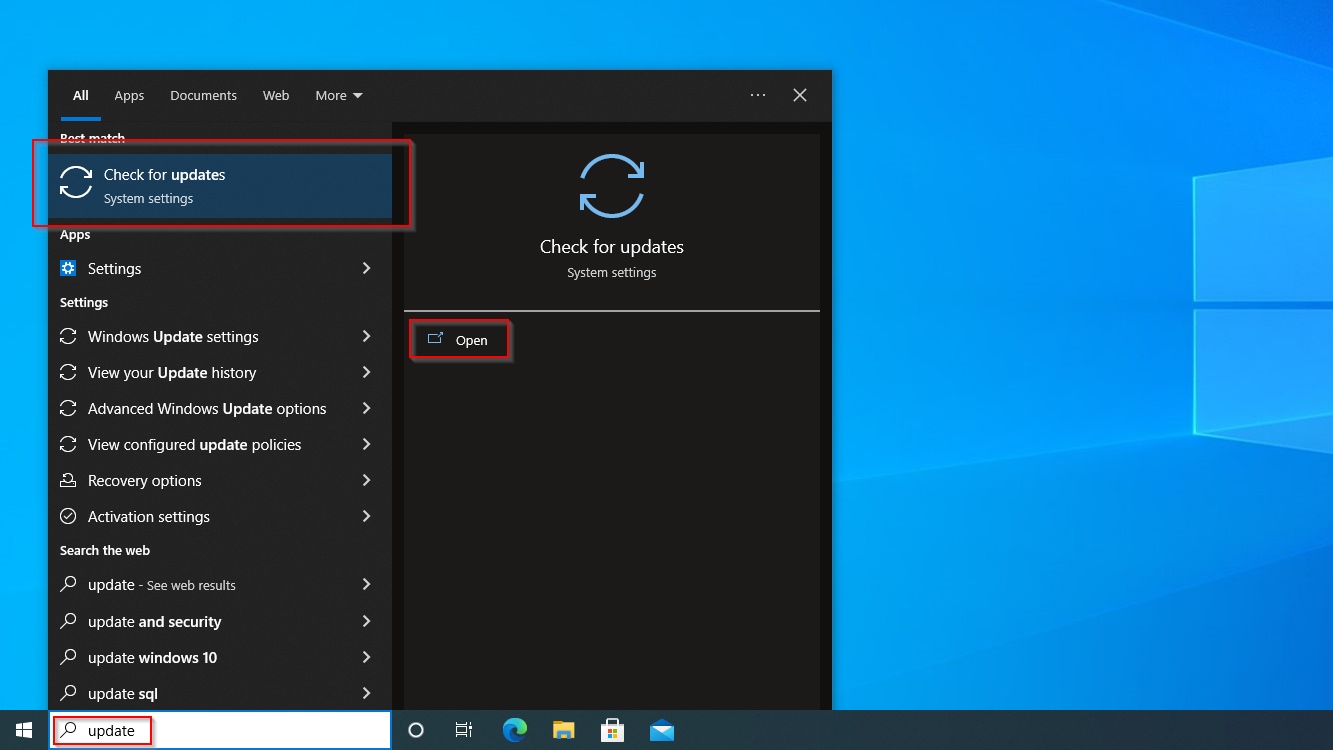
- If Windows Update reports that Updates (are) paused, click the Resume updates button to re-enable them. If it is not, but is idle when you visit it, click on Check for updates to kickstart the process manually. If new updates are available, listed, but not downloaded and installed, click on their individual Download & install button to do what it states.
Method 2: Disable Unnecessary Background Apps to Reduce Disk Usage
There are limits to what our hardware can pull off, and one app eating 100 percent of your hard drive’s bandwidth can make your other software crawl.
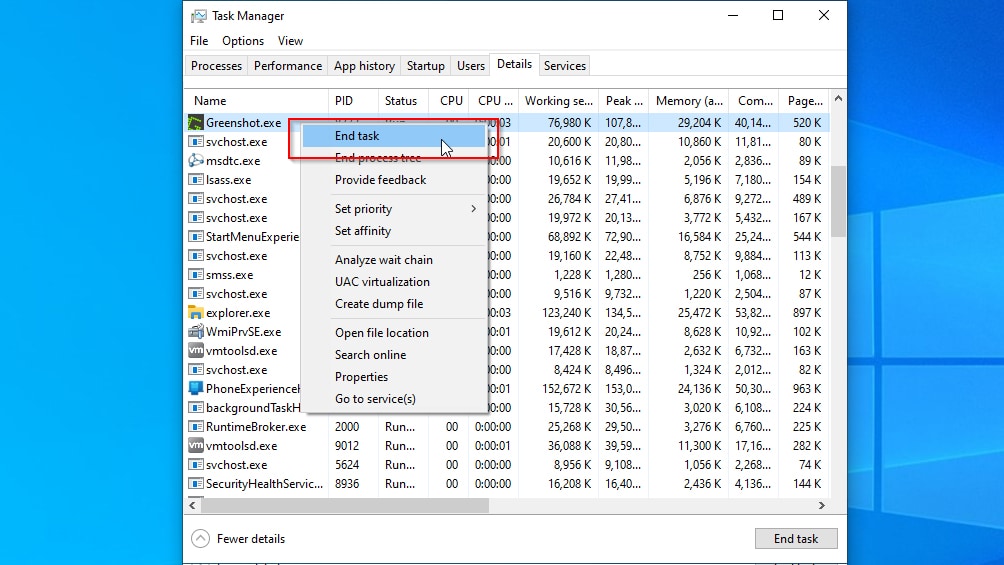
To find what has your disk running at 100% of its capabilities and stop it using the Task Manager:
- Press CTRL + Shift + Esc to launch the Task Manager. Move to the Details tab.
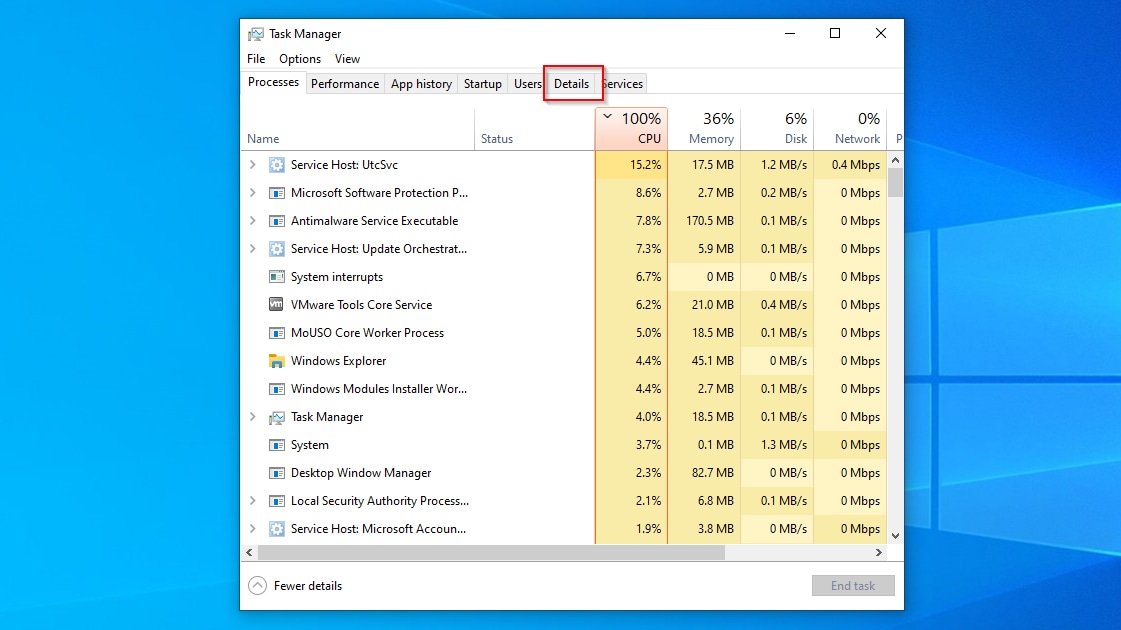
- Find the process that pushes your disk at 100% in Task Manager’s Details tab. If you cannot locate it, right-click on one of the column titles, and choose Select columns to control the details visible in Task Manager’s window. Find and add to the Task Manager’s window columns related to disk usage, like I/O reads and writes.
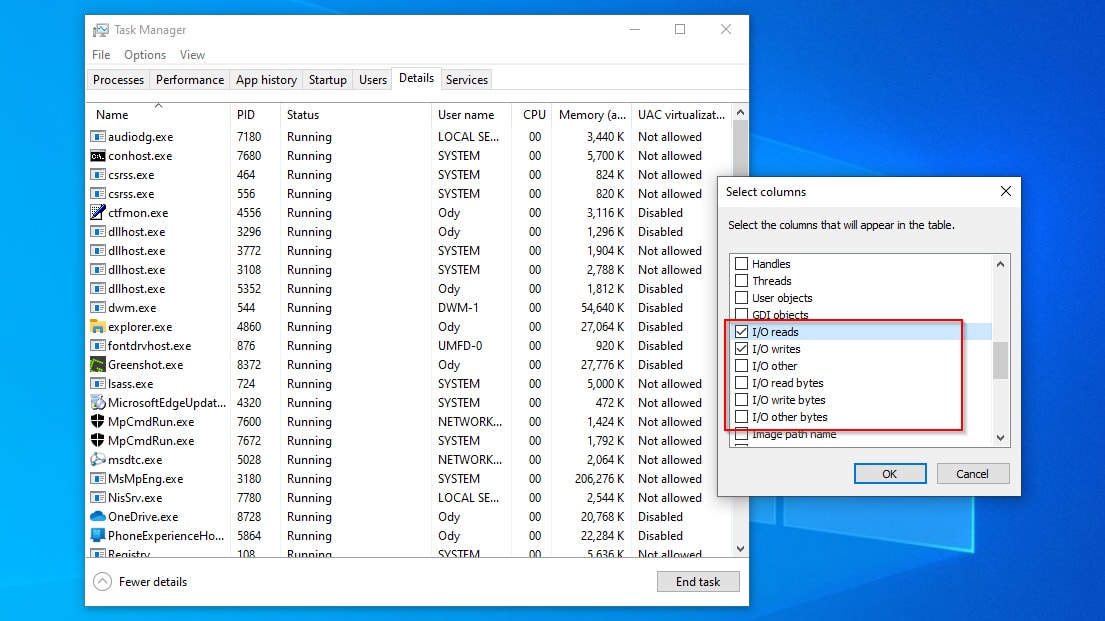
- Click on the newly-added columns to sort all entries according to how much data they read or write. Right-click on the offending process (it should be near the top), and choose End task to terminate it.
Method 3: Run Antivirus Software to Scan for Malware and Viruses
A virus or malware that manages to creep inside your PC can make its disks run at 100% while accessing your data.
Thankfully, if you are using one of the latest versions of Windows, you already have access to the built-in, zero-cost, and easy-to-use Windows Defender antivirus.
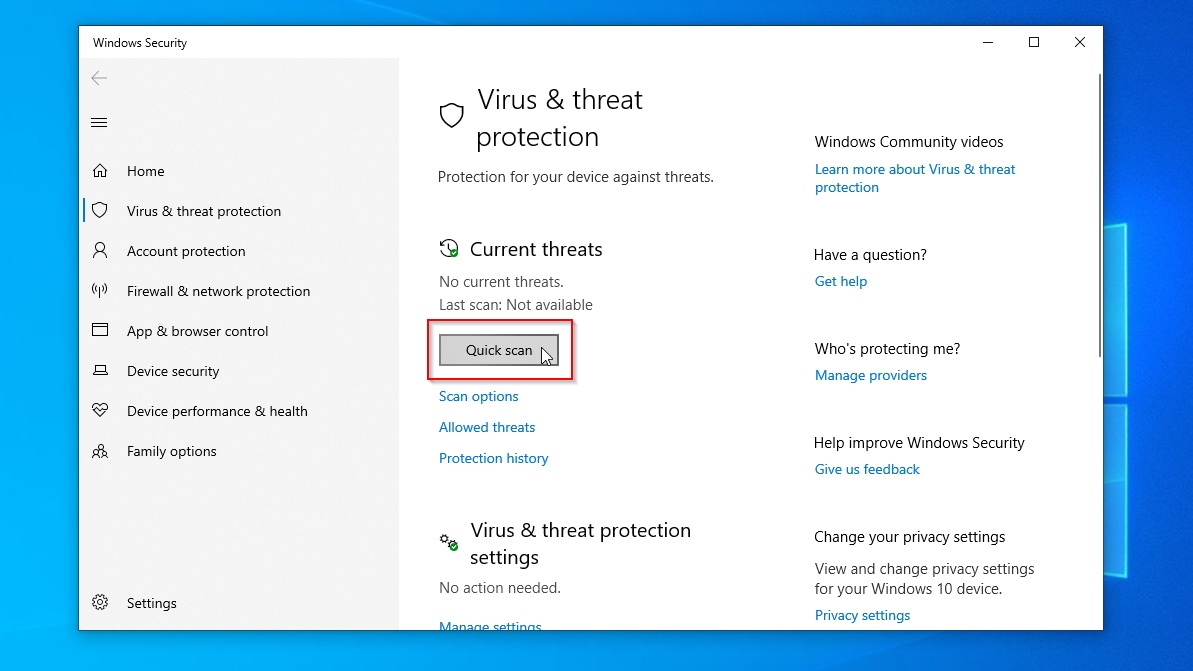
To scan your PC for malware and viruses with Windows Defender:
- Use the Start menu or Search to seek “virus” or “threat”. When you find the Virus & threat protection entry, open it.

- Click on Quick scan for a “light” PC check-up. This is usually enough to locate and deal with potentially malicious files and processes that may have found their way into your PC.
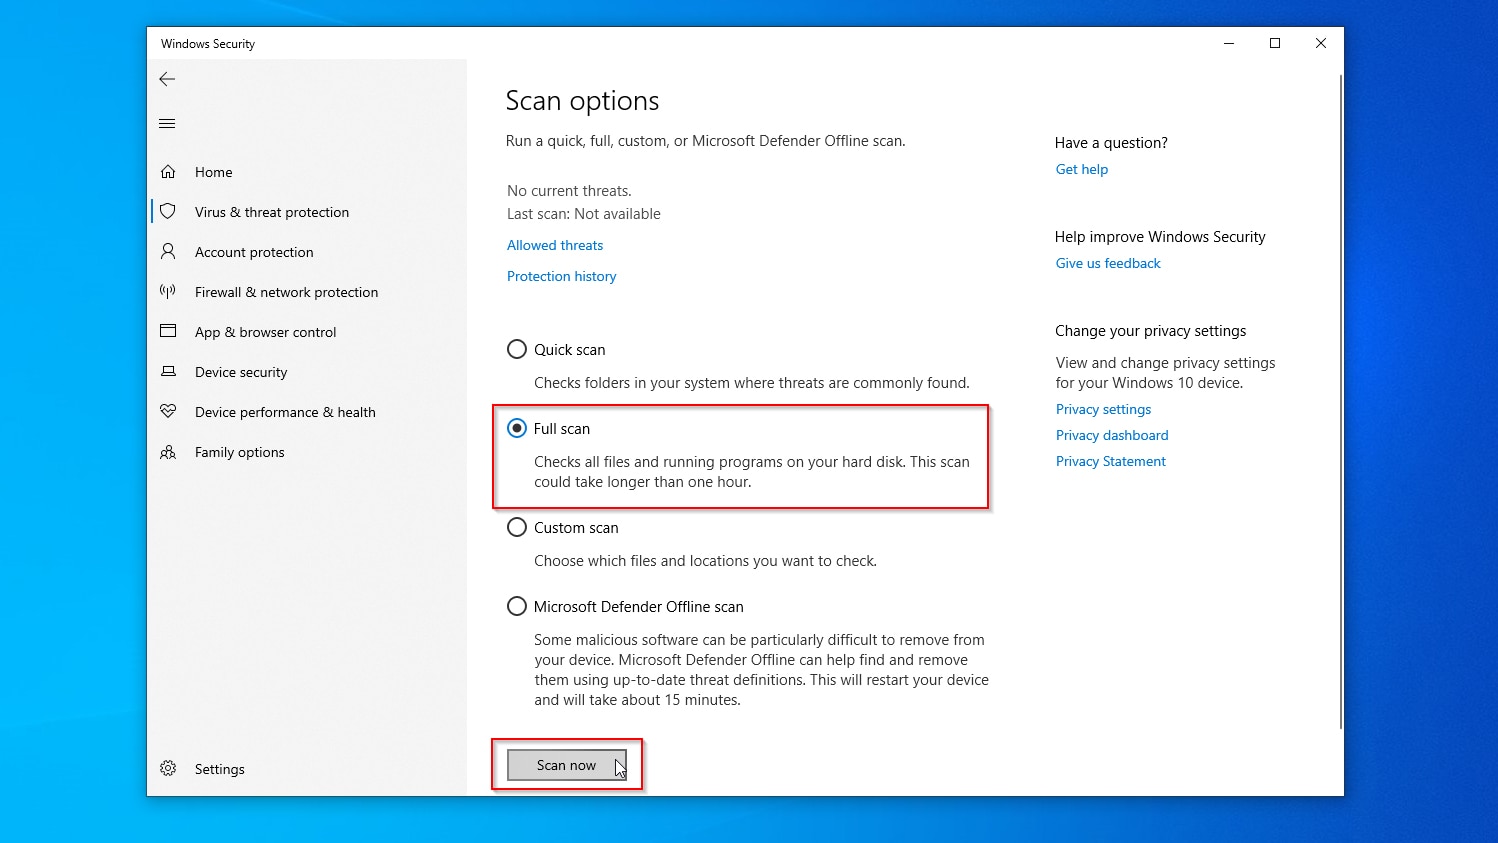
- If the problem persists afterward, and you still see your disk at 100% in Task Manager, return to this window, but this time click on the Scan options link under the Quick scan button. Go for the Full scan or, even better, if you can afford the time (and restarts), the Microsoft Defender Offline scan option.
Method 4: Clean Your Startup List to Reduce Disk Usage at Boot
If you see 100% disk usage from the moment you enter your desktop, the cause might be an auto-launching app.
To stop startup apps using the Task Manager:
- Press CTRL + Shift + Esc to launch the Task Manager, or right-click on your taskbar and “launch it” from there.

- Move to the Task Manager’s Startup tab.
- Select the offending app pushing your disks at 100% utilization, and click Disable.
Method 5: Disable Superfetch Service
Since Windows Vista, Superfetch works in the background, checking which apps we use the most. It can then guess when we will need them again to “preload” their files for a zippier startup.
However, in some cases, Superfetch can consume resources for nothing, preload the wrong files, and waste memory while keeping the hard drives spinning.
To disable Superfetch on Windows 10:
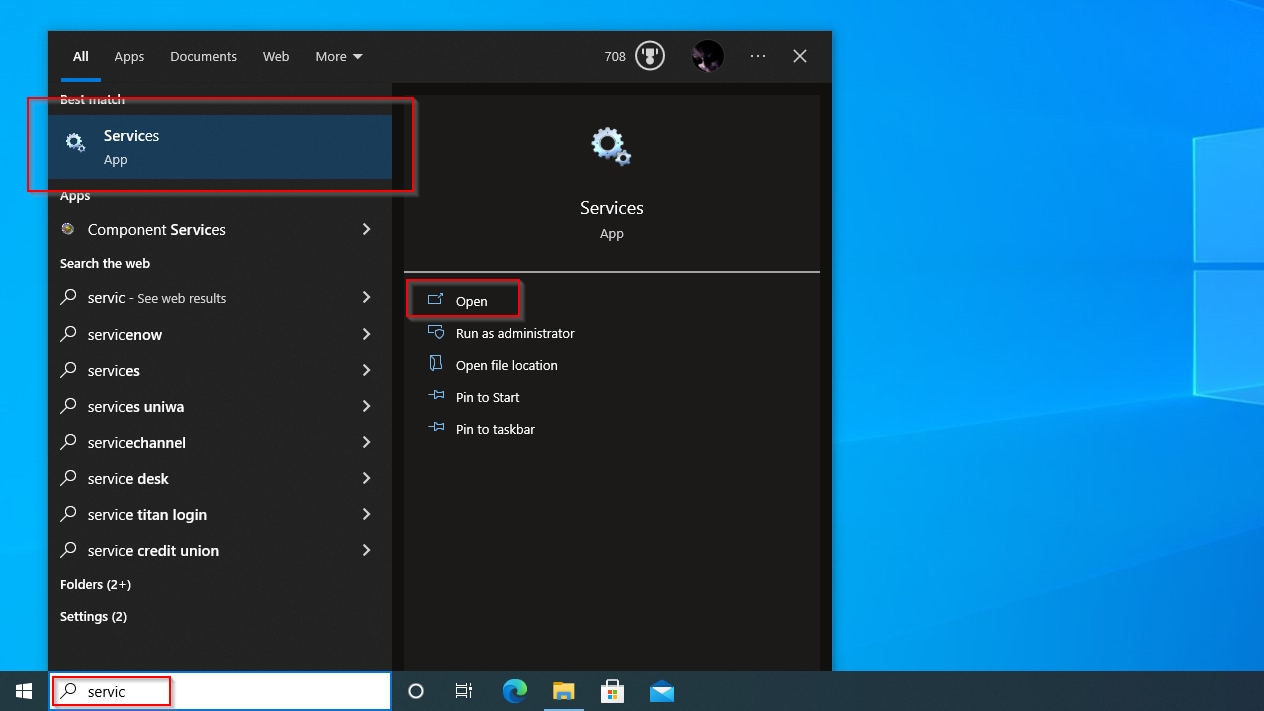
- Press Windows Key + R and type “services.msc” to launch the Services app.
- Locate the SysMain entry in the Services (Local) list. Right-click on it and choose Stop to terminate it.

- To make the change permanent, double-click on the SysMain service or right-click on it and select Properties. Use the pull-down menu to change its Startup type to Disabled. Click OK to save the changes and exit.
Method 6: Check Your Synchronization Settings
When troubleshooting why your system is using 100% of the disk continuously, it’s worth temporarily terminating all your cloud storage clients, like Dropbox, Mega.nz, Google Drive, or OneDrive.
For example, to disable OneDrive on Windows 10:
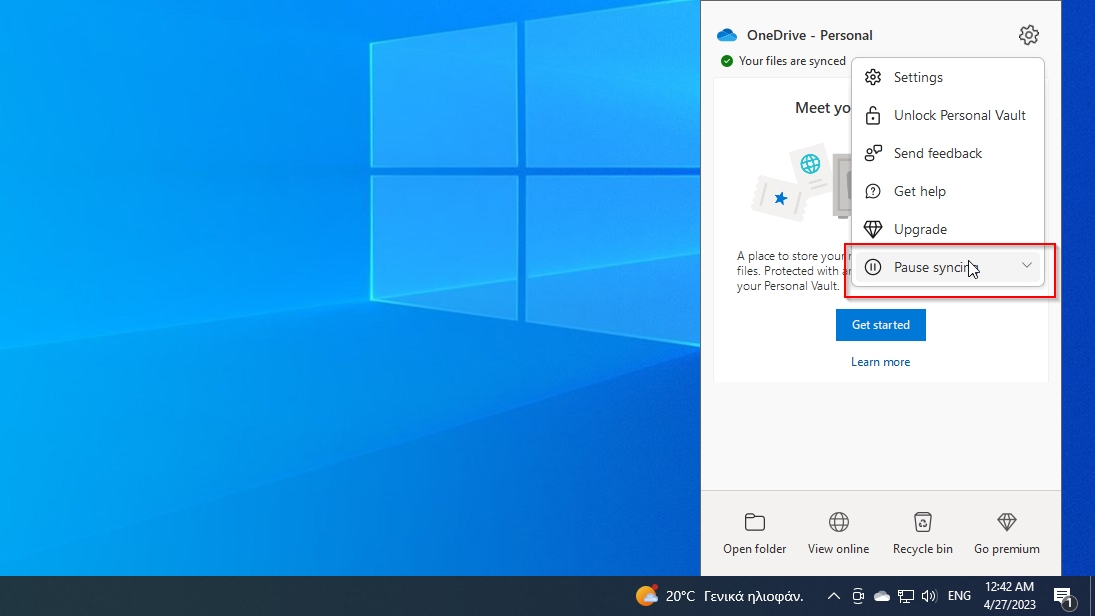
- Find OneDrive’s icon on the system tray. Click on it to access its pop-up menu, and then on the button with the cog icon on its top right.
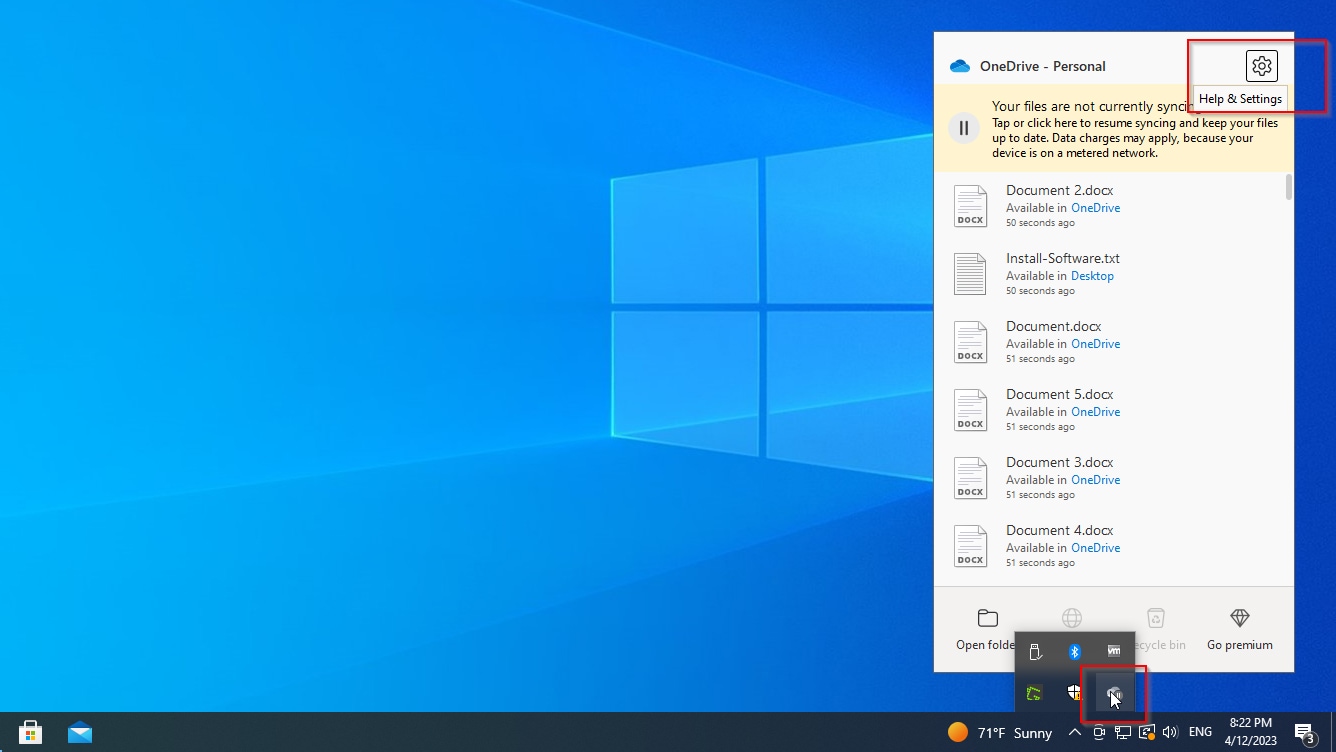
- Select Pause syncing to temporarily stop any transfers of files between your PC and your cloud storage.
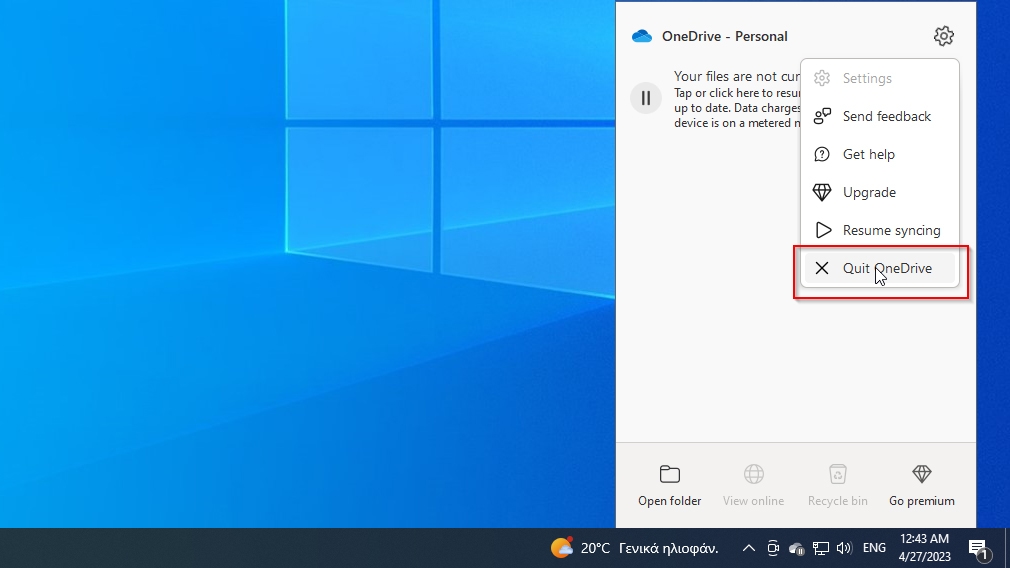
- If after that tweak, your HDD usage is still 100%, and you are sure the offender is OneDrive, you can choose Quit OneDrive from the same menu to fully close the app and terminate all syncing.
Method 7: Manage Windows Search
Windows Search functionality is quite helpful in locating files, except when it fails. Then, the indexer service it relies on may keep fruitlessly scanning your hard drives in the background.
To ensure those are the culprits for your disks running at 100% all the time:
- Press Windows Key + R and type “services.msc” to run the Services app.
- Find the Windows Search service on the Services (Local) list.
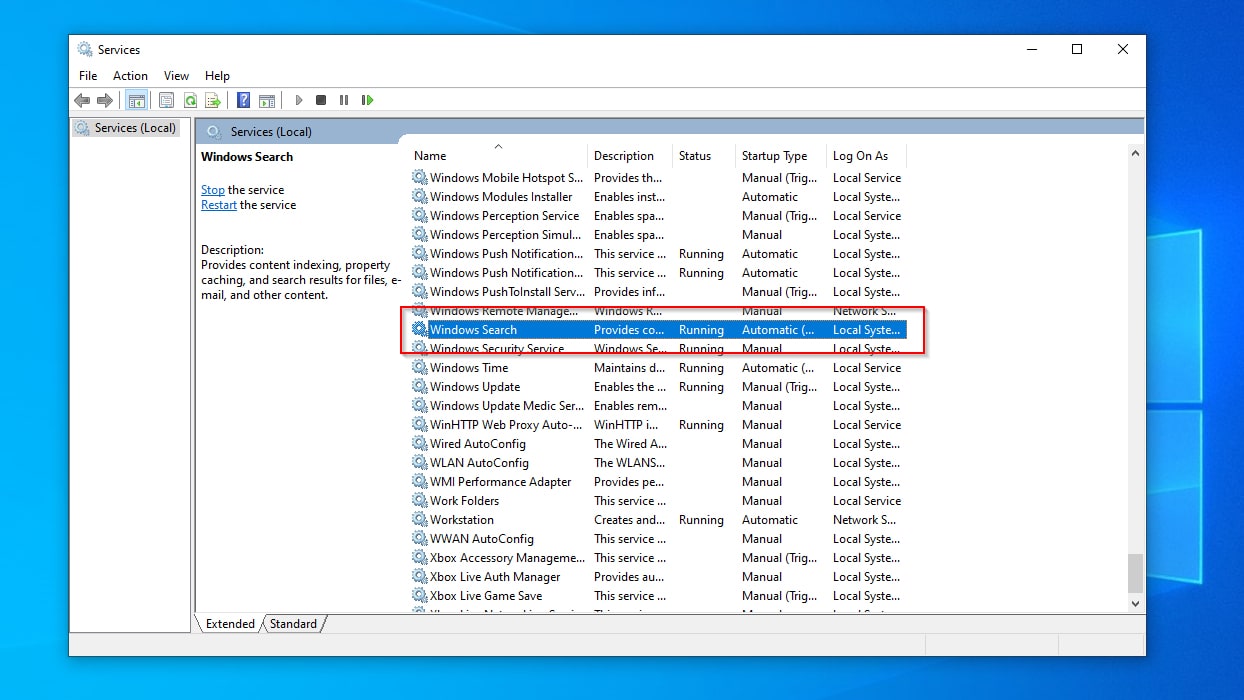
- Double-click on the service, or right-click on it and choose Properties. Click on Stop to terminate it for the duration of the active session. Press OK to close the window and then close the Services app.

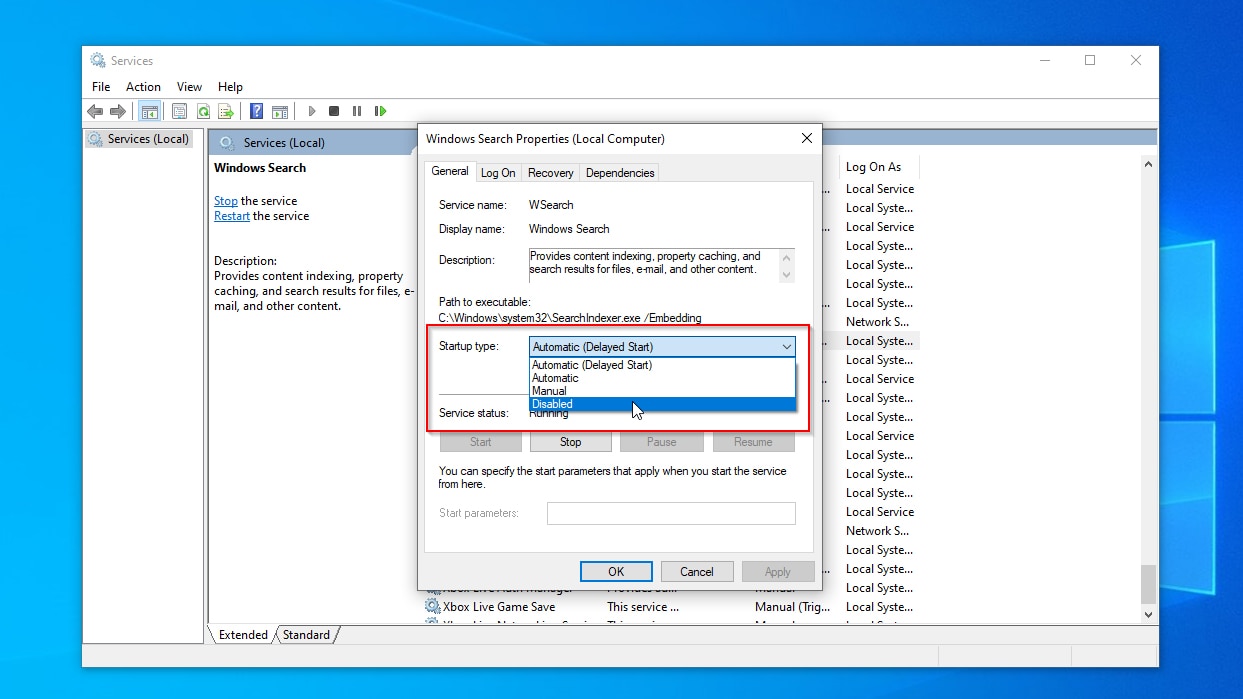
If you find this tweak solved the issue for you and decreased disk usage to realistic levels, you can keep the service disabled.
To fully disable the service, repeat the steps we saw, but also:
- Use the pull-down menu next to Startup-type and select Disabled to turn off automatic startup of the Windows Search service. Save the changes with a click on OK and close Services.
Another option is to rebuild the index on which the Search service relies and then re-enable it.
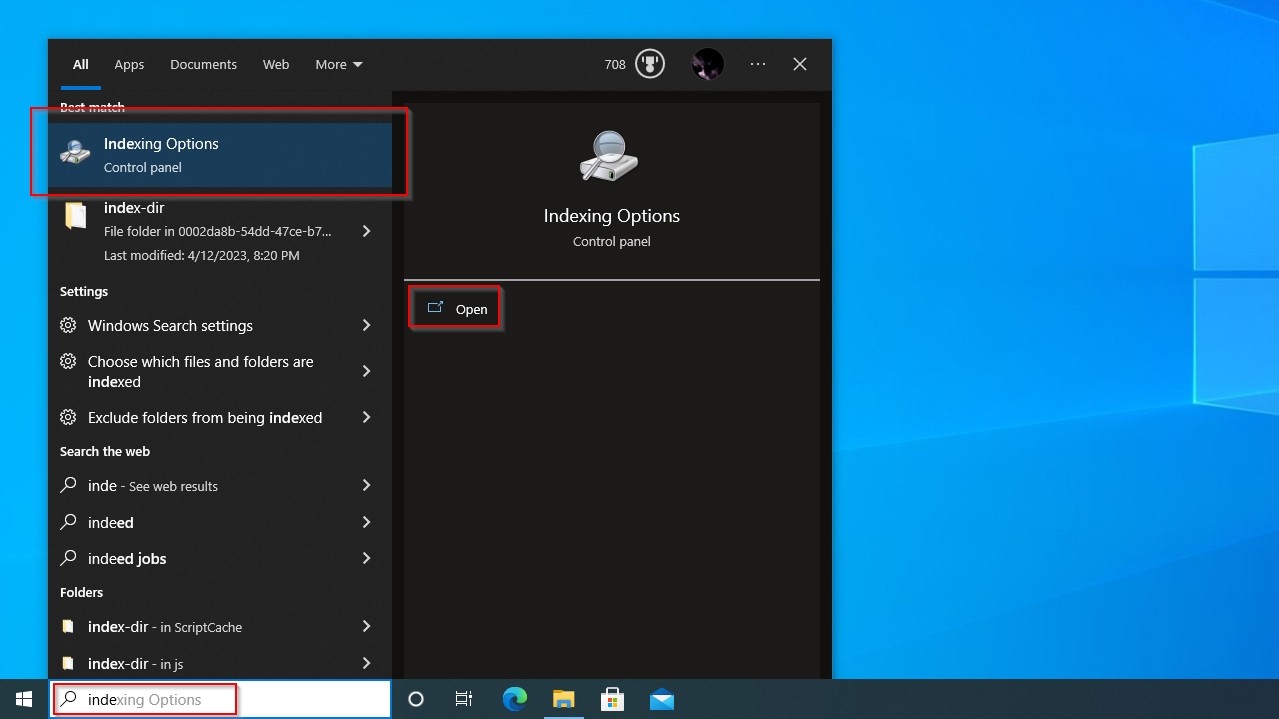
To rebuild the search index:
- Use the Start menu or Search to find and open Indexing Options.
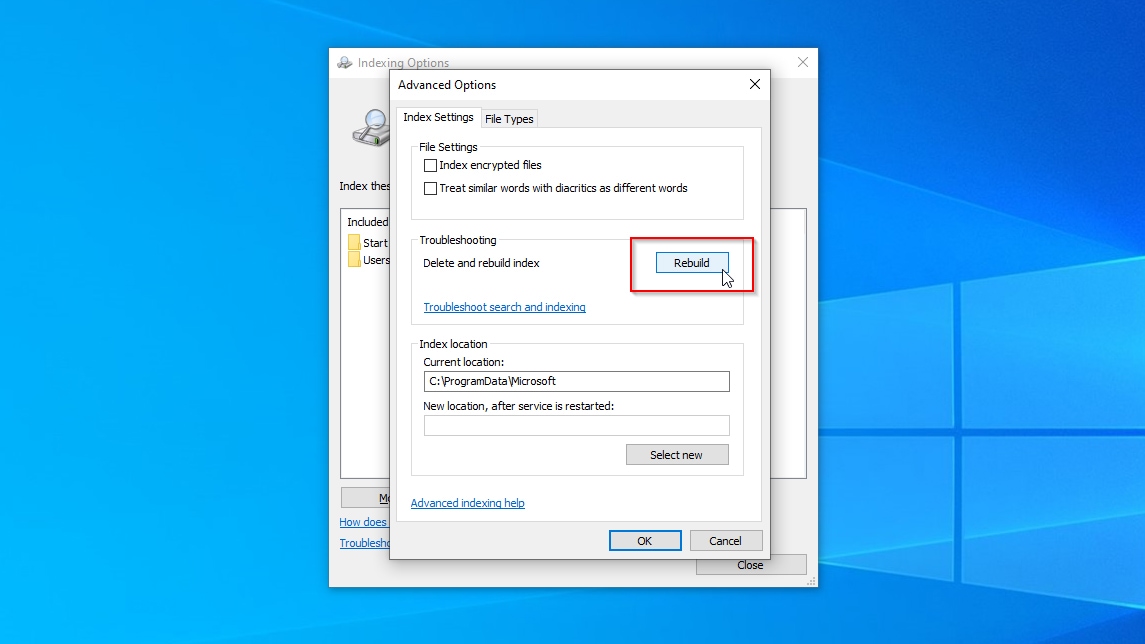
- When the Indexing Options window shows up, click on Advanced.

- On the Index Settings tab of the Advanced Options window, notice the Troubleshooting section. Click on the Rebuild button on its right.
Method 8: Check the Hard Drive’s Health
A failing hard drive, repeatedly trying to access bad blocks, or running self-tests may be why you see 100% disk usage on your PC.
You can check if that is the case with a tool that can present your hard drive’s Self-Monitoring, Analysis, and Reporting Technology (SMART) status. One of the most thorough and feature-rich is Hard Disk Sentinel.
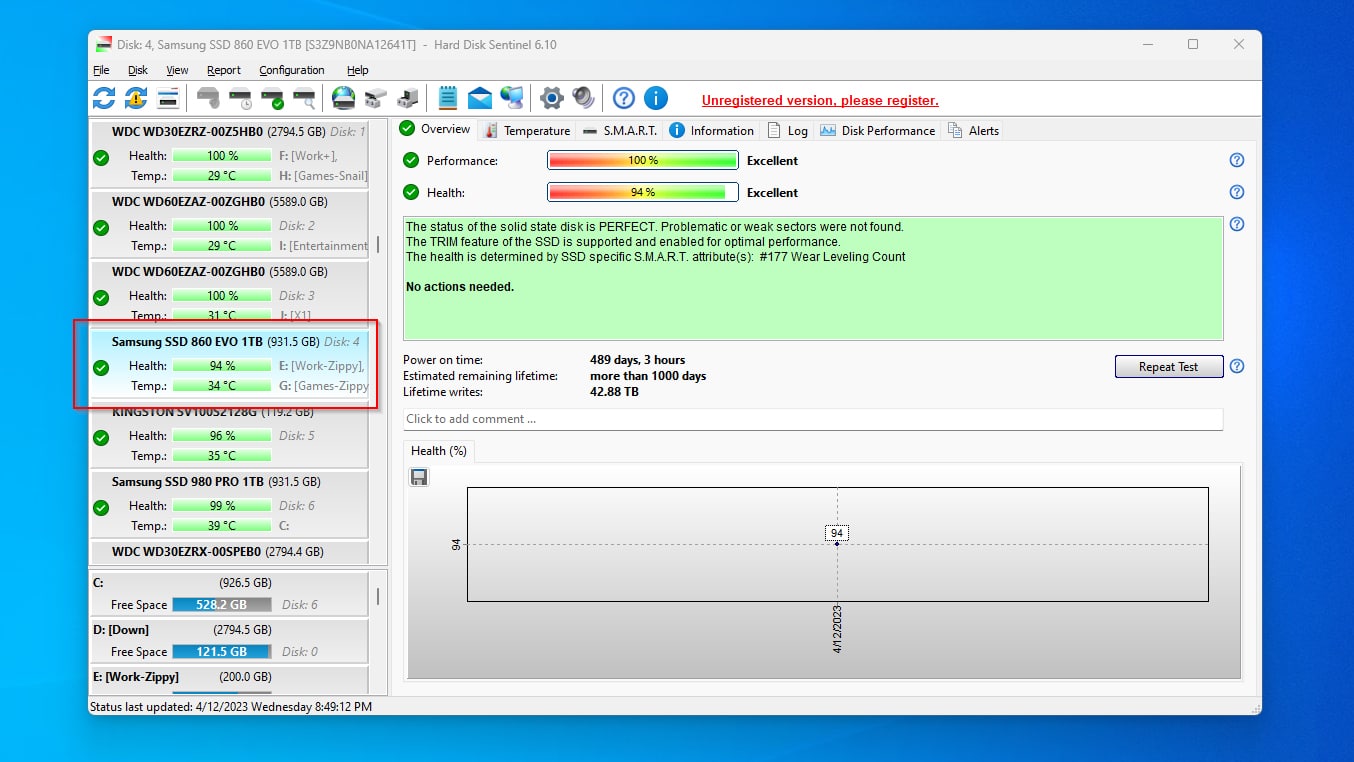
To check if the health of your disk is at 100% with Hard Disk Sentinel:
- Download the app from Hard Disk Sentinel’s official site, and install it.
- Run Hard Disk Sentinel and select the hard drive you want to check from the list on the left. Hard Disk Sentinel will show a report of its status on the Overview tab that covers the larger part on the right of its window.
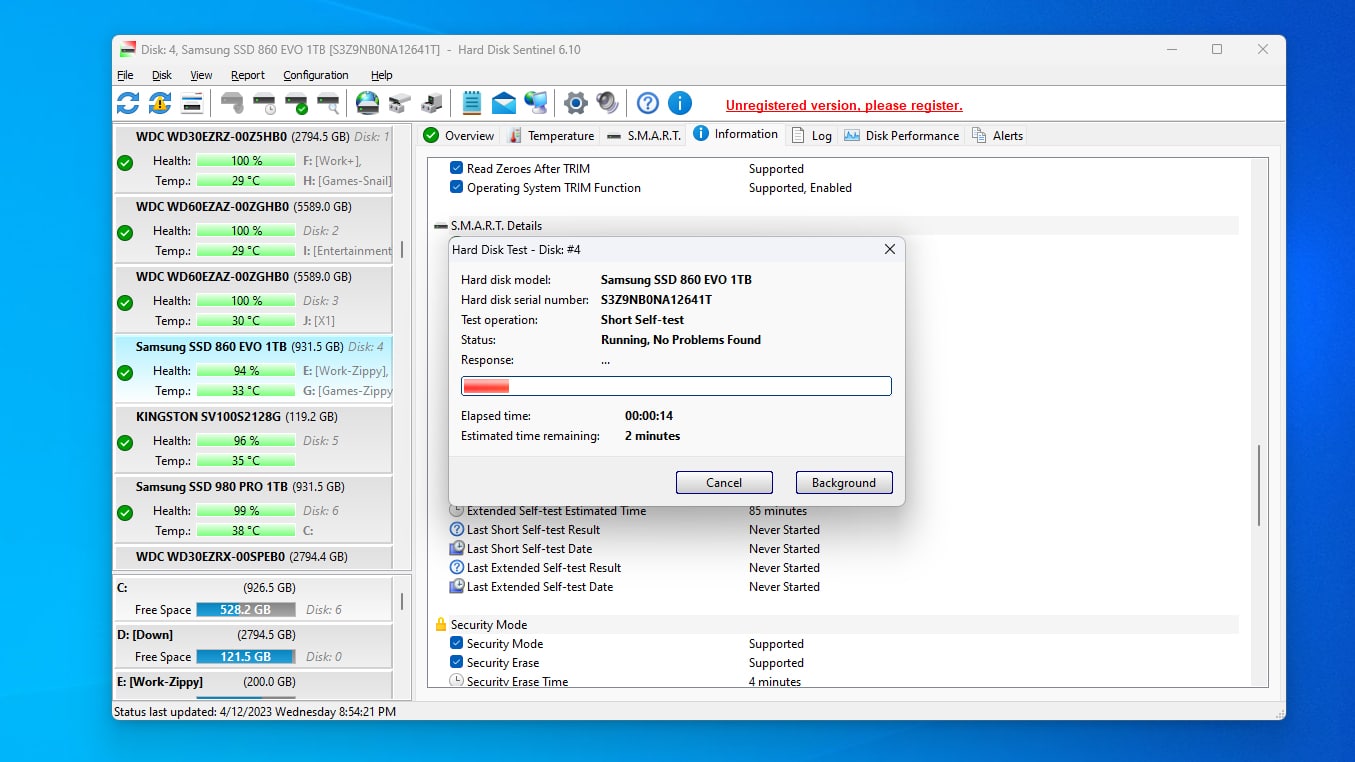
- To ensure there’s no problem with the particular disk, move to the Information tab while it’s still selected. Scroll down, and you’ll find the options to initialize one of the self-tests your disk supports.
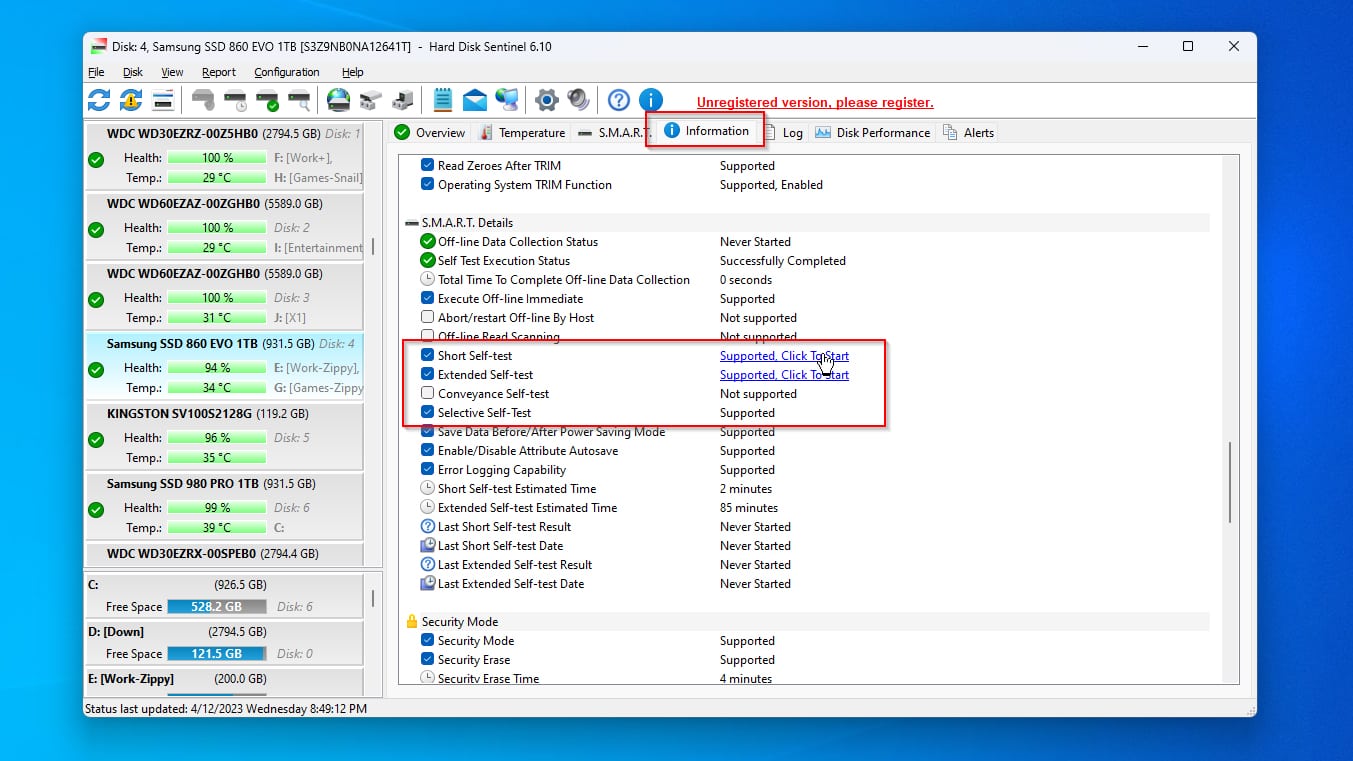
- Try all tests, in sequence of the time required for their completion: first, the Short Self-test, then the Conveyance Self-test, and finally, the Extended Self-test. Note that the last option can take days on large, old, slow, and failing hard drives.
This is only one of the ways you can check the condition of your hard drives. For more, check our more extensive guide on how to check hard drive health on a Windows PC.
Method 9: Fix Hard Drive Issues to Reduce Disk Usage
When dealing with bad sectors, it might seem a disk is running at 100% while analyzing them, marking them as problematic, and reallocating data.
By manually scanning your entire drive for such problems and addressing them, you will reduce drive utilization and be able to use your PC smoothly.
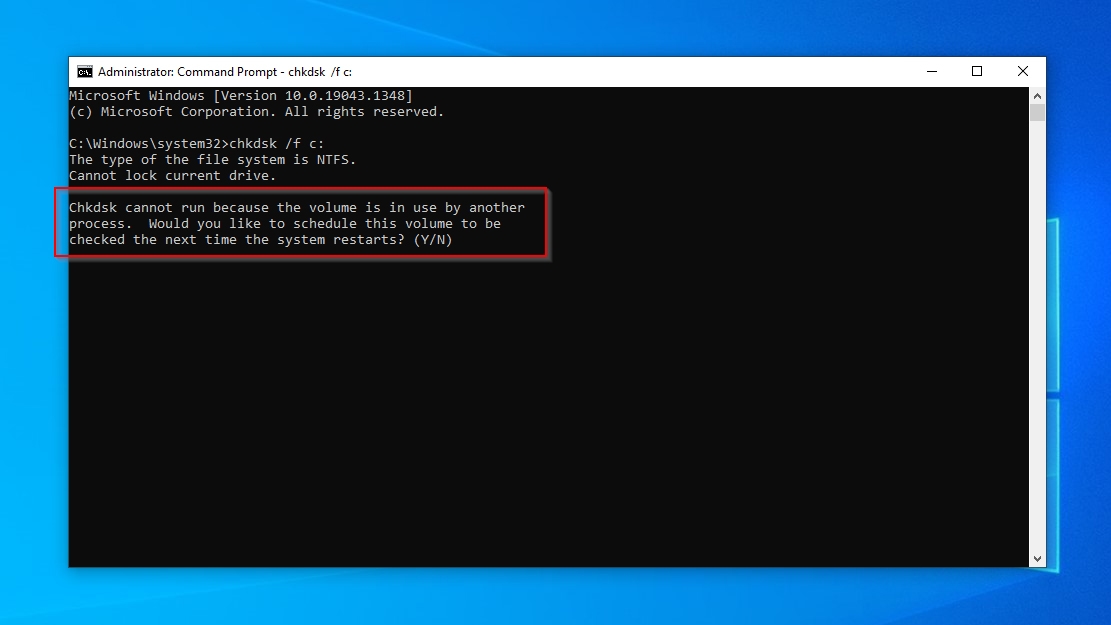
To deal with 100% disk usage by scanning the drive for errors and fixing them with CHKDSK:
- Seek CMD or PowerShell using the Start menu or Search. Choose that you want to Run as administrator.

- To check the file system on disk that’s usually at 100% for errors, use CHKDSK /f DRIVE_LETTER:, where DRIVE_LETTER the one of the drive you want to scan. For example, to scan the system drive, which is usually mapped to the letter C, use CHKDSK /f c:.

- If other processes use the drive, CHKDSK will not be able to scan it and will ask if you would like to schedule the scan for the next reboot.
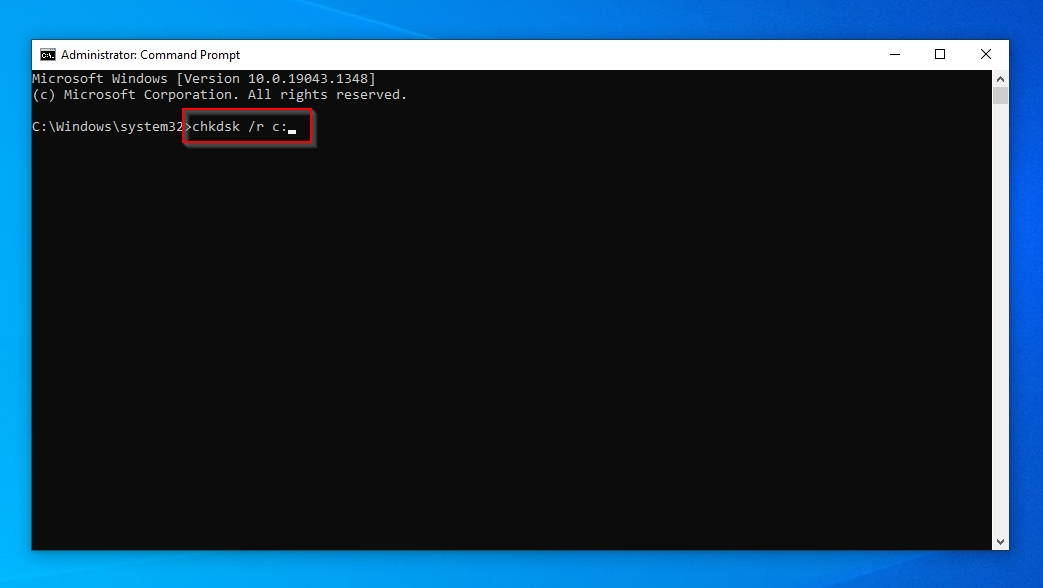
- To scan 100 percent of the disk’s storage area, check for bad sectors, try to recover data from them, and mark them as unusable in one go, use CHKDSK /r DRIVE_LETTER:.
If soon after dealing with bad sectors, the problem reappears, also check the solutions we saw in our guide on how to fix a corrupted hard drive on Windows 10/11. If bad sectors keep popping up, immediately stop using your hard drive. Copy as much of your precious data off it as possible with an advanced recovery tool like Disk Drill. After that, replace the drive. Never trust and keep using a disk with quickly multiplying bad sectors. Anything you store there will soon be gone with it.
Method 10: Update Hard Drive Firmware for Better Performance
Modern storage devices come with onboard controllers that manage how data is stored and recovered. Those controllers are upgradeable with firmware, which may fix issues or increase performance.
However, we cannot offer detailed instructions on the process, for it varies based on vendors, product families, and models.
As an example, for the SSD and NVMe drives by Samsung:
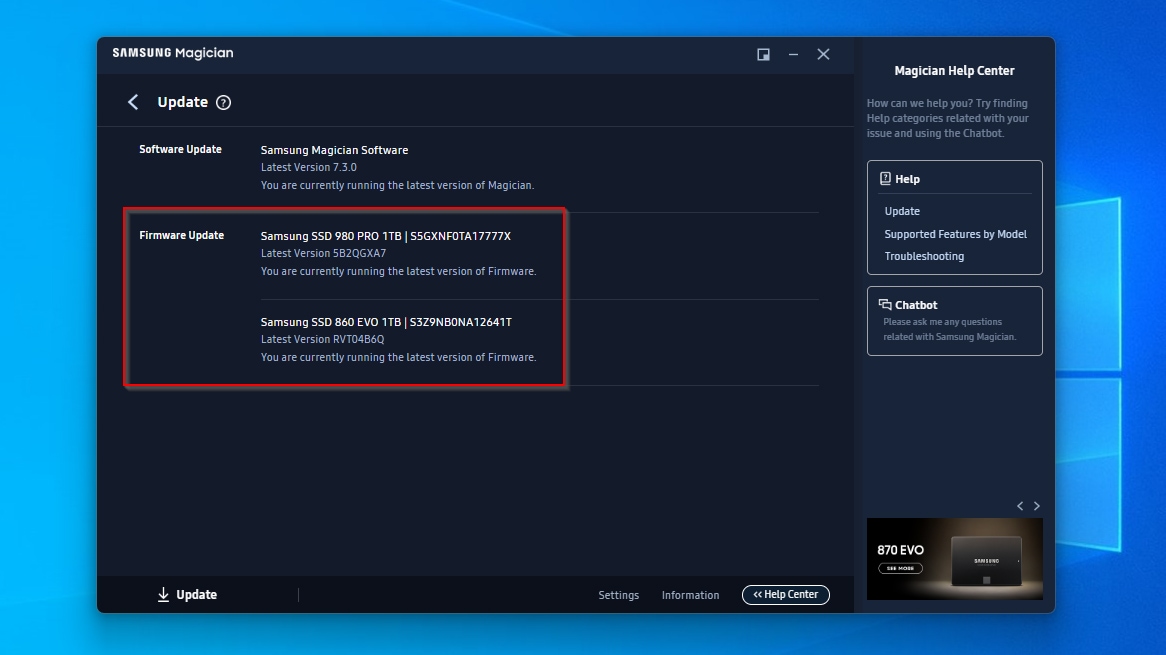
- Visit Samsung’s official site for the Magician app. Download, install, and run Samsung Magician. Then, click on Update on the bottom left of its window.
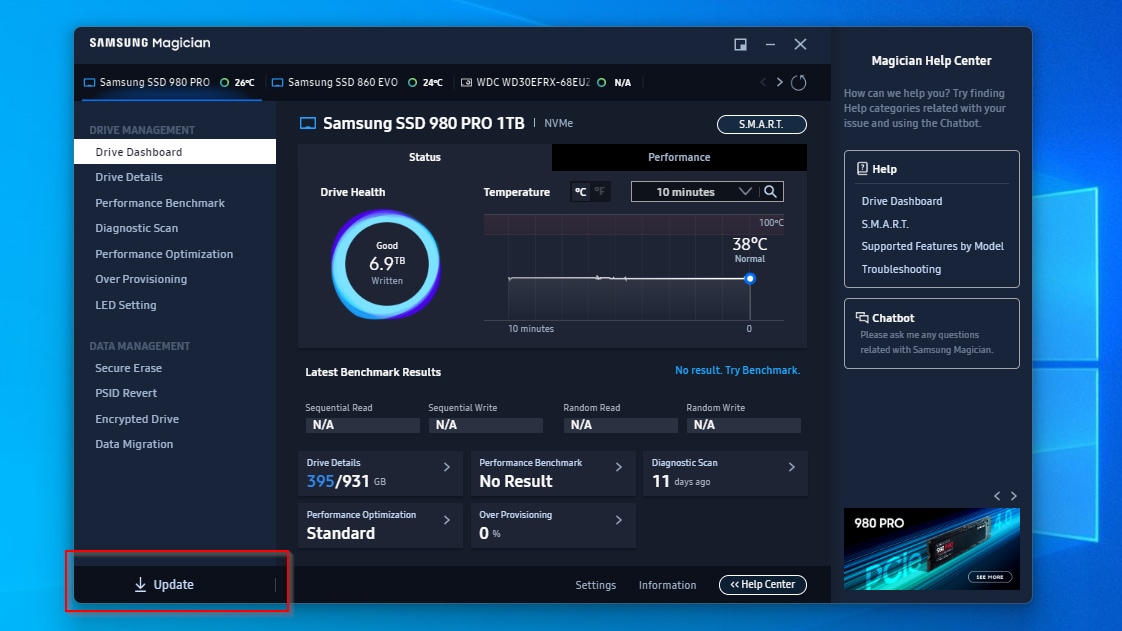
- In our case, there were no newer updates available. If there were, though, Samsung Magician would have offered the option to download and install them.
Method 11: Use SFC and DISM Commands to Fix System Files
When your PC seems to work fine but with some “quirks”, like an occasional 100% disk usage on Windows 10, maybe the culprit is the OS itself.
It might be that a handful of the OS’s files got corrupted. This could lead to instability, erratic OS and apps “behavior”, and, in some cases, seeing the system using 100% of the disk for no apparent reason.
Windows comes with two tools for dealing with such issues: SFC and DISM.
To eliminate 100% disk usage because of OS issues by fixing corrupted Windows files with SFC and DISM:
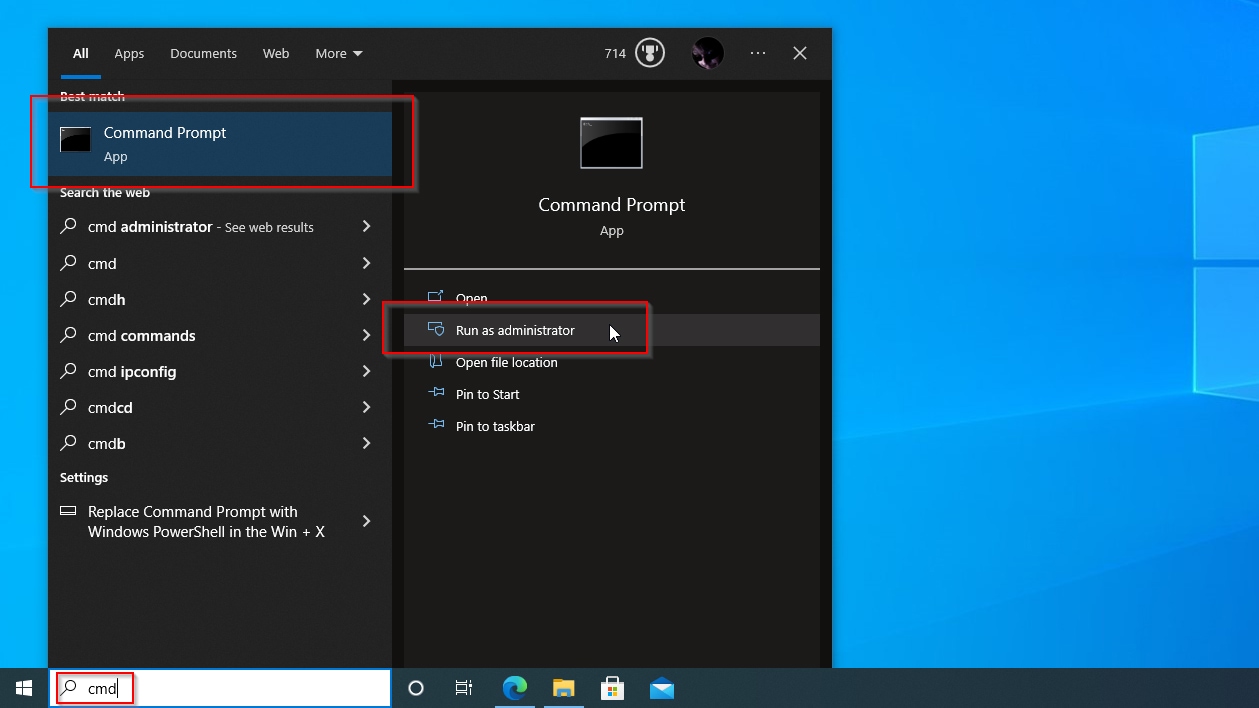
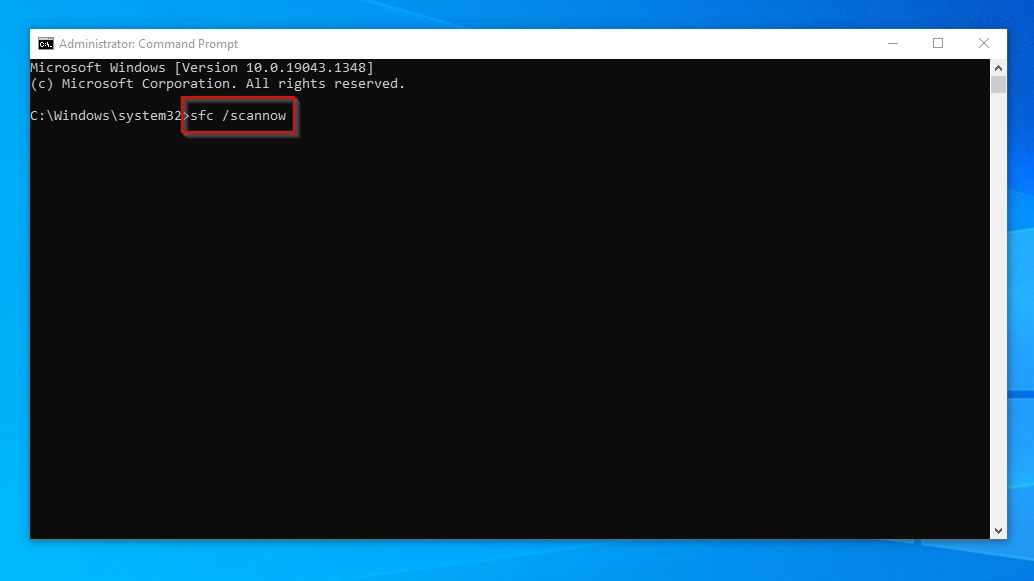
- Use the Start menu or Search to find CMD or PowerShell, and launch either with Run as administrator.
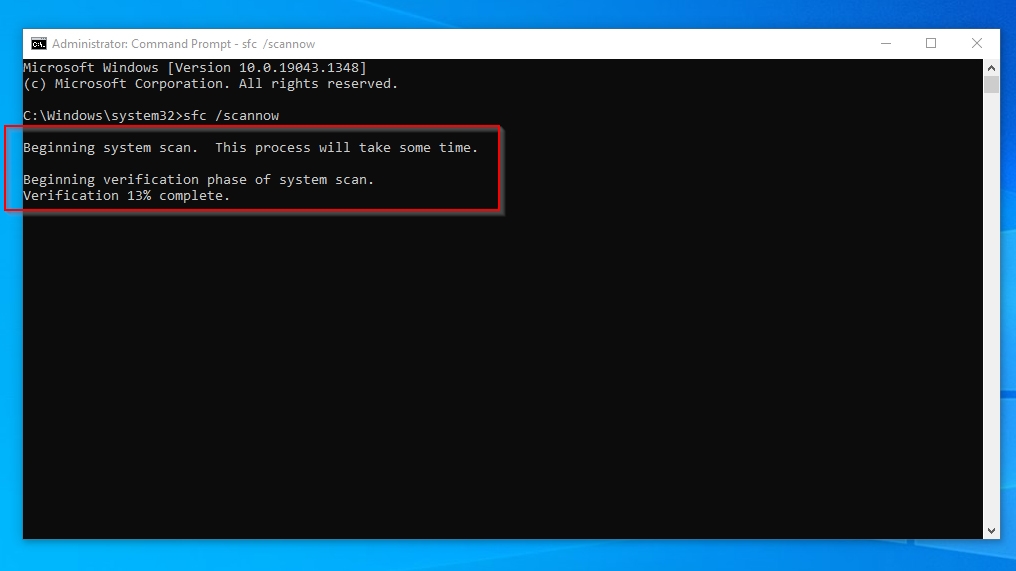
- Use SFC /scannow to check your Windows installation for problems using SFC.
- Give SFC some time to scan your OS’s files for potential issues.
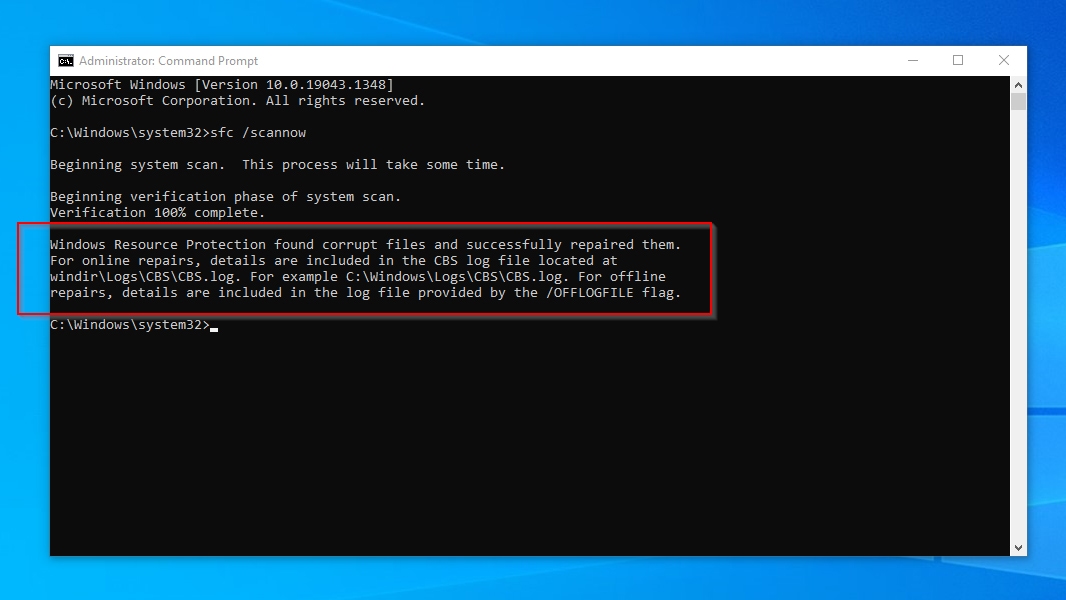
- SFC will show a report afterward, stating if it found and repaired corrupt files.
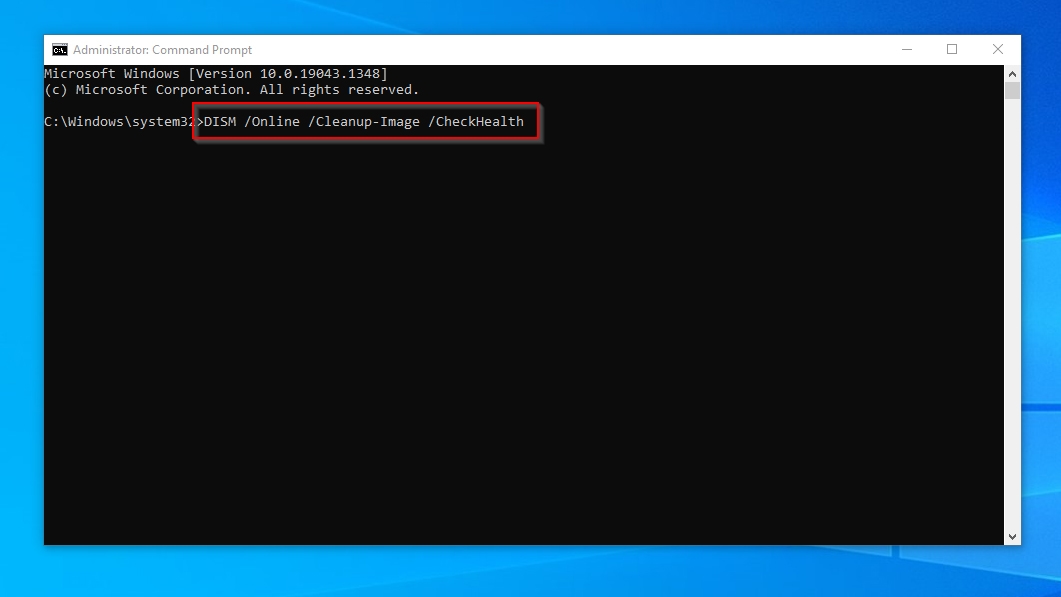
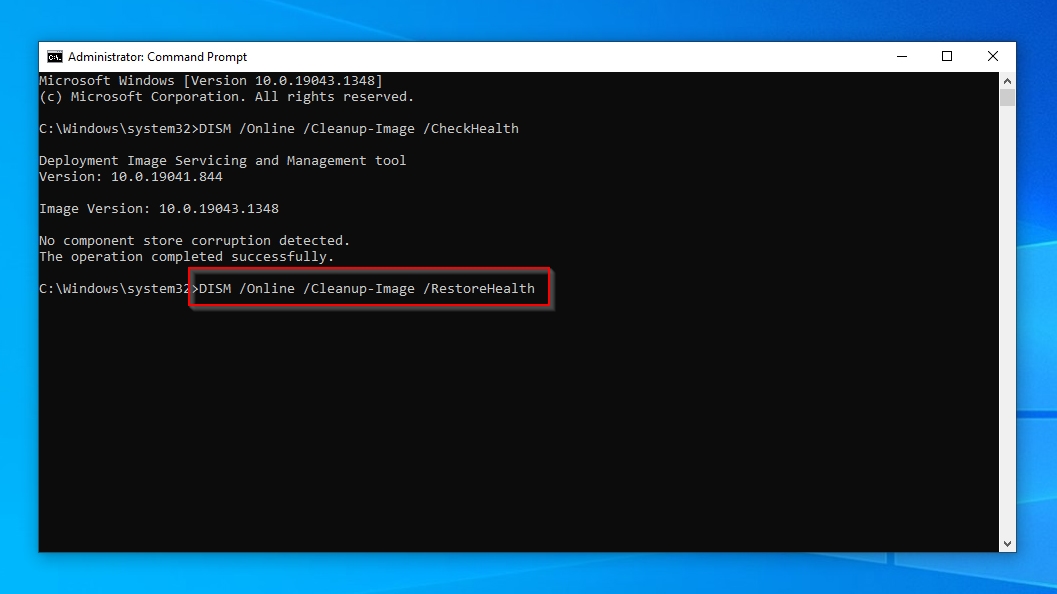
- Use DISM /Online /Cleanup-Image /CheckHealth to have DISM scan your Windows installation for inconsistencies with the OS’s known official files.
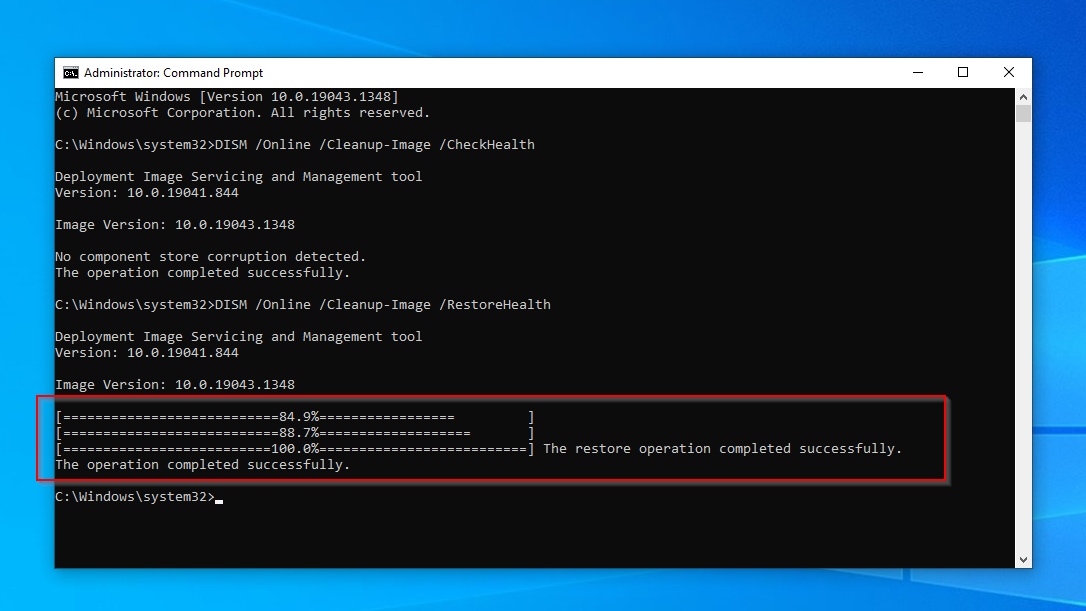
- If the previous command found problems with your Windows installation, fix them using DISM /Online /Cleanup-Image /RestoreHealth.
- DISM will inform you about the outcome of the operation when it completes.
Method 12: Check the Amount of RAM Being Used
Thanks to the magic of virtual memory, also called “swap” or “a paging file”, we can run software on our PCs that require more memory than we have available.
There’s a catch, though: virtual memory relies on “juggling” the RAM’s contents to the OS’s paging file. If that happens often, the continuous access of the paging file might lead to 100% disk usage.
To ensure your RAM usage is normal on Windows 10:
- Press CTRL + Shift + Esc to quickly launch the Task Manager, or seek it using the Start menu or Search and launch it from there. Move to its Performance tab.
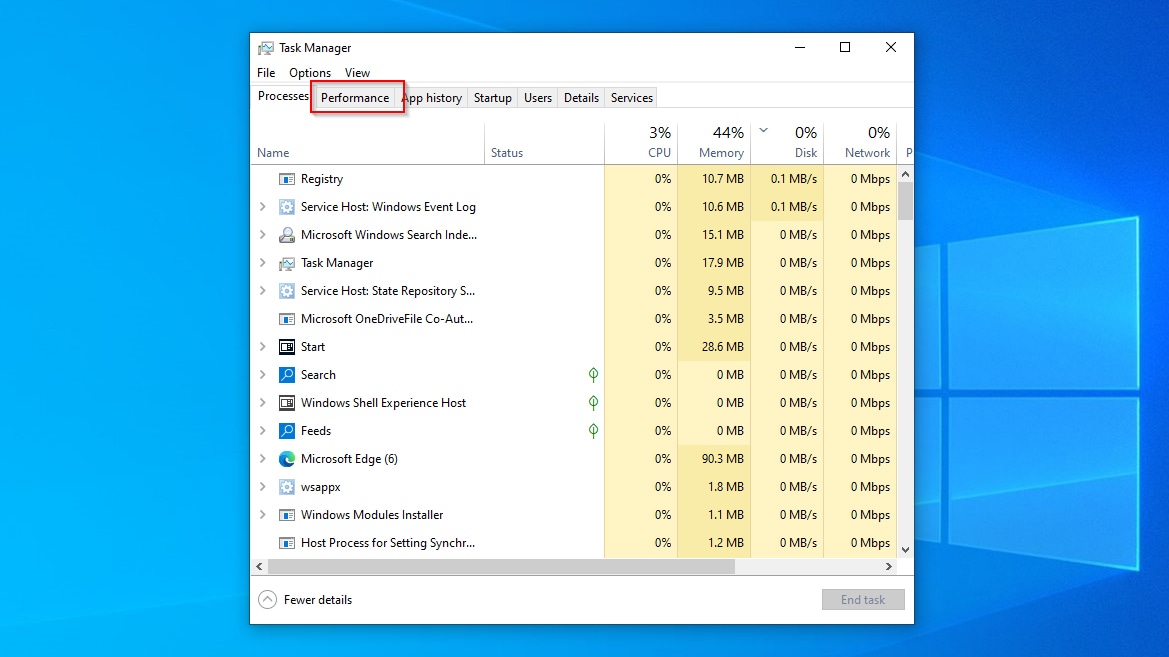
- Select the Memory entry from the list on the left to see a detailed report (including helpful graphs) on memory usage on your PC.
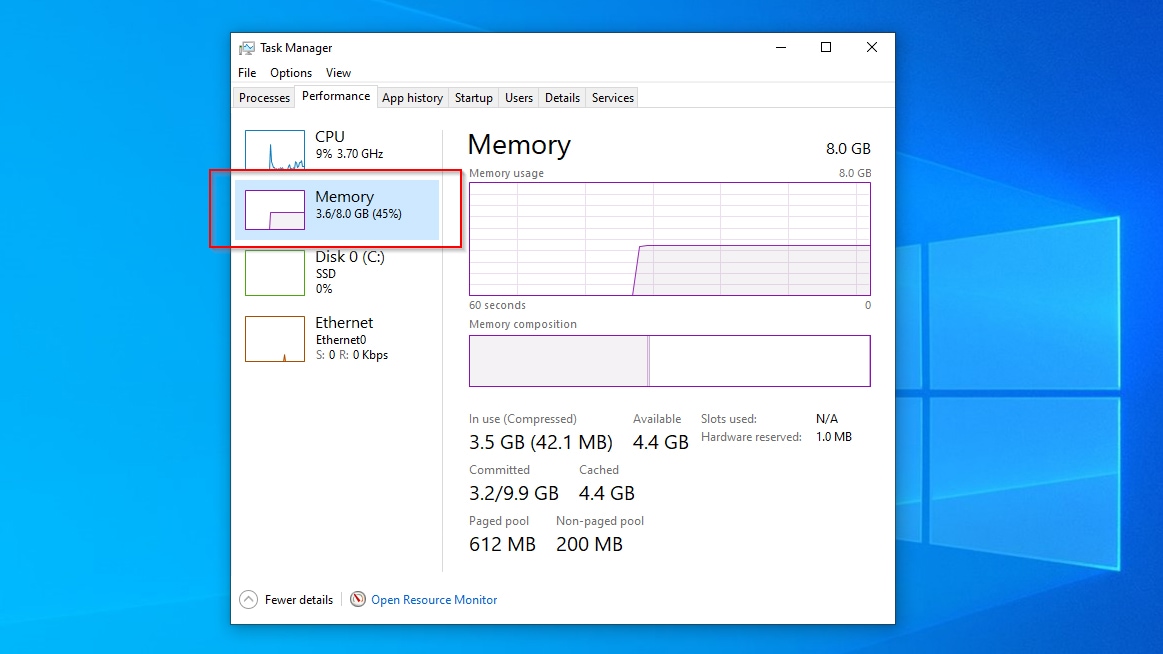
Based on that, if:
- Your Available RAM is only a tiny fraction of what is In use.
- Your Committed (paging file) is almost full.
You should try to decrease your RAM usage by closing any apps you are not actively using or are lingering in the background (like backup, chat, gaming clients, etc.).
If that doesn’t solve the problem, and it persists even after restarting your PC, it is worth seeking alternative “lighter” apps to the software you’re using. Otherwise, you ought to start considering a RAM upgrade.
Method 13: Fix the Improper Overclocking of the System
Your HDD usage is 100%, but despite everything you have tried, you cannot decrease disk usage? If you have overclocked some PC components, it’s worth eliminating them as the potential cause.
That, though, is another topic where we cannot offer specific instructions. The simplest explanation would be to “undo” any “tweaks” applied to your hardware’s settings.
For example, let’s say you have overclocked one of the latest Ryzen processors by AMD using the company’s Ryzen Master software and its Curve Optimizer feature.
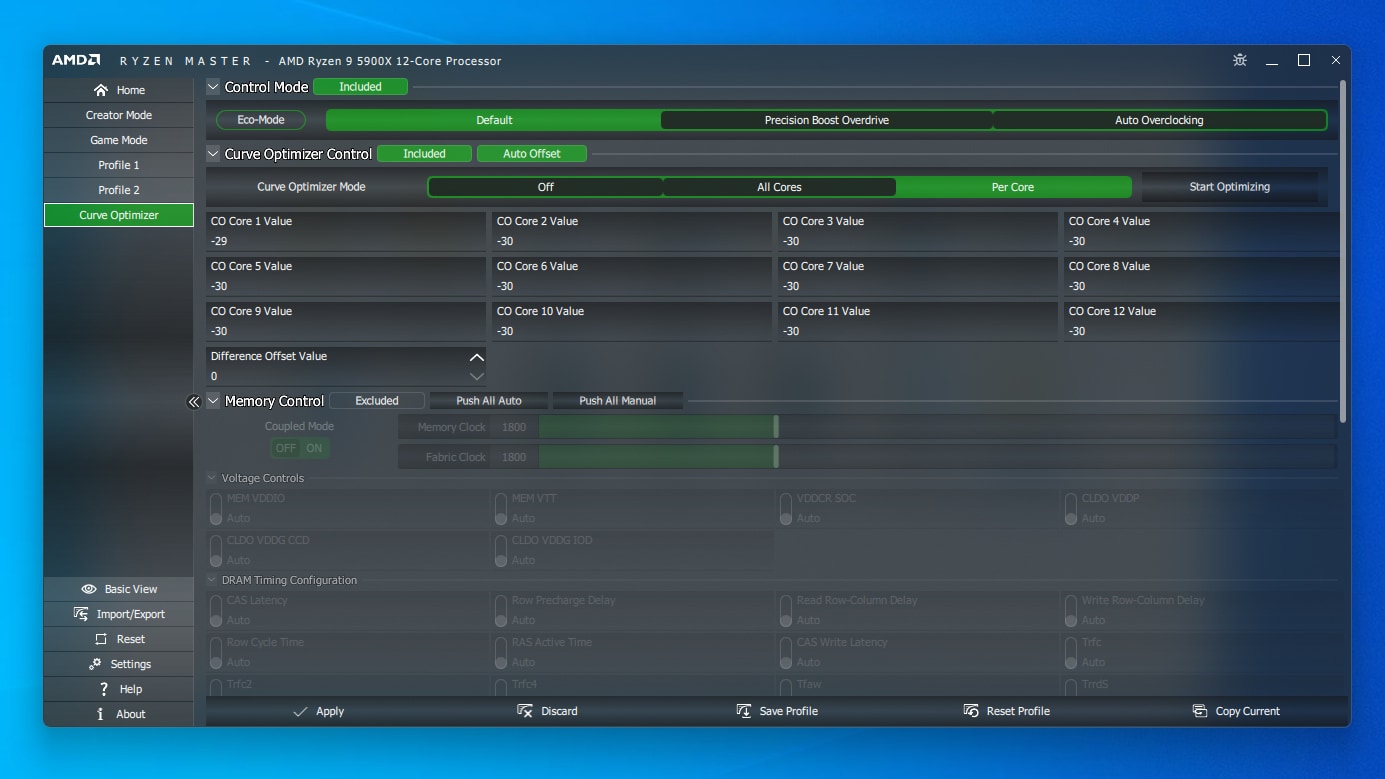
In that case, to revert your overclocked settings to the defaults, while on Ryzen Master’s Curve Optimizer tab, choose Off instead of All Cores or Per Core. Then, click on Apply on the bottom left.
Method 14: Make Some Space
It’s suggested you leave at least 10% space free on all storage devices. This space can then be used for moving files around when checking the file system’s consistency, defragmenting, temporary file storage, etc. If your free space drops below that, you might see your disk at 100%.
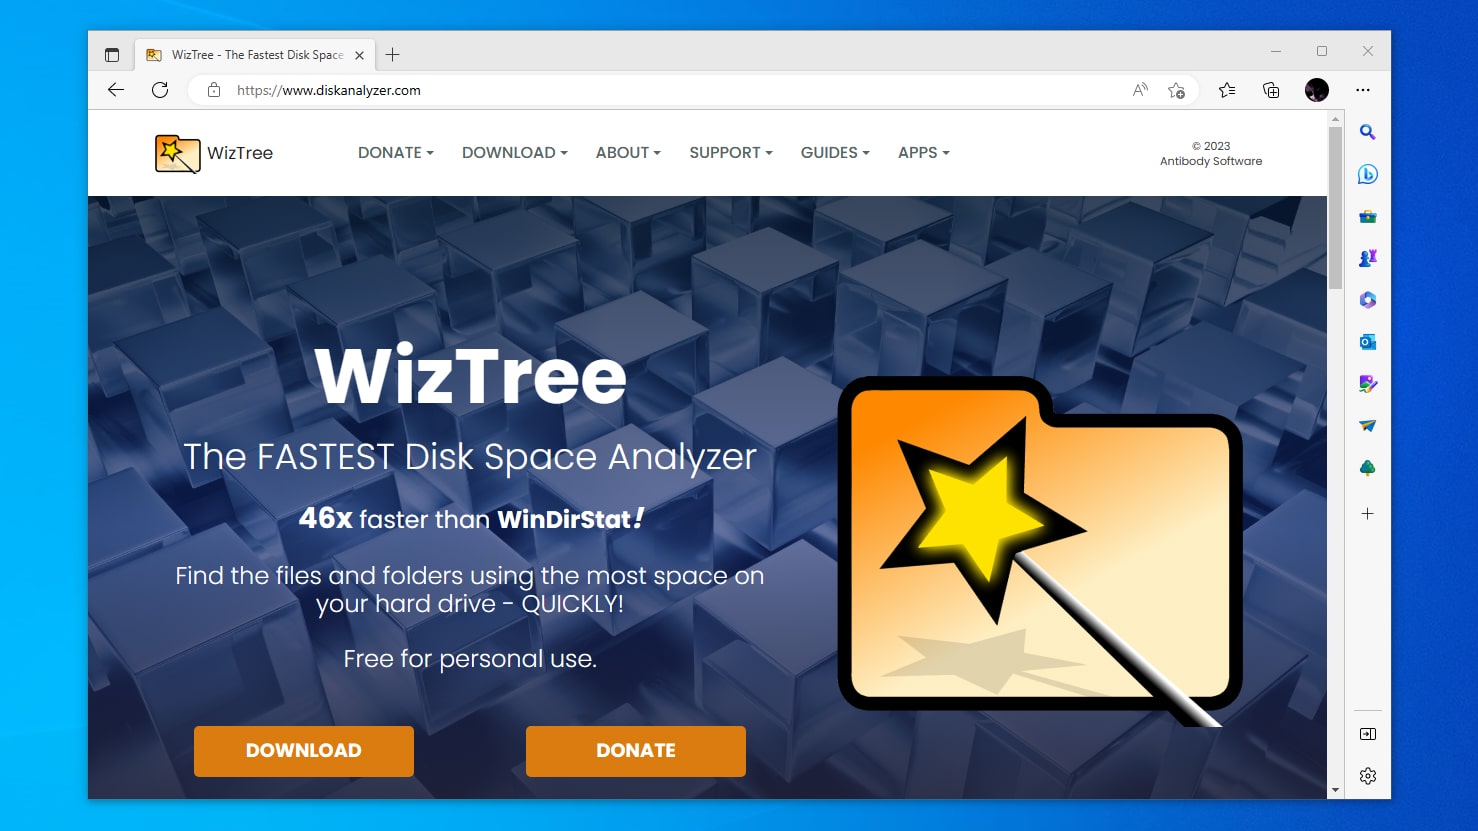
To check what eats up your storage with WizTree, and possibly locate and delete some files you don’t need anymore, reclaiming disk space:
- Download the app from WizTree’s official site. Then, install and run it.
- Select the disk you want to check from the drop-down menu on the top left and click Scan.
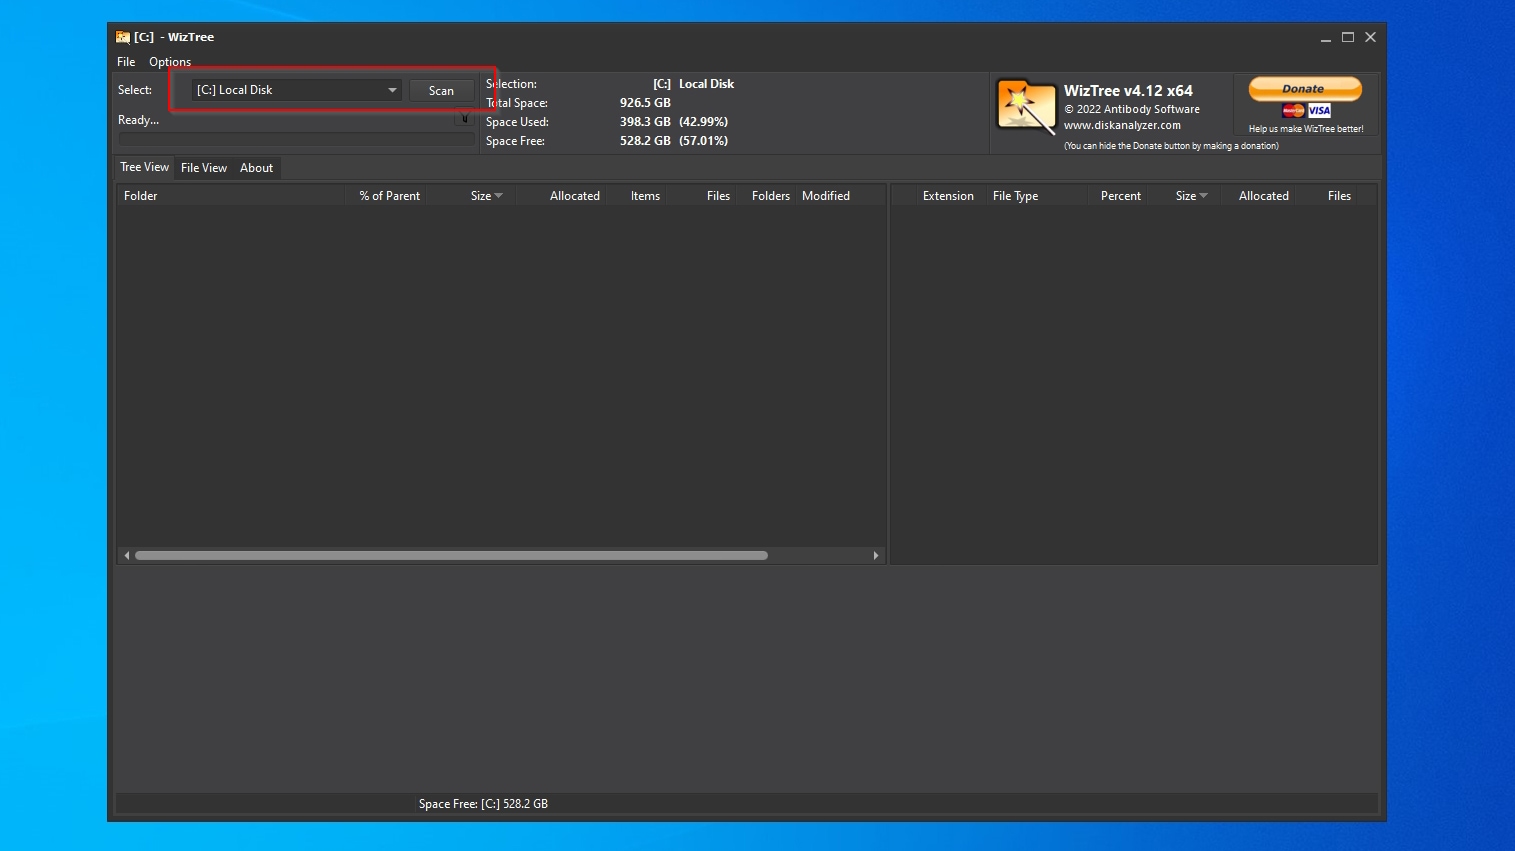
- Check either the Tree view or the graph at the bottom of the app to locate the worst offenders that take up most of the disk space. If possible, delete any you don’t need anymore.
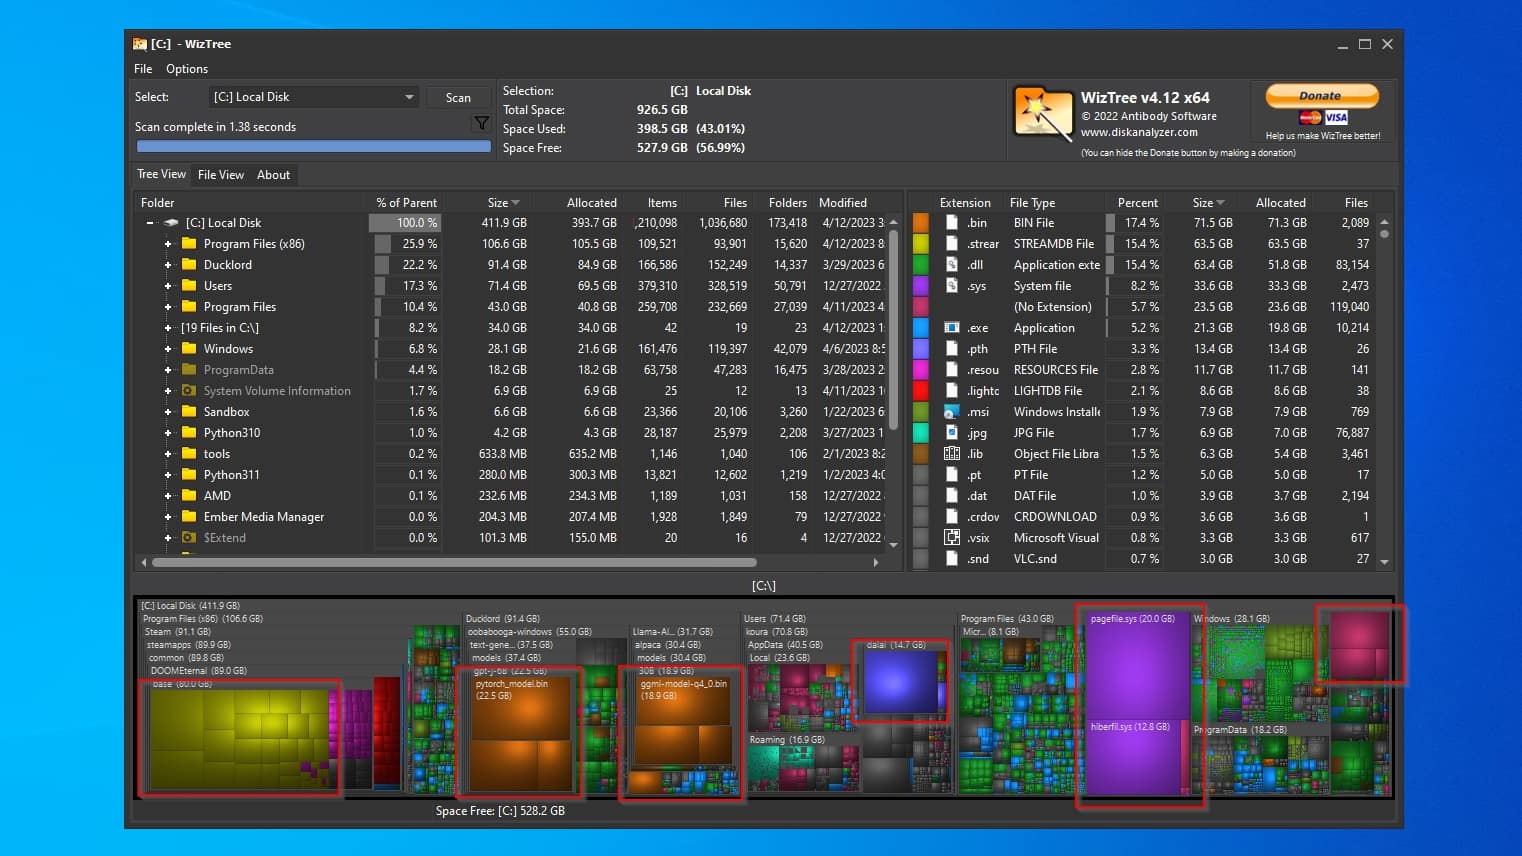
Make sure not to remove any files you don’t know about, for they might be required by the OS or apps you use.
FAQ
How to check disk usage?
The quickest and easiest way is this:
- Press Windows Key + Shift + Esc simultaneously to launch the Task Manager.
- Move to the processes tab.
- Click on the Disk column to sort all processes according to their disk utilization. The ones pushing your disk at 100% will be near the top.
Why do I have 100% disk usage but nothing running?
Even when not actively using any app, a background process might be taking a backup, downloading large torrents, etc., leading to 100% disk usage.
The same could happen because of corrupted OS files or a hardware problem.
Why does Windows 10 show high disk usage at startup?
It’s normal to notice higher disk usage than usual right after the OS loads and you land on your desktop. That’s when all auto-starting processes are loading.
To decrease disk usage during startup:
- Launch the Task Manager with Windows Key + Shift + Esc.
- Move to the Startup apps tab.
- Select any app you don’t want to auto-start and click on Disable.
Conclusion
Many reasons can lead to 100% disk usage, making your PC stutter. Thankfully, the methods we covered in this article should help you solve such problems.
We must emphasize, though, that you should never forget that your data is more important than the hardware it’s stored on. At the first hint of any serious hardware issue, backup or recover your data from your failing storage. Then, replace it as soon as possible.
This article was written by Odysseas Kourafalos, a Editor-in-Chief at Handy Recovery Advisor. It was also verified for technical accuracy by Andrey Vasilyev, our editorial advisor.
Curious about our content creation process? Take a look at our Editor Guidelines.