Have you stumbled upon some old memories from a long-forgotten phone? You must’ve tried to play them and seen a peculiar name for the file format: “3GP”. You wouldn’t be alone if this mystery file format fails to play or shows signs of corruption (issues range from soundless videos to something more serious like pixelated artifacts or, worse, a black screen).
The good news is that your corrupted 3GP file isn’t necessarily lost forever. Phew. With today’s advanced tools, you have powerful software tools for PC and simple online video recovery services that can help repair 3GP files, all from your smartphone. We’ve tested the best methods and will spill all the secrets on how to fix your 3GP files, as we’ve done ourselves many times before.
Note: In 2025, the 3GP file format is pretty old tech. Once a popular choice for mobile video recording and playback, today, 3GP is much less common and more of a legacy format. It was designed for efficiency and worked great for its time, allowing for tiny file sizes thanks to its efficient compression. But today’s powerful smartphones make the need for such compression obsolete.
This presents a problem: old data stored on legacy devices often suffers from file degradation and unsupported codecs. So it isn’t surprising if you face corruption issues when trying to play that old 2009 video of your cat Oscar!
Quick 3GP Fixes to Try First
Before we delve into special repair tools, let’s rule out minor compatibility problems. In many cases, your playback issues can be fixed with these quick troubleshooting steps:
- 📂 Transfer the file to internal storage: External devices (especially older ones) can introduce playback issues, even if your 3GP file itself is fine. If you’re trying to play the 3GP file from an external device like a USB drive or SD card, move it to your computer’s internal storage first (you can copy-paste the file to your internal storage by clicking Ctrl+C on the file, and then Ctrl+V at the desired location).
- 📀 Update your media codecs: If that doesn’t work and your media player still fails to recognize the file, you may be missing the right codec. Instead of manually figuring out which one works, install a codec pack like K-Lite Codec Pack, which acts like a Swiss military knife and has support for dozens of video formats, including 3GP. Here’s how you do it:
- Download K-Lite Codec Pack from their website. The website can be a bit confusing, so we’ve attached screenshots to help.
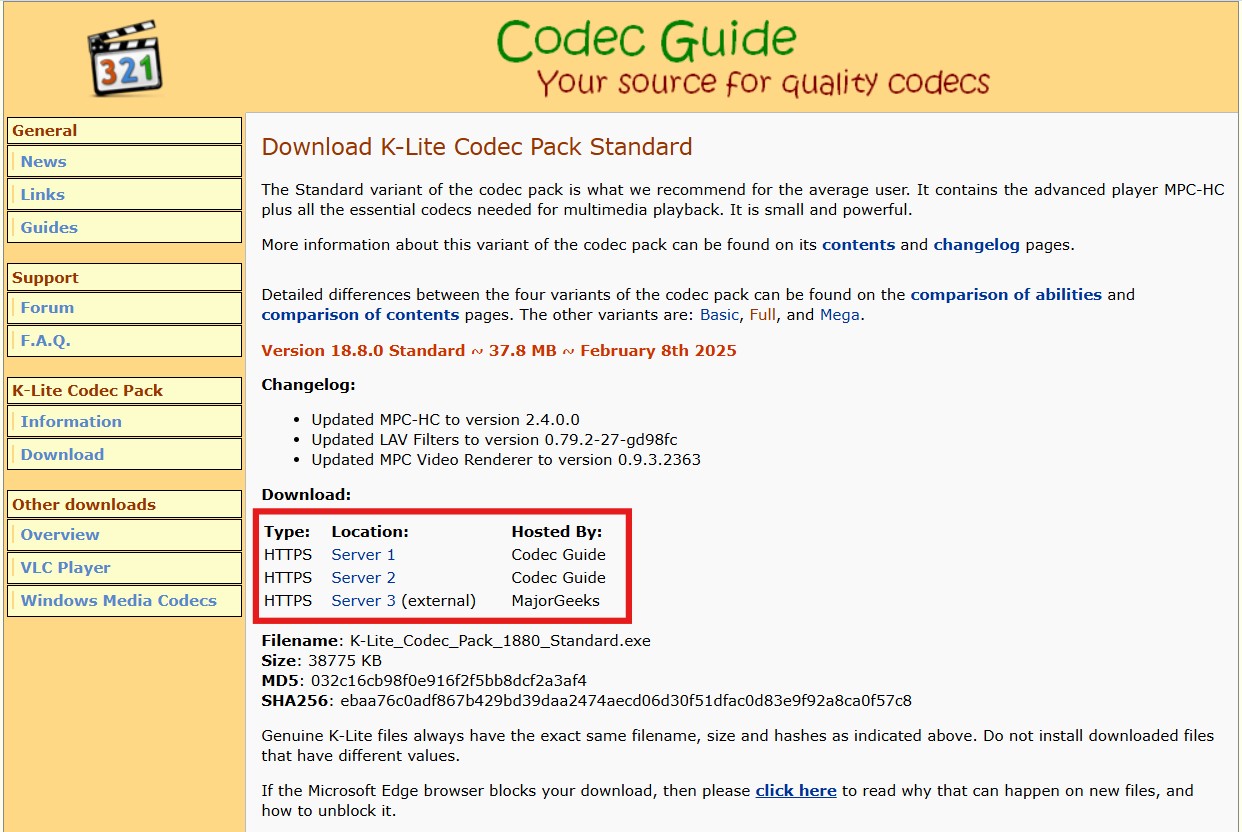
- Find the .exe file in your downloads folder and open it. This will open the installation wizard. Select Normal and click on Next.

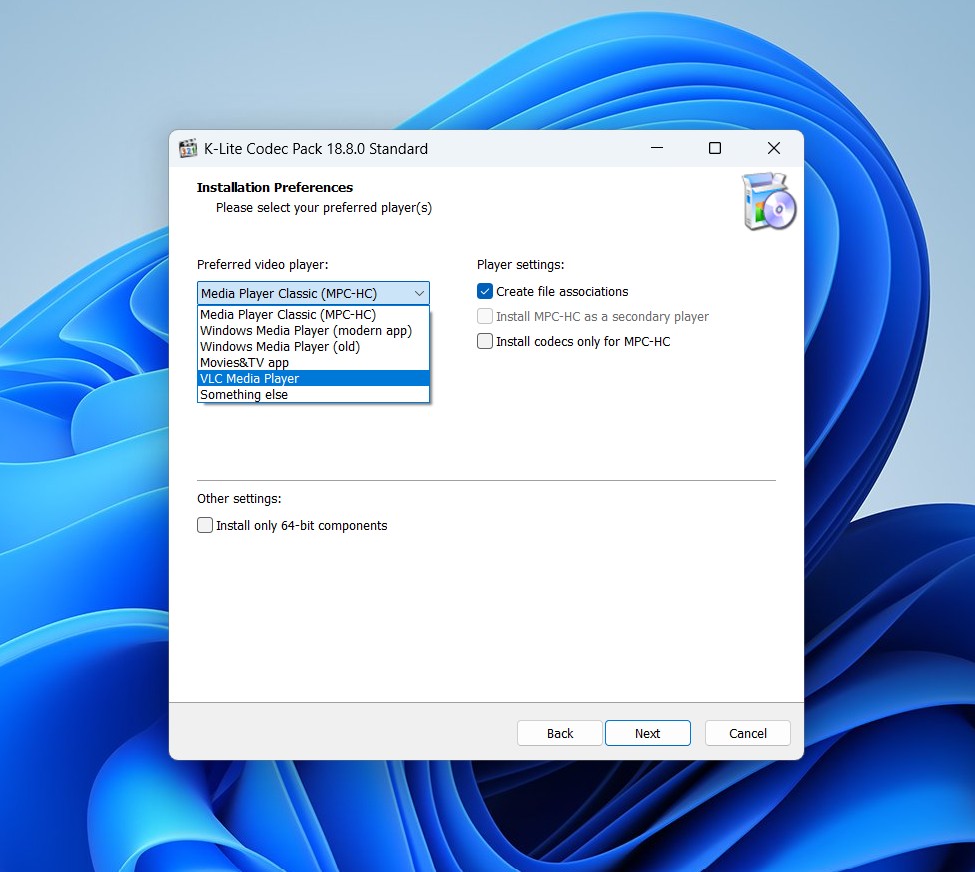
- Select your preferred media player on the next screen. You can try to use VLC Media Player (we’ll describe this ahead, so keep reading); otherwise, the default Windows Media Player works as well. Click Next.
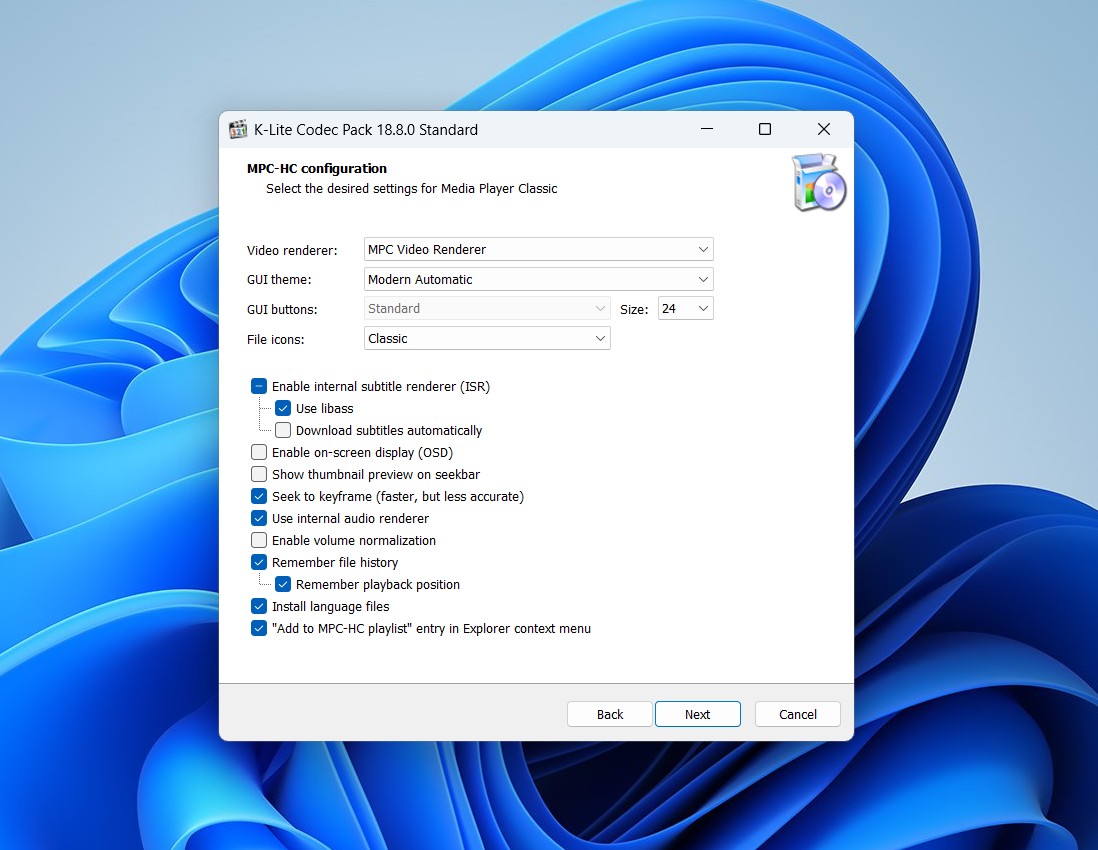
- The next few screens deal with configurations. For our demo, we’re keeping all the settings to default and just clicking on Next moving forward. If you want to explore all the configurations in detail, check out this YouTube video on K-Lite Codec Pack.
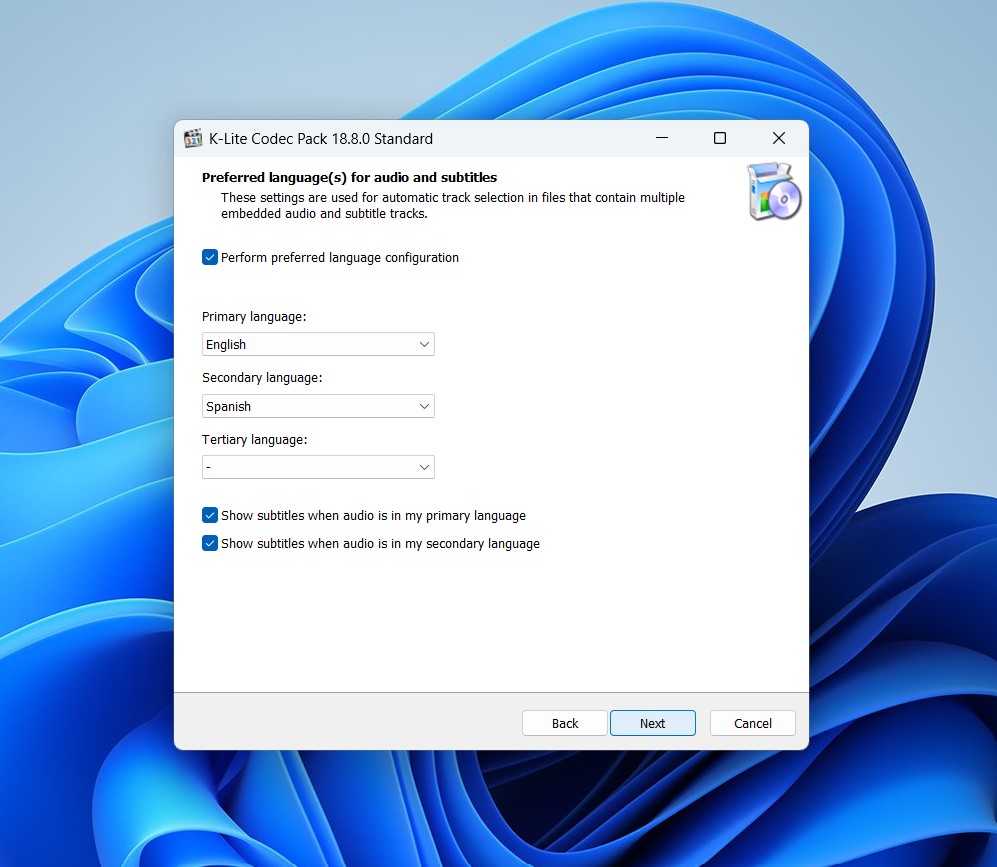
- The next screen also has options for selecting a language. We selected English and clicked on Next.
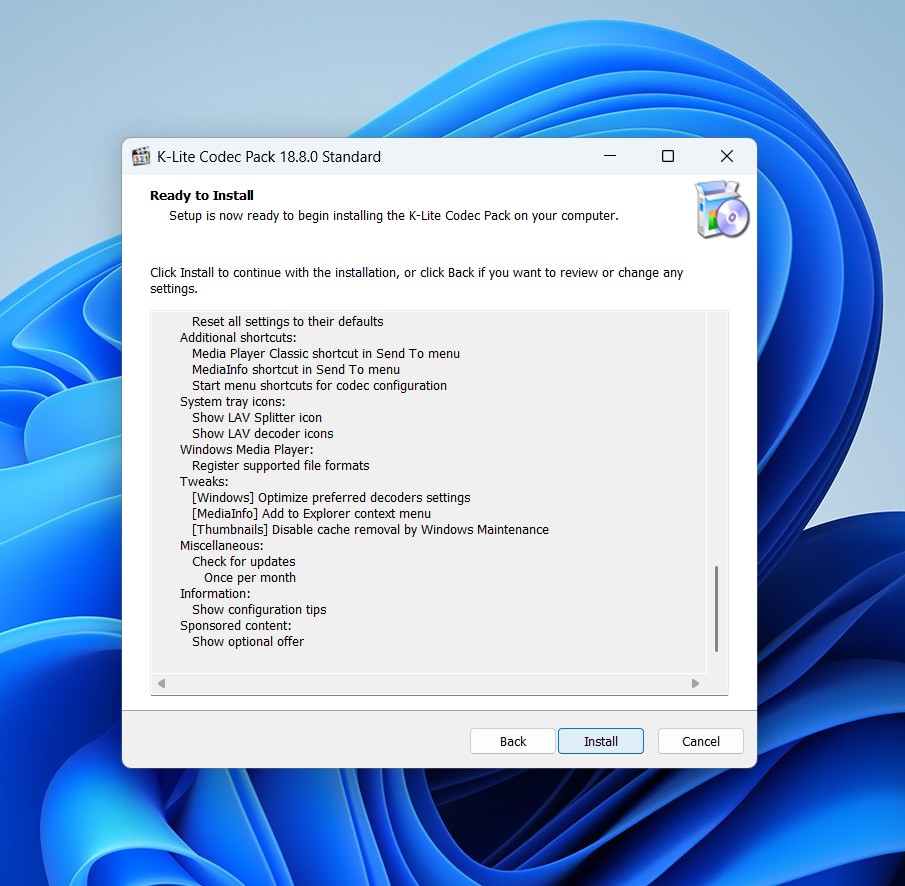
- You can review all the settings on the next page and then hit Install. In just a few seconds, the process finished.
- Once the installation is complete, you’ll get a “Done!” message and can hit Finish.
- Finally, you can test it out. Open your media player and try playing your 3GP file again. If K-Lite took care of a missing codec issue, your video will work properly.
- Download K-Lite Codec Pack from their website. The website can be a bit confusing, so we’ve attached screenshots to help.
- 🛠️ Try VLC’s Always Fix Option: If you’ve decided to download and use VLC, try using its Always Fix built-in repair feature, which automatically attempts to fix corrupted AVI files. Here’s how you can use VLC’s Always Fix option to fix your 3GP file:
- Download VLC media player and install it by following the installation wizard.
- Locate your 3GP file and rename it by changing the extension from .3gp to .avi. While this method isn’t guaranteed to work, it’s worth a shot. A better way would be to convert the file to AVI and then try again (also note that the conversion itself sometimes fixes the error, which we’ll cover in more detail below).
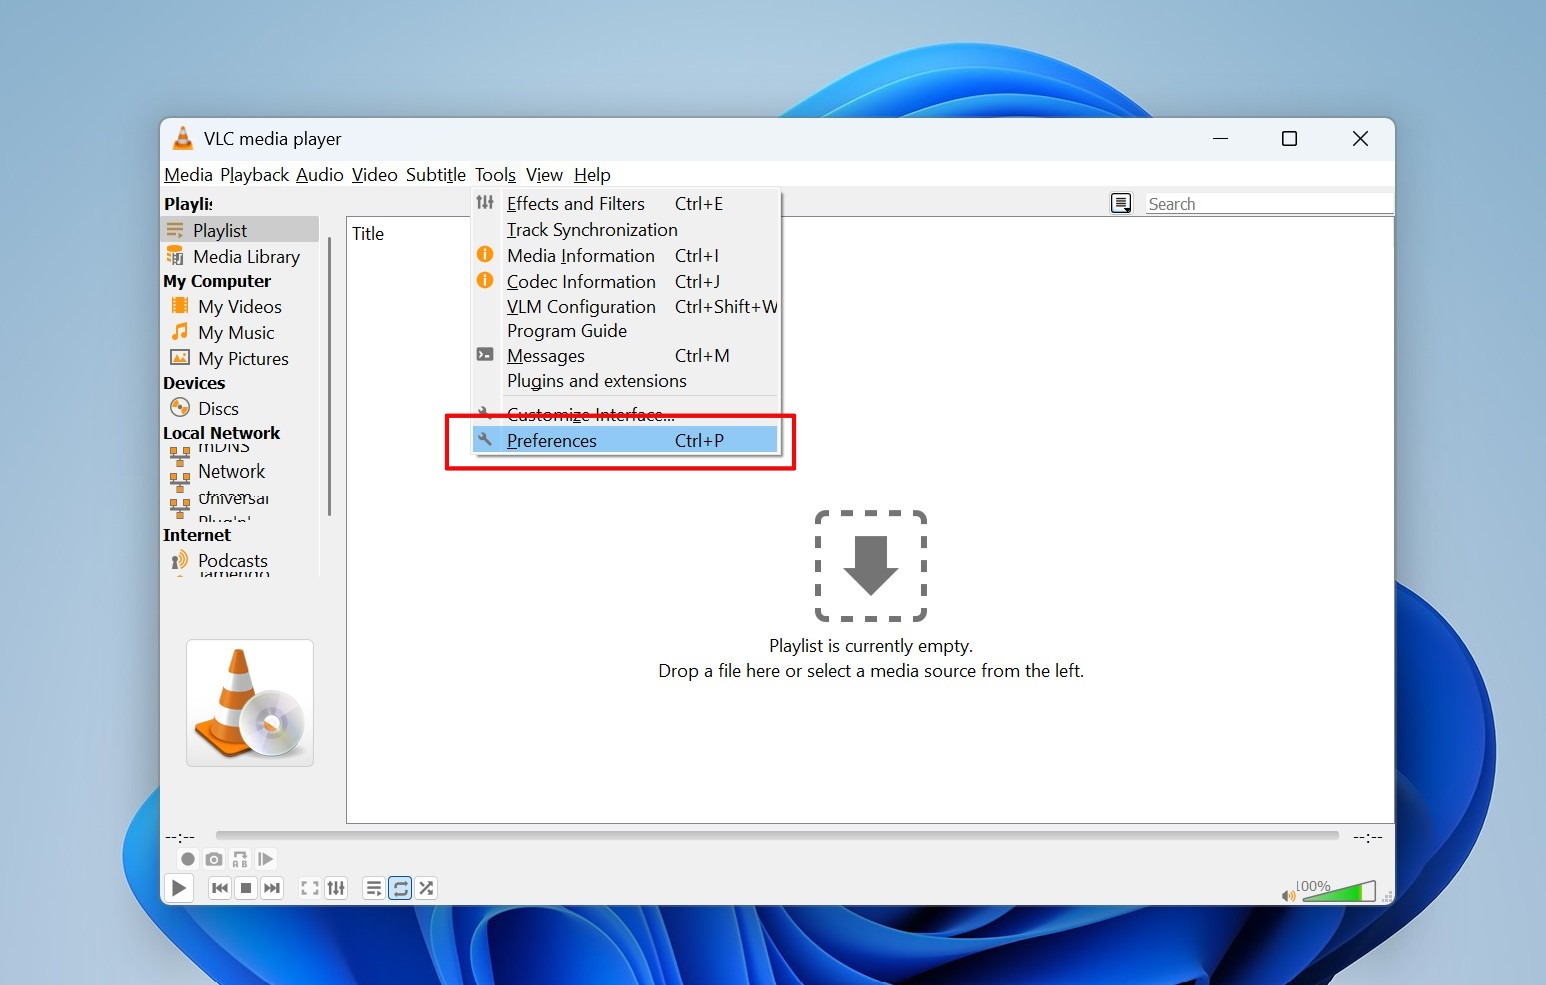
- Launch VLC Media Player, then head to Tools>Preferences (or press Ctrl+P on your keyboard).
- In the Preferences window, click on the Input/Codecs tab.
- Scroll down to the Damaged or incomplete AVI file section and set the option to Always fix.
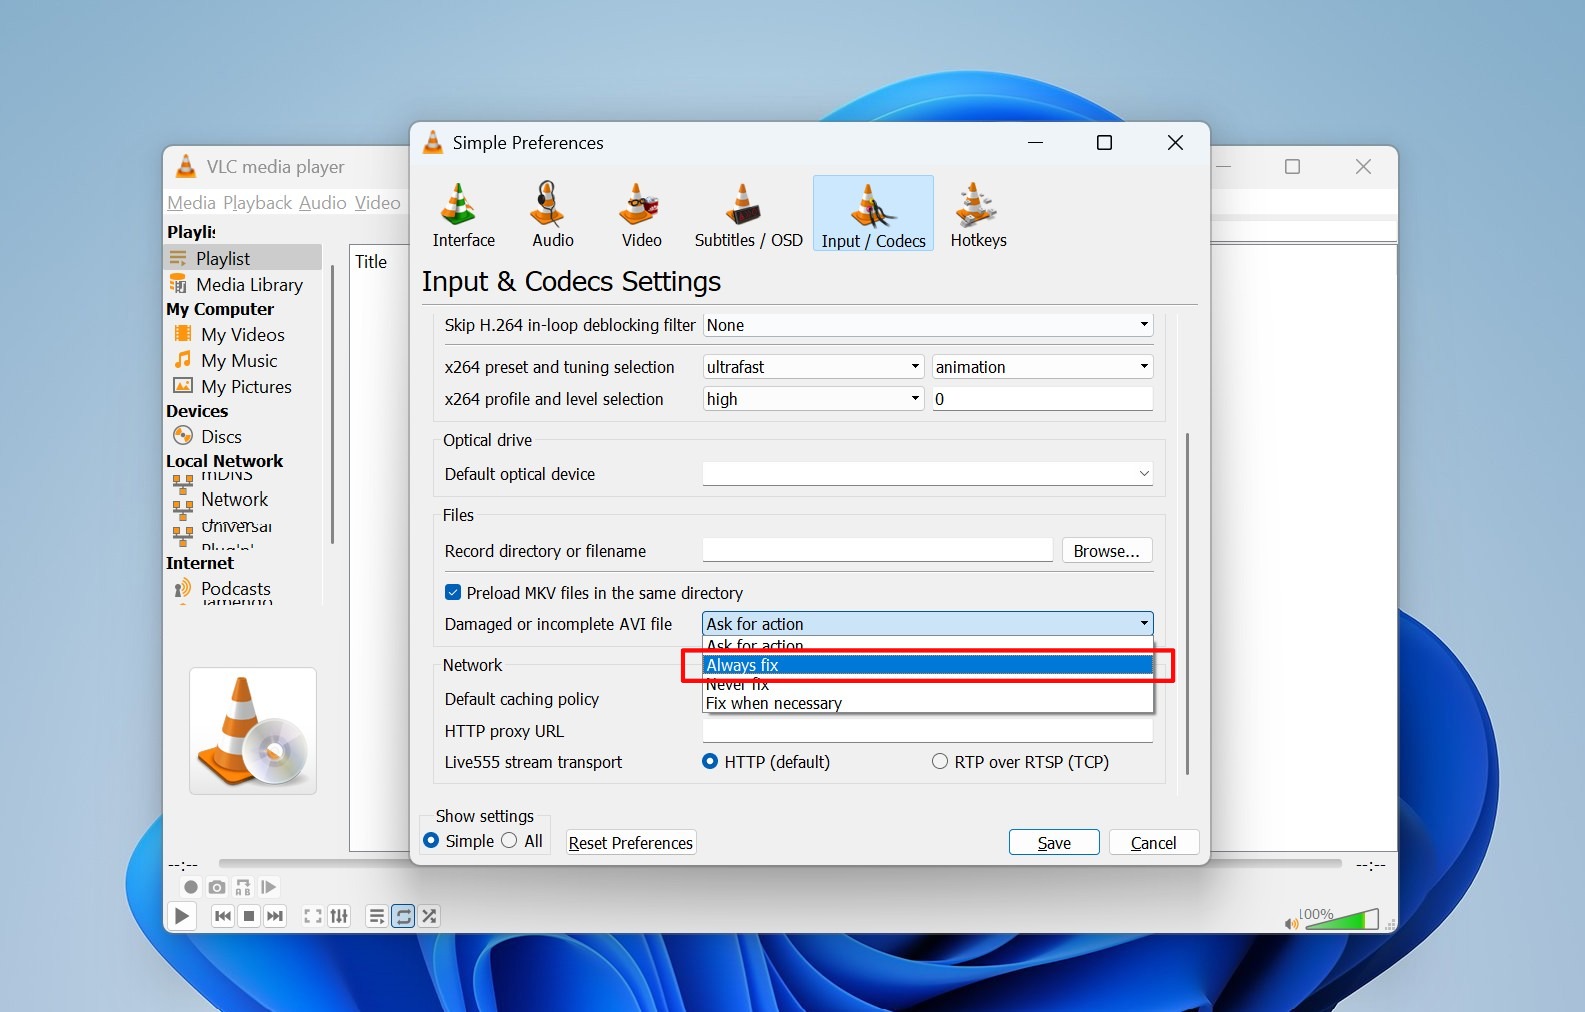
- Click the Save button at the bottom of the Preferences window.
- You can now test your 3GP file. Re-open VLC and play your renamed AVI file to see if this built-in repair successfully worked for you.
How to Repair 3GP Files Online
If the above fixes fail to solve your problem, or you don’t want to install third-party software, online 3GP repair tools might help. Well, here’s a secret– most of these tools actually use popular open-source solutions in the backend, just with a nice web interface for convenience. We tested several of these online video repair tools, including Clever Online Video Repair, FileConverto, and VideoUtils. After testing them all out, we’ve decided to show you the guide for Clever Online Video Repair. Why? Well, for starters, our team reviewed this software while searching for the best video repair tools, and found it to be the most reliable and effective solution.
Plus, it’s free to use and doesn’t impose artificial recovery limitations on the max file size. Unlike its competitors that seem to put arbitrary file upload limits of ~500MB, Clever Online Video Repair lets you upload a whopping 5GB video to repair (one thing to note, though, is that old 3GP videos are unlikely to be that big in size. But a little extra never hurts).
Note: Before we continue, you should know that to repair corrupted video with this software, you’ll also need a healthy working video recorded on the same device. This allows the tool to extract whatever info it needs from the healthy video to work its magic and restore your damaged file.
As we mentioned before, Clever Video Online Repair is completely free to use and only requires mail registration. It also has a mobile-friendly web service so that you can upload your 3GP videos directly from your smartphone and even download the fixed video back to your portable device. It’s great for situations where video recording or transfer was cut prematurely (which results in all kinds of errors, for example, “Moov atom not found.”)
For the demo below, we used this tool on our Windows PC, but you can also use it on your phone with any browser of your choice. Here’s how to use Clever Online Video Repair to fix your 3GP file for free:
- Open the Clever Online Video Repair website on your device (it works with any search engine).
- The UI has big intuitive buttons; click Log In to register with your email for free.
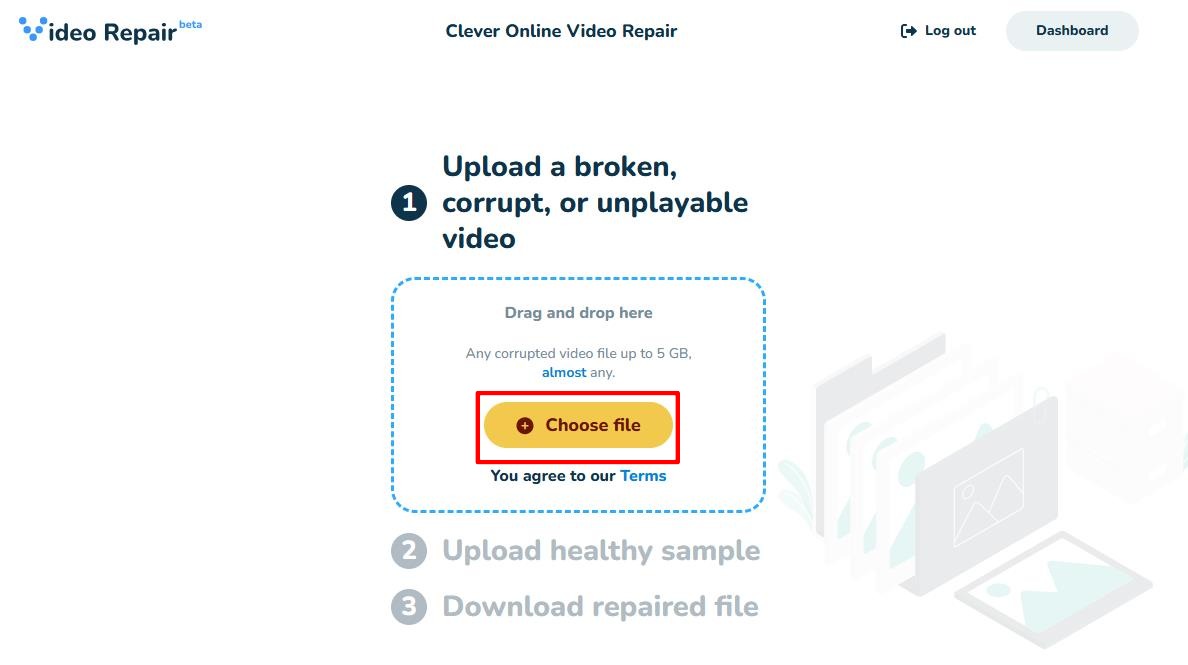
- Next, upload your broken, corrupt, or unplayable 3GP video by clicking the yellow “Choose file” button. This opens your device’s file explorer, from where you can select your problematic 3GP file and click Open.
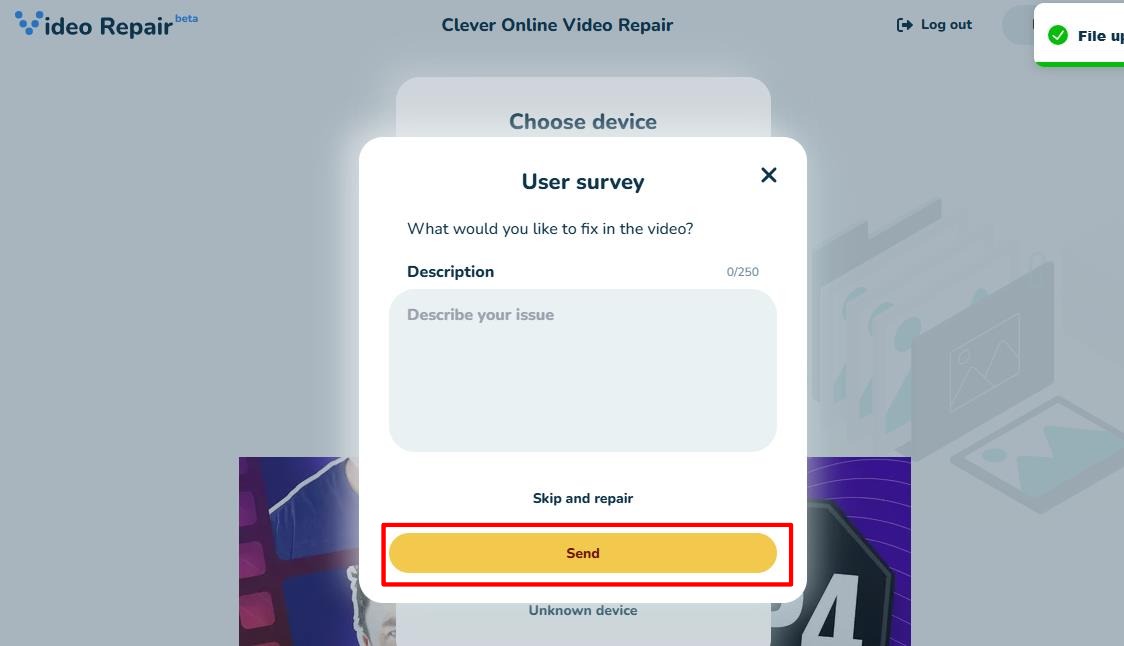
- A user survey window will open, where you can describe the issue. Answer this and hit Send or press Skip and repair.
- The next dialog will ask you to input your camera type, brand, and model on which the 3GP file was shot. Try to answer as accurately as possible, then click Repair (or Unknown device if you aren’t sure).

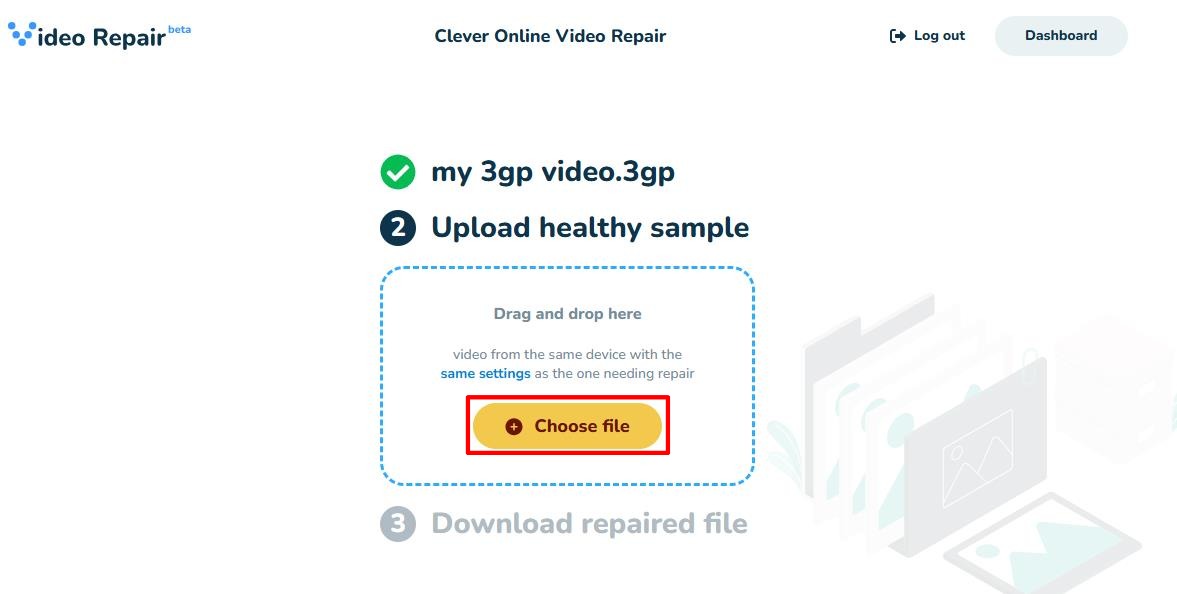
- The tool will ask you to upload a healthy sample video from the same device with the same settings as the one you want repaired. Go ahead and click on “Choose File” and upload your working sample video.
- Now, you’ll need to give the tool some time to analyze and compare the files. After a couple of minutes, the tool gave us a fixed version of the corrupted 3GP video using the relevant bits from the healthy file we uploaded.
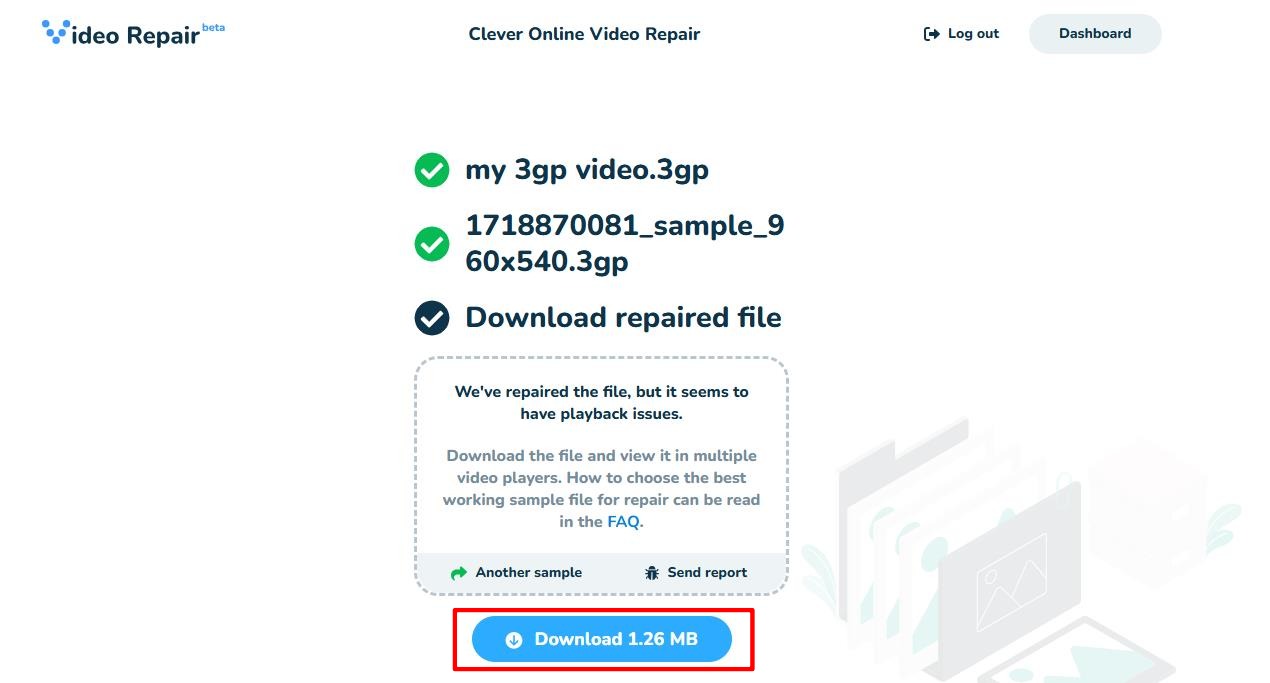
- You can now download and test out your repaired 3GP file. If it still has issues, try uploading a different reference file and try again.
How to Repair Corrupted 3GP Videos with File Conversion
If the above method doesn’t work for you or you want to try something else, you can try converting your 3GP file. Converting or “re-encoding” the video can help rebuild missing/damaged data and fix it. This method works especially well when the file structure is broken, but the actual video and audio streams in your 3GP file are intact.
We’ll show you two free and open-source tools that you can use to repair your 3GP file with conversion.
Note: Before you begin any repairs, make sure you have a backed-up copy of your original files, just in case.
As discussed above, VLC is good for quick repairs. While it is mainly a media player, it also has built-in video conversion features that can sometimes repair corrupted files- if you don’t need advanced settings, VLC is easy to use and your best bet.
The second option we’ll discuss is another free software called HandBrake, which is a dedicated video transcoder. It allows you to fine-tune the encoding settings and choose the video output, which can help when VLC fails. Let’s dive into both these re-encoding methods:
Option A: Using VLC Media Player
- Launch VLC on your computer. If you don’t have it installed, download it from the official VLC site.
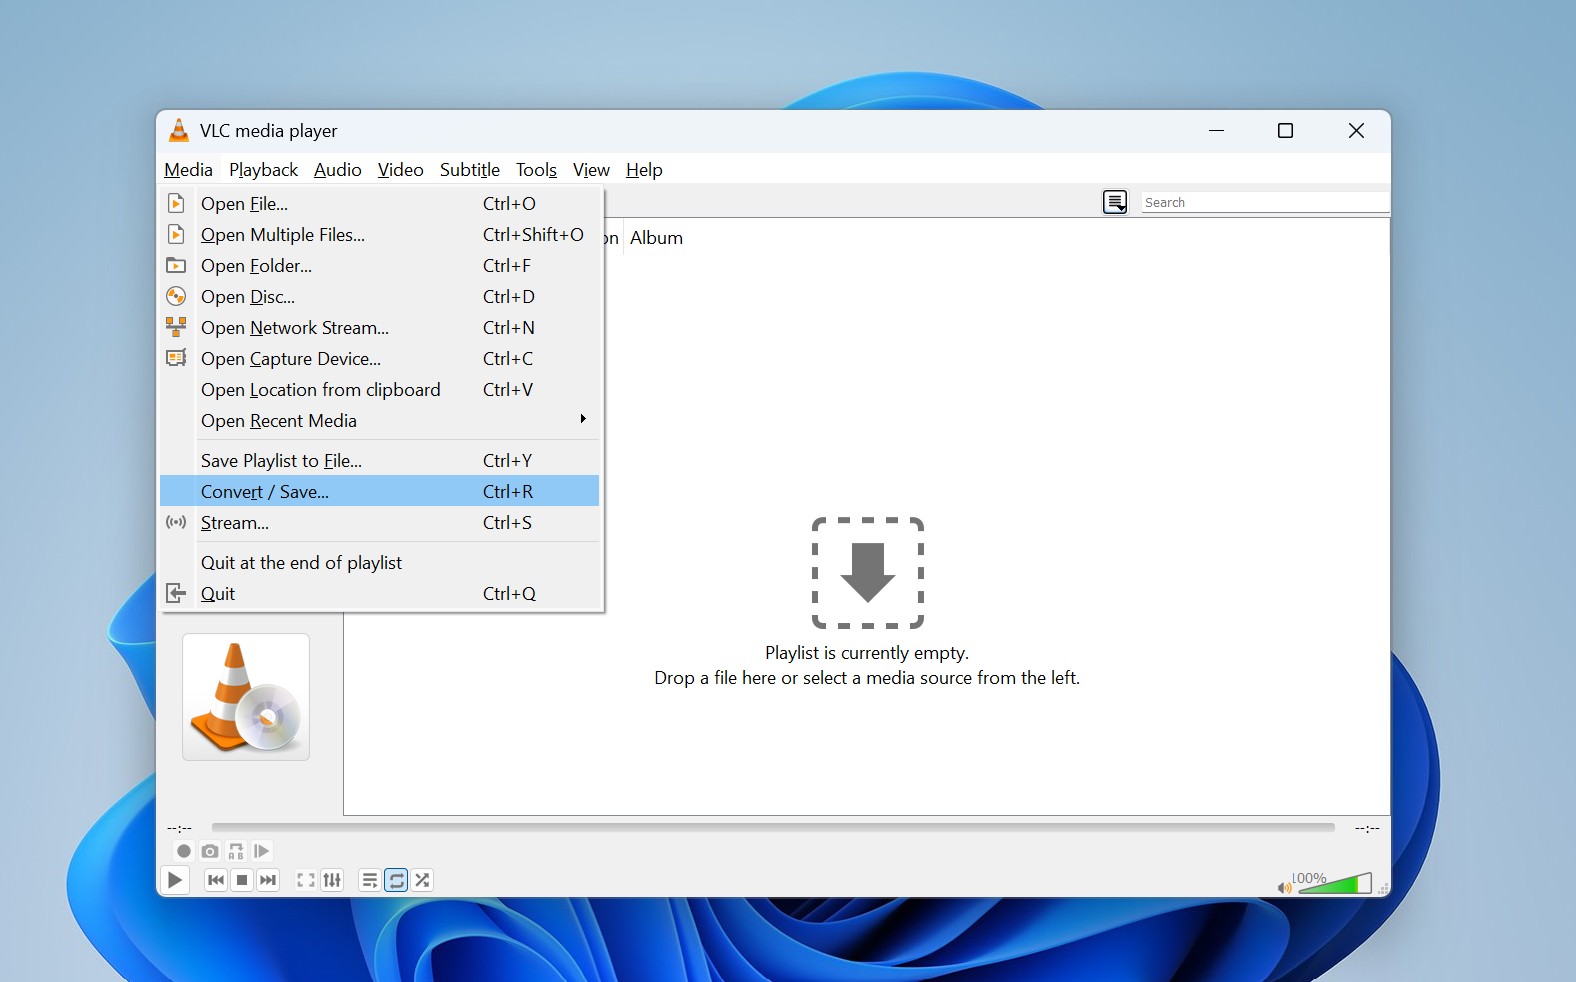
- Now Click on Media>Convert/Save ( or you can press Ctrl+R).
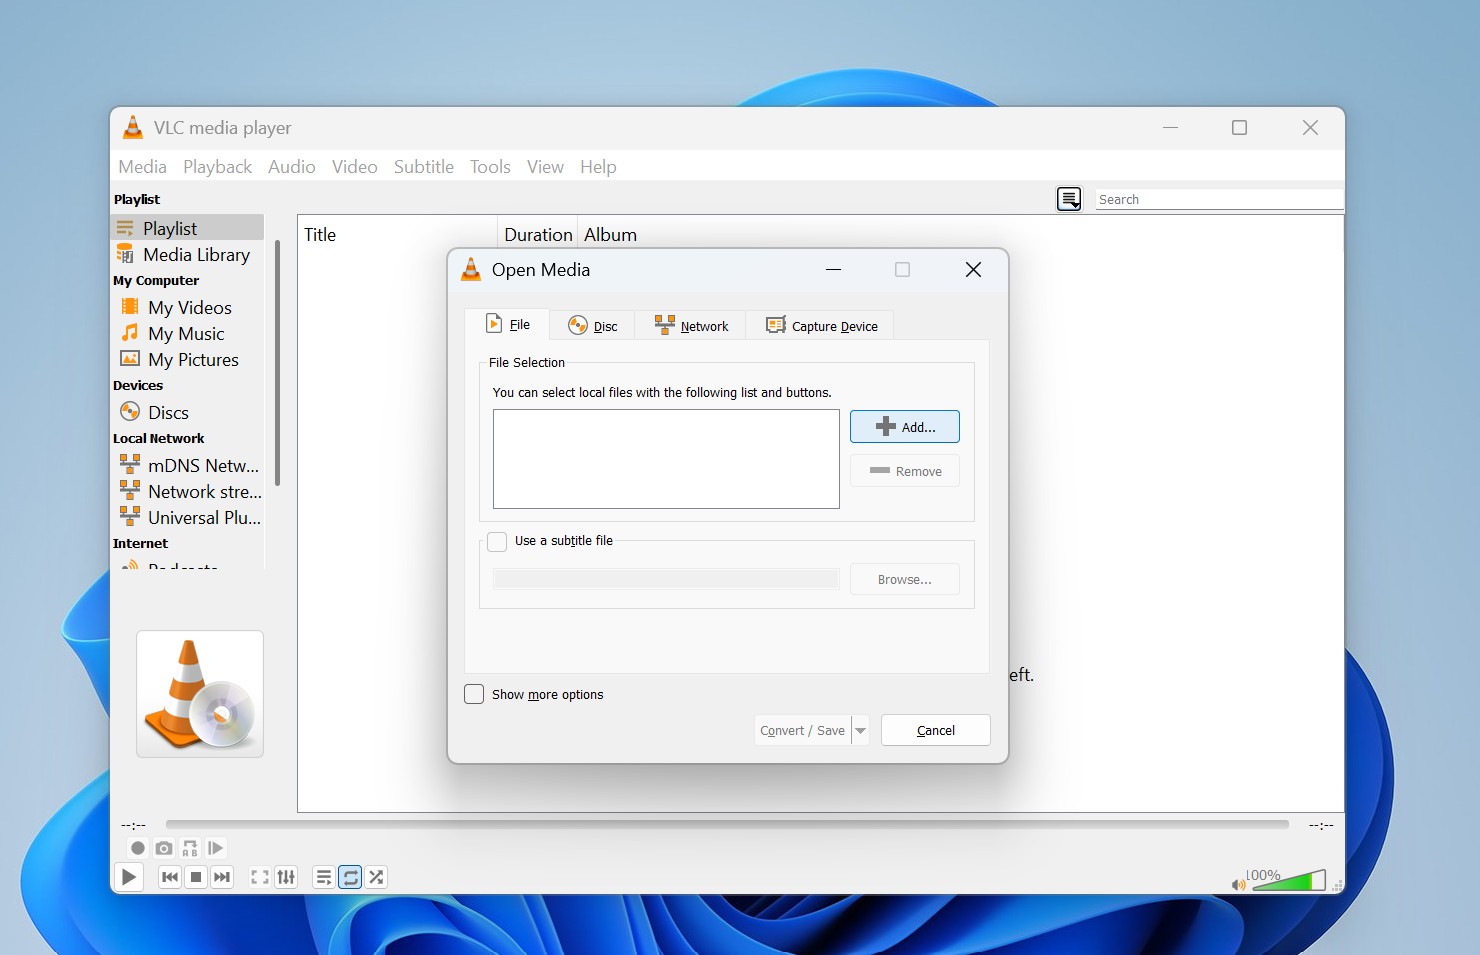
- Click Add and select your corrupted 3GP video file that you want to convert.
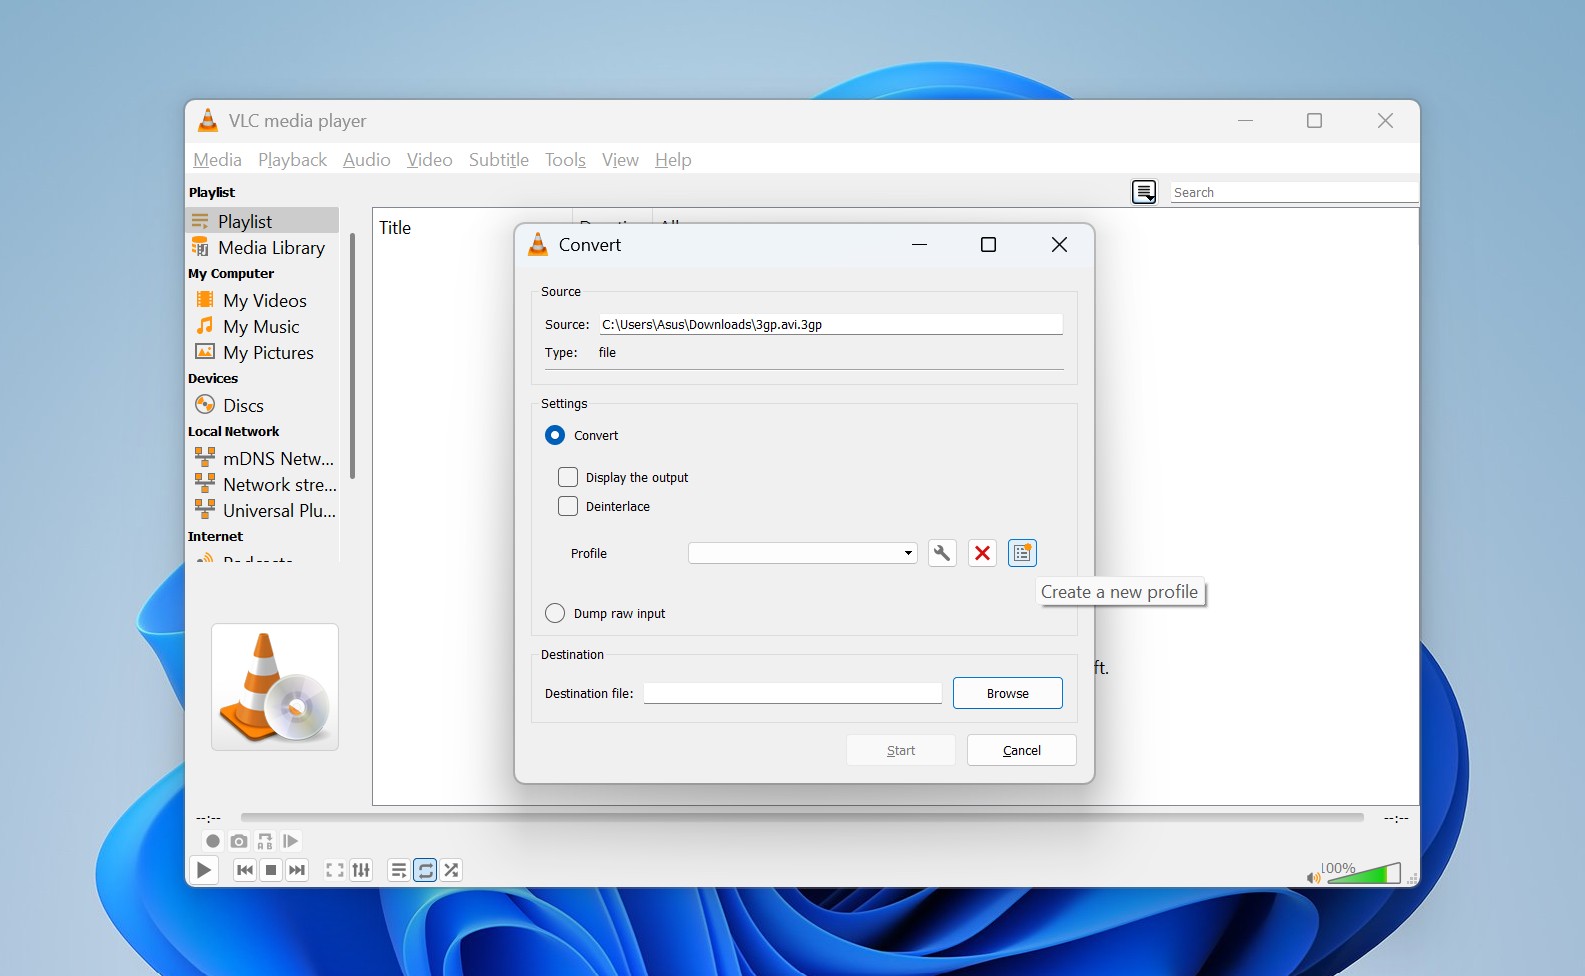
- Click Convert/Save. A Convert pop-up will open. In the Settings section, click on the list-icon button. This opens the Profile edition window. Give your profile a name and select MP4/MOV as the output format (We recommend MP4 since it’s widely supported and more stable than 3GP). Click on Create.
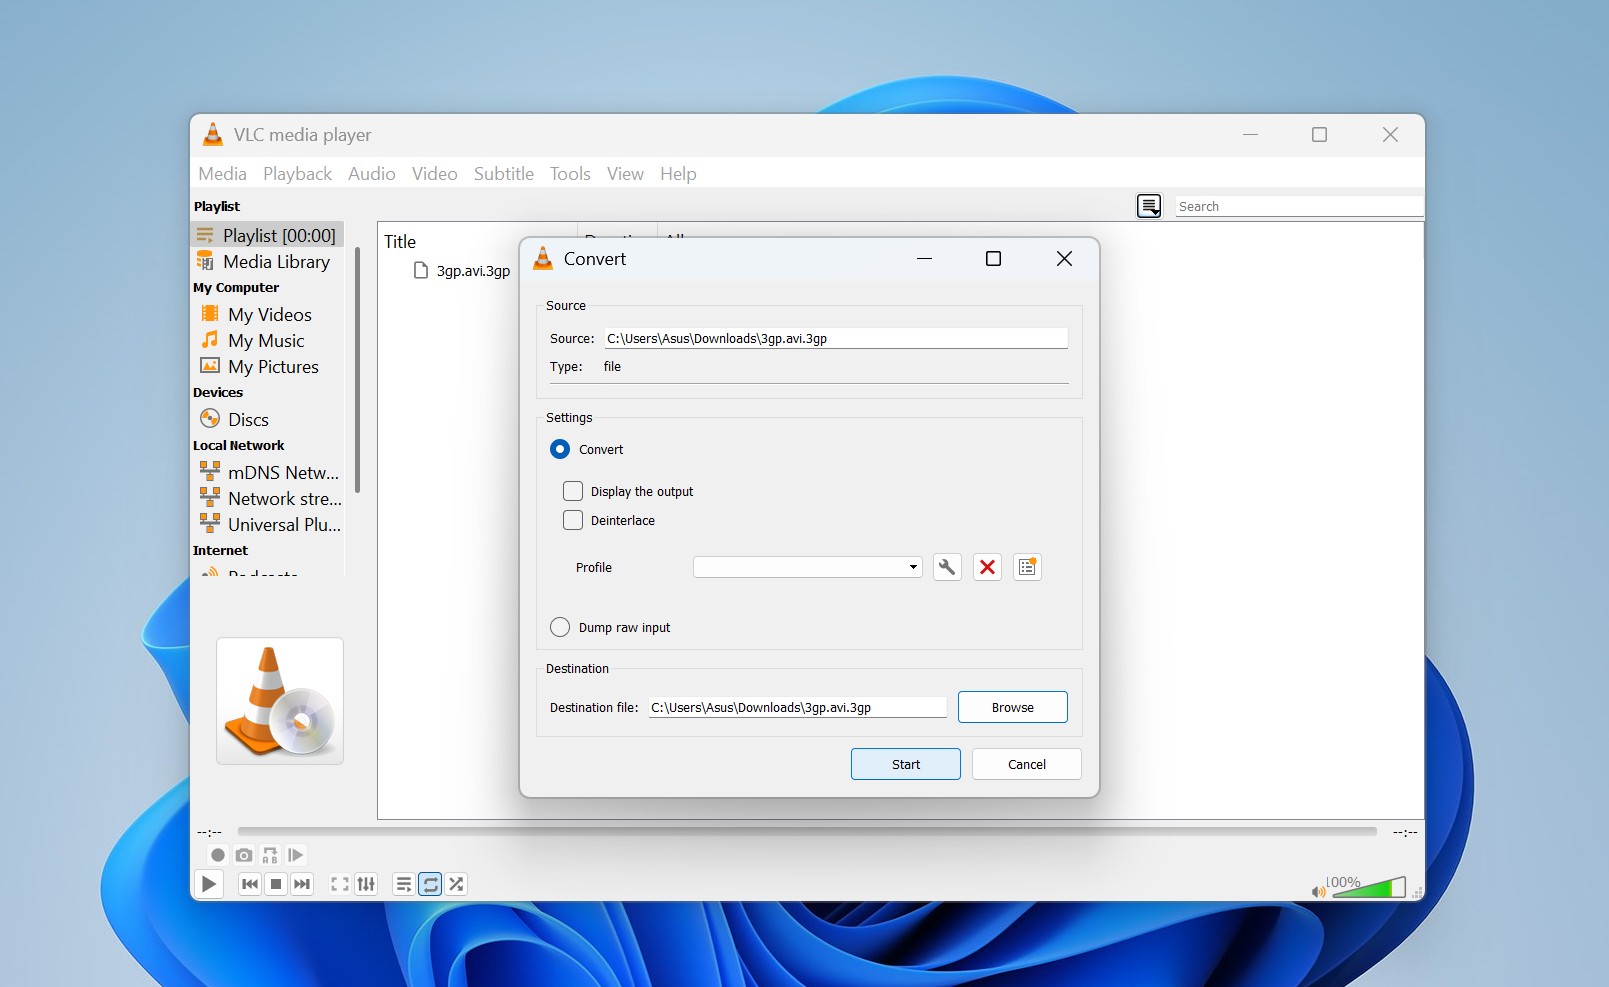
- Click Browse, choose where to save your converted file, and give it a name.
- Now click Start, and VLC will re-encode your 3GP file. Once done, open the destination folder and try playing the converted file to check if your issue is resolved.
Pro-tip: If you skipped it in the quick fixes section above, try converting your file to AVI and then use VLC’s Always Fix again if simple renaming doesn’t work.
Option B: Using HandBrake
- Download and Install HandBrake from their official website.
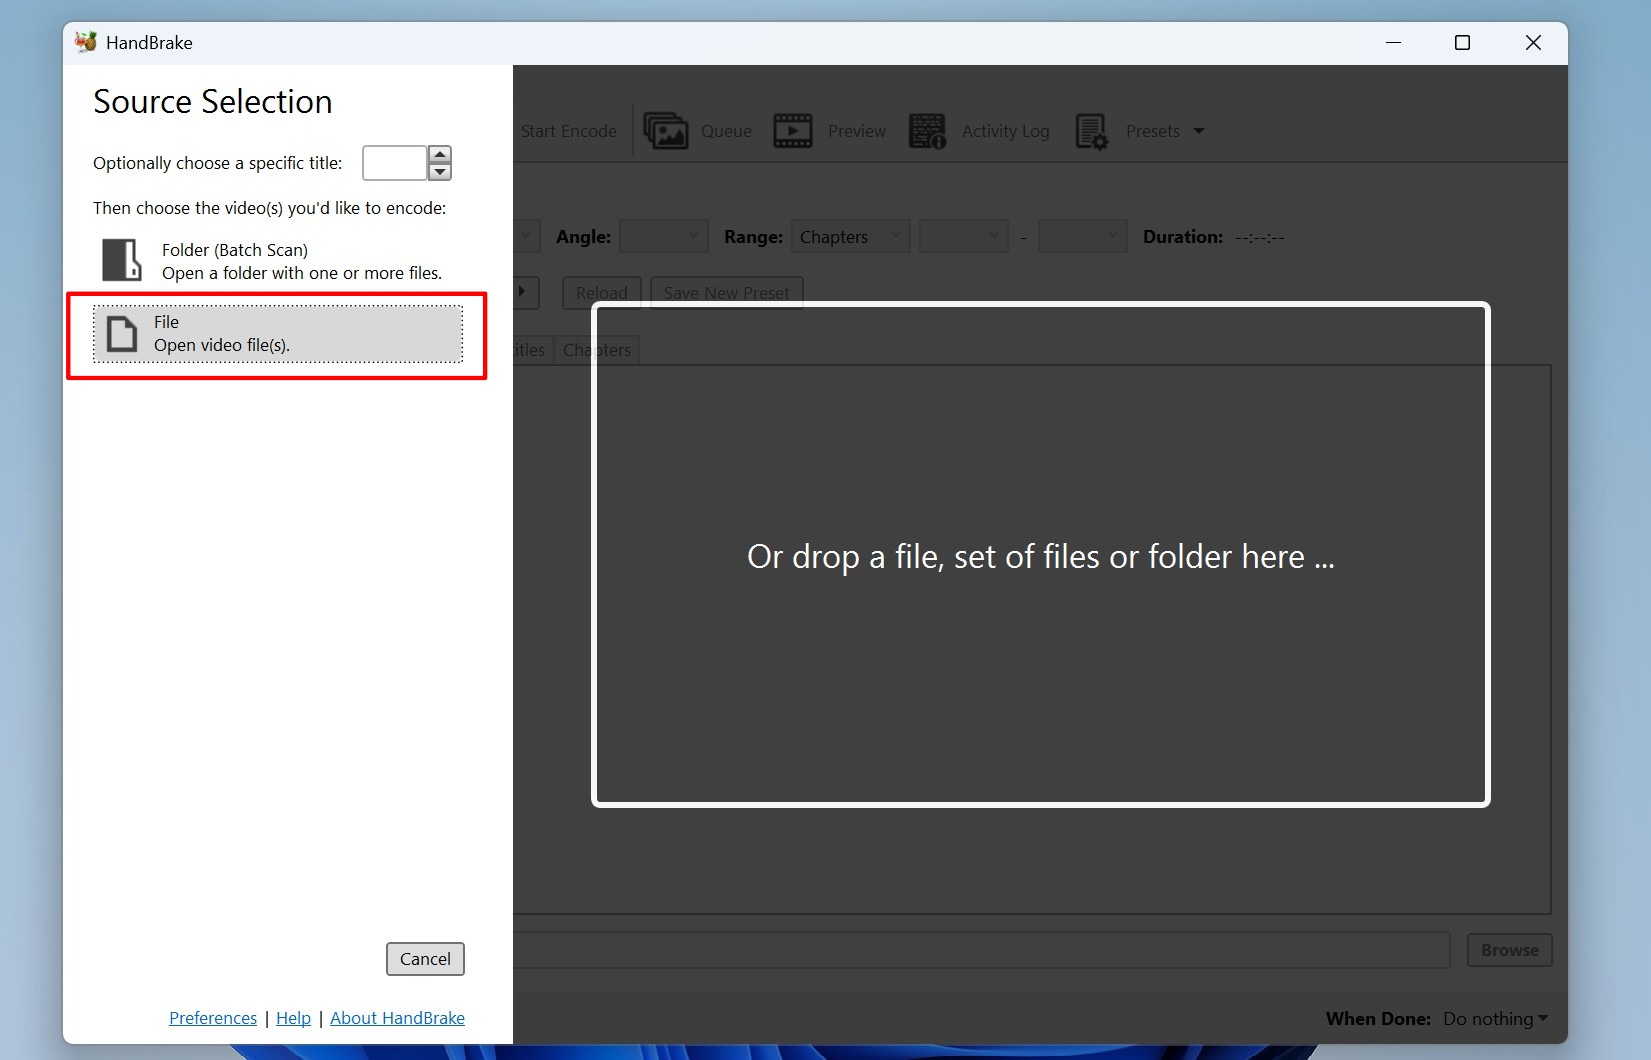
- Launch the application and in the source selection tab on the left, click on File to load the damaged video.
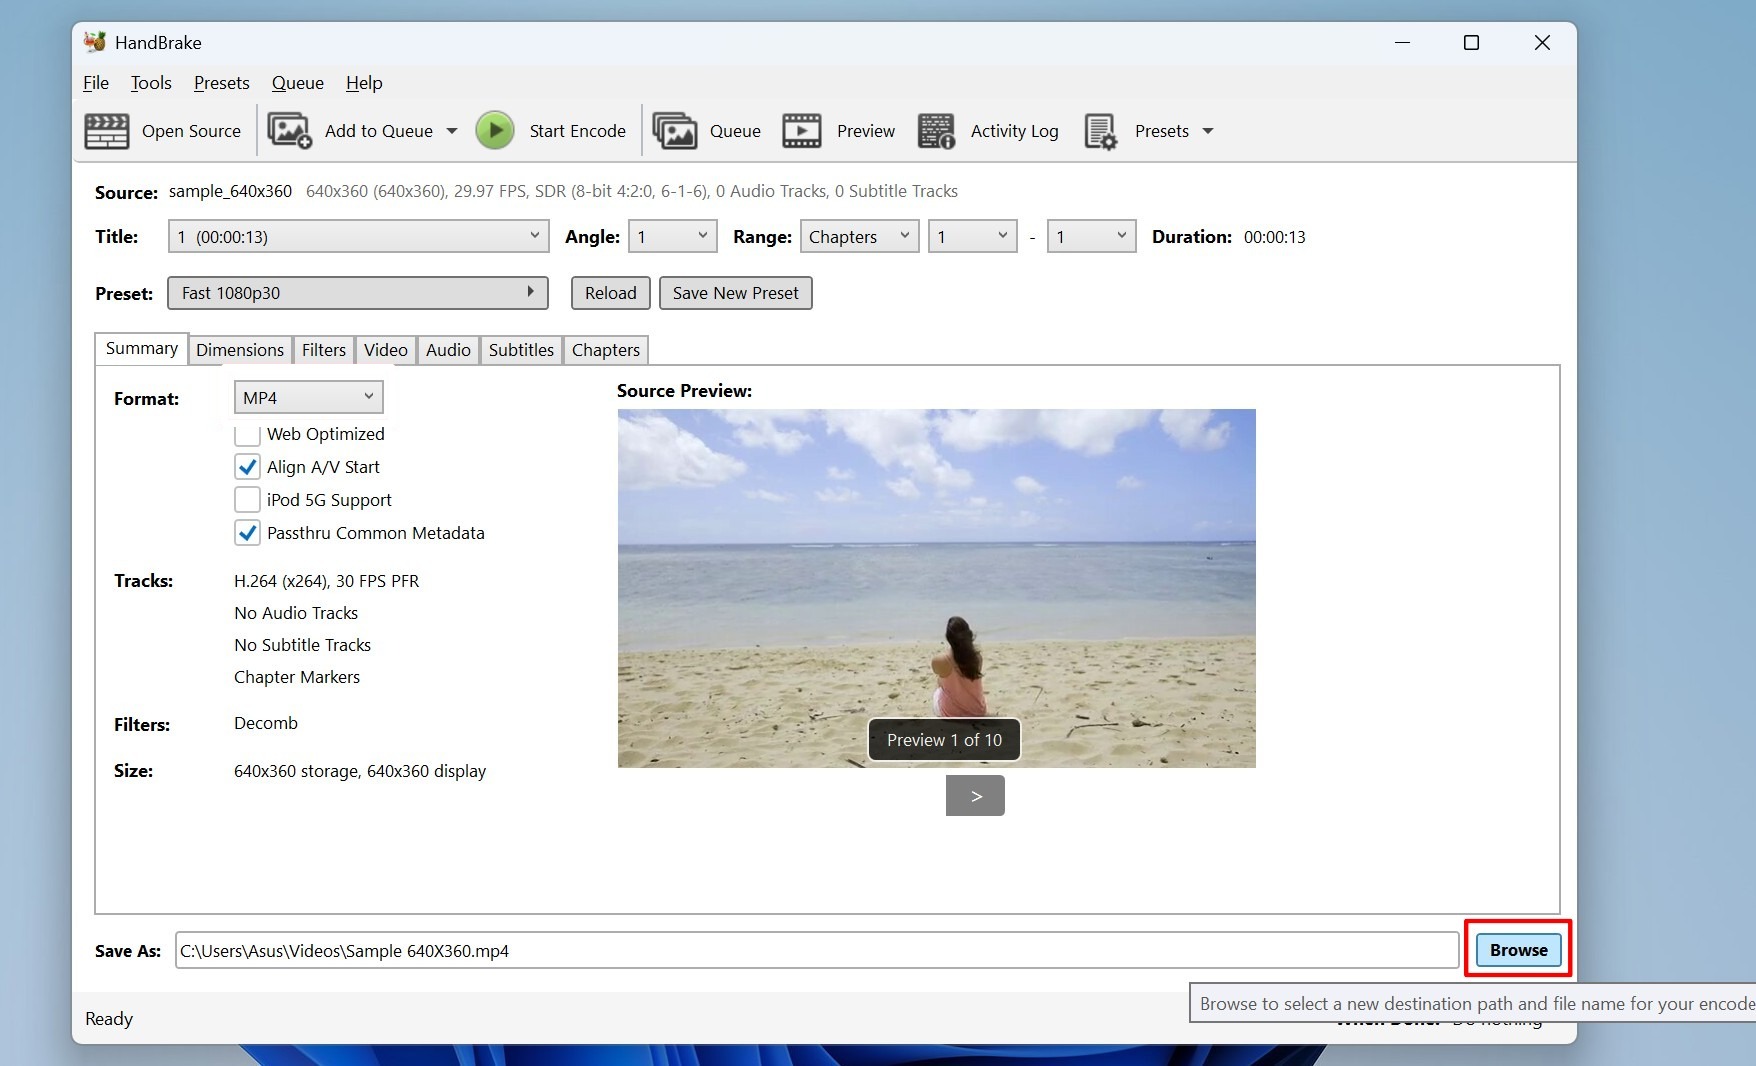
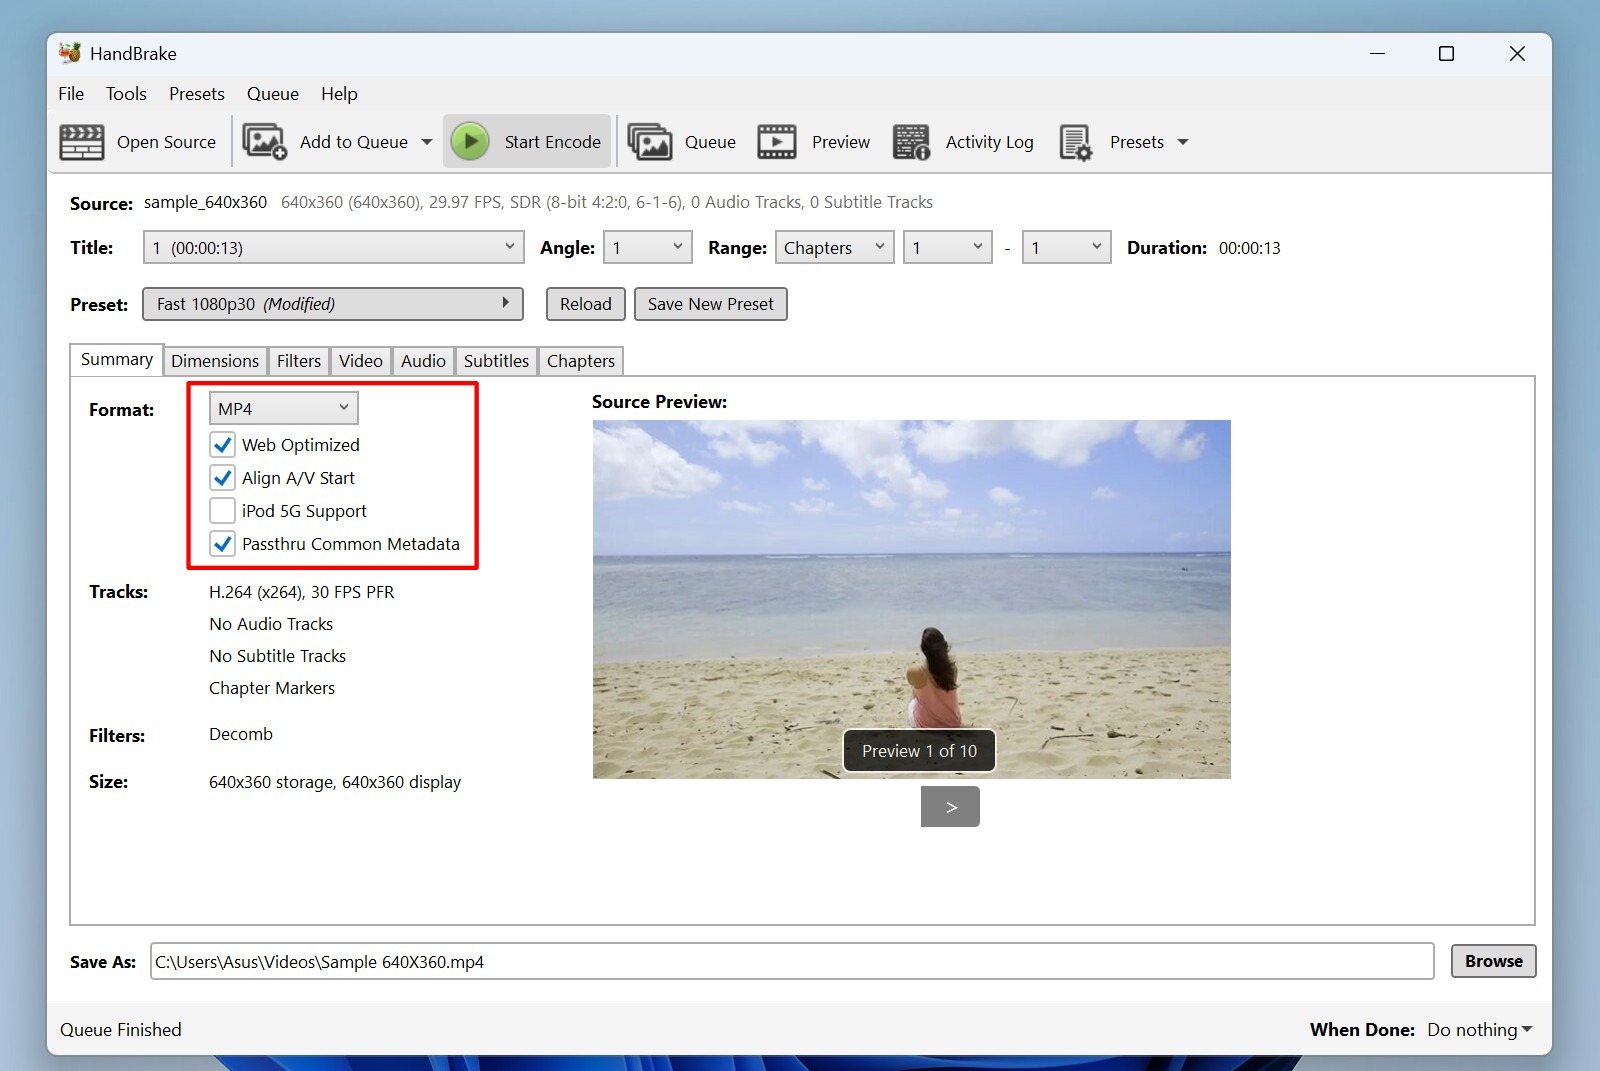
- Choose MP4 as the destination format in Summary.
- We found that if the default settings don’t work, you can enable “Web Optimized” under Summary, which can help fix structural issues.
- Next, click on Browse in the Save As field at the bottom, and then select where to save your repaired video and rename your file.
- Click Start Encode, and HandBrake will convert the video. Wait for the process to complete and try playing the repaired file in the destination folder.
How to Repair 3GP Videos Using CMD
For most cases, the methods we’ve listed above are enough to fix a corrupted 3GP video (if it is even salvageable, that is). Sometimes, however, you might need more advanced methods, so we’ve given a guide on using command-line tools like Untrunc and FFmpeg to attempt repairs. They provide more granular control over the repair process.
As such, they might be a little more intimidating for beginners, but we’ve laid it out as simply as possible with screenshots for every step, so don’t worry.
Option A: Untrunc
Untrunc is a command-line tool that can repair damaged video files, with support for many formats, including MP4, MOV, M4V, and even 3GP. Like before, you can use it to analyze a healthy sample video recorded on the same device that you took the 3GP video on. The tool works its magic and reconstructs missing or corrupted data in your broken file.
Note: Since Untrunc is Linux-based, Windows users need to install Windows Subsystem for Linux (WSL) or use a precompiled Untrunc version from GitHub. If you prefer using the CLI, run the following command in a Linux terminal or WSL after placing both your files (healthy and corrupted) in the same folder: untrunc healthy_video.3gp corrupted_video.3gp
But wait; if that sounds too complex, we found a better solution– if you prefer a graphical interface (GUI) instead of a CLI, there are Untrunc GUI wrappers like MP4 Repair that simplify the repair process. This version of Untrunc provides a simple interface with buttons instead of writing code in the CMD. Here’s how to use it:
- Download MP4 Repair Untrunc GUI from their website and extract the ZIP file to a folder on your system. Open the folder and run mp4repair.exe.
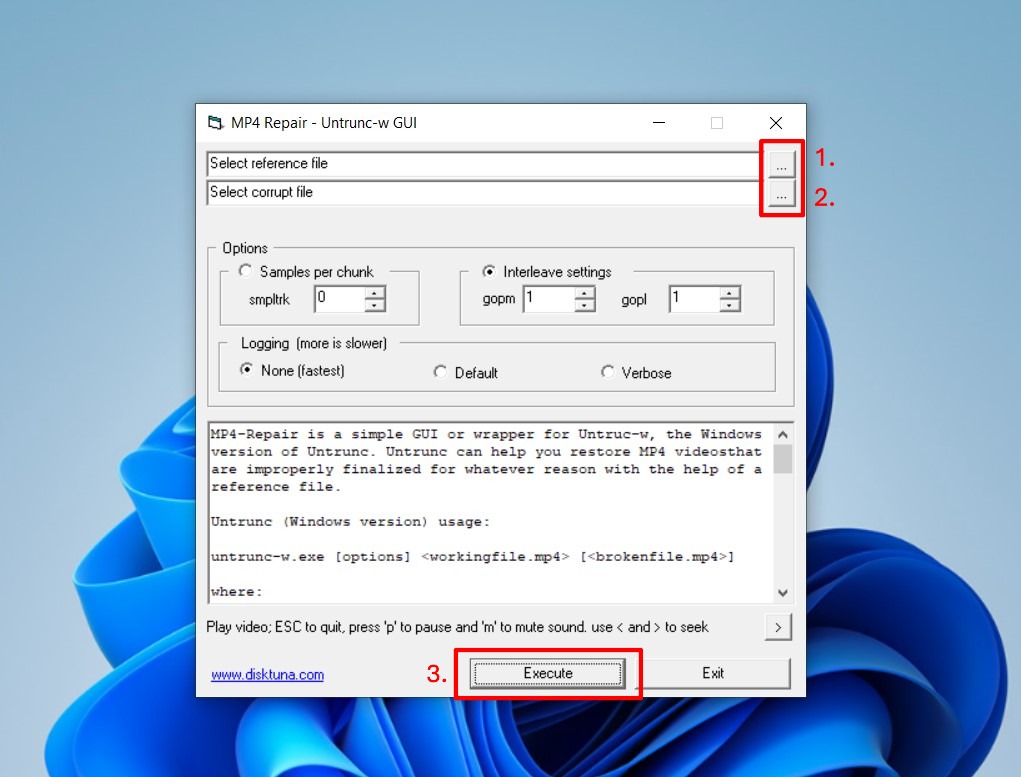
- Select the three dots “…” next to “Select reference file” and upload your healthy 3GP sample recorded on the same device. This sample video will help Untrunc reconstruct missing metadata and file structure.
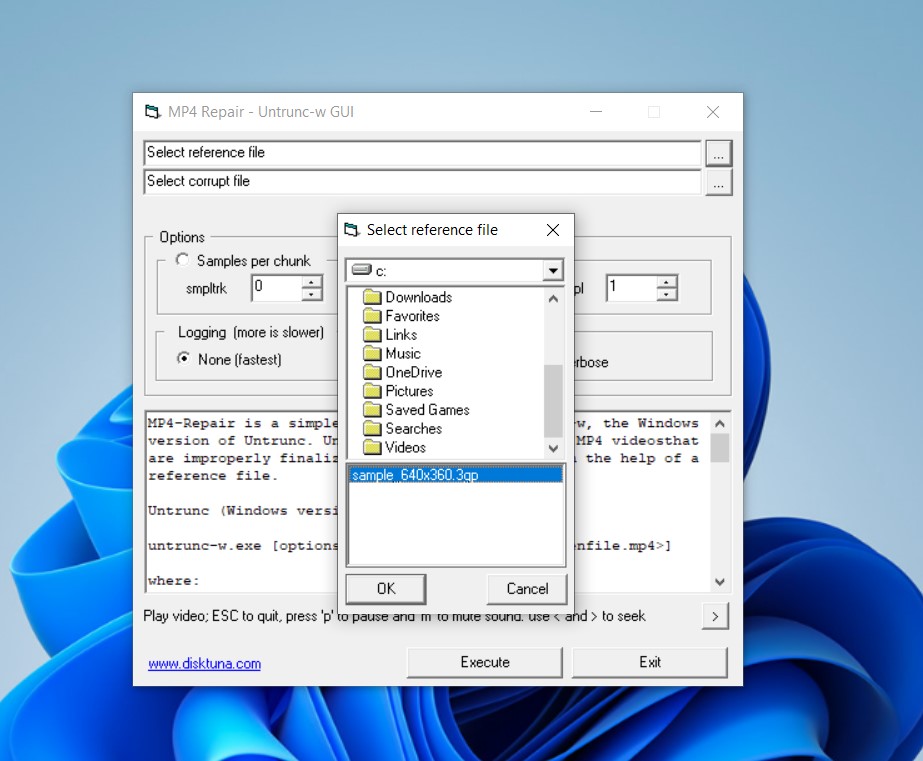
- Now do the same and upload the damaged 3GP file that you want to repair in the “Select corrupt file” section just below.
- Click on Execute to run the tool. MP4 Repair will analyze both files and attempt to rebuild the corrupted one.
- Once the repair is complete, preview the output and check if it plays correctly. You can then click on Save and send your repaired file to your chosen location. 👀
Tip: If it doesn’t play, you can now try converting this repaired file to MP4 using our above-mentioned tools, such as with VLC.
Option B: FFmpeg
This one is an open-source tool used for video repair and re-encoding of video files, including corrupted 3GP files, and is compatible with all major codecs and media formats. We’ve repaired corrupted videos using FFmpeg before.
We’d like to clarify that FFmpeg will be slightly harder to use for those unaccustomed to using command lines through CMD. If you want a GUI version, there are a few alternatives. The HandBrake encoder, which we outlined above, uses FFmpeg. We also found other dedicated GUI wrappers like QWinFF and Axiom.
If you still want to give FFmpeg a shot through CMD, we’ll make it super simple. Here’s how to use it to try and recover unplayable 3GP files:
- Download FFmpeg’s latest version from their official site and extract it to a folder on your computer.
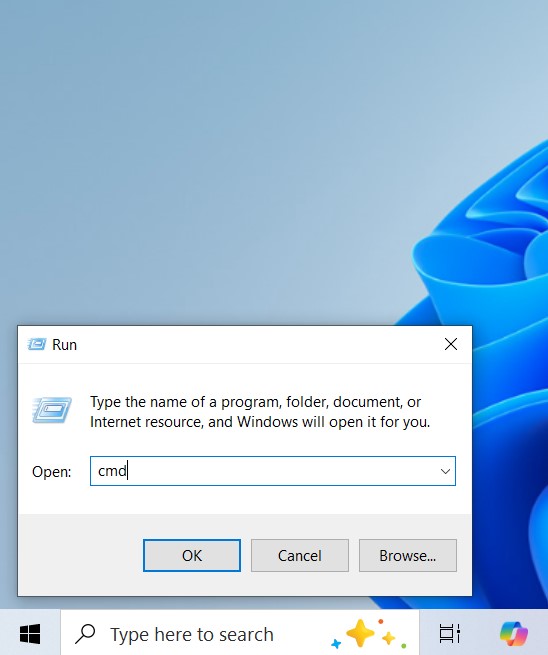
- Press Win+R, type cmd, and then press Enter. This opens the CMD (command prompt) terminal where you’ll use FFmpeg.
- In the CMD, you have to enter the following and hit Enter:
ffmpeg -i corrupted_video.3gp -c copy repaired_video.3gp - You may have already guessed that you must replace the corrupted_video and repaired_video text in the above command with the name of your sample file and corrupted 3GP video. This command will attempt to copy streams from the broken file to a new playable version.
- If the above fix doesn’t work, you might need to try forcing a full re-encode. Do this by entering the following command:
ffmpeg -i corrupted_video.3gp -preset ultrafast -vf “format=yuv420p” repaired_video.mp4 - This converts your 3GP file into MP4 while preserving as much data as possible.
- Now try and play the repaired file in VLC or another media player to see if it worked.
Note: If you encounter the “Moov Atom Not Found” error during FFmpeg repair, we have a detailed guide explaining what it is and how to fix it, which we’ve already linked above.
The above is just one use case for FFmpeg. If you want more info, you can get it here in FFmpeg’s extensive online documentation. If you’re still stuck, try asking for help on the r/ffmpeg forum on Reddit.
What if the Repaired 3GP File Still Doesn’t Play?
In some cases, your 3GP file will be simply too damaged to fix, and recovery can never be guaranteed 100%. If all else fails, we recommend that you try asking for help in the online communities we’ve already mentioned like r/ffmpeg or visit our Handy Recovery Advisor Forum for expert guidance and access to useful discussions.
Another potential solution is to use a freelance gig site like Fiverr and pay someone else to try and fix it for you. Make sure to carefully read reviews and testimonials before hiring and only make on-site payments!
FAQ
What causes 3GP file corruption?
The most common causes for 3GP file corruption include incomplete transfers, sudden power loss during recording, file system errors, or issues with your storage device, like bad sectors or malware.
Is there a free 3GP repair tool?
Yes, several free tools can repair your 3GP files. VLC Media Player has a built-in repair function, Untrunc can restore damaged files with a reference sample, and FFmpeg can extract playable data. Online tools like Clever Online Video Repair also let you repair dozens of video files, including 3GP, for free.
Can I repair 3GP files directly on my smartphone?
Yes, tools like Clever Online Video Repair are fully optimized for use on your modern smartphone. It allows you to repair videos directly from your mobile device. If you register with your email, you can also access your repaired files anytime from any device.
Is it safe to use online 3GP repair tools?
It depends. Online repair tools can be safe, but you should only use trusted websites. We recommend that you avoid services that ask for unnecessary personal data or require suspicious downloads. Clever Online Video Repair is a reputable option that is also completely free and supports 3GP repair with files of up to 5GB size.
Why do some tools ask for a sample or reference file?
Tools like Untrunc require a reference file to reconstruct the missing metadata and structure of your corrupted 3GP video. The sample file helps the tool restore your broken file using a known, correct format and replacing the relevant bits.
How does converting a 3GP file help fix corruption?
Converting your corrupted 3GP file to a different format, like MP4, can help if the issue is caused by codec mismatches or minor corruption. The conversion process restructures your file and sometimes makes it playable again. VLC and HandBrake are great free options for doing this.
Can I repair a 3GP file that was partially downloaded or copied?
It depends on the specific situation. If key metadata is missing from your file, then it will be unplayable. In some cases, FFmpeg can extract playable data, or Untrunc can repair the file if you have a healthy reference. However, if your file is incomplete, full recovery may not be possible.
Can Untrunc work without a sample file?
No, Untrunc requires a sample file recorded on the same device to reconstruct your damaged 3GP video’s structure. It cannot determine how to fix the missing data without a reference.
Why does FFmpeg repair output result in much larger file sizes?
FFmpeg outputs larger files because it re-encodes the video with a less compressed format to preserve quality. Here’s a fix: if you want a smaller file size, use a codec like H.264 with settings that optimize compression. Run this command: ffmpeg -i repaired_video.3gp -vcodec libx264 -crf 23 output.mp4
How to repair 3GP video/audio sync issues?
If your repaired 3GP file has audio sync issues, you can try and use FFmpeg to adjust the audio delay. As an example, we shifted the audio on a test file by 0.5 seconds forward using this command: ffmpeg -i video.3gp -itsoffset 0.5 -i video.3gp -map 0:v -map 1:a -c copy fixed_video.3gp
You can customize this command yourself by changing the -itsoffset value any other number (+ve values delay the track while -ve values will advance it). Alternatively, VLC Media Player has a built-in audio delay adjustment (go to Tools>Track Synchronization and then manually fix playback sync issues).
This article was written by Vihaan Jain, a Staff Writer at Handy Recovery Advisor. It was also verified for technical accuracy by Andrey Vasilyev, our editorial advisor.
Curious about our content creation process? Take a look at our Editor Guidelines.