If you’re wondering whether it’s possible to recover data from an SSD drive, then we have good news for you: yes, you can use data recovery software to undelete data lost from an SSD—at least in most cases.
Is SSD Data Recovery Even Possible?
Contrary to what some online guides would make you believe, SSD data recovery is really possible, but your success rate can vary greatly depending on whether you have the TRIM command enabled.
When enabled, the SSD TRIM command allows your operating system to inform the SSD that unused data can be wiped internally. This is done to speed up subsequent write operations and thus increase the overall performance of the SSD.
Because it’s up to the operating system to send the TRIM command, trimming typically doesn’t happen after a power failure, software error, file system corruption, sudden partition loss, and other common causes of data loss.
As long as you begin the recovery process soon enough before the TRIM command has a chance to trigger, you should be able to get your data back without major problems—as long as you use a reliable SSD recovery application.
Here’s some reassuring information: TRIM does not work on external SSDs on Windows.
How to Increase Chances of Successful SSD Recovery
As we’ve already explained, SSD recovery is often possible without going through extra steps, but there are several things that you can do (or avoid doing) to increase your recovery chances:
- 🛑 Disconnect the SSD: You should disconnect the SSD from which you want to recover your missing files immediately after noticing that data loss has occurred. You should then connect it to a different computer and perform the data recovery there. In this case, TRIM will be excluded from the recovery process. If you don’t have access to another computer or this seems like too much work to you, then at least shut down your machine until you’re ready to begin the recovery process.
- 🧰 Install data recovery software on a different drive: If you don’t have data recovery software installed on your computer already, then avoid installing it on the SSD that contains your missing files. Why? Because you could overwrite them and make them impossible to recover. For the same reason, we always recommend having at least one data recovery application installed on the system drive. That way, you can simply fire it up when you experience the loss of important files and begin their recovery without any delay.
- 🏆 Use the best SSD recovery software available: Since SSD recovery is a time-sensitive process, you may have just one chance to undelete your files. That’s why you should always use the best SSD recovery software available, even if it means spending some money.
How to Recover Data from SSD on a Windows PC
Regardless of whether the TRIM command is enabled or not, you can perform SSD file recovery with the same data recovery software you would use to recover files from a traditional hard drive. Disk Drill Data Recovery is an excellent choice because it’s exceptionally easy to use and supports all commonly used Windows file systems and file formats.
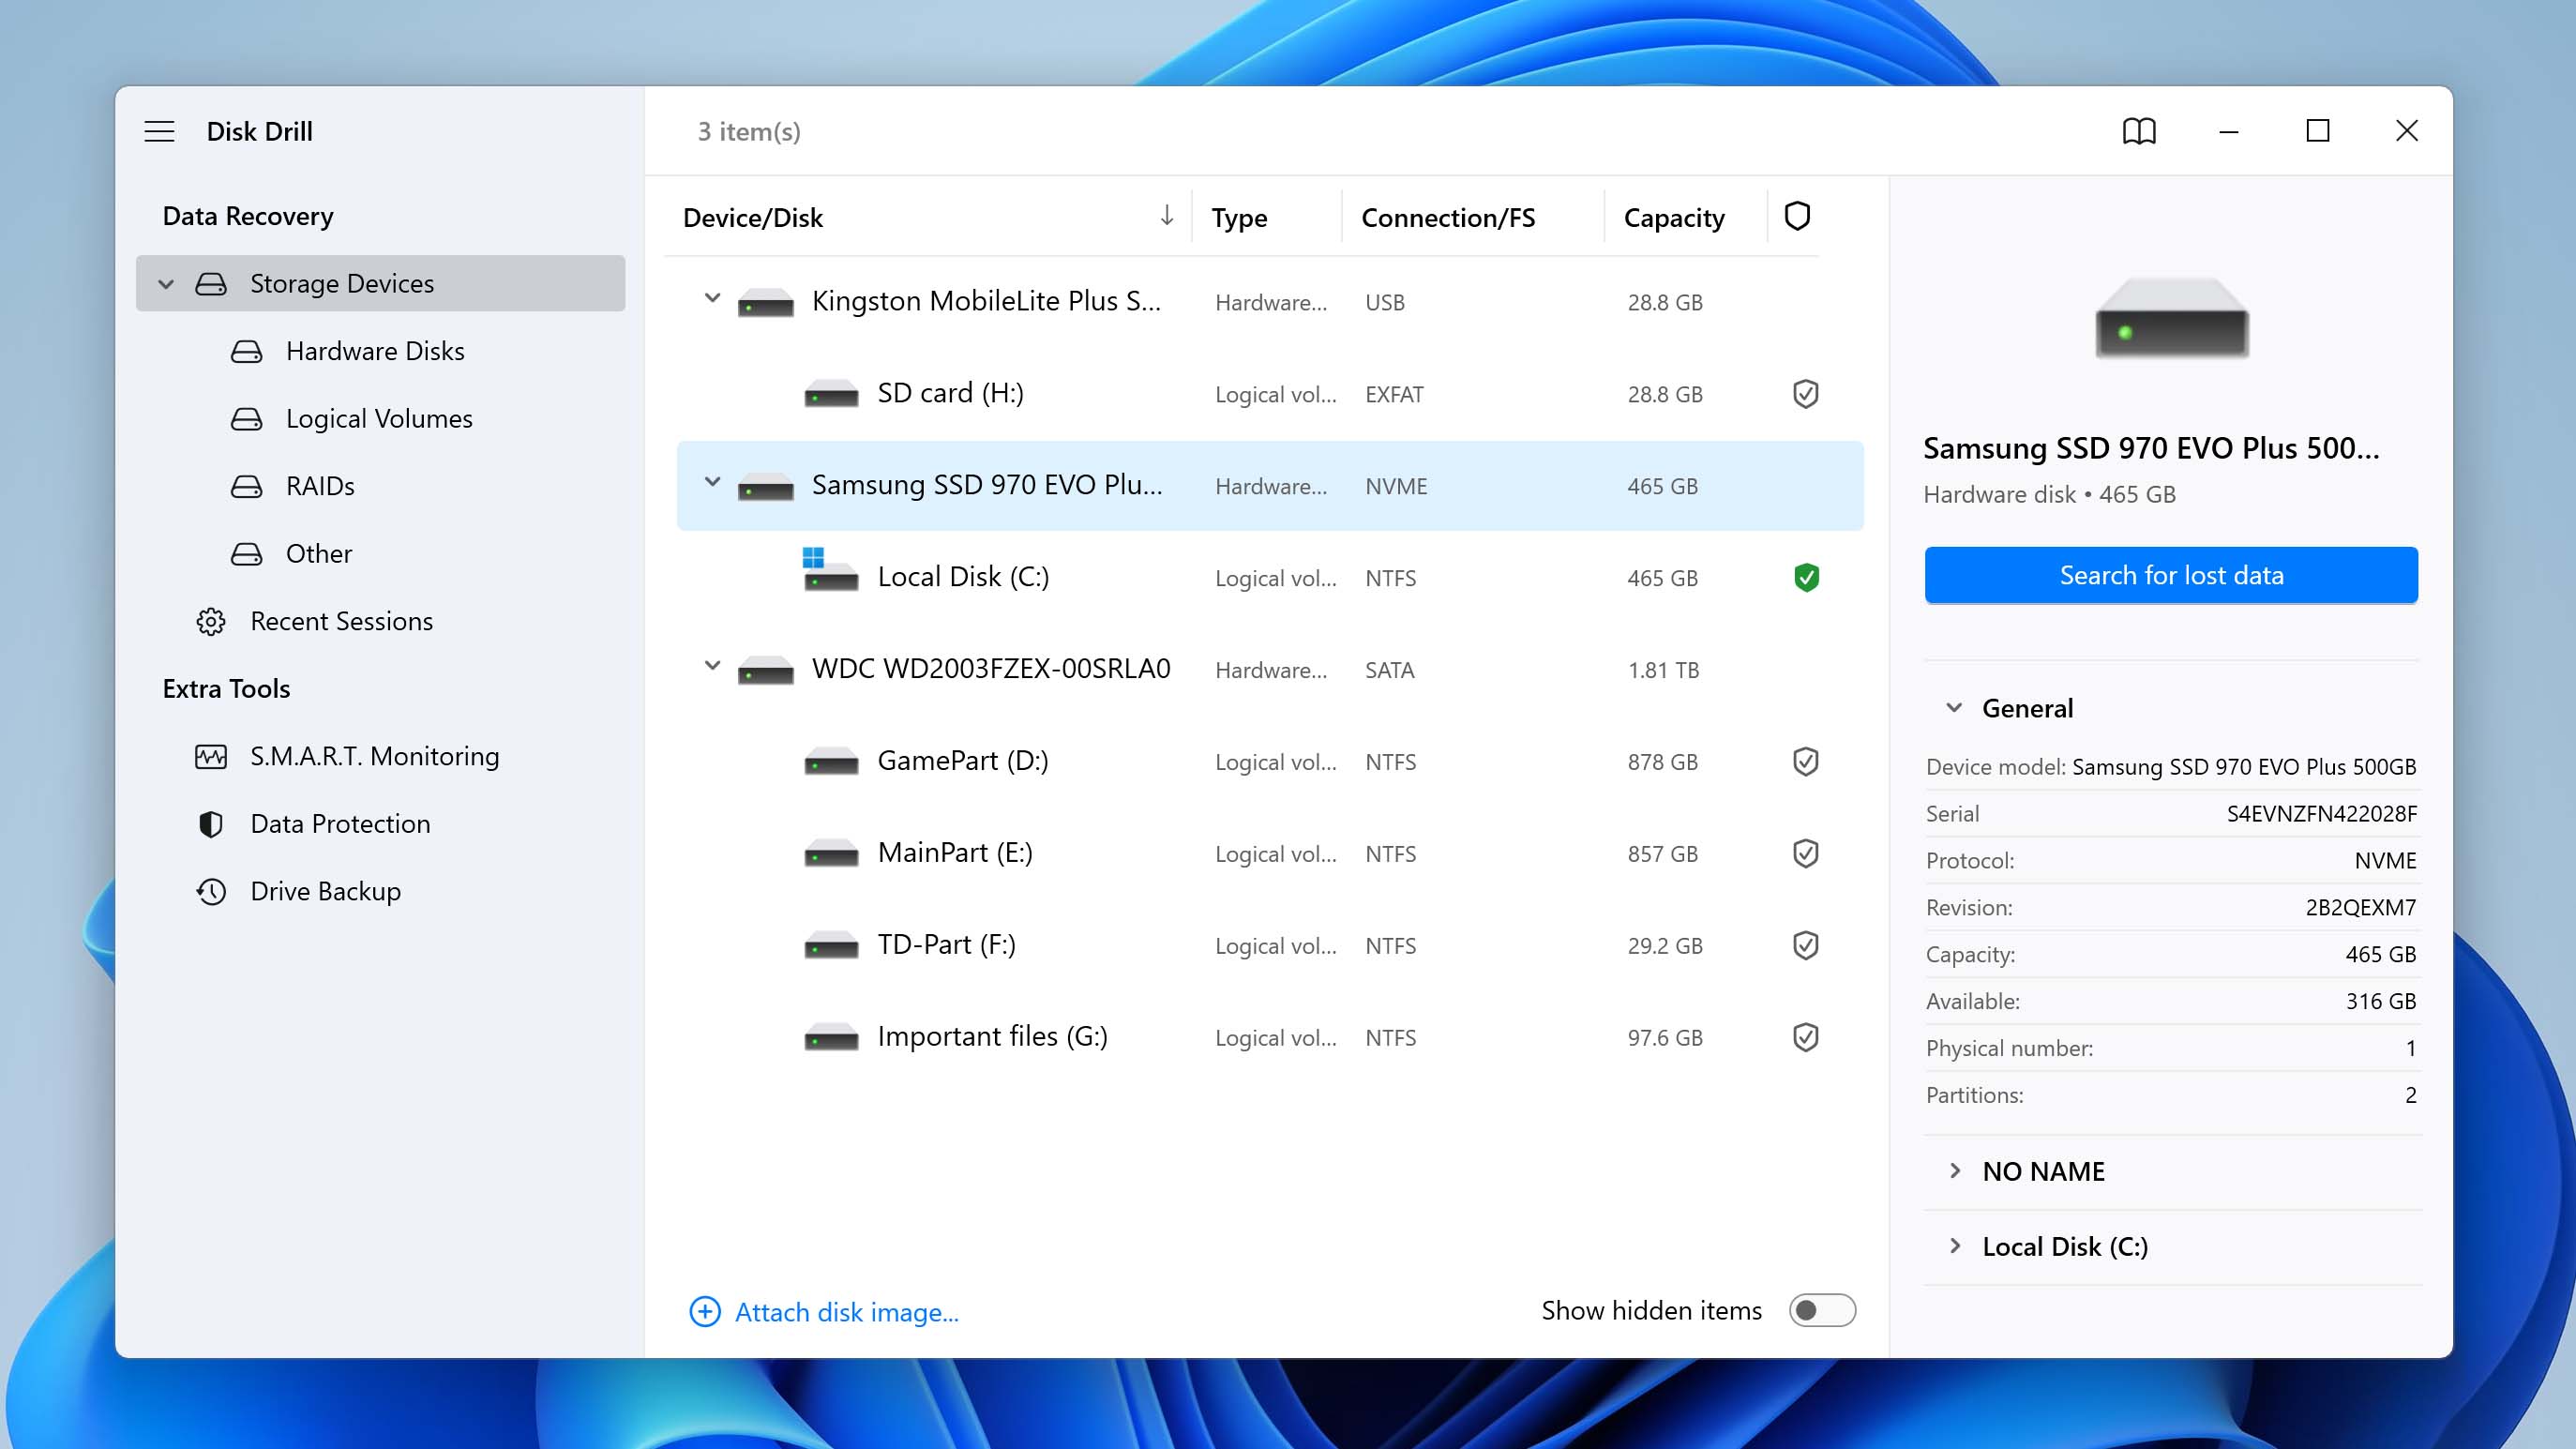
- Download and Launch Disk Drill for Windows: The Windows version of Disk Drill can be downloaded for free from its official website and used to recover up to 500 MB of data. To recover an unlimited amount of data, you can upgrade to Disk Drill Pro at any time.
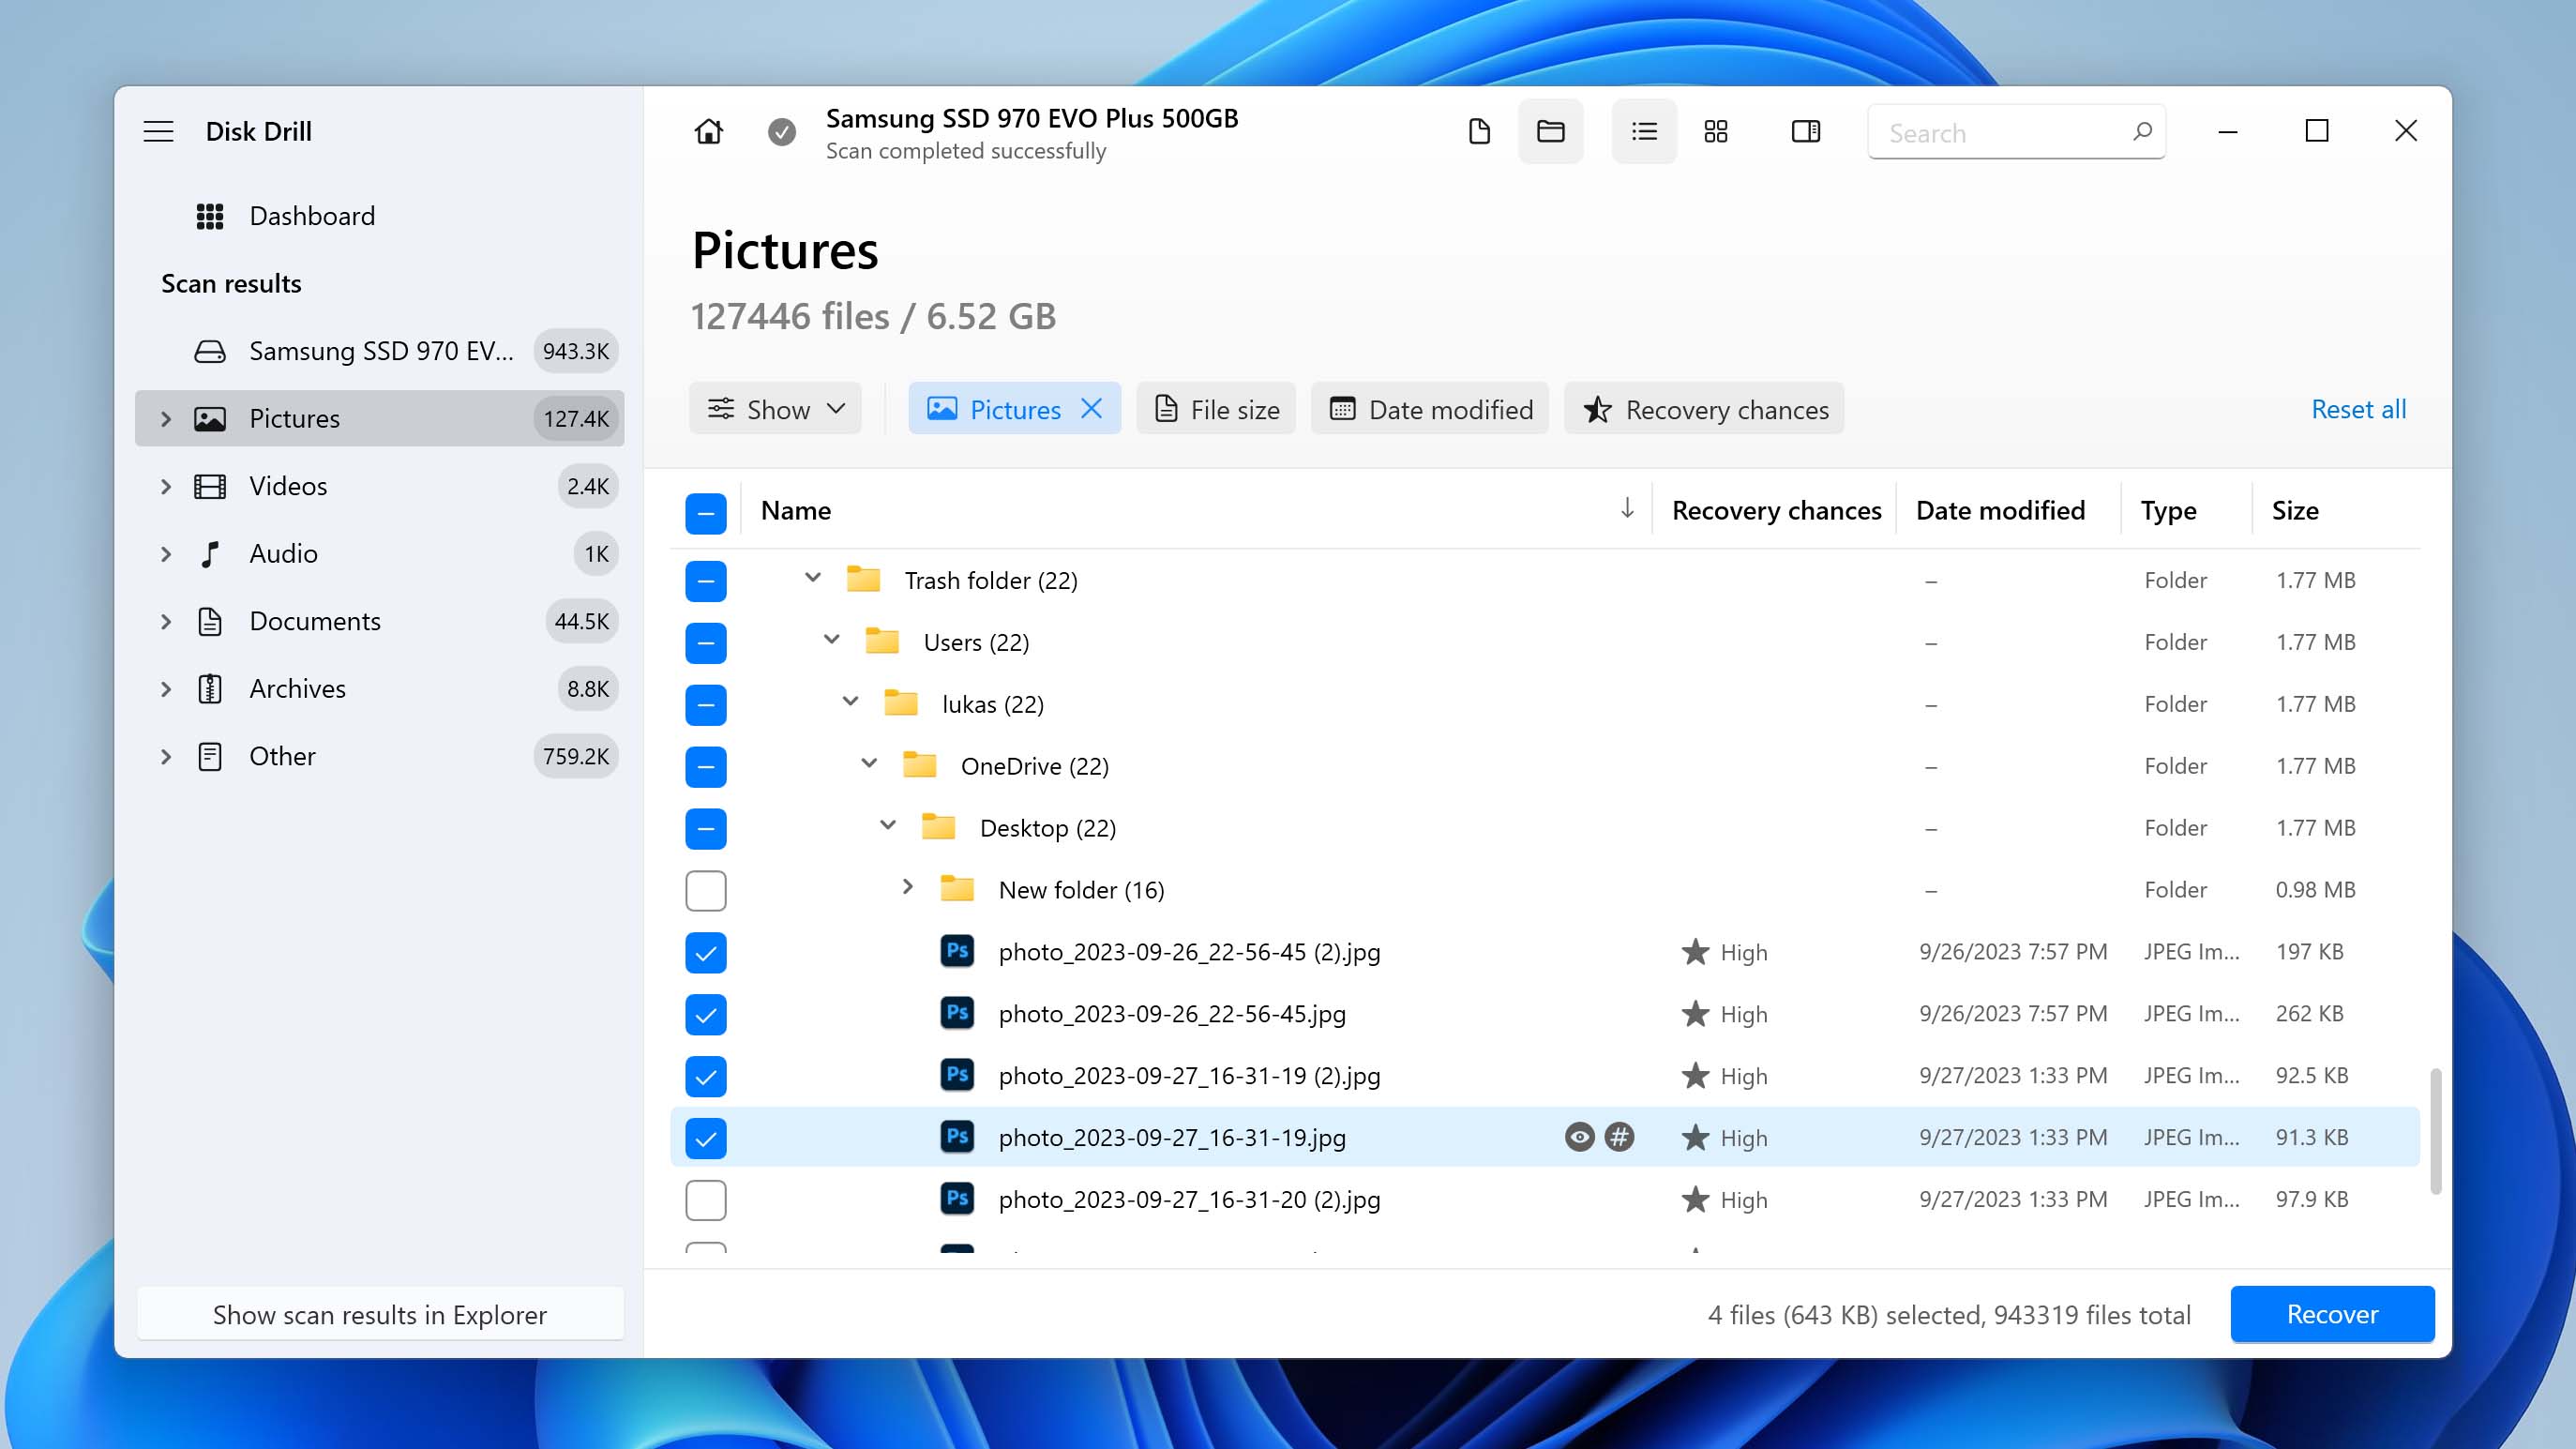
- Select Your SSD and Click Search for Lost Data: Once launched, Disk Drill will list all available storage devices, allowing you to select your SSD. To begin the recovery process, click the Search for lost data button and let Disk Drill apply all data recovery algorithms in the optimal order. When the scanning process is over, click on the Review found files button.
- Preview Recoverable Files: Disk Drill can preview all multimedia file formats supported by the Windows operating system or those for which you have a third-party viewer installed. When a file can be previewed, it virtually always means that it can also be successfully recovered, so make sure to take advantage of this feature when deciding which files to recover.
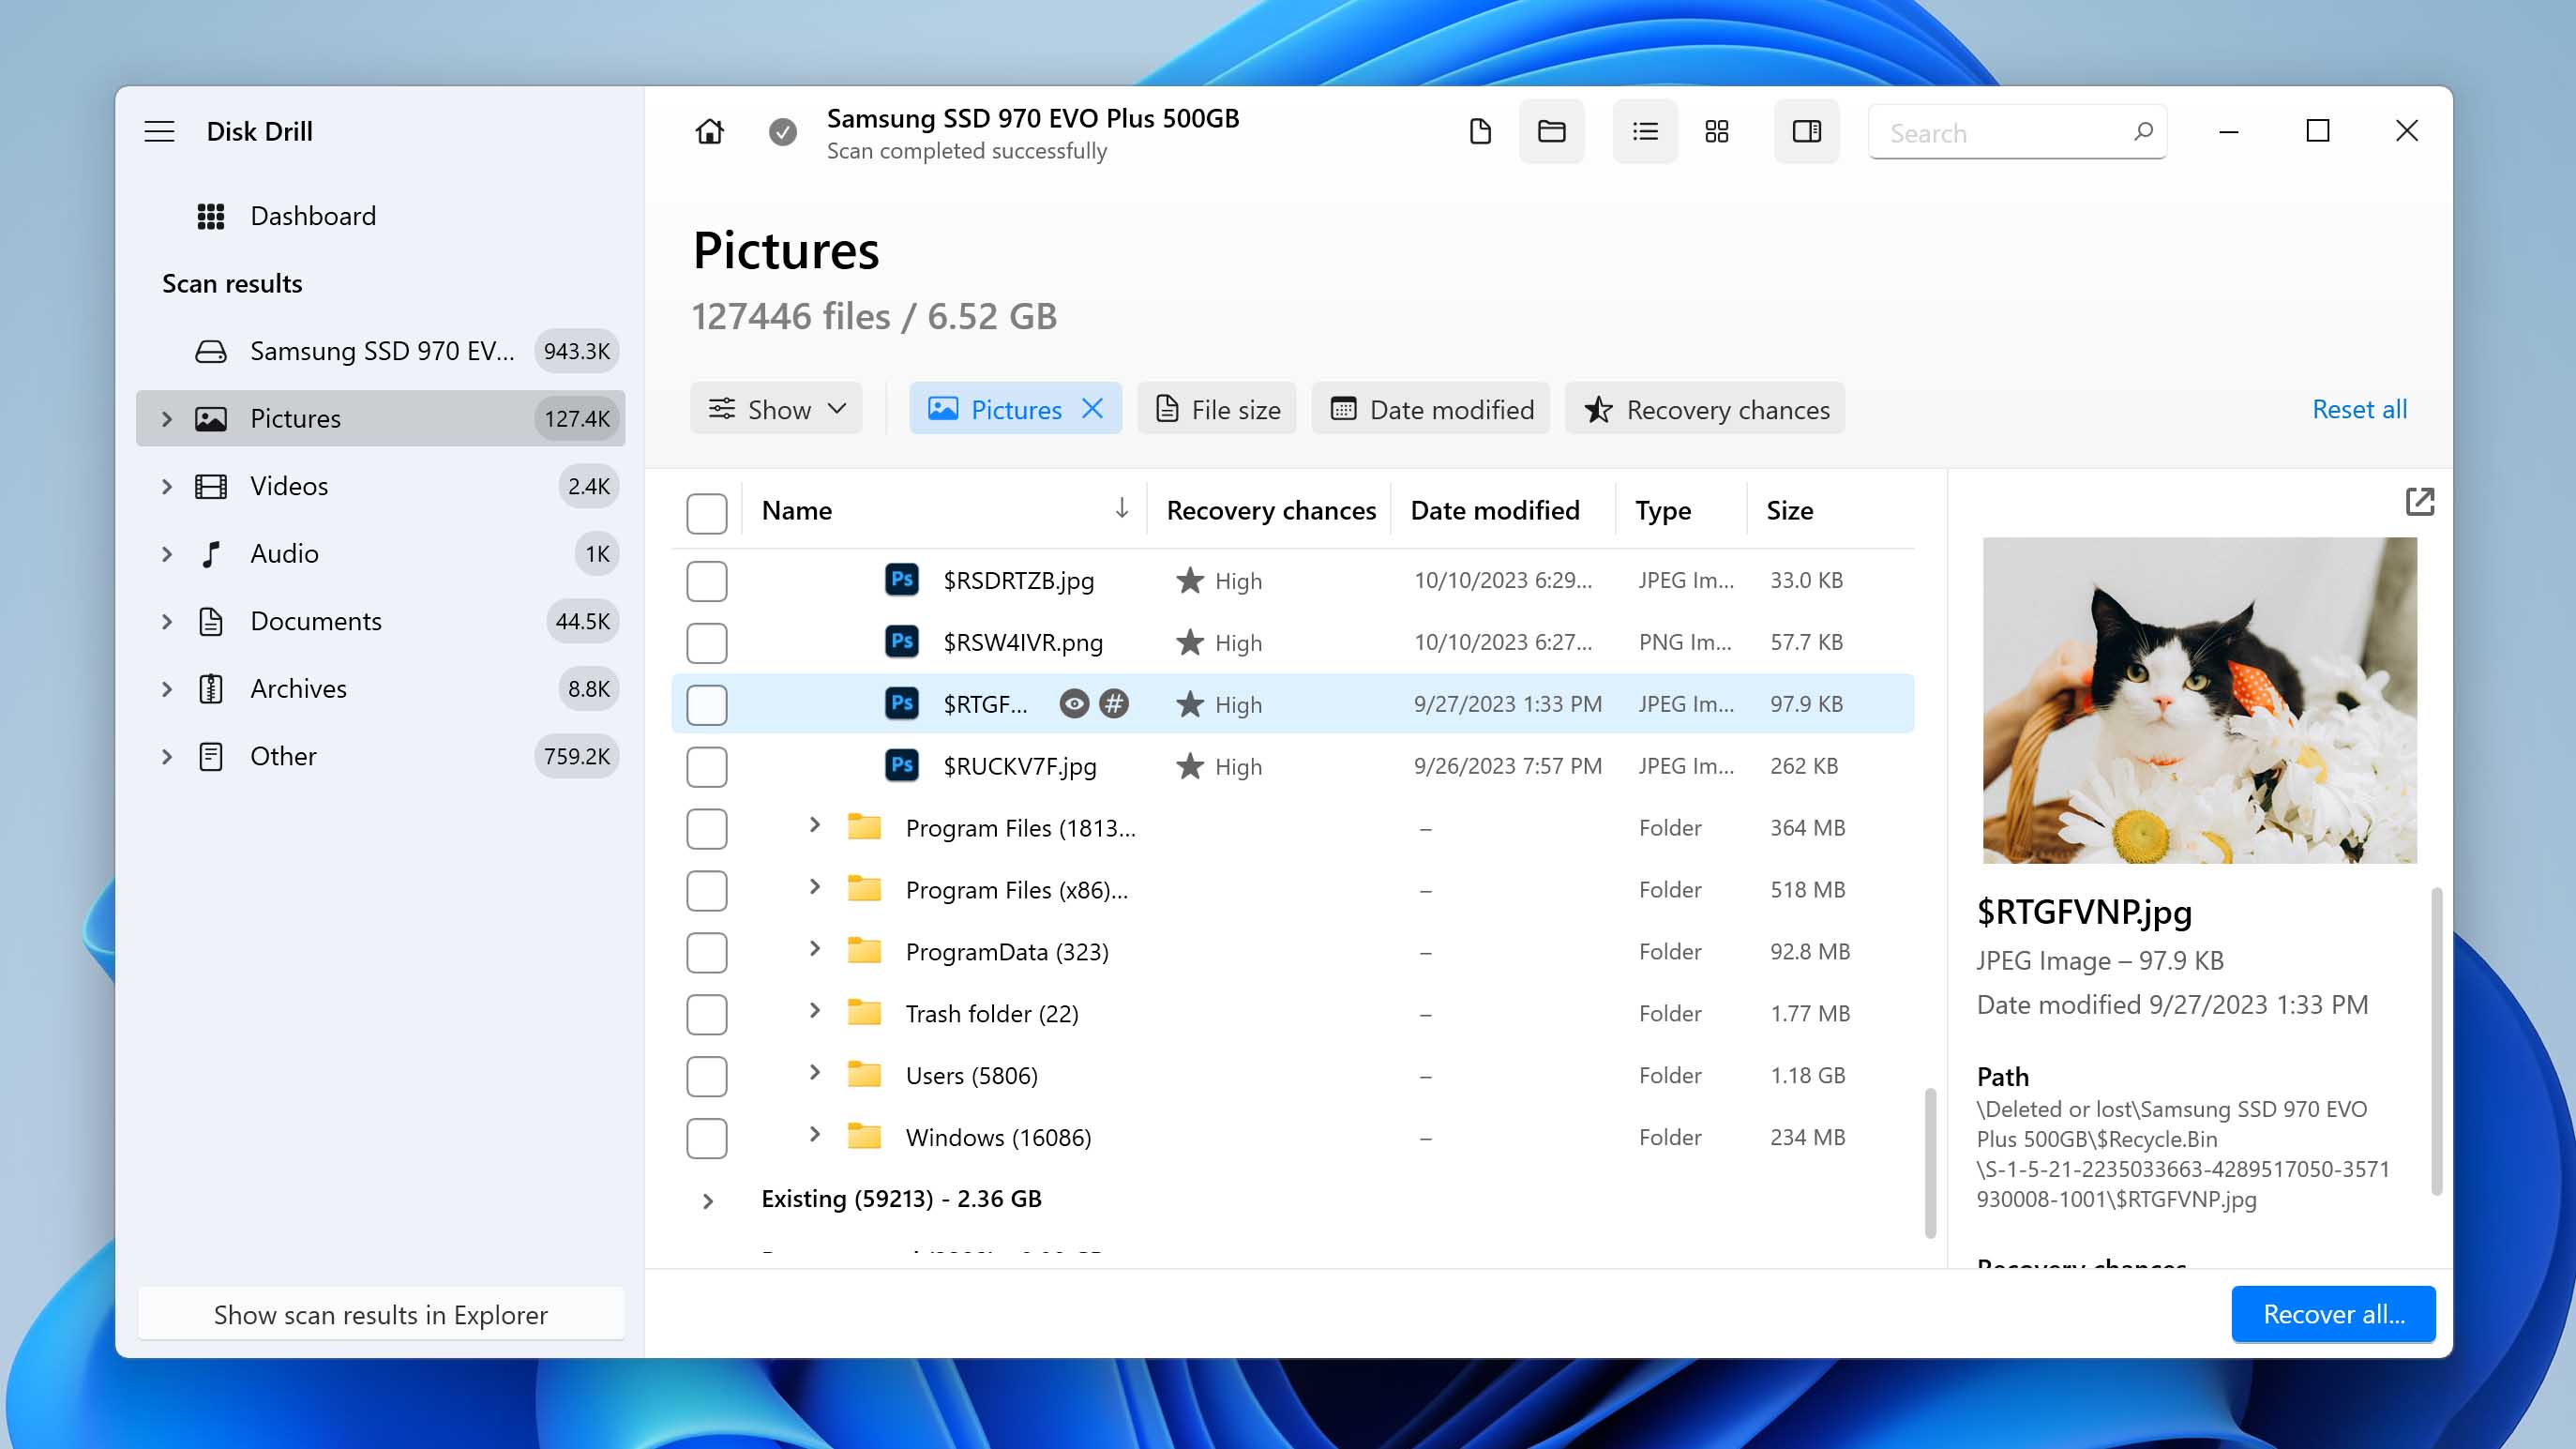
- Select Files You Want to Recover: To add files to your recovery queue, simply click the checkbox next to each file you want to recover. You can use the scan results filters on the left to narrow down the number of recoverable files.
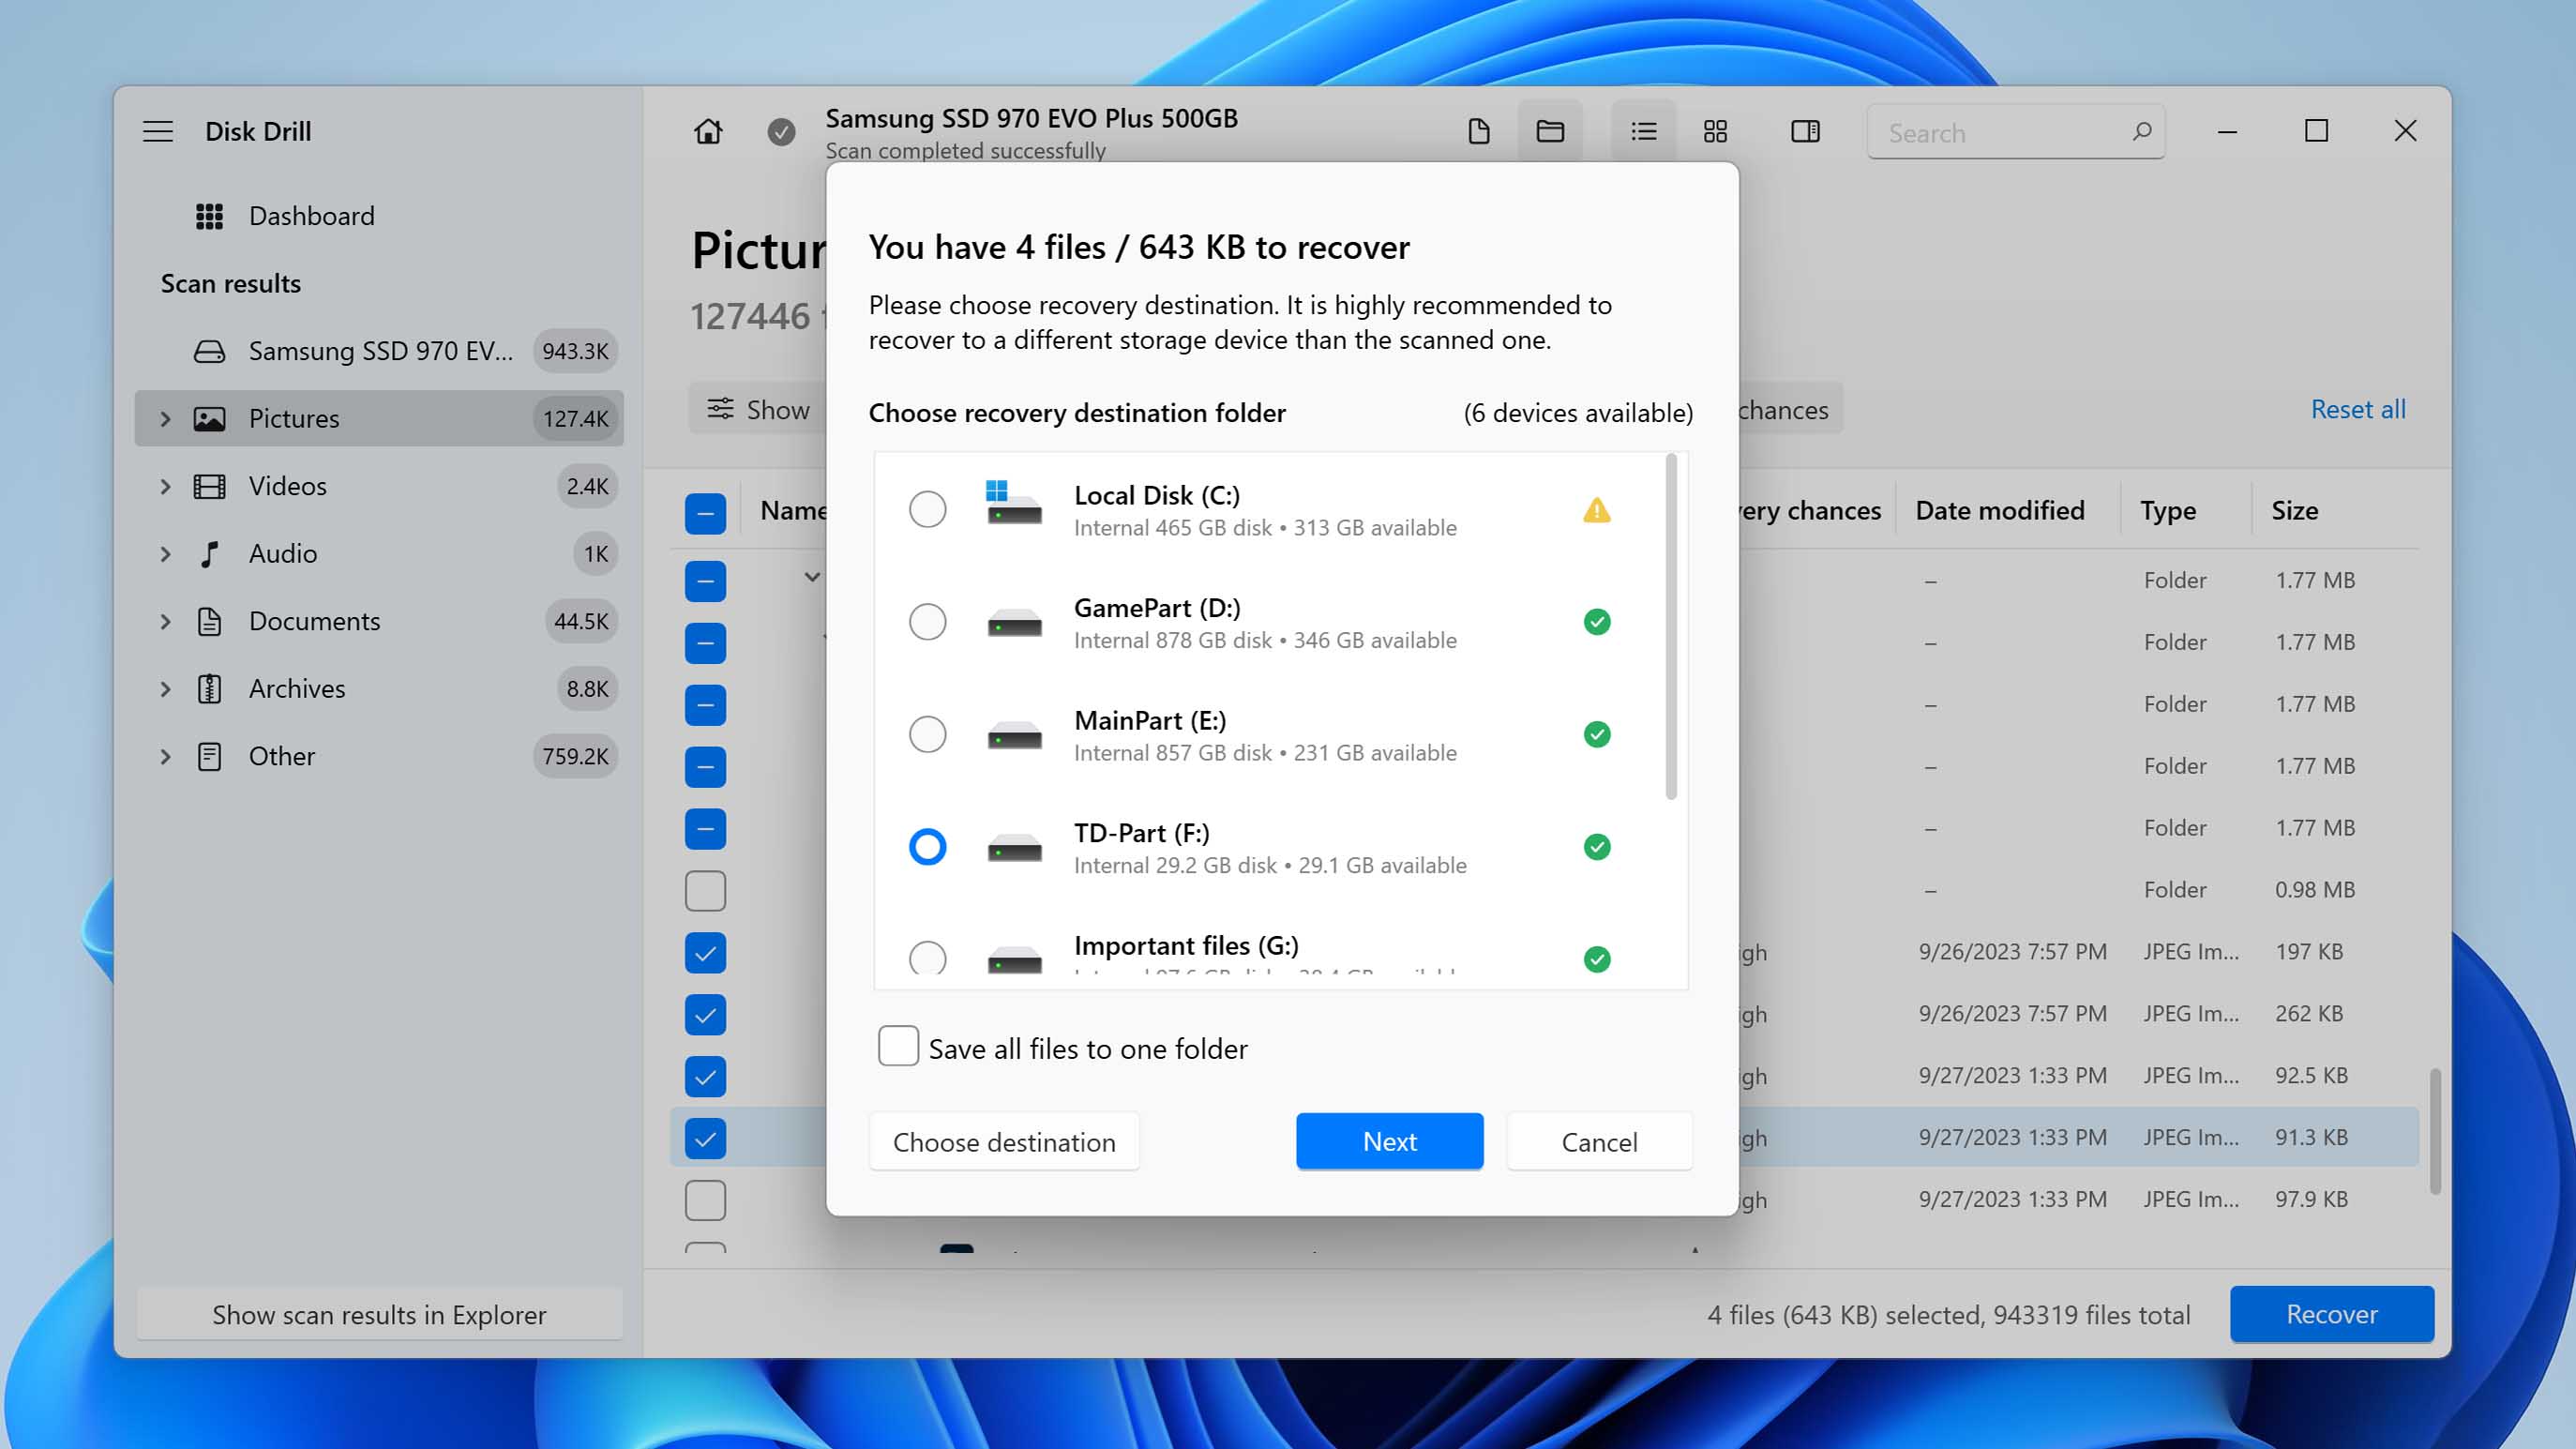
- Click the Recover Button and Specify the Recovery Folder: Finally, click the Recover button to undelete all selected files. Disk Drill will ask you to specify the folder where you want to recover your files, and you should always pick a folder located on a different storage device than the one you’re recovering from to avoid overwriting.
In addition to the points mentioned above, our editorial board deems Disk Drill an excellent choice due to its support for all kinds of SSDs, irrespective of brand (whether it’s Samsung, WD, or Crucial), type, or even the cause of data loss (e.g., formatting). It’s also worth noting that Disk Drill can recover data from an SSD on a Mac. However, the free version of Disk Drill for Mac only allows users to preview recoverable files, as explained in this detailed review.
How to Fix a Failed SSD
SSD recovery using a data recovery application like Disk Drill is possible only if your SSD can be recognized by Windows when connected to your computer. But what if your SSD has failed? Here are a few fixes that you can attempt without any special skills or technical knowledge:
- 🔌 Reconnect your SSD: Sometimes, the easiest fixes are the most effective. If your SSD seems like it has failed, then we recommend you start by turning off your computer and disconnecting both the data and power cables. Then, turn your computer back on while leaving the cables disconnected. Finally, turn it off again and reconnect the two cables. Hopefully, your SSD will come back to life the next time you boot into Windows.
- ⚙️ Install the latest version of SSD firmware: All SSDs rely on the firmware to provide instructions on how they should operate. Sometimes, manufacturers release SSDs with buggy firmware, and consumers pay the price. Fortunately, installing the latest version of SSD firmware is fairly straightforward, and the entire process should be explained on the manufacturer’s website.
- 🖥️ Use a different computer: If you have access to another computer, then you should connect the failed SSD to it and check if the SSD is actually the real cause of your issues. It’s entirely possible that the SSD is actually working as it should but your operating system, or perhaps even your motherboard, is acting up.
When Should I Let Professionals Recover My Data?
DIY-style SSD data recovery applications like Disk Drill are not your only option when it comes to recovering from seemingly desperate data loss situations. You can also ship your SSD to a professional data recovery service and let experts take care of everything for you. But should you? Well, that depends on the type of data loss you’re dealing with:
- 😬 Accidental deletion → use SSD data recovery applications
- 👻 Partition loss → use SSD data recovery applications
- 🗑️ Formatting → use SSD data recovery applications
- ⚠️ Data corruption → use SSD data recovery applications
- 👊 Physical damage → ship your SSD to a professional data recovery center
- 📛 Firmware failure → ship your SSD to a professional data recovery center
- 👾 Ransomware attack → ship your SSD to a professional data recovery center
While it’s true that DIY-style SSD data recovery applications like Disk Drill are always more affordable than professional data recovery services, the best data recovery services offer a free price estimate and charge only for recovered data, so you can rest assured, knowing you won’t end up several hundred dollars poorer without gaining anything in return.
SSD vs. HDD: What Are the Differences Between Them?
Solid-state drives (SSD) and hard-disk drives (HDD) are the two main types of storage devices for desktop computers and laptops. Each of them has different strengths and weaknesses, and you need to be aware of them when making a purchase decision.
Cost per GB | At the time of writing this article, you can buy a 1 TB SSD for around $100. For the same amount of money, you can easily buy an HDD with a capacity of 4 TB. Clearly, the venerable HDD is a clear winner when it comes to cost per GB, making it an easy choice for long-term file archiving. |
Speed | A typical 7200 RPM HDD has a read/write speed of 80-160 MB/s. A modern SSD can push up to 550 MB/s through the same connector. And if your motherboard has an M.2 connector and support for NVMe-based SSDs, you can enjoy writing speeds as high as 3500 MB/s. |
Lifespan | Traditional spinning hard drives contain extremely precise moving parts, which can break without warning. On the other hand, SSDs don’t contain any moving parts whatsoever, which is one reason why their MTBF (Mean Time Between Failure) is 2.0 million hours, but the MTBF of HDDs is just 1.5 million hours. There’s also the fact that SSDs are not affected by magnetism, making them far more reliable in certain industrial applications. |
Power Consumption | On average, HDDs draw 6–7 watts, while SSDs draw just 2–3 watts. While you might not care about a few watts if you have a desktop computer that draws over 300 watts under load, every watt saved can result in a substantial boost to the time you can use your laptop on battery power. |
Other Considerations | Because SSDs don’t contain any moving parts, they don’t produce noise or vibrations. For this reason alone, SSDs are a much better choice than HDDs for laptops and home theater PCs. |
Even though the TRIM command is usually written in all caps, it’s not an acronym. It’s likely that hard drive manufacturers and researchers have been capitalizing it to maintain visual unity with other storage-related terms, such as SSD, NTFS, EXT4, HDD, and so on. This would also explain why the DEALLOCATE operation in NVMe (Non-Volatile Memory Express) PCIe-based SSDs is sometimes capitalized as well.
FAQ
Here’s a super-quick guide on recovering deleted files from an SSD drive:
- Download and install data recovery software.
- Connect your SSD drive and scan it.
- Wait until the scanning process is finished.
- Review the results and mark the files you need to recover.
- Click Recover and choose a safe recovery location.
Yes, SSD data can be recovered—even from SSDs that have the TRIM command enabled, in many cases. The key is to begin the data recovery process as soon as possible using the best SSD recovery software application available.
Not really. It’s just that the TRIM command, which some SSDs use to proactively wipe unused storage space clean to increase the performance of subsequent write operations, makes the outcome of SSD recovery more unpredictable.
That’s a difficult question to answer because there are many factors that come into play, including the type of data loss scenario from which you’re trying to recover. Generally speaking, you can expect to spend anywhere from around $100 to several thousand on SSD recovery, depending on whether you go with DIY-style data recovery software or professional data recovery services.
To transfer all data from an old SSD to a new SSD, you can use a disk cloning software application like Clonezilla, which is free, open-source, and can be launched live directly from a USB drive. Alternatively, you can use Disk Drill’s Drive Backup feature, which lets you create a byte-to-byte backup of any storage device.
If you’re trying to recover data from a system SSD that doesn’t boot anymore, then you can disconnect it from your computer and connect it to a different one. You should then be able to scan it with your favorite SSD recovery tool and recover lost data without any problems.
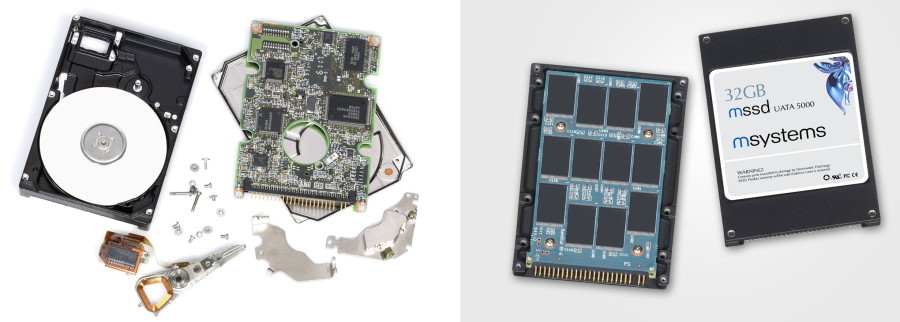
The way SSDs store data is fundamentally different from traditional spinning hard drives, which rely on a series of spinning magnetic disks, also known as platters. When you open an SSD, you’ll find multiple NAND flash memory chips. These chips consist of a large number of floating-gate transistors, which can be electrically erased and reprogrammed.
Because floating-gate transistors are electronically isolated from other components, they retain an electrical charge even without a steady supply of power, which is why you can store data on an external SSD for years without any loss of information.
Even though HDDs and SSDs rely on two completely different storage technologies, you can easily transfer data between them because your operating system takes care of all the technical stuff that happens under the hood for you.
That said, it’s a good idea to use a data migration software application when transferring a lot of data from one drive to another, such as Samsung’s Data Migration software, WD SmartWare, or Intel Data Migration Software.
Without the use of the TRIM command, which allows the operating system to inform an SSD that certain data stored on the drive are no longer needed, the performance of SSDs degrades noticeably with use. While modern operating systems like Windows 10 enable TRIM by default, older operating systems don’t support this command at all.
The good news is that SSDs support a feature called Secure Erase, which marks all storage space as empty to restore any SSD to factory condition. Most major SSD manufacturers provide a free software utility with support for Secure Erase, including Samsung, Western Digital, and Seagate.
Unless your SSD is suffering from a soft issue that can be fixed by formatting or upgrading the drive’s firmware, you most likely won’t be able to recover data from it on your own, using data recovery software like Disk Drill. A data recovery laboratory might be able to extract data directly from the memory chips inside the SSD or fix a controller board problem, but even they won’t be able to guarantee success.
To recover pictures from an SSD with a missing master boot record (MBR), you need to perform MBR repair by running the bootrec.exe utility using Command Prompt:
- Insert a USB bootable media with Windows 10.
- Select the Repair your computer option on the first installation screen.
- Click the Troubleshoot button.
- Click the Advanced options button.
- Click the Command Prompt button.
- Type the following command and press Enter: bootrec.exe /fixmbr
- Restart your computer.
Conclusion
While not as straightforward as HDD data recovery, SSD data recovery is still possible under the right conditions and with a modern data recovery software application like Disk Drill. By following the instructions provided in this article, you should be able to restore data from your SSD drive quickly and without any expert knowledge.
This article was written by David Morelo, a Staff Writer at Handy Recovery. It was also verified for technical accuracy by Andrey Vasilyev, our editorial advisor.
Curious about our content creation process? Take a look at our Editor Guidelines.